


I seem to have learned the hard way a couple of times since owning my FJR that exceeding manufacturer specifications can lead to unintended consequences.....he says with a wry smile.
Yes, I learned the hard way that if you try and bolt on a Pelican case with three bolts you can crack your subframe. And I learned how to fix it better than new.
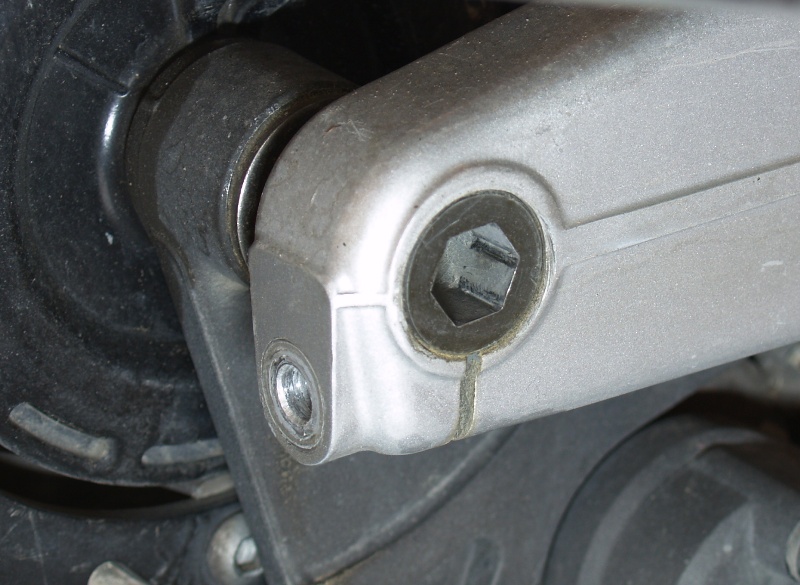
Well, my most recent one fits in squarely in the Boy-Was-I Stupid-But-Don't-Tell-Anybody-About-It category. Sometime early last year I replaced a rear tire and must have forgotten to torque my rear axle pinch bolt properly. The effect of which is an "Oh shit!" moment when you notice some days....or weeks later.
And in my haste I rapidly went to the bolt bin, grabbed the best replacement 8x35mm galvanize bolt I could find, and then torqued it with my precision German calibrated wrist to "Guttentight".
Of course it stiffens nicely and as I give it that last 1/8 of a turn it goes limp. Limp as in I-Just-Stripped-The-Threads limp.
Damn.
What torque was it supposed to be? 11 ft. lbs.? Yeah, I definitely tried more than that.
Damn again.
So, I turn a bit more and torque it down to that point I know it won't skip again and call it "Close Enough". I have a rally to go to....
I've gone about a year now....including multiple rallies....multiple rear tires looking at the rear end occasionally hoping it would give me a warning sign without catastrophically failing. It's actually amazing how I could easily forget about it and suddenly remember it as I entered a stiff turn that would push on the rear assembly. Was it meant to just hold the axle bolt still or also act as a structural piece of that thingie called a rear swingarm?
Yes, yes, you should mock me at this point.
Hopefully, I can redeem myself a bit though. Talking with Warchild's officemate one day he shared his similar stories of broken bolts in mini-stock racing and that he would just change things to studs.
I looked at him somewhat blankly. It sounded very technical like "o-ringin' a head" or "portin' and polishin'" and something a NASCAR team would have to do at a machine shop.
However, it was a very simple concept. Instead of a bolt that threads strip in a partially damaged nut.....take a headless bolt (aka a stud), slather it in Red Loctite, and then screw the stud into the thread. He said from experience (and logic I think) suggest the Loctite should hold the threads of the stud and the nut part of the axel better than my original bolt. And if it holds the business end would never have to be removed!
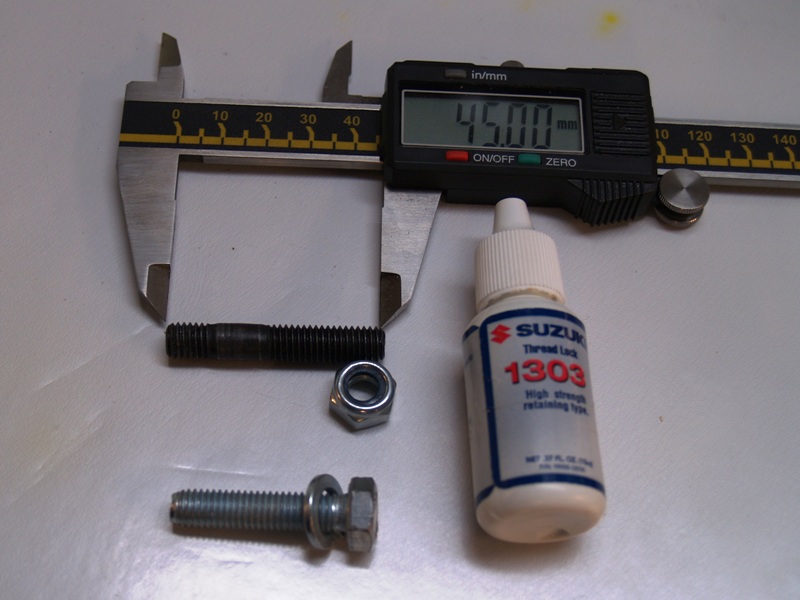
So, here's the setup: The bolt I was using is at the bottom. The "stud" I bought from a local fastener store for $1.06 is 8x40mm (you need a bit more than the original bolt). And enough of the stud then will stick out of the axle to put an aircraft nut on and torque to 11 ft./lbs.
With the stud in hand and lubing up the left end with some thread fasterner, putting on the aircraft nut on the other I then finger tighten the whole affair into the rear axle. Jiggling I don't get any play and let it set for the night. I need those little sticky Loctite elves to do their work.
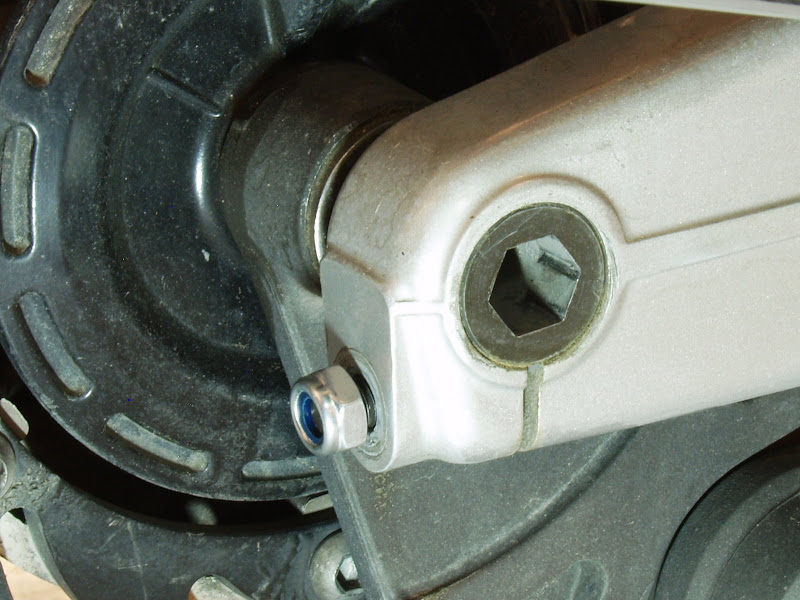
The next day after it's all set I run it through 11 ft./lbs. (with a real torque wrench), loosen it, and make sure the stud stays in.
It does and I breathe a sigh of relief and thank my friend John.
One less thing that could kill me.
Yes, I learned the hard way that if you try and bolt on a Pelican case with three bolts you can crack your subframe. And I learned how to fix it better than new.
Well, my most recent one fits in squarely in the Boy-Was-I Stupid-But-Don't-Tell-Anybody-About-It category. Sometime early last year I replaced a rear tire and must have forgotten to torque my rear axle pinch bolt properly. The effect of which is an "Oh shit!" moment when you notice some days....or weeks later.
And in my haste I rapidly went to the bolt bin, grabbed the best replacement 8x35mm galvanize bolt I could find, and then torqued it with my precision German calibrated wrist to "Guttentight".
Of course it stiffens nicely and as I give it that last 1/8 of a turn it goes limp. Limp as in I-Just-Stripped-The-Threads limp.
Damn.
What torque was it supposed to be? 11 ft. lbs.? Yeah, I definitely tried more than that.
Damn again.
So, I turn a bit more and torque it down to that point I know it won't skip again and call it "Close Enough". I have a rally to go to....
I've gone about a year now....including multiple rallies....multiple rear tires looking at the rear end occasionally hoping it would give me a warning sign without catastrophically failing. It's actually amazing how I could easily forget about it and suddenly remember it as I entered a stiff turn that would push on the rear assembly. Was it meant to just hold the axle bolt still or also act as a structural piece of that thingie called a rear swingarm?
Yes, yes, you should mock me at this point.
Hopefully, I can redeem myself a bit though. Talking with Warchild's officemate one day he shared his similar stories of broken bolts in mini-stock racing and that he would just change things to studs.
I looked at him somewhat blankly. It sounded very technical like "o-ringin' a head" or "portin' and polishin'" and something a NASCAR team would have to do at a machine shop.
However, it was a very simple concept. Instead of a bolt that threads strip in a partially damaged nut.....take a headless bolt (aka a stud), slather it in Red Loctite, and then screw the stud into the thread. He said from experience (and logic I think) suggest the Loctite should hold the threads of the stud and the nut part of the axel better than my original bolt. And if it holds the business end would never have to be removed!
So, here's the setup: The bolt I was using is at the bottom. The "stud" I bought from a local fastener store for $1.06 is 8x40mm (you need a bit more than the original bolt). And enough of the stud then will stick out of the axle to put an aircraft nut on and torque to 11 ft./lbs.
With the stud in hand and lubing up the left end with some thread fasterner, putting on the aircraft nut on the other I then finger tighten the whole affair into the rear axle. Jiggling I don't get any play and let it set for the night. I need those little sticky Loctite elves to do their work.
The next day after it's all set I run it through 11 ft./lbs. (with a real torque wrench), loosen it, and make sure the stud stays in.
It does and I breathe a sigh of relief and thank my friend John.
One less thing that could kill me.
