AVCC Install Clearance problem

Yamaha FJR Motorcycle Forum

Help Support Yamaha FJR Motorcycle Forum:

This site may earn a commission from merchant affiliate links, including eBay, Amazon, and others.

Fred W

1 Wheel Drive
FJR Supporter
Joined
Nov 9, 2006
Messages
17,696
Reaction score
3,874
Location
Eastern VT
I am in the middle of the AVCC (AudioVox Cruise Control) install on my 1st gen, and since I couldn't come up with anything more elegant for attaching the servo control cable to the throttle I followed the standard instructions of drilling the tab and installing the screw to hold the ball chain end fitting. BTW - thanks to Ionbeam for suggesting that the tab could be drilled without removing the fuel rail. That saved a lot of grief.

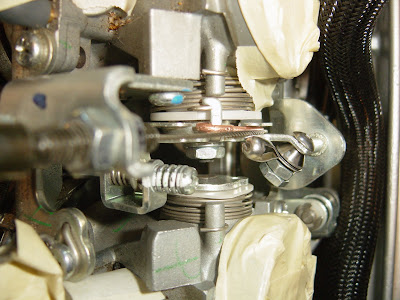
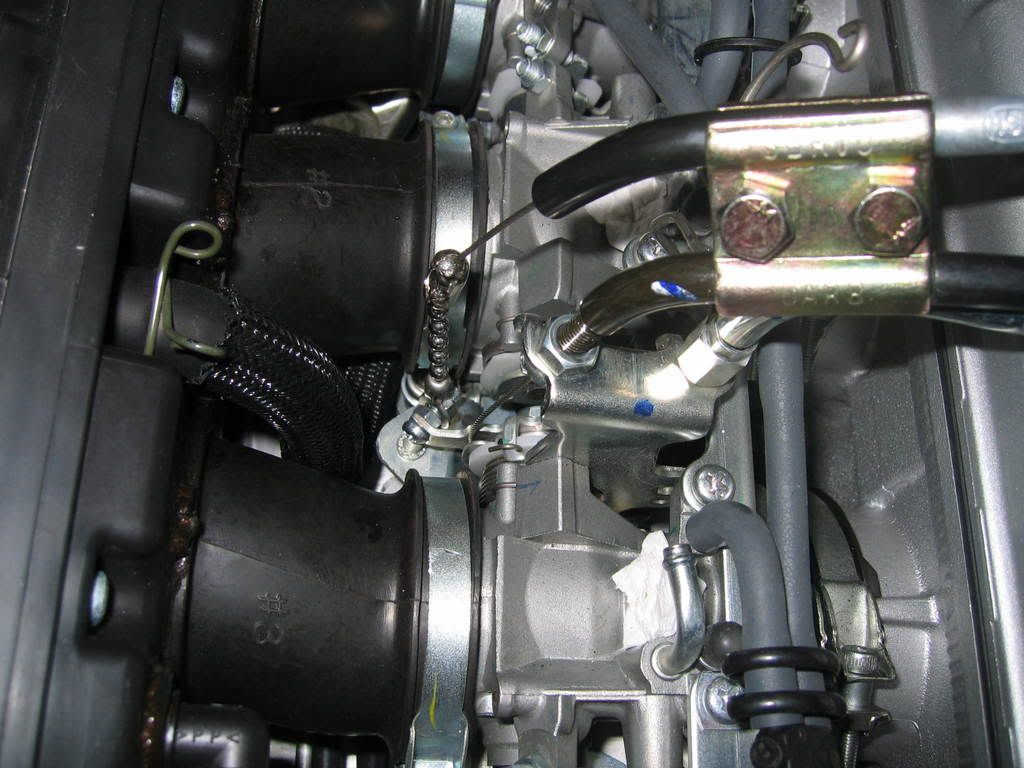
Anyway, all was going along fine and I was almost ready to drop the tank when I noticed that the nut side of that screw actually sticks out of the tab far enough to contact the throttle cable at a large throttle opening, and actually inhibits the throttle from opening the last little bit. The way I noticed what was happening, while checking for any hangups with the servo cable, is that instead of feeling a nice solid stop when WOT was reached, I was feeling a "springiness" of the screw and nut contacting the tensioned cable.

Here's a picture of mine:

2644169280098858932S600x600Q85.jpg


I was able to slacken the cable and push it around the nut and there is about another 10 degrees of rotation before the hard throttle stops

Now, I'm sure that I could just leave it as is, especially since I spend so little time at WOT, and it doesn't look like it would skip over the cable and snag at WOT as it is. But the OC engineer wienie within will never be happy. It just isn't right.

So did anyone else that followed the standard install see this? Are all the FJR's with AVCC now full throttle limited?

 
Get thy self to a mega mart hardware store and score a button head screw (semi flat rounded dome). Now, put the button head where the nut currently is, with the nut on the bottom. A pain in the ass to do for sure. IIRC, I taped the nut to the bottom of the tab then gently started the screw. The various instructions are not as clear as they should be about which side of the tab the nut should go on. As your 50/50 chance shows, the nut should be down.

Good luck!

 
Get thy self to a mega mart hardware store and score a button head screw (semi flat rounded dome). Now, put the button head where the nut currently is, with the nut on the bottom. A pain in the ass to do for sure. IIRC, I taped the nut to the bottom of the tab then gently started the screw. The various instructions are not as clear as they should be about which side of the tab the nut should go on. As your 50/50 chance shows, the nut should be down.
Good luck!

Thanks,

I guess that's what I get for following the directions...

 
I turnd my bolt around in that hole, too, used model glue to hold the nut in place to get the bolt started.

 
The problem that I ran into was due to trying to use the shoulder screw provided in the AVCC kit, in the same orientation as the much referenced install document, as can be seen in this picture:

image027.jpg


I actually scrounged up all the hardware I needed in my junk hardware collection. I ended up using a small button-head Allen screw and three nuts to secure the chain end to the tang. I initially put a small washer under the head of the screw but even that caused rubbing on the cable, so no washers, and loctite'd the bajeebers out of it.

For anyone following along, I found it is actually a bit easier to install the button head screw and nuts vs. the provided shoulder screw as I could put the screw on a long Allen wrench (I used an Xcelite allen driver) and insert it through the hole then hold the nut in a pair of roach clips hemostats and spin the screw to thread it on.

Oh, one more tip for this part. If you can't convince Ionbeam's wife to come and hold the throttle open while you work on the attachment, just wrap a tie wrap around the grip and brake lever. Works like a charm...

 
Last edited by a moderator:
Or you could use a cotter pin instead of a bolt and nut to connect the chain to the throttle assembly.
Do you have any photos of the cotter pin method?
The small buttonhead screw is far superior to the cotter pin-or any other fastening method. I was the first to use it AFAIK, or at least to post about it, and promoted it here, it has been on Frank for 35K , has never grabbed the cable preventing movement (a problem some other methods have run into), nor has the cable frayed at all from contact (which, because of the attachment method required on this install, is inevitable) with the smooth surface, also a problem any other fastener can develop. I've installed the cruise using it on a half dozen FJR's since, and the same goes for them. Use the 3mm or at most 4mm size and a nylock nut installed upside down (nylock side first), with the tab connection AT THE NUT SIDE and it will go forever. Also, use a piece of fuel line over the threaded end where the cable exits the housing-it will better locate the cable directly over the tab mount while at the same tine preventing fraying from rubbing on the steel housing as it angles down to the throttle connection.

 
Last edited by a moderator:
Or you could use a cotter pin instead of a bolt and nut to connect the chain to the throttle assembly.
Do you have any photos of the cotter pin method?
The small buttonhead screw is far superior to the cotter pin-or any other fastening method. I was the first to use it AFAIK, and promoted it here, it has been on Frank for 35K , has never grabbed the cable preventing movement (a problem some other methods have run into), nor has the cable frayed at all from contact (which, because of the attachment method required on this install, is inevitable) with the smooth surface, also a problem any other fastener can develop. I've installed the cruise using it on a half dozen FJR's since, and the same goes for them. Use the 3mm or at most 4mm size and a nylock nut installed upside down (nylock side first) and it will go forever. Also, use a piece of fuel line over the threaded end where the cable exits the housing-it will better locate the cable directly over the tab mount while at the same tine preventing fraying from rubbing on the steel housing as it angles down to the throttle connection.

Gunny that, Radman - I've used the Radman approved button head on 7 installs - with absolutely no clearance or hang-up problems.

 
Thanks for the clarifications.

Just for the record, I don't want to do use the cotter pin method. I'm just curious about the attatchment method prior to the button head screw. Were they still drilling a hole in the same spot?

Here's mine:

[SIZE=36pt] [/SIZE]

(Click on the images for more detail)

Nothing spectacular, but I did make a little bushing/spacer that allows freedom of movement.

 
Last edited by a moderator:
Here's mine:
[SIZE=36pt] [/SIZE]

(Click on the images for more detail)

Nothing spectacular, but I did make a little bushing/spacer that allows freedom of movement.
Joe,

Interesting you opted to allow your screw to stay loose. Also, your screw looks a bit larger than the one I used and the head looks like it will still rub against the cable at the top.

In my install I used a smaller gauge screw and nut fastened securely to the tab to minimize how much it extends toward the cable. Then I slipped on the bead chain eyelet followed by two more nuts, one back-nutted to the other. This way the screw head does not move but the eyelet is free. Sorry I didn't think to take a "final" picture, but it came out a lot like this one (shamelessly stolen from GordonFJR's thread):

IMG_9647.jpg


I may have a screw loose, but not on this installation.

The bushing/spacer I made is threaded and has a shoulder. The bead chain eyelet rides freely on the shouldered diameter. I really only needed one nut to act as a jam nut, but I spun the second one on there just for the hell of it.

The throttle cable can contact the button head, but the movement was so smooth that I didn't worry about it too much.

 
I may have a screw loose, but not on this installation.
The bushing/spacer I made is threaded and has a shoulder. The bead chain eyelet rides freely on the shouldered diameter. I really only needed one nut to act as a jam nut, but I spun the second one on there just for the hell of it.

The throttle cable can contact the button head, but the movement was so smooth that I didn't worry about it too much.

Aha!! I should have known better. You are the master of mechanical fasteners.

 
You are the master of mechanical fasteners.
Far from it!

I didn't have a 4mm button head. The major diameter of an 8-32 is .164". I thought, "Close enough! 4 mm is .1575". What difference can .007" make?"

Answer: The nut for the 8-32 is a lot bigger than the 4mm nut. (.068” to be exact)

That necessitated the custom bushing/spacer. It works, but it certainly isn't evidence of any brilliance on my part.
Hence my use of the metric version. Also note, those who may wonder-two reasons for mounting the nylock nut nylon side first,1) to insure the locking function fully engages the shaft of the screw used (also allows use of a fairly short screw) 2) the nut doesn't have to be fully tightened, allowing the easy swiveling of the cruise cable tab. The tab pull is in shear, so no need to worry about it somehow pulling off the nut.

 
Last edited by a moderator:

Latest posts

Top