need some AE help! YCCS disengage needs adjusted...

Yamaha FJR Motorcycle Forum

Help Support Yamaha FJR Motorcycle Forum:

This site may earn a commission from merchant affiliate links, including eBay, Amazon, and others.

~Kilroy

Member
Joined
Feb 20, 2009
Messages
17
Reaction score
0
Location
Klamath Falls, OR
Noob here with an FJR1300AE specific question.

I pulled the tank off yesterday to take out the 1/4 turn or so of free play I had in the throttle. Several friends told me that it was WAY too much lash, so I tore into it and adjusted it on the EFI end fo the cable down under the heat shield. The free play is right on now with very little lash (~3mm). The only problem I have now is that the clutch hangs on for a split second longer than it used to while coming to a stop. You have to drag the brakes just a bit to dis-engage the clutch, then all is ok. It's probably something I can get used to, but there should be some type of adjustment for the computer or something. Before I adjusted the throttle, my stops were smoothe as butter...

2006 AE ABS

Idle set at 10,500-1100 RPM's

Starts are perfect

Stops are not as smoothe...

HELP!!!

..............\|||/.......................

.............(@@)........................

_____ooO_( )_Ooo___________________________

_____|_____|_____|_____|_____|_____|_____|__|

___|____|_____|_____|_____|_____|_____|____|

_____|_KILROY_WAS_HERE_|____|_____|____|

 
Last edited by a moderator:
The only thing I see in the service manual about this adjustment is under error code SH_ _ 66. Maybe it will work for you.

It says you can manually adjust the clutch engagement point to 21 engine speed settings. The initial setting varies on different bikes.

To adjust up by 100-150 revs, shift the hand shifter up 4 times. After you've operated the switch, your hand shift select indicator light should come on for "0.6 seconds."

To adjust downward, do the same thing, but down shifting 4 times. After you operate the switch, the light should come on for "0.3 seconds."

Once you're happy with the setting, write it to EE-PROM by pushing the hand shift select button for 0.3 seconds. The light should come on for 2 seconds to indicate success.

Hope this helps.

 
Are sure you didn't get the cable so tight that now it's idling higher? Maybe before you were just under 1K at idle and now at ~1100 it's not disengaging so easily...just a thought.

that's just based on the fact the the freeplay is all you changed and the idle is the only thing that you could have affected that I could see having any impact.

 
Seems to me before you go through the trouble of adjusting the clutch you should fool around with the idle speed first. The tachometers are not percision instruments so they are only a "go by".

And you adjusted the throttle.....not the clutch, so maybe that's where you should start with the adjustments. The idle adjustment screw is on the right side, up under the fairing a little. Mine came back from the shop one time and it was "low" by about 100 RPM's. I adjusted the speed up to about 1100 RPM's (indicated, no idea what it really was) and it would do exactly what you are describing, hang up a little on stopping. So down to an indicated RPM of about 1050 and problem solved. It also sounds like you may have taken out ALL of the slack in the cable. See if the engine will slow down if you back off the idle adjustment screw. If it stays at the same idle revs, you've got zero or less (hung up throttle cam) cable slack.

Same year model as your's. They seem to be very sensitive to the idle speed. Fool with that first.

Why did you take up the slack at the throttle bodies? A lot simpler from the adjuster by the twist grip. I finally had to take up some slack at about 22,000 miles at the throttle bodies as I had used up most of the available at the twist grip.

 
Starting from most recent reply.

BwanaDik: Thanks for your reply to my post and the suggestions. When I adjusted the cable free play it did not change the idle. It is still at 1050 where it was before I adjusted the cable free play. I was under the tank replacing 3 year old spark plugs so while I was in there I did the adjustment there in lieu of the top adjustment points. This way I have plenty more up top left! I experimented with the idle up to 1100 using the adjustment that you noted, and it didn't change the disengagement of the clutch. I went to 1000 and same... Bike idles better at 1050 so I put it back there for good. Used a magneto idlemeter that attaches to the side case and it is indicating almost exact to what the tach displays, so I know I'm good on the RPM's. Also, motorcycle operators manual (MOM) shows adjust free play ~0.3-0.5mm free play. It's right at 0.3mm with room to strech some more if needed. No hang ups on the cam at all. Good thoughts!

Big Shasta: Also thanks for your reply to my post. Not too high on the idle as that was the first thing I troubleshot when I noticed the change in clutch disengaging. Your thoughts are spot on in my mind, but I can't seem to increase/decrease the idle and have any impact on the disengage point with that alone. It would make sense that nothing else should have changed, but I was thinking maybe TPS somehow was affected, although the idle did not change??? (gremlins...) Next post...

uctofeej: Sir, This seems now to be the most logical explanation to my dilema. Not sure why it is out of whack, but nonetheless it is... From what you are informing me and what I have seen in the troubleshoot phase, I believe this to be the case. (Heck, If I can work on F-15's I should be able to work on F-JR's eh?) I just needed the instructions to plug in some new EEPROM bytes. I need to go DOWN on the engine speed settings a point or two, but can't get it to go to program mode. When I followed your instructions to a tee, it will only allow me to shift up once and stops in first gear. It won't go up 4 times or down 4 times. Nothing in your fine reply indicated to 1) start the bike 2) don't start the bike, just turn the ignition key on 3) go into program mode by ________ 4) turn the hand shifter on/off or 5) anything else... Am I missing the obvious (remember I'm a new FJR owner! :unsure: )

New question: How do I get to the correct mode to talk to the ECM with my hand shifter??? Kick the tires twice, cycle the ignition three times, and tap the brakes once??? I obviously need to get a shop manual ~ in the meantime, PLEASE continue explaining to this FJR noob how to fix this one little glitch by getting into program mode first. (I'm so close to getting her fixed!)

Respectfully,

Kilroy

[edit]3 hours searching and trying stuff... found this thread howeverr, I'm still not able to access the YCCS diag mode to adjust engage points... [/edit]

 
Last edited by a moderator:
...[edit]3 hours searching and trying stuff... found this thread howeverr, I'm still not able to access the YCCS diag mode to adjust engage points... [/edit]
Note the reference in this post in that thread. There's a connector dangling under the left dash panel that needs its two wires connecting. Think it's got a blue with green tracer and black wires going to it.

 
Got ya. I still don't know what to do with the wire however!!!

I'm wondering if the manual that we can buy is the same one that the stealer mechanic's use... How do I get my hands on an actual yamamama shop manual (the ones that have ALL the information in them)?

I suppose I'll tear into the panel this weekend and just stick a wire between the posts to short the plug, then try the steps that uctofeej and you suggest the manual show.

Thanks for all your help on this. If/when I get done, I'll be sure to post my results. This still seems like a mistery (unless someone can chime in who has already done this).

:clapping: Anyone, anyone... Bueller, Bueller...

 
Got ya. I still don't know what to do with the wire however!!! ...
Just link them together before doing anything else.

Ok, thanks for the pointers...

HOWEVER, I really don't think anybody on this forum has successfully adjusted the YCCS. I'm so close. I found the plug, shorted the contacts, got into the YCCS "Shift" mode by visualizing the "SH_ _61" on display, but NOTHING. I tried every button on the bike, but nothing toggles to "SH_ _66" like the FSM say's to. All it does is loop between the following codes and nothing else.

SH_ _61

SH_ _11

SH_ _12

SH_ _35

SH_ _42

SH_ _51

Then back to 61 for continous loop.

Does anybody have any ideas on this before I button up the bike?

When I get done, I'll post pictures and detailed instructions on how I did it, along with the final results on what I did and if it was successful. Called several dealers today and not one mechanic knew what the heck I was talking about.

Thanks again,

Kilroy

 
Got ya. I still don't know what to do with the wire however!!! ...
Just link them together before doing anything else.
HOWEVER, I really don't think anybody on this forum has successfully adjusted the YCCS. I'm so close. I found the plug, shorted the contacts, got into the YCCS "Shift" mode by visualizing the "SH_ _61" on display, but NOTHING. I tried every button on the bike, but nothing toggles to "SH_ _66" like the FSM say's to. All it does is loop between the following codes and nothing else.

...

Does anybody have any ideas on this before I button up the bike?

...

Kilroy
Copied from a manual (can't put original here or I'll get lambasted (quite correctly) for copyright infringement)

DIAGNOSTIC MODESetting the diagnostic mode

1. Turn the main switch to "OFF"

2. Remove the front cowling left inner panel to access the YCC-S test coupler "1"

3. Remove the protective cap from the YCC-S test coupler.

4. Connect the test coupler adaptor to the YCC-S test coupler.

5. Push and hold the hand shift select button, turn the main switch to "ON", and continue to push the button for 8 seconds or more.

NOTE

- All displays on the meter disappear except the odometer/tripmeter/fuel reserve tripmeter displays.

- "Sh__61" appears in the odometer/tripmeter/fuel reserve tripmeter LCD.

6. Select the diagnostic code number corresponding to the fault code number by pushing the hand shift select button and operating the brake lever (or brake pedal) simultaneously.

7. Turn the main switch to "OFF" to cancel the diagnostic mode.

.

.

.

SH_66 ... To increase the clutch engagement point by approximately 100-150 r/min, operate the hand shift lever (shift up) four times. After the switch is operated, the hand shift select indicator light will come on for 0.6 second.

... To decrease ... operate the hand shift lever (shift down) four times. After the switch is operated, the hand shift select indicator light will come on for 0.3 second.

[EDIT] To write the changed setting on EEPROM, push the hand shift select button for 0.3 second. After the button is pushed, the hand shift select indicator light will come on for 2 seconds [/EDIT]
Does that help?

click.jpg


You are correct, I've not tried it, so let us know how you get on.

 
Last edited by a moderator:
mcatrophy, outstanding... Thank you! :clapping:

I ordered a manual, but it won't be here till late next week. Here's the dealio ~ I used what you wrote to a t-ee and it worked WELL.

I adjusted the shift point up by ~110rpm's and it's perfect now. I had to go up two settings, try it, and then go back down one to get the perfect spot. I just needed a little bit so the clutch would disengage before you came to a complete stop. The only difference between the posted directions (from a FSM) and what I did is that I only had to bump the shift paddle one time to change up or down settings, not the 4 like the FSM stated. So, be careful when you adjust your's and try it each time you get a green flash confirmation by the shift on/off button. Also, the simultaneous pressing of the brake and shift on/off button was a bit tricky, just look at the display for toggling of the SH_ _66 code to appear.

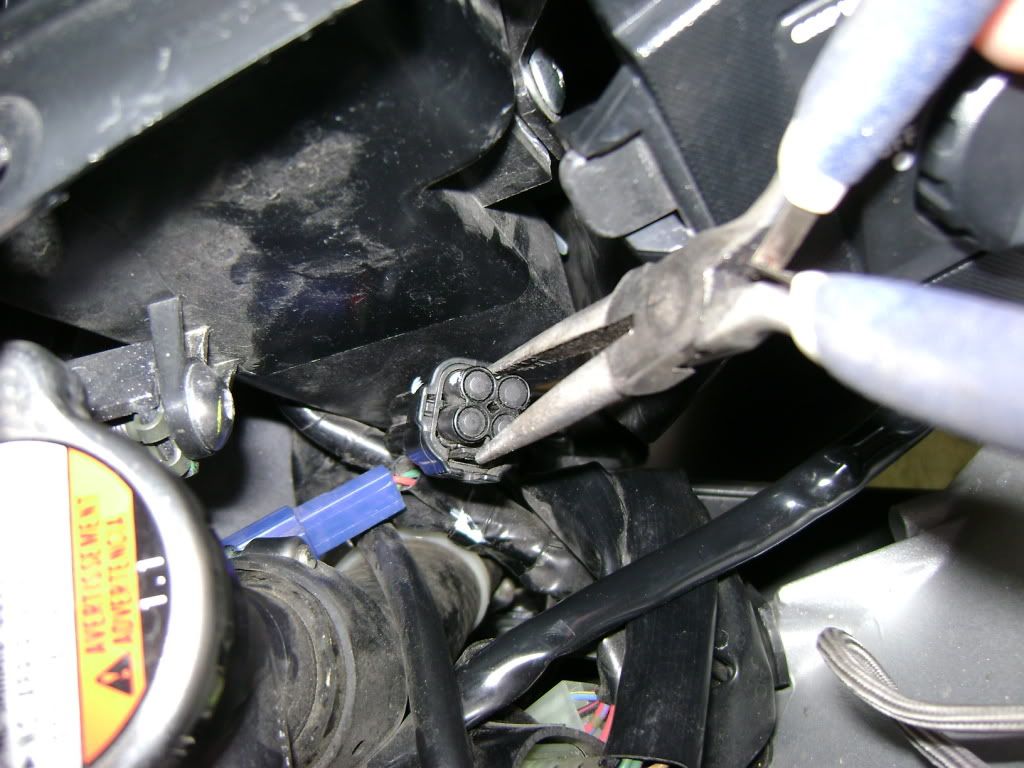
I also ordered a new plug cap (see pic#2, the cap that the pliers are holding) from the dealer that I will customize a jumper right into. That way I can simply remove the blank plug, install my jumper plug, and do the work without alligator clips. I'll post pictures of the custom plug when I make it. It was $4 and well worth it as the clips were difficult to attach. I'd bet that is what the yama shop uses personally...

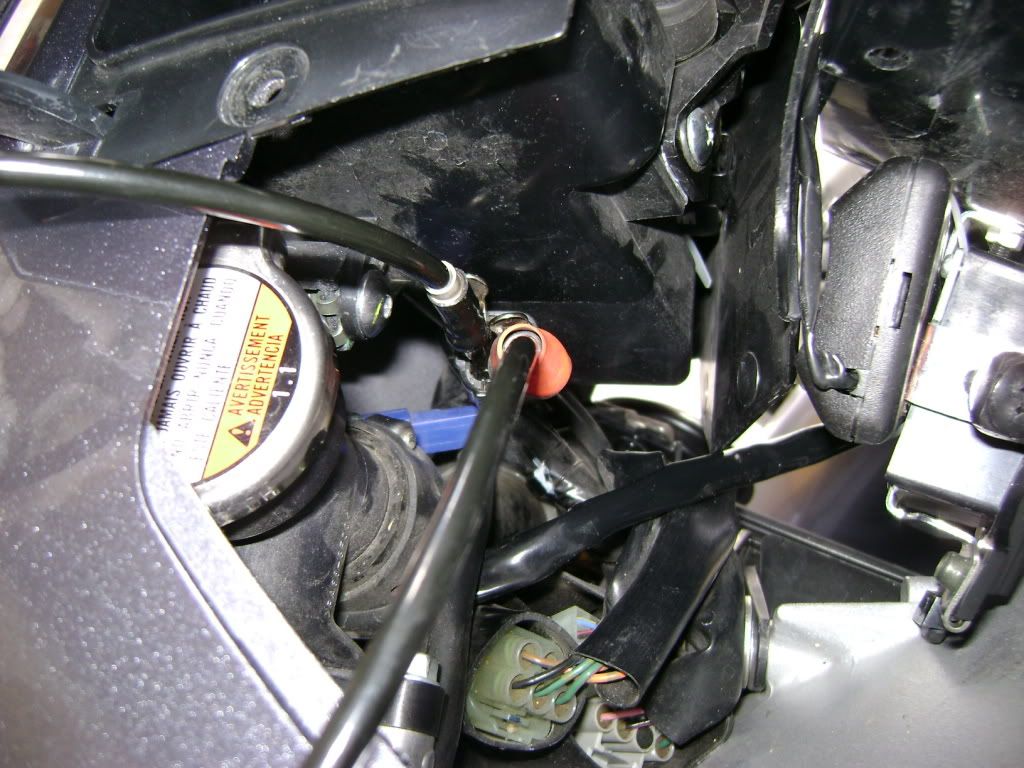
After directions came in, the entire job took me less than 10 minutes. The hardest part was removing the little plastic fasteners (rivits) from the inside valance near the fork tubes. Swing the grip heater switch and panel out of the way, and reach down to access the YCCS dongle. You'll see my garage door opener mounted under this switch in the fourth picture. See this post for installation of that farkle.

I hope this helps other AE members with the ability to adjust their YCC-S, as it's simple as pie. post or PM for further guidance.

Again, thanks to all who contributed.

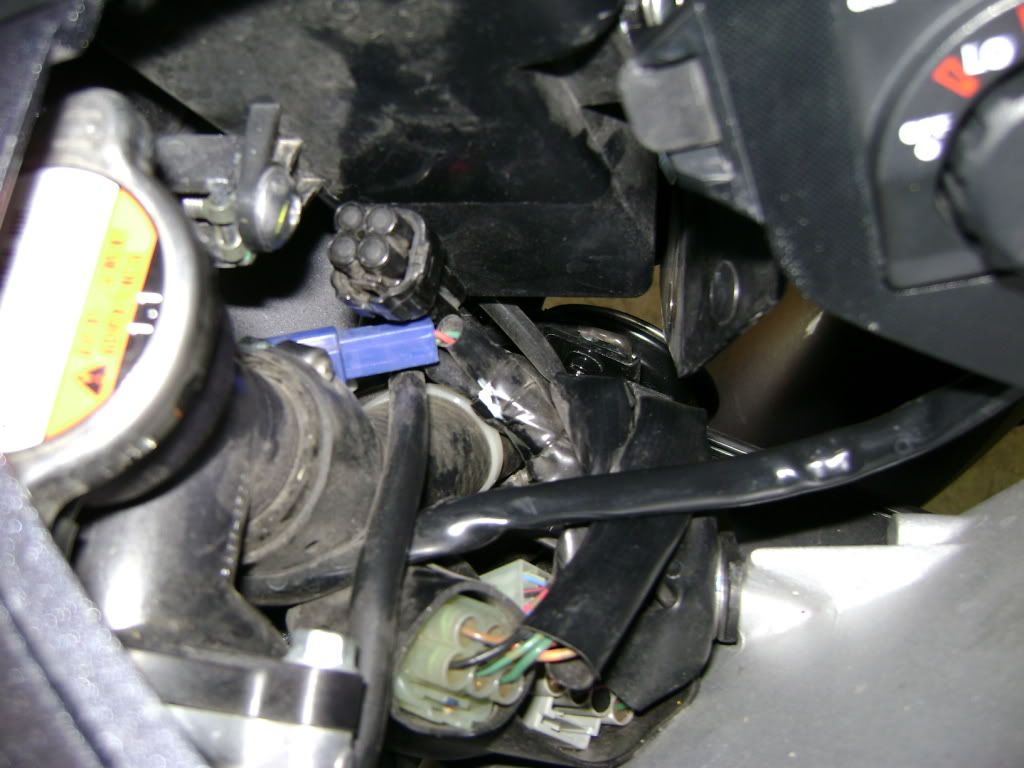
Here is a picture of the exact YCCS diagnostic plug (it's the 4 prong plug, above the blue one):

DSC01080.jpg


Here is what I used to take the cap off:

DSC01081.jpg


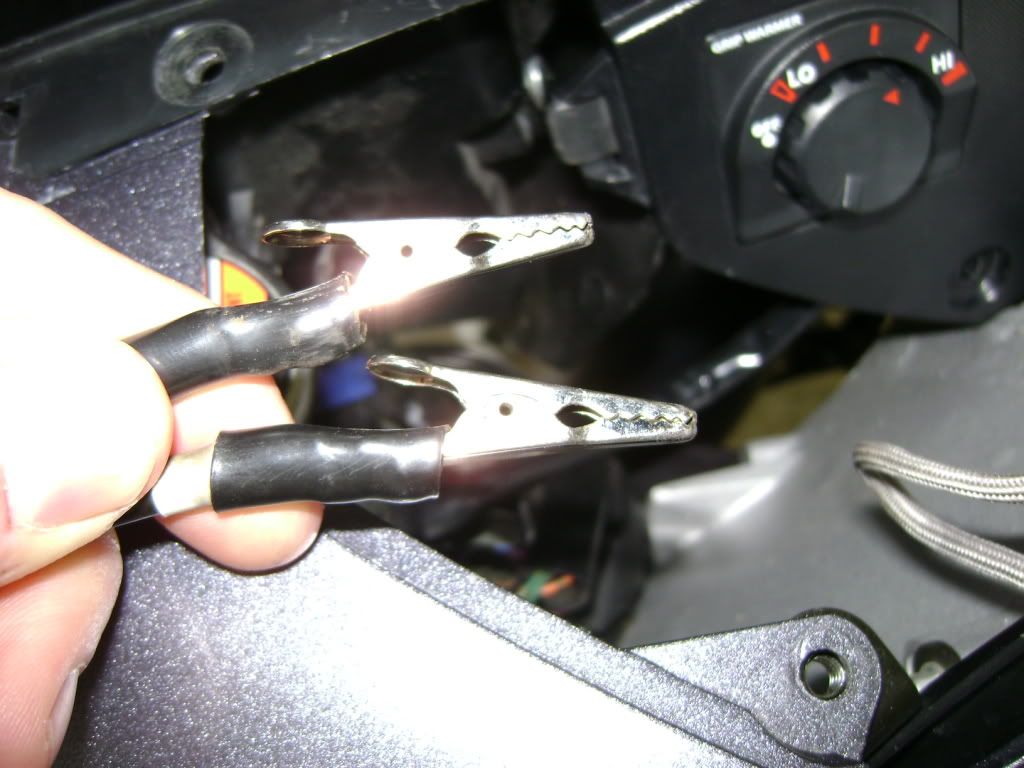
Here is the setup I used for a jumper:

DSC01084.jpg


jumpers installed:

DSC01085.jpg


Last edited by a moderator:
mcatrophy, outstanding... Thank you! :clapping: ...

I adjusted the shift point up by ~110rpm's and it's perfect now. I had to go up two settings, try it, and then go back down one to get the perfect spot. I just needed a little bit so the clutch would disengage before you came to a complete stop. The only difference between the posted directions (from a FSM) and what I did is that I only had to bump the shift paddle one time to change up or down settings, not the 4 like the FSM stated. So, be careful when you adjust your's and try it each time you get a green flash confirmation by the shift on/off button. Also, the simultaneous pressing of the brake and shift on/off button was a bit tricky, just look at the display for toggling of the SH_ _66 code to appear.

...
Glad to hear it went OK, good result :yahoo: .

FYI Your piccies seem to have vanished from photobucket as I write this (23:05 UK time), they were visible earlier. Edit: They're back.

 
Last edited by a moderator:
Top