How's this look for DIY tire changing?

Yamaha FJR Motorcycle Forum

Help Support Yamaha FJR Motorcycle Forum:

This site may earn a commission from merchant affiliate links, including eBay, Amazon, and others.

carlson_mn

Well-known member
Joined
Jan 19, 2009
Messages
1,017
Reaction score
36
Location
Bloomington, MN
https://www.motorcycle-superstore.com/1/4/65/38786/ITEM/Motorsport-Products-Portable-Tire-Changer-with-Bead-Breaker.aspx

0000-Motorsport-Products-Portable-Tire-Changer-with-Bead-Breaker-Black.jpg


That combined with something like the mojolever should get it done? I was wondering if I would need to 'mount' that thing, but from watching youtube videos it looks like it will not be a problem.

Any tips from those DIY'ers I'm all ears.

 
As with most things in (garage) life..........

The better the tool, the easier the job.

No doubt you could change a tire with that thing, but you wouldn't catch me ever trying it. It just wouldn't be worth the hassle to me. You would definitely want to mount it, which will help immensely.

My minimum tire changer is a Harbor Freight POS with some simple mods. Don't know what it runs these days, but way back when you could find it on sale (Tire changer with motorcycle adapter) for about $75. Throw in another $25 for mounding hardware, and other crap. And then $100 or so for a good mount/demount bar. Oh, and $100 or so for the Marc Parnes balancer.

That's what changing my own tires for the last 8 years has taught me.

When I first started, I did change a few tires on a changer I built out of a junkyard car rim. Got instructions on how to do that on the 'net. I'll never do that again, though I think Fred W might disagree with me on that one. ;)

 
I'm going to have to look into some kind of tire changer. We have five bikes in the family and I got charged for $212.00 last summer to install a set of PR3's on the FJR. I think they would quickly pay for itself. I just about purchased on the No-Mar or Cycle Hill at the Minneapolis Motorcycle show. I also wouldn't feel like a heel bringing in my internet purchased tires for mounting.

 
Six of us FJR riders in the Aussie Forum, (in SE Queensland), bought into a Cycle Hill changer and a balancer.

Just wished we did it sooner. Save heaps of $$$$ buying in tyres and changing them out ourselves.

It paid for my share the first time I changed out a set.

No more damaged rims and a job done right :yahoo:

 
I know this doesn't answer your specific question Matt, but I think you need to talk to the No-Mar people.

A guy I work with put off the decision for a number of years and finally did it a little over a year ago. I checked back with him recently and he couldn't be happier. He has not only changed his tires a couple of times since, but a few different friends' tires. In all he is already close to the payback number. But what he really likes is that he changed his tires on his schedule and controlled every aspect of the work.

He mounted anchor bolts into the floor in his garage where his car normally parks so that when it is tire changing time, he backs the car out, drops the changer on the mounting bolts, and away he goes.

I watched the guy at the big Motorcycle Show and saw it was a breeze. Also intriguing, is that the nicer changers can also do car tires! Hmmmm....cars too....I am still mulling that one over. I think you should pull the trigger and get a nice one! Just think of all the "friends" with FJR's and such that could stop by....

mr.paul, from Minnesota

 
I would get a No-Mar in a second, but I have to struggle through life with a one car garage that the FJR must share with the wife's vehicle.

The only available room is for the FJR to spend its winter at. I've witnesses Shane off this forum change tires with the method Skooter mentioned using a car tire on a work bench and he did it no problem at all by himself and old school tire irons.

DSCN7491.jpg


Last edited by a moderator:
I have one and it works just fine. The only issue is it is big and takes up space. It works very easy and is a 3 minuet job to break the beads on tires.

I got mine on a special very cheap and I am very pleased with it!

I do have this exact tire bead breaker and it works very easy, and it does not need anchored down. The wide base gives it stability.

When not in use I hang it in the rafters to free up space.

It is fine the only thing I did was take a garden hose and cut it to cover the stud so I do not scratch anything putting the wheel on and off.

 
Last edited by a moderator:
The trick is to use nut type moly inserts on the concrete rather than stud type. That way they're not a tripping hazard. Just hit them with a shot of compressed air to get the accumulated crud out, :) clean the crud out of yer eyes, :blind: then bolt down the changer. Takes maybe five minutes to set up, except for the eyes part. :coolsmiley02:

 
As with most things in (garage) life..........

The better the tool, the easier the job.

No doubt you could change a tire with that thing, but you wouldn't catch me ever trying it. It just wouldn't be worth the hassle to me. You would definitely want to mount it, which will help immensely.

My minimum tire changer is a Harbor Freight POS with some simple mods. Don't know what it runs these days, but way back when you could find it on sale (Tire changer with motorcycle adapter) for about $75. Throw in another $25 for mounding hardware, and other crap. And then $100 or so for a good mount/demount bar. Oh, and $100 or so for the Marc Parnes balancer.

That's what changing my own tires for the last 8 years has taught me.

When I first started, I did change a few tires on a changer I built out of a junkyard car rim. Got instructions on how to do that on the 'net. I'll never do that again, though I think Fred W might disagree with me on that one. ;)
I'll second everything Scooter is saying. You need to keep the tire from turning, so it has to clamp to the device. And to keep the device from turning, gotta mount it to something.

 
Matt, I'll see if my buddy Jason (co-worker and fellow 2008 FJR owner) can give you some advice. He built his own, and has it in his garage. Works great, and when I ever get the garage space, I'm going to build one just like it. As it is now, I bring my old wheel and tire along with the new tire into work (in my car trunk), and he takes it home, does it overnight, and I get it back the next day. He charges me $20, and it's been perfectly balanced every time. I'll see if I can get him to get in contact with you for advice.

 
Cycle Hill! Great machine for the price. Fantastic service response if required as well. I have mine mounted to a 1" piece of plywood which I stand on when using the machine then push it into a corner of the garage when not in use.

 
https://www.motorcycl...ad-Breaker.aspx

0000-Motorsport-Products-Portable-Tire-Changer-with-Bead-Breaker-Black.jpg


That combined with something like the mojolever should get it done? I was wondering if I would need to 'mount' that thing, but from watching youtube videos it looks like it will not be a problem.

Any tips from those DIY'ers I'm all ears.
That is really just a tire bead breaker. I'm sure that it will do that OK. But... no better than mine, which I made for free (all scrap stuff I had laying around).

Fred W might disagree with me on that one. ;)
And of course, Skooter is exactly right.

I've changed a butt load of motorcycle tires, both on my own bikes and also helping out some of the locals, using nothing more than a wheel stand and bead breaker that I made from an old steel car wheel and some 2x3"s, and a pair of good MotionPro tire irons. I did buy the tire irons from a local bike shop and a wheel balancing rig off eBay. I've and even managed to spoon on (and then almost immediately take back off) a car tire onto my FJR's back wheel (long story).

One of the guys' wheel was all scraped up from somebody misusing one of the whammy spin bar type setups. I'm sure that there are some that won't scratch the wheel, but using my method I've never scratched one either.

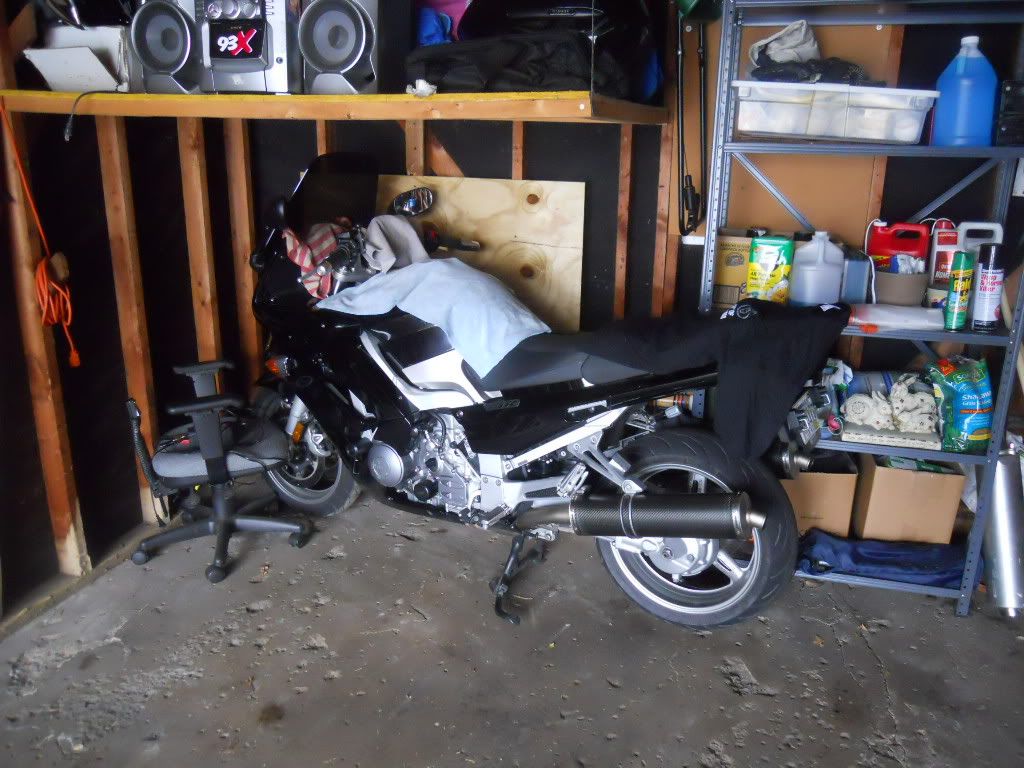
Here's a look at my tire changing "gear"

(most of these pictures were stolen from ionbeam from a rainy day when we changed a few folks tires last year)

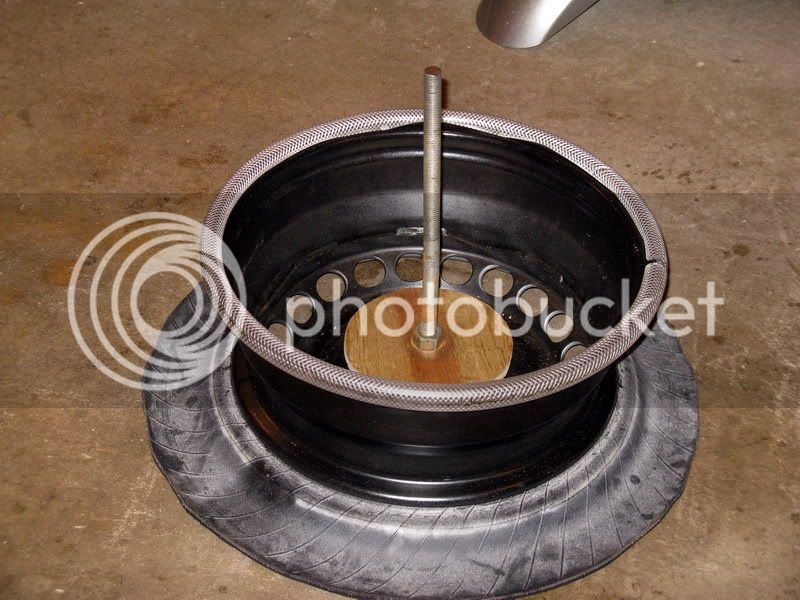
The Frugal Freddie Tire Mounting Facilitator

IMG_4356a.jpg


As you can see, this is just a steel wheel that I've covered the top edge with a piece of split 1/2" hose. Some old garden hose would work fine. I just had a reel of the clear stuff laying around. I cut the old tire and left the bottom sidewall still attached to give me something to stand on when pulling off the 2nd bead during a dismount. Piece of threaded rod allows me to hold down the wheel. Because I'm using spoons and not a Mojo lever type bar I don't have t worry about any rotation of the wheel.

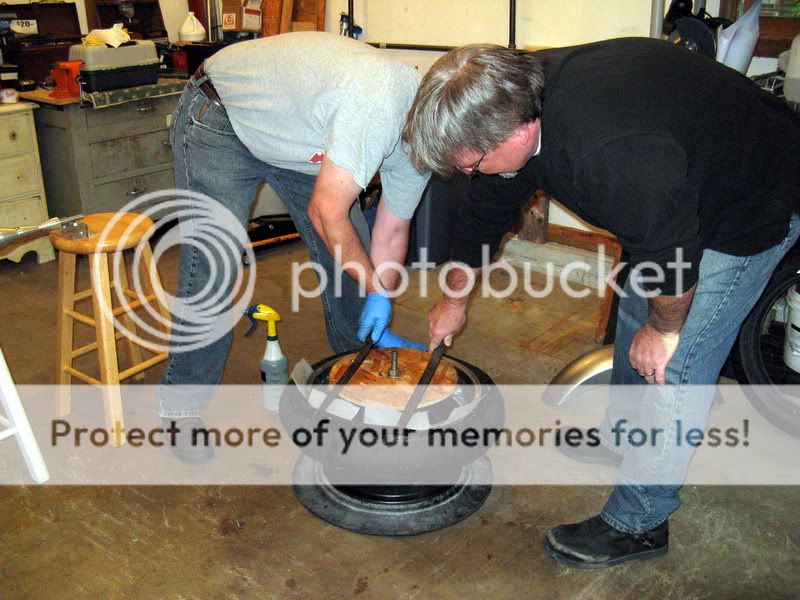
Here's a look at my home-brewed "Bead Breaker" in action.

100_2950.jpg


As you can see, it's just a hunk of lumber nailed to the wall as a fulcrum, and the tool itself, which is a couple of pieces of 2x3 bolted together. With the wheel mounted on the facilitator, a couple of quick cranks on the bead breaker and it's free.

The next operation is to get the old tire off the wheel. For this I just leave the wheel on the facilitator and use tire spoons to pry the top bead off. The key to not getting any dings or scratches on the wheel from the irons is to cut up some (free!!) rim protectors out of old windshield washer fluid bottles. Same plastic as milk bottles, but thicker. Just need to make sure that there is always some plastic between the tire iron and the metal rim.

IMG_4349a.jpg


After prying the first (top) bead off, you can usually just yank the second bead off the rim manually. You just need to position the diametrically opposite bead into the valley of the rim.

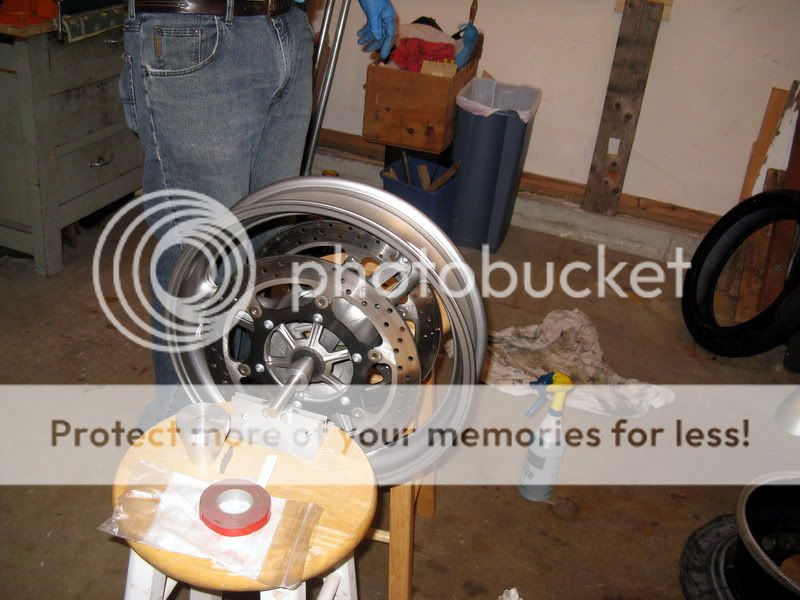
Here's a bare wheel on the facilitator

IMG_4354a.jpg


The OSB disc I made to cover up the 2nd brake rotor on the front wheel. Rear wheel I just keep the rotor side down while wielding tools.

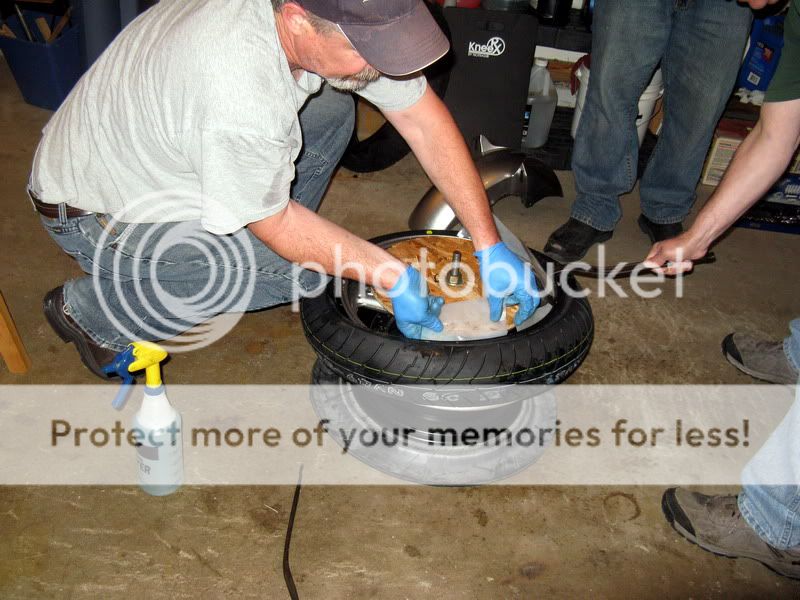
Getting the first bead onto the wheel is just a matter of lubing it up well and then, holding the tire at a shallow (maybe 30 degrees) angle to the wheel, you thrust the tire at the stationary wheel. About half the time it will just pop all the way on. The rest of the time you can just push the 2nd bead over the rim edge. Getting the second bead on requires the use of the spoons.

Here you see me getting ready to pry the second bead of the new tire onto the wheel. Note the OSB protector in place.

IMG_4355a.jpg


There was a good crowd in the garage that day. Having an extra set of hands to hold irons, etc. makes the spooning go that much easier. But I also do it by myself all the time. It isn't all that hard. You just have to learn where to put your knees to hold the bead.

My wheel balancing station is pretty much the same as anyone else's Nothing really much new to see here...

IMG_4352a.jpg


Cycle Hill! Great machine for the price. Fantastic service response if required as well. I have mine mounted to a 1" piece of plywood which I stand on when using the machine then push it into a corner of the garage when not in use.
I've got the same setup upstairs in my garage. Got a good deal on it two years ago at the bike show.

 
Top