remove front wheel for tire change

Yamaha FJR Motorcycle Forum

Help Support Yamaha FJR Motorcycle Forum:

This site may earn a commission from merchant affiliate links, including eBay, Amazon, and others.

fjrbird

Well-known member
Joined
Jun 5, 2012
Messages
120
Reaction score
2
Location
Monterey Park, CA
Hello FJR AE owner,

I plan to change the front tire in the next month or two. Page 4-17 of the service manual calls to:

1. Disconnect the front wheel sensor coupler, believed to be underneath the gas tank. Is this really necessary?

2. Remove the front brake disc (rotor). I want to have the dealer shop to change and balance the tire so wonder if the rotor (and wheel bearing?) really needs to be removed.

What else should I inspect, replace and lubricate for this occasion?

Thanks,
1. Sensor. No need to do anything under the tank.

2. No, leave the wheel as it comes off the bike, just make sure to remove the spacer from the right side. Don't even think about removing the brake rotors, bearings or seals.

A brief(?) how-to:

Undo the screw holding the sensor to the wheel, near bottom centre of this pic

(click on image for larger view)


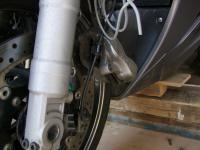
Then pull the sensor out. BUT ...

You will probably find it's seized in there, in which case put the screw back in, the wheel can be removed without, but it's slightly more fiddly, and you'll have to free up the sensor'e wire higher up by undoing a couple of clips higher up, you'll see when you get there.

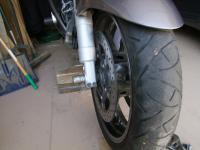
Bike on centre stand, jack up under the headers (or put some bags of cement on the pillion seat) to lift the front off the ground. I slip some wood under the front tyre, not to hold up the bike, but to take the weight of the wheel when it's freed.

I usually stick a big note over the brake lever to make sure I don't squeeze it while the wheel is off.

Undo the four screws holding the brake callipers to the forks (two each side), slide them back and manoeuvre them out. It's tight, but they will come out. It's suggested you tie these up to prevent hanging them from their hydraulic lines.

I find it easiest to remove the front mudguard (American English: fender) by undoing the four screws, two each side, in front and behind the forks. The mudguard will slide out through the front. I suggest a layer of rag to prevent scratching as it's drawn forward.

Undo the big nut on the left side, slacken the four pinch bolts at the bottom of the forks, now the axle will drift out. I usually start it by putting the nut on a few turns, then hammering the nut with a block of wood (I don't possess a rubber mallet), then remove the nut and drift the spindle out using a large screwdriver.


When the spindle comes out the wheel will free, but may require some wriggling particularly if you couldn't remove the speed sensor. There will be a spacer on the right, and the sensor housing on the left. Note the sensor housing has a notch to engage with the fork, this must be put back in the correct orientation when re-fitting.

IF THE SENSOR DIDN"T COME OUT OF THE HOUSING, DON"T PUT ANY STRAIN ON ITS WIRE. TIE THE SENSOR HOUSING UP.

The speed sensor housing pulls out of the left side of the wheel, a spacer from the right.

While off the bike, clean out the brake callipers, but don't squeeze either brake lever. You can take the opportunity to remove the pads, check their wear (several threads around, one contribution I made in a recent thread here) and clean up.

If you're transporting the wheel, don't lie it on its side so that the brake disks are taking its weight, put a couple of blocks of wood under the rim. (Many moons ago I was told that you could warp the rotors, don't know if I believe it, but better safe than vibrating brakes.)

I clean off the spindle and smear a little grease on it as a rust preventative.

When you come to replace the wheel, ensure its spindle seals are clean, smear a little lithium-based grease (I use Castrol LM 'cos that's what I've got) in round the inner surface of the seals. Put in the right spacer, and, if the speed sensor and its housing stayed together, it will need fiddling into place as the wheel is offered up and the spindle pushed through.

Push the spindle in from the right, it may need gentle tapping, but if it comes up to anything solid, move the wheel to improve alignment. Make sure the sensor housing is aligned to the fork correctly, it's easy to get it wrong and jam the notch in the wrong place. I find this the trickiest part of the whole procedure.

I put a little copper grease on all threads during re-assembly.

With the spindle in place, tighten the big nut to 66 ft-lbs. I don't have a torque wrench, so I tighten it to a mid-to-high grunt tightness.

Some people suggest leaving the pinch bolts until the bike's weight is on the front wheel and the forks are "exercised" by pushing down with the brake on. Either now or then, tighten the left fork's pinch bolts, inner first, then outer then repeat the inner, do them in one shot to 15 ft-lbs, without intermediate tightening (I'm quoting the manual here). Without a torque wrench, I do them up to a moderate tightness. Don't over-tighten, they're into aluminium threads. Make sure the spindle end is flush with the right fork, tap it until it is if necessary. Then tighten the right fork's pinch bolts in the order outer -> inner -> outer.

Check the sensor housing alignment, replace the sensor (if taken out) using a little copper grease to attempt to stop it seizing if it hasn't already, replace the brake callipers and the mudguard. Check the sensor wire retaining clips are all in place.

Squeeze [edit] the front brake lever both brake levers [/edit] a couple of times until the brakes work before removing the bike from the stand, saves a nasty surprise later.

If a visual shows everything in order, all screws and nuts tight, remove any wood from under the front wheel, take the wife sacks of cement from the pillion seat and you're good to go.

[edited thanks to HotRodZilla's comment below]

 
Last edited by a moderator:
What Mcatrophy said, except don't forget to exercise the rear brake pedal too. Your GenII rear brake is linked to the lower right front caliper, so the pedal will be soft there too until you pump it a couple times.

 
What Mcatrophy said, except don't forget to exercise the rear brake pedal too. Your GenII rear brake is linked to the lower right front caliper, so the pedal will be soft there too until you pump it a couple times.
Thanks, forgot that! (Too many birthdays ...)

Edited my post above.

 
Last edited by a moderator:
I have never found it necessary to remove the front fender to do a tire change. I will concede that it could make it a little easier to finesse the wheel out of there but it isn't mandatory as long as you can get the front of the bike up high enough (I use a jack under the header pipes and lift the bike on the center stand until the rear wheel touches down). The type (and settings) of your rear shock may determine whether this is high enough.

 
It's much easier to just pull the four bolts and yank the fender off. Takes literally seconds. The big advantage is you can still put a floor jack under the headers (with a piece of plywood), but just jack it up enough to take the weight off of the front wheel, and still leave the wheel lightly touching the floor. You can then pull the axle out and, more importantly, align all the parts and slide it back in more easily with no weight hanging from it and no need to hold the wheel up in the air.

For the back end, first roll the back tire of the bike onto a length of 2x6 or 2x8 lumber. Then put another piece of 2x under the center stand before you raise it up onto it. (if you don't do the first step you'll have a bear of a time doing the second one). That puts the rear end up high enough to get the wheel out from under the rear fender assembly, even with a funky home made fendah extendah. ;)

 
I have never found it necessary to remove the front fender to do a tire change. I will concede that it could make it a little easier to finesse the wheel out of there but it isn't mandatory as long as you can get the front of the bike up high enough (I use a jack under the header pipes and lift the bike on the center stand until the rear wheel touches down). The type (and settings) of your rear shock may determine whether this is high enough.
What I did last time was stick a piece of plywood under the center stand to get the bike a little bit higher, then a jack under the headers.

I had a few scraps laying around, so I had plywood under both tires and under the center stand. Once I got the bike up I slid the rear piece out, jacked it up, then removed the front piece. I jacked it up until the rear touched, and I had plenty of room to remove the front wheel. 1/2" doesn't sound like much at the center stand but it seemed to make a pretty big difference up front.
+1 That's what I do, works great!

 
It's much easier to just pull the four bolts and yank the fender off. Takes literally seconds. The big advantage is you can still put a floor jack under the headers (with a piece of plywood), but just jack it up enough to take the weight off of the front wheel, and still leave the wheel lightly touching the floor. You can then pull the axle out and, more importantly, align all the parts and slide it back in more easily with no weight hanging from it and no need to hold the wheel up in the air.
Fred, I think folks are missing the elegance of this method. By having the fender out of the picture you can roll out (and in) the wheel at the exact correct height to avoid lifting the tire and lining up the bushing (right) and ABS sensor (left) simultaneously. having the tire support itself while doing the piece part alignments makes the job go smoother.

I've done maybe 8 front tire changes and it only took me about 4 to realize the beauty of this method.

I have a scissors jack I put under the header pipes and can dial in the right front tire height very quickly.

YMMV

 
I have to agree with Fred until the last time I changed tires. thought I didnt need to take fender off,the last time I took it off much easier like he said just roll it in no lifting, :angry: cussing!

 
Thanks so much gentlemen. This is my first time removing a front tire so with this much information I will definitely be more confident. For example, I looked at the underneath of the fjr engine and can't find any frame that can support the jack as my Kawasaki cruiser does. I am puzzled until today reading your posts and the headers can be used to jack up the bike. The manual is great laying out drawing and part descriptions but it rarely summarizes nor reasoning about what and what not to do. Explaining in plain English makes more sense and easy to follow. The manual does not explain how to lift the front wheel either. I assume it's written for shop operator, not do-it-yourself owners. When it comes to the rear tire change, I'll check in with this forum again. LOL.

 
if you need a practical demo you can ride down to Torrance anytime and i can show you in a few minutes....

R

 
Thanks so much gentlemen. This is my first time removing a front tire so with this much information I will definitely be more confident. <snip>
The first time I did it I played hell getting the calibers out. I looked in the TSM, here, and went back and they came out right away the second time. Using the plywood under wheels/centerstand does help, but I don't usually do that, just take a 1x4 under the exhaust and jack it up with a scissor jack. Works well for me; YMMV........

 
I like this stand.

stand
I have been meaning to build one of these. I get into my front end - well handlebars and such a couple of times a yr and this would work great supporting all the 'stuff'! great idea and it folds/stores easily on a peg on the wall. Many uses for something so simple IMO.

 
as so deftly noted above, this is a pretty easy procedure.

BE ADVISED: some of the tutorials and (i think) even some manuals indicate the ABS sensor bolt be torqued to 22 ft lbs.


THIS IS WRONG WRONG WRONG and will only leave you with stripped threads in your ABS sensor plate.

i will look but the correct torque values i found are 5.8 ft/lbs, are very low and honestly, totally unnecessary.

here's a thread listing my sad little adventure and wisdom development

https://www.fjrforum.com/forum//index.php?showtopic=145009&st=0&p=955299&fromsearch=1entry955299

 
Last edited by a moderator:
Top