Audiovox CC issues

Yamaha FJR Motorcycle Forum

Help Support Yamaha FJR Motorcycle Forum:

This site may earn a commission from merchant affiliate links, including eBay, Amazon, and others.

Jack D

Well-known member
Joined
Nov 23, 2009
Messages
119
Reaction score
9
Location
Albuquerque
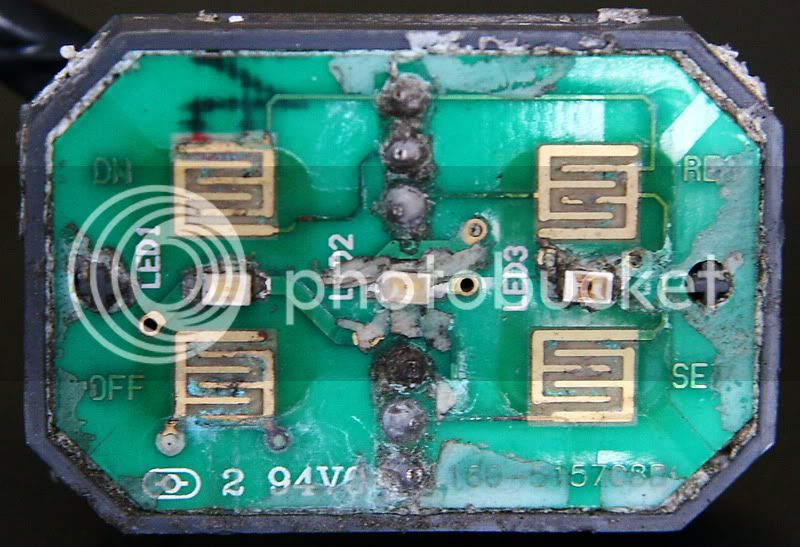
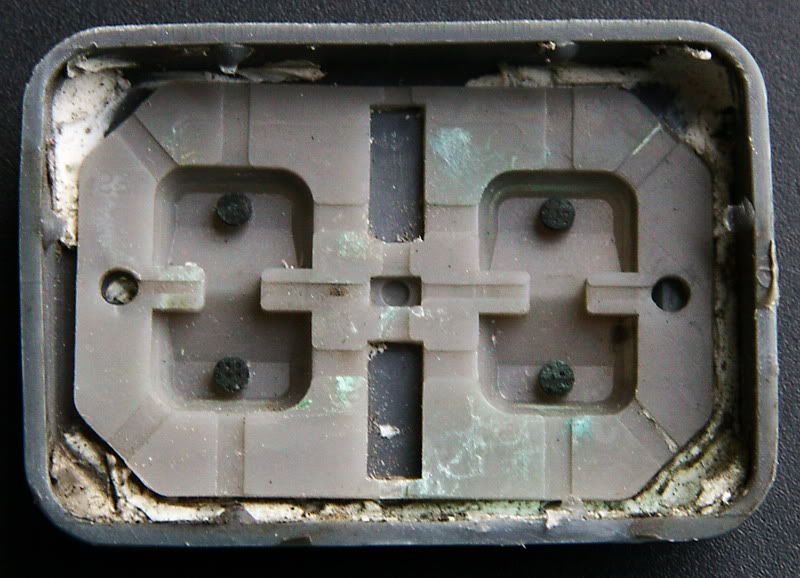
I have a CCS-1000 vacuum control cruise control on my 2009. It worked fine for a few thousand miles but has recently started having issues after about 200 miles of riding. After 200 miles if I have to use the brakes because of a lane changing big rig or slow BDC in the fast lane the resume button will not function. After a little more time the set button will not work. Sometimes if I turn the unit off and on the set button will work again. However it does need to be held in for awhile before the unit locks in to the speed and many times it sets at a speed below the speed I was traveling at. Finally when I travel still farther the speed begins to vary by 3-4 mph. When I first start out the speed seldom changes by 1 mph. All of this has been verified on level roads where hills are not a factor. I checked to make sure that the clamp that holds the cable in place by the throttle linkage was still tight and made a bracket that holds it firmly in place. Yesterday I had a 150 mile stretch of highway to test on. When I needed to disengage the cruise control I would use the clutch lever and rev the engine. This disengaged the unit without using the brakes as I was concerned that maybe the ground path through the stoplight filaments changed resistance when the filaments heated up or that the switches were sticking. The problems remained. I suspect a heat related issue with the control board but several people have their units mounted over the engine with no issues. Mine is under the seat. I do a lot of long distance riding where I travel 3-400 miles between stops which gives the unit quite awhile for faulty components to heat up. Has anyone experienced similar issues?

 
^^^^^^ Next time the cruise won't set, hook you toe under the brake pedal and lift, then try to set it again.

This is very reminiscent of the failure symptoms with Gen IIs and an incorrect dip switch setting in the AVCC. 'D, do you know what the dip switch settings are in the servo? Most AVCC install procedures say to set dip switch position 7 to ON but it should be set to OFF. Why it is more sensitive in a Gen II we dunno, why it takes time from when first installed and time on the road before the problem expresses itself we dunno, but switching 7 to OFF works.

Dip switch 7 is for selecting the electrical ignition system type. When set to ON the AVCC thinks the engine is running with a point breaker ignition which is electrically 'noisy' so the AVCC uses a particular noise filter. When the switch position is set to OFF the AVCC thinks that the engine is running with an electronic ignition system and uses different noise filtering. Of course the FJR has electronic ignition like almost all street motorcycles since the '80s.

I hope this is what is causing your problem because it is quick, easy and free for a permanent fix.

 
Last edited by a moderator:
I've had the same unit installed in my '08 for three years now and have NOT experienced the problems you've reported - I've got it installed in the typical spot above the valve cover. The only issue i have is intermittent cruise drop - seems to be correlated to cold and damp weather, so I'm thinking its some moisture penetrating the cheesy control pad. I used liquid electrical tape to try and seal the whole unit prior to install but I've been too lazy to dig into it to see what the real root cause is.

 
Hmmm, sealing the switch pad is important. A Forumite sent me a control pad to see if I could find anything wrong with it. Yup, I did. The control pad had not been completely sealed and over time both dirt and water had entered the pad, then water + electricity did its black magic to the circuit.

The solder pads are corroded, the gold conductors are etched and a lot is covered by green oxidation. In places you can see where the copper etch under the green solder mask has corroded. The interlaced gold fingers are part of the switch circuit. Note that LED 3 is burned up.

PCB1.jpg


This is the rubber membrane that covers the PCB. On the front side of the membrane, the ON OFF RESUME SET labels are directly over the black dots below. When you push the 'switch' the little black dot is pressed on the interlaced gold fingers thereby shorting the fingers together making the switch 'close'. Any oxidation, burning and/or etching of the gold fingers will cause the switch to either not make at all or behave intermittently.

Pad1-1.jpg


In the picture below you can see where dirt and water came in around the poor seal and some of the green corrosion from the PCB.

Pad2-1.jpg


You really want to do a good job sealing the switch pad or do away with it all together and use momentary switches mounted in the left side control pod. Clean, fresh rain water isn't too bad. Rain water mixed with road spooge is bad. Wash water is worse. This pad was designed and intended to stick on the dash of a car and never see elements.

 
Last edited by a moderator:
I agree 100% with ionbeam.

When I sealed mine, I used clear builder's silicon sealant, and I sealed it in three stages.

(Click on image for larger view)

The pad to the front . . . . . . . . . . The wires through the back


and the edges of the front . . . . . including into the corners


In well over 2 years and over 20000 miles (many in heavy rain and over wet, salted roads), never a problem.

 
Last edited by a moderator:
Good info thatnks to ionbeam and mcatrophy. I am getting ready to install one of these, and for sure will seal the unit.

 
I had my cruise on for a long time before it started to act up. I checked everything 5 times and out of frustration I changed the 7 switch and bingo. It has worked fine ever since. I hope that it stays that way as I head to Alaska in 5 weeks.

 
Let me be the nay sayer on the the switch 7 fix. ;) My AVCC worked fine for a few years and then started not engaging intermittently. I moved switch 7 to OFF and that appeared to fix it for a little while, but then it started acting up again.

While troubleshooting, I found that the brake wire had a very small voltage (don't remember exactly, but it was in the milli-volt range) on it with the brake not applied. I temporarily grounded the brake input to the AVCC and confirmed the brake voltage was a problem. The AVCC needs to see no voltage on the brake input or it won't engage. So I installed a relay and thought the problem was solved, but it has since reappeared.

There's been no time for additional troubleshooting, so I can't report what the fix is. I do know that the brake pedal is well lubed and not causing the problem. Obviously I have a problem other than the most common failures. More will be revealed as time permits......

 
Let me be the nay sayer on the the switch 7 fix...
That is the first best place to start, but not the only possible cause. If switch #7 isn't the whole solution then the brake circuit, as Harald notes is certainly a stop along the troubleshooting chain. I am also beginning to see a number of servos that have sticking vacuum solenoids and blown solenoid drivers. I've never seen this in older AVCC servos in car applications.

First, starting from the easiest and moving to the more complex, start with DIP switch #7. Next the brake line. Next will be the vacuum system and the driver circuit.

FWIW, I use a '85 Goldwing fuel filter as my vacuum reservoir which helps filter anything that may back-stream through the vacuum system.

 
Switch 7 was in the off position on my bike so I tried putting it in the ON position. No change so I put it back to the OFF position. I did notice that even though it does not take control of the speed immediately if evidently does recognize that I pressed the set button and several miles later suddenly takes control and works fine. This is fun when you set it for 75 originally and it decides that it will start working in the middle of 40 mph curves. I will look for a loose ground wire connection this morning before leaving for home. At home I will ground the wire that is currently connected to the brake light wire and see if there is a change. I will also connect the LED on the control board to another LED on the bars so that I can watch the status when I push buttons. I am not sure if it shows when the unit is SET or not.

 
.... I will also connect the LED on the control board to another LED on the bars so that I can watch the status when I push buttons. I am not sure if it shows when the unit is SET or not.
Afraid not, the LED only indicates it is powered up, no indication of "set".

And, sorry, I have no idea what can cause a delayed set, makes no sense to me at all.

 
I thought someone said a delayed set was possibly an overlong throttle chain. Something about the servo taking up the slack.

 
I thought someone said a delayed set was possibly an overlong throttle chain. Something about the servo taking up the slack.
He said "several miles", not "several milli-seconds".

Although at the speeds you are rumoured to do ...

 
Tuesday morning I found a questionable ground on the black wire from the servo. I redid that and rode 450 miles home. There were no large changes in speed when the unit was controlling the speed. The speed control was very smooth. The country was very up and down in elevation and it was a windy day which means the unit was constantly working.However there was still the lag in setting. After pressing the set button I would forget it and wait. Sometimes it would engage in a mile and other times it would take 4 or 5 miles and once it did not engage for 10 miles. Next step is to ground the wire to the brake light and test again.

 
. After pressing the set button I would forget it and wait. Sometimes it would engage in a mile and other times it would take 4 or 5 miles and once it did not engage for 10 miles. Next step is to ground the wire to the brake light and test again.
Jack, I don't remember if one of the symptoms of lagging engagement is cause by the low voltage on the brake light line. Did you put a relay in the brake circuit to ensure the servo has a solid ground? Look at bottom of this page: https://www.cnrepperson.com/motorcycles/audiovoxCCS100/

Roy

 
If there was a brake light error the CC would not set at all, the brake circuit is not related to delayed engagement.

Have you verified that the vacuum is present and sufficient when you try to set speed? The servo only needs to see a few inches of vacuum to work.

Have you verified that there is minimum slack in the bead chain and that the servo cable moves freely?

I'm surprised that the CC goes so long with significant error conditions and still will eventually set. One error condition is when the set speed and the actual road speed are not close, this is supposed to cause the cruise to disengage. There is another error condition where the vehicle speed does not change correctly in response to servo commands and this should cause the cruise to disengage too.

Have you verified the coil wire connection is solid?

 
Change? of symptoms. Original problem was that my CC would set and work fine for about 200 miles and then not set if I had to disengage it for some reason. Then it got to the point that it would not set at all or very seldom even when I first started out and when set it would vary speed by several miles per hour. Tightening a slightly loose ground screw Tuesday allowed it to set albeit very delayed but once set it maintained speed very well. Today I was in the battery area and noticed a little bit of white corrosion on the battery terminals. I removed the main cables and also the auxiliary wires to the fusebox and cleaned everything up. The unit now sets immediately and holds speed very well. I do not know if it is fixed or just back to the condition of working for a couple of hundred miles. FWIW the CC was installed at 52K miles in December, the 7 month old AC Delco battery was replaced with a Yuasa in Feb. at 56K miles and the cables were thoroughly cleaned and the problem first appeared in March at 59K miles. I am not sure when I will get to ride this bike for several hundred miles non-stop as I am preparing one of my other bikes for a May 27th departure to Alaska. I hope that a regular cleaning of battery terminals every 3K is not a new part of my maintenance schedule. I will spray my battery terminals with a corrosion protector tonight although I have never had to do that on any other bike. When I do get to do a long ride, probably in July to Maine, I will update this thread.

 
Ignore the last post. A longer test ride shows that the problem is still there. Tomorrow I ground the brake light wire and try again. Then it sets so that other projects can get done.

 
Top