Shock Replacement

Yamaha FJR Motorcycle Forum

Help Support Yamaha FJR Motorcycle Forum:

This site may earn a commission from merchant affiliate links, including eBay, Amazon, and others.

Spud

Well-known member
Joined
Mar 3, 2009
Messages
1,366
Reaction score
632
Location
Southeast Idaho
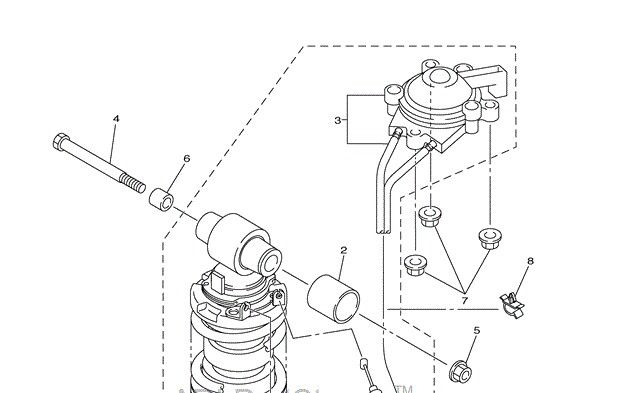
I'm going to replace the Shock on my '08. I found a low-miles Gen 3 shock thanks to the forum, and it's on the way.

In looking over the procedure, I've found some helpful links (ie https://www.fjrforum.com/forum/index.php?showtopic=102533)

In that nice write-up, it says "there is a bushing on the right side of the bike that the head of the bolt will go against. This bushing will probably fall out but is easy to replace before mounting the new shock."

My question: Is the bushing something to be replaced? Bike has 56K miles. I've been thinking I just needed to swap shocks and didn't need any parts....

Thanks in advance.

 
No. It's a spacer bushing, not a bearing bushing.

#6 in the parts diagram

Shockbushing.jpg


Last edited by a moderator:
Dis-assemble the cables from item #3 otherwise you will never get them up an around. You won't find that in any write up. Very easy to put the cables back in once they are where they are supposed to be.

Dave

 
For an OEM shock swap, I've found that if you unplug the Rectifier & Regulator Assy the hard/soft cables will easily come out. As installed, they're above and wrapped around the R&R assembly and wiring.

Have fun!

--G

 
Thanks all for the help. Using that first link I got part "A" done and didn't even crack open my service manual. Hopefully part "B" will be equally successful. New (to me) Gen III shock with under 1500 miles on it going in next weekend.
punk.gif


20141101_152829_zpsb592c39c.jpg


I was worried about my bolt after the post on FJRtech from Warchild's bike:

DogboneBoltCorrosion.jpg


However, my bolt at 56K miles and 5 years of riding in most every condition came out looking pretty damn good. Here it is with no cleanup whatsoever (w/spacer):

20141101_153129_zpsf6ccb225.jpg


All in all the parts under there look remarkably good. Will clean out and re-grease bearings this week and get the new one installed.

 
Nice pictures! Please post a picture of the shock with the rubber cover pulled back so everyone can see the size and number of coils on both springs.

 
Will do--when the new shock arrives (it's on the way) I'll put them side by side and take a pic.

 
So I got into the linkages last night to clean them up and re-grease the bearings. Turns out one of my bolts in a dog-leg looked pretty nasty.

20141105_182653_zps8961296b.jpg


It's only on the one side of the bolt. I don't think it really matters or affects anything because that bolt goes through the stainless steel collar. The collar rotates on the bearings. I'm thinking the corrosion is just on the bottom of the bolt where moisture got in. I cleaned it up and put it back in. The bearings and collars where they meet the bearings looked really good. Nothing got through the seals.

New shock (Gen III) should be here tomorrow. I'll take some pics to show it compared to the Gen II.

 
No one will ever notice that bolt. A little protective grease should keep that from progressing.

Last time I got in there, my bolts looked pretty good, but the bearings came out of that wax bearing ring or whatever it is. I'll probably have to replace them next time around since they are just packed in grease with no kind of seal anymore.

 
Tom,

Don't ignore those little needle bearings that 'have come out of the wax bearing ring'. Those little guys will go south quick without protective grease. I had water get past a seal and corroded the crap out of my needles in less that two years. Verify that the seals that cover your bearings are in good shape and have grease in the lip that touches the bearing inner race.

After buying and replacing all my relay arm bearings a few years ago, I now service those bearings every winter. No problems since.

This service item has been discussed many times here over the years but not too much recently that I recall. You can find pages of good discussion and photos if you dig a little. search for 'relay arm' or 'relay arm service'

 
Last edited by a moderator:
The lowest set of relay arm bearings are not contained in a cage, but are packed in a lot of high quality grease. I'll be checking them this winter, and probably will rebuild the relay arm, especially since it took a full submersion at the Ohio SEO ramble. The biggest obstacle is hanging the bike and removing the center stand.

 
Got the bike together. It was unseasonably warm this weekend so I took over and put about 650 miles on it. The rear wheel feels much more planted and controlled. My forks are in bad need of a service too, which I'll do in the spring.

Here's a comparison pick of the Gen II and Gen III shocks. Sorry not the greatest for detail, but I didn't want to mess with the rubber boot too much. The spring is different, the Gen III has an extra coil wound in.

20141107_162739_zps0de6a1c5.jpg


The lowest set of relay arm bearings are not contained in a cage, but are packed in a lot of high quality grease. I'll be checking them this winter, and probably will rebuild the relay arm, especially since it took a full submersion at the Ohio SEO ramble. The biggest obstacle is hanging the bike and removing the center stand.
I agree the center stand is the biggest obsticle in servicing the dog bones! I'm sorry my computer has crashed and I can't access photo's of my mistakes! I was able to remove the offending bolt using my cut off wheel and then reversing the bolt on replacement. It was a bitch of a job and for some reason I can't remember what I cut out? Another way and probably the best is lowering the header, but of course that means more disassembly which I didn't want to do. I'm lucky in that I have a hydralic lift so I'm working while standing but my first attempt at lifting the back end almost ended in disaster, sorry no pictures of my bike 3 1/2 feet in the air almost on it's side hanging by one ratchet strap!

 
Top