Pterodactyl
Well-known member
This is a how-to thread that shows how to convert a Nelson-Rigg CL-1060 Tail Bag to an economical alternative to the Corbin Smuggler's Trunk.
This is not an original idea of mine. A member of this forum did essentially the same thing a few years back and posted a link to his website to show how he did it. I copied his idea. I cannot remember the other member's name and I'm told the link to his website is broken. I regret I cannot attribute the idea to the person who deserves it and hope he chims in if he is still frequenting the forum. I was asked by a member to post this DIY thread so that he and others can potentially adapt it to their bikes.
The concept is simple. Use a $58.83 Nelson-Rigg Tail Bag as an alternative to the Corbin Smuggler's Trunk. Now, I have nothing against the Smuggler's Trunk... except I think they are over priced by a wide margin. I had a Smuggler's Trunk on my old 2007, R1200RT and I loved it. This alternative approach has proven to meet all my needs and expectaions as an alternative, and in fact is a better option in some respects than the Smuggler's Trunk. It can be expanded or contracted to meet your needs, is not susceptable to minor dings, dents and chips and can be replaced with a new bag for about 8% of the price of the Smuggler. It does not, however provide the same level of security as the Smuggler.
I bought the Nelson-Rigg CL-1060 from Amazon in April 2013 (https://www.amazon.com/Nelson-Rigg-CL-1060-Black-Sport-Tail/dp/B00AC6ZCMI); as of 2 November the price had not changed.
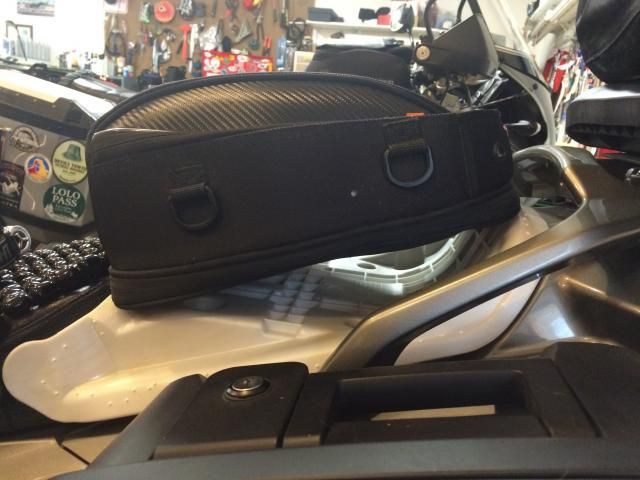
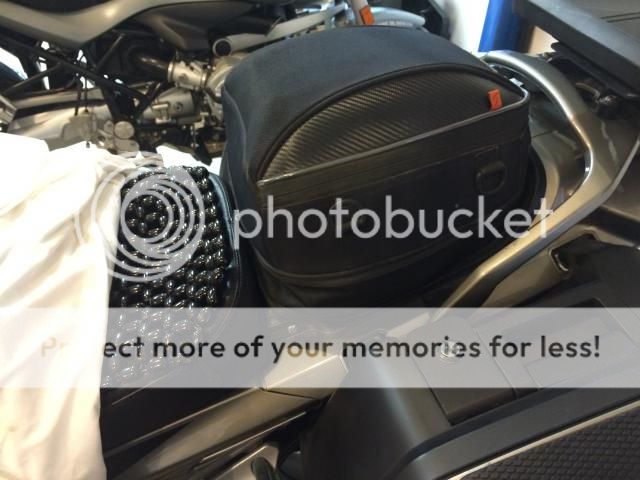
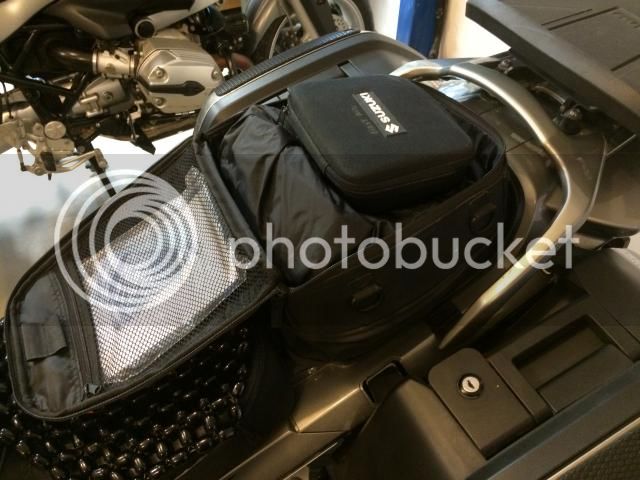
Here is a picture of the bag mounted and filled to the point of needing to be expanded.
How:
- Remove the seats.
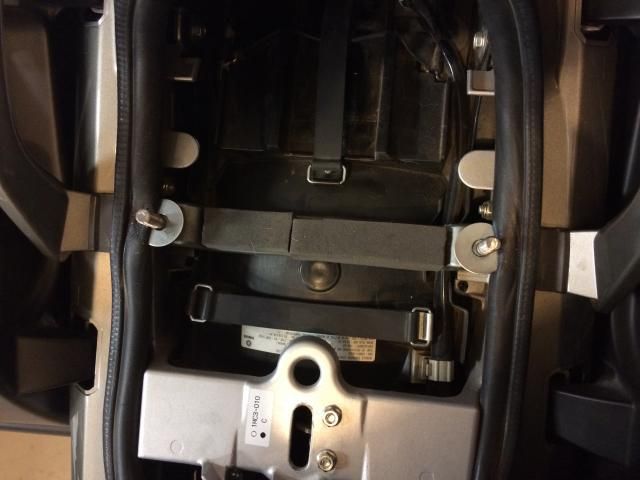
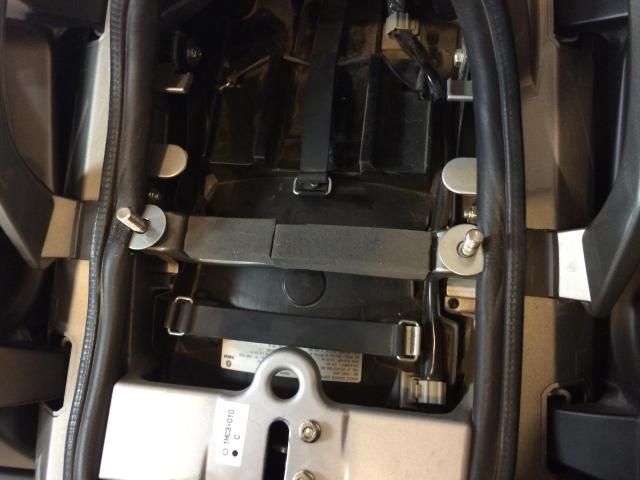
- Locate and remove the two 8mm screws located under the rear seat and next to the leading edge of the passenger handrail. In the picture below the screws have been replaced by the studs with the fender washers on them. I placed some closed cell foam on the cross brace as additional support for the bag; an optional step.
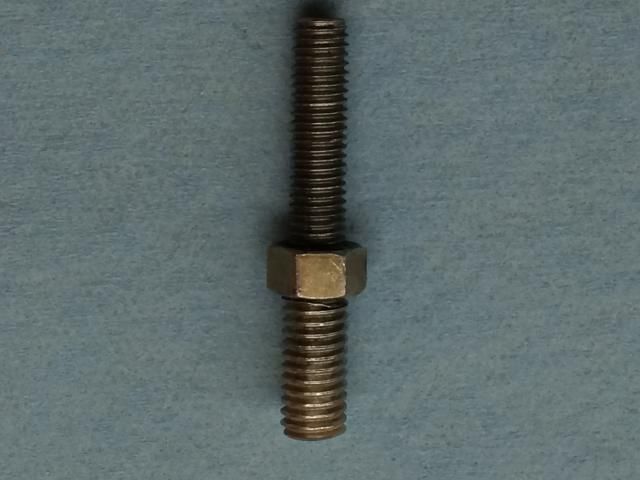
- Replace the screws with studs that provide 50mm of threaded area above the cross brace. I looked locally for an 8mm fastener with enough threaded area to make the stud and was unable to find one. I had a machinest friend make the studs out of a 3/8 bolt. He replaced the 3/8 threads on the bolt with 8mm threads. The 8mm threaded length should be equal to that on the OEM bolts you removed, plus the space required to hold an 8mm nut. We elected to leave the 3/8 inch thread on the part of the stud that protrudes above the cross brace. You can use a stud that has 8mm threads the entire length if you so desire. This is how they should look:
- Insert the 8mm threaded end into the holes where the OEM bolts used to be and then tighten the nut snuggly to hold them in place. Place a fender washer over the protruding stud.
Fit the tail bag into the opening to determine where you will need to make the holes for the studs. Have the rider's seat installed for this step. I used a red hot Phillips screw driver to melt the holes thru the bottom of the bag.
- Reinforce the bottom of the bag. I used a piece of 3/8 inch thick high density fiber board to make a interior bottom for the bag. This performs multiple functions: helps the bag hold its shape, provides a solid floor for the loading area and provides solid attachment points for securing the bag to the bike.
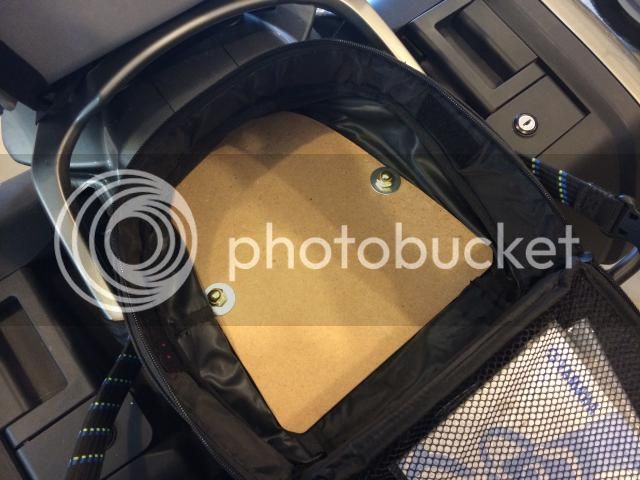
I intended to replace the fibre board with a thick rubber sheet, but the board has held up well. I had anticipated that the board would get wet and deteriorate, but with about 17,000 miles with this system installed the board has never been touched by even a drop of water. You can see that I went with acorn nuts and washers to hold the bag in place; wing nuts are another option and will allow removal without the need for tools. I was concerned that a wing nut might wear a hole in whatever I place in the bag.
- Seal the opening. With the bag removed use an automotive door seal to provide a weather tight edge around the bag. There are a few types of generic seals available at NAPA. I used this style (do not recall the name).
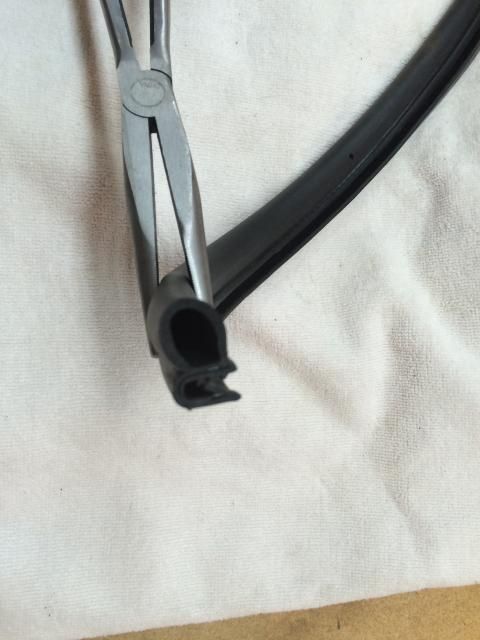
You can see the seal installed and the opening prepared for the bag in this picture.
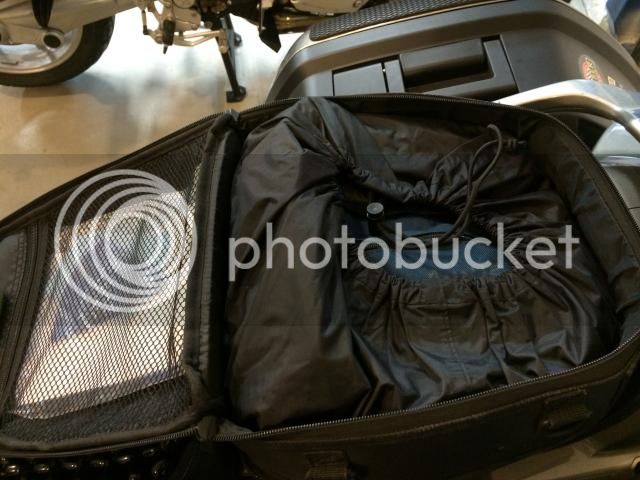
Here is a sample of what I carry in the bag. Includes a normal selection of hand tools and specialty tools needed for the FJR and all of my wife's Beemers; multi-meter, tapes, fuses, tire pump and tire changing and plugging stuff. This picture does not include the first aid kit I also carry.
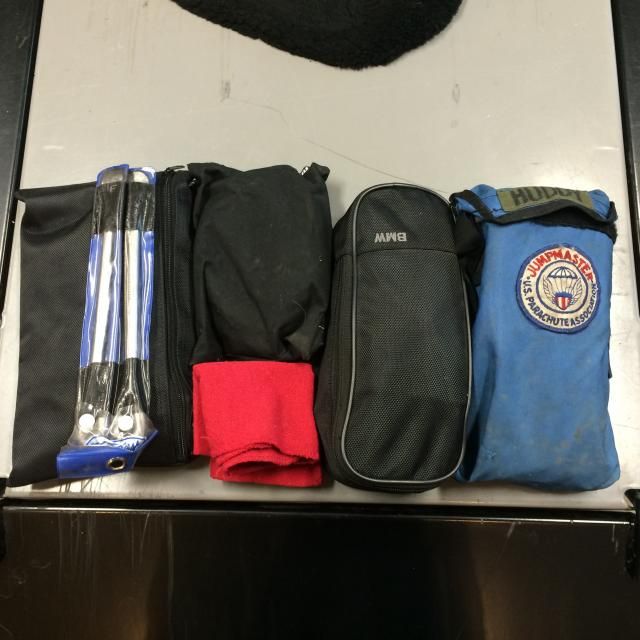
The bag comes with a waterproof cover that is supposed to be stored in an internal pocket. It takes up too much space and would be cumbersome to use. I use it as an internal bag and place the contents of the bag in it. Makes it easy to remove everything if needed. I have been surprised that that in all the time I have used this set-up there has been zero evidence of any moisture getting inside the tail bag. Here is how I pack the tools.
The first aid kit fits on top.
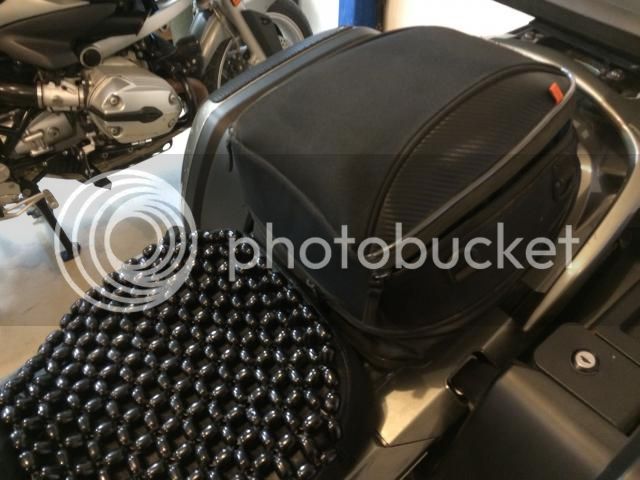
All shut-up and ready to go.
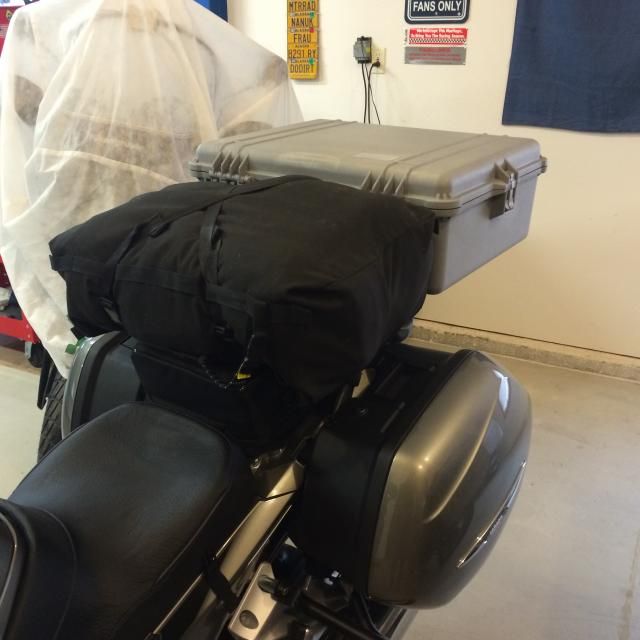
We do a great deal of long distance travelling and often camp. I strap down all the camping gear loaded in a Kermit Duffle Bag on top of the tail bag. (The Pelican Case used as a tail box was an experiment that proved to be unsatisfactory for me.)
Security.
The fabric tail bag cannot offer the level of security of a Smuggler's trunk. You can use a small lock to lock the zipper tabs together. That will stop only the least dedicated thief. My bike is always stored inside and theft is not an issue in our rural area (there was a thief caught in a local home and shot dead by the owner a few months ago... that seems to have ended that sort of behavior for the time being). When we travel and stay in motels we cover the bikes which reduces the likelihood of theft, and on rare occassions I have taken the contents of the bag into the motel (once or twice); packing everything in the waterproof bag makes this easy.
The front seat cannot be locked. To access the front seat lock I slide my fingers between the bag and the Corbin seat. A knowledgeable thief could get the seat off in moments.
I simply refuse to let a fear of being robbed prevent me from using the system. I've never been burned before and hope it stays that way. If it happens then I'll get new stuff. I also bet a thief could pry open a Smuggler's Trunk with a screw driver in under 30 seconds. The resulting damage would be costly.
One side benefit is that you will now have a one seater bike. I do not like to ride with anyone else on the bike. Now I need not invent an excuse. Another is that I always have the tools I need with me. I have another tool kit for my R12R so there is not a need to repack everytime I trade bikes.
Hope this proves useful to some of you. Let me know if there are questions.
This is not an original idea of mine. A member of this forum did essentially the same thing a few years back and posted a link to his website to show how he did it. I copied his idea. I cannot remember the other member's name and I'm told the link to his website is broken. I regret I cannot attribute the idea to the person who deserves it and hope he chims in if he is still frequenting the forum. I was asked by a member to post this DIY thread so that he and others can potentially adapt it to their bikes.
The concept is simple. Use a $58.83 Nelson-Rigg Tail Bag as an alternative to the Corbin Smuggler's Trunk. Now, I have nothing against the Smuggler's Trunk... except I think they are over priced by a wide margin. I had a Smuggler's Trunk on my old 2007, R1200RT and I loved it. This alternative approach has proven to meet all my needs and expectaions as an alternative, and in fact is a better option in some respects than the Smuggler's Trunk. It can be expanded or contracted to meet your needs, is not susceptable to minor dings, dents and chips and can be replaced with a new bag for about 8% of the price of the Smuggler. It does not, however provide the same level of security as the Smuggler.
I bought the Nelson-Rigg CL-1060 from Amazon in April 2013 (https://www.amazon.com/Nelson-Rigg-CL-1060-Black-Sport-Tail/dp/B00AC6ZCMI); as of 2 November the price had not changed.
Here is a picture of the bag mounted and filled to the point of needing to be expanded.
How:
- Remove the seats.
- Locate and remove the two 8mm screws located under the rear seat and next to the leading edge of the passenger handrail. In the picture below the screws have been replaced by the studs with the fender washers on them. I placed some closed cell foam on the cross brace as additional support for the bag; an optional step.
- Replace the screws with studs that provide 50mm of threaded area above the cross brace. I looked locally for an 8mm fastener with enough threaded area to make the stud and was unable to find one. I had a machinest friend make the studs out of a 3/8 bolt. He replaced the 3/8 threads on the bolt with 8mm threads. The 8mm threaded length should be equal to that on the OEM bolts you removed, plus the space required to hold an 8mm nut. We elected to leave the 3/8 inch thread on the part of the stud that protrudes above the cross brace. You can use a stud that has 8mm threads the entire length if you so desire. This is how they should look:
- Insert the 8mm threaded end into the holes where the OEM bolts used to be and then tighten the nut snuggly to hold them in place. Place a fender washer over the protruding stud.
Fit the tail bag into the opening to determine where you will need to make the holes for the studs. Have the rider's seat installed for this step. I used a red hot Phillips screw driver to melt the holes thru the bottom of the bag.
- Reinforce the bottom of the bag. I used a piece of 3/8 inch thick high density fiber board to make a interior bottom for the bag. This performs multiple functions: helps the bag hold its shape, provides a solid floor for the loading area and provides solid attachment points for securing the bag to the bike.
I intended to replace the fibre board with a thick rubber sheet, but the board has held up well. I had anticipated that the board would get wet and deteriorate, but with about 17,000 miles with this system installed the board has never been touched by even a drop of water. You can see that I went with acorn nuts and washers to hold the bag in place; wing nuts are another option and will allow removal without the need for tools. I was concerned that a wing nut might wear a hole in whatever I place in the bag.
- Seal the opening. With the bag removed use an automotive door seal to provide a weather tight edge around the bag. There are a few types of generic seals available at NAPA. I used this style (do not recall the name).
You can see the seal installed and the opening prepared for the bag in this picture.
Here is a sample of what I carry in the bag. Includes a normal selection of hand tools and specialty tools needed for the FJR and all of my wife's Beemers; multi-meter, tapes, fuses, tire pump and tire changing and plugging stuff. This picture does not include the first aid kit I also carry.
The bag comes with a waterproof cover that is supposed to be stored in an internal pocket. It takes up too much space and would be cumbersome to use. I use it as an internal bag and place the contents of the bag in it. Makes it easy to remove everything if needed. I have been surprised that that in all the time I have used this set-up there has been zero evidence of any moisture getting inside the tail bag. Here is how I pack the tools.
The first aid kit fits on top.
All shut-up and ready to go.
We do a great deal of long distance travelling and often camp. I strap down all the camping gear loaded in a Kermit Duffle Bag on top of the tail bag. (The Pelican Case used as a tail box was an experiment that proved to be unsatisfactory for me.)
Security.
The fabric tail bag cannot offer the level of security of a Smuggler's trunk. You can use a small lock to lock the zipper tabs together. That will stop only the least dedicated thief. My bike is always stored inside and theft is not an issue in our rural area (there was a thief caught in a local home and shot dead by the owner a few months ago... that seems to have ended that sort of behavior for the time being). When we travel and stay in motels we cover the bikes which reduces the likelihood of theft, and on rare occassions I have taken the contents of the bag into the motel (once or twice); packing everything in the waterproof bag makes this easy.
The front seat cannot be locked. To access the front seat lock I slide my fingers between the bag and the Corbin seat. A knowledgeable thief could get the seat off in moments.
I simply refuse to let a fear of being robbed prevent me from using the system. I've never been burned before and hope it stays that way. If it happens then I'll get new stuff. I also bet a thief could pry open a Smuggler's Trunk with a screw driver in under 30 seconds. The resulting damage would be costly.
One side benefit is that you will now have a one seater bike. I do not like to ride with anyone else on the bike. Now I need not invent an excuse. Another is that I always have the tools I need with me. I have another tool kit for my R12R so there is not a need to repack everytime I trade bikes.
Hope this proves useful to some of you. Let me know if there are questions.
Last edited by a moderator: