Trip meter reset button doesn't work

Yamaha FJR Motorcycle Forum

Help Support Yamaha FJR Motorcycle Forum:

This site may earn a commission from merchant affiliate links, including eBay, Amazon, and others.

BugCollector

Member
Joined
Aug 1, 2014
Messages
10
Reaction score
2
Location
Bastrop TX - Texas
Hi guys.

I just bought a 2004 FJR on Wednesday and among the little things that need fixing is the multi function panel.

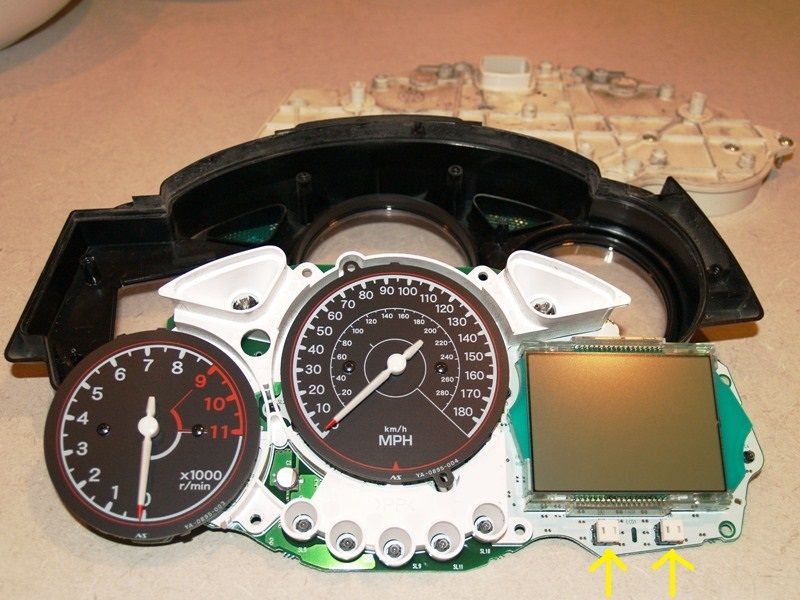
I noticed that the clock was about 14 hours out of sync, so I pressed and held both buttons and nothing happened.

Then I went to the gas station and being in the habit of resetting the trip odo at every fill up I held the reset button. Nothing.

So I am of the opinion that the reset button doesn't work.

Is there a fix?

If I have to get a new part can I get just the multi function display?

Or do I have to pop for the whole dash?

In either case is it possible to reset the odo to show the actual mileage of the bike (23100)

I don't want to get a part off a bike with 75000 and try to explain to Future Buyer that the dash was replaced.

Thanks for any reply.

BTW, this thing is a HOOT to ride!

 
Don't know about Gen1 but on a Gen2 the display needs to be flashing for the reset to work.

If you are looking at the odo reading you need to reset you will have to cycle it around until it appears flashing.

Haven't done it for a very long time but that's how I remember it........

 
Dear BugCollector:

Before you go off at 900 mph in a wrong (or expensive) direction, try fiddling with pushing buttons, holding down buttons, and searching the web ("trip meter reset site:fjrforum.com") for a few simple, easy solutions. Hold off on sourcing an entire dashboard replacement for a few hours.

As the next-to-last resort, try a web search for the 2004 Owner's Manual. As the absolute last resort, call a dealership and ask them how it's done. If you call a dealer far, far away, you can pretend to be somebody from, say, Wheaton, Illinois.

Sincerely,

Uncle Hud

PS: Yessirreee Bob, this machine is a hoot to ride!

 
Last edited by a moderator:
2004 Owner's Manual (UK, but they're the same) has this:

1_TripReset2004.jpg


OP is right. It is supposed to reset just by holding the reset button down.

You'll need to get into the dash, which is a chore on its own right, but you may be able to clean the contact area on the circuit board to get the switch working again.

If you search the forum for the threads where people have had to replace their 1st Gen dash lights, you should be able to get a look at the innards of the Instrument cluster.

 
Are GenIs different from GenIIs where both buttons have to be held down to reset the clock, and the numbers have to be fresh and flashing for the reset to work?

 
Yes and no. Two button hold down to change the clock is the same, but you don't press once for flashing then press again for reset of trip odo on a 1st Gen. Just hold the reset down when the trip meter is being displayed.

 
Last edited by a moderator:
First, the display needs to show the info you are trying to reset, before pushing AND holding reset button for about 2-3 seconds.

Once the info you want to reset start flashing, push reset button once and that should do it.

 
Thank you all for your reply's.

I got it to work and I know why it was such a chore.

The buttons are covered with rubber for protection from the elements.

My buttons both are compromised and have holes in the rubber.

I had tried the button pushing about 50 times to try and get things working.

On my 51st attempt it worked! I pushed the reset button on the upper right portion of the button and the clock hours started flashing.

I was able to get the trip reset too.

So now I know there's a slight trick to this particular bike.

I'm going to give it a little shot of WD-40 to help with any water that might be in there and then reseal with a bit of silicone.

The previous owner must have had trouble with it too, thus the clock being 14 hours off and the trip meter was showing 3500 miles.

I'd have a hard time living with that.

Time to go for a ride!

 
A bit late but anyway..

Perhaps you must spray some contact cleaner in the micro switches inside the meters..

If this doesn't work i think that these two micro switches are easily replaceable by a electronic workshop.

DON'T SPRAY WD40 INSIDE THERE!ONLY CONTACT CLEANER!

https://www.fjrforum.com/forum/index.php?showtopic=31021

https://www.fjrforum.com/forum//index.php?showtopic=100352&st=0&p=373123&hl=+speedo&fromsearch=1&&do=findComment&comment=373123

This picture is from the link.You can see the two microswithces..

MW184080b_zpsseyrzb7w.jpg


Last edited by a moderator:
+1 on the contact cleaner. Also you can gently use a hair dryer to make sure there's no lingering moisture.

BTW, WD-40 is overrated, and overused. There are some very good anti-corrosion agents available, (I'm a fan of ACF-50), and silicone spray lubricants that won't damage plastic or rubber. For electrical contacts there's an electrical contact lube you can get at electronic supply/hobby stores.

To repair those holes in the buttons, make sure the existing rubber is clean and dry, so the silicone rubber will bond well.

 
I didn't know they made brake cleaner. I need some of that too. My tractor was inundated in the flood that totaled my goldwing.

The clutch disk is stuck to the flywheel. I've tried some maneuvers to unstick it to no avail. The next thing to try is to

remove the starter and spray some brake cleaner on the clutch disk.

Thanks again.

 
Now that root cause is likely corrosion due to deteriorated buttons, I'd take the thing apart to clean the switches..... and come up with a permanent fix for the buttons, which might better be done from the back side?

 
Dug around in the garage and found an instrument cover off my long gone '04. It has the some what common 'melt' on the top/right from the wind screen.

But the buttons are like new. It appears that the buttons might pop out like a grommet. For the cost of shipping I'd be happy to send it to you. Drop me

a PM or a note to st4gary at hotmail.

Gary

20151122_134501.jpg


20151122_134447.jpg


Top