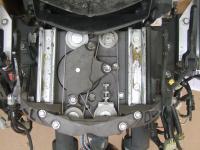
windscreen motor

Yamaha FJR Motorcycle Forum

Help Support Yamaha FJR Motorcycle Forum:

This site may earn a commission from merchant affiliate links, including eBay, Amazon, and others.

Igoslo

Member
Joined
Nov 7, 2015
Messages
23
Reaction score
1
Location
Louisville ky
I took my first good ride on my 2010 FJR today (after 2 weeks of changing fluids, tires, cleaning gunk, etc).

Great bike!

I noticed that when lowering the wind screen it does not move smoothly, but chatters on the way down.

I know this bike sat for a long time with out use.

Suggestions on what to look for?

is there something that can be lubricated?

 
<snip> Suggestions on what to look for?
is there something that can be lubricated?
Two possible issues. The windshield / mechanism moves on two sets of glides under the plastic. Things dry out and get dirty, which causes the symptoms you're seeing. It's possible to lightly lube the glides with a spray lubricant and straw by reaching through the fairing notches. A little lube goes a long way...

You should also check, clean and lightly lube the rubber seals around the mechanism. Sometimes the rubbers come loose and bind up causing chattering. They're held on with adhesive or double side tape. If those are loose, the best method to repair is to remove the nose assembly. Search for threads explaining the sequence for removal. Do it once and it's a snap the next.

Good luck!

--G

 
That Gen II windshield mechanism has got to be one of the weirdest, rube-goldbergian contraptions I've ever seen.

Mine chattered annoyingly soon after purchase, and the dealer helpfully squirted some lube through the fairing notches, which helped for about a day.

I finally resorted to removing the front fairing (!!), cleaning off all that lube overspray, (iirc the dealer used lithium soap spray lube -- what a mess!)

I polished the tracks with autosol metal polish, put a very small amount of waterproof lube on them, (can't recall what I used, but anything non-sticky and waterproof should work ok), and carefully adjusted the cable tension*.

One of the rubber seals was detached about one third it's length, so I re-glued it. Note that it wasn't binding, because the mechanism chattered even with the front fairing removed. YMMV.

I used silicone lube on the rubber seals, made sure the mechanism slid up and down smoothly, and re-installed the front fairing.

It's been smooth and chatter-free ever since.

*If you adjust the cable tensioner, be aware that only a very small adjustment is needed. The tensioner mechanism is not the most robust, and all that is needed is sufficient tension so that all the guide wheels pulleys rotate smoothly.

 
Cleaning and lubing will fix your problem. I think I would removed the front and expose the innards and do it right the first time. Then you won't have to worry about it for a long time, if ever again.

 
spraying the rails with WD40 didn't do much, so you are right. I'll have to pull the fairing and do it right.
WD 40 is not a lubricant. It's a water displacement. Useful for cleaning, possibly freeing seized stuff, but no good to lubricate things. Use a waterproof grease, sparingly.
(click on image for larger view)


I took some pictures when I needed to pull my front fairing, these may help you.

 
Thanks, the photo helps a lot. I have some white lithium grease I'll use once I'm in there, but WD40 was the only think I could squirt in through the fairing.

 
According to my Haynes manual I need to remove the fairing side panels prior to the front? (Gen II).

Does that make sense?

 
First thing to do is check the rubber (actually soft PVC) gaskets around the actuator arms. If the material is detached from the fairing, you have to remove it in order to fix it. Mine was partially detached so I removed the nose and removed the gasket, cleaned thoroughly and re-installed using 3M double sided trim tape. Been good for 4 years or so. If it is not detached, try a thin coating of silicone (dielectric) grease on the arms and the gasket where it touches the arms (try using a Q-tip cotton swab). This might be all that is needed.

If you are still having issues (or if the material is detached) remove the nose and do a thorough cleaning. I would be VERY careful about using lubricants on the plastic channels. It will attract dirt and could gum things up worse than it already is. Removing the nose isn't all that bad and it gives you a chance to clean up everything in there and check all of the electrical connectors. Take the opportunity to admire the ridiculously complicated windshield mechanism and do the easiest headlight replacement you'll ever do. If you have a lot of miles on the bike, you might want to replace the front marker/signal lights. One of mine just went out and its a bitch to replace - side panels have to come off. These are cheap standard automotive bulbs.

Note: Some people have just removed the gasket by cutting it up and pulling pieces through the slots in the fairing. While the gasket is far from waterproof or dustproof, remember that there is stuff behind the fairing that you might not to get wetter or dirtier than necessary.

 
That was what i was afraid of. Sounds like an all day project the first time , but maybe only a few hours in reality.
It's not difficult, just time consuming the first time.

Like anything you haven't done before take the time to read through ALL the instructions to the end and if you are at all unsure take pictures of how things look now BEFORE you change anything...

 
I now have the whole thing apart

It seems that the right side guide is dragging and vibrating. I have tried lubricating with silicone which did not work. I've tried realigning the guide and that did not work.

It is only dragging as it moves downward. Once it starts moving downward that part of the bracket seems to flex. Has anyone seen this? I'm sitting here staring at the thing right now.

 
Fixed!!

It wasn't clean enough. I had to use a scotchbrite pad and basically polish the metal and edges. I did all this with the power on so I could keep testing.

Funny thing is all this seems to have reset my odometer to 66 miles. ???

 
Fixed!!It wasn't clean enough. I had to use a scotchbrite pad and basically polish the metal and edges. I did all this with the power on so I could keep testing.

Funny thing is all this seems to have reset my odometer to 66 miles. ???
All that rubbing probably blew its little mind...
wink.png


Top