Problem installing 1" risers on 2013

Yamaha FJR Motorcycle Forum

Help Support Yamaha FJR Motorcycle Forum:

This site may earn a commission from merchant affiliate links, including eBay, Amazon, and others.

Laser Dude

Well-known member
Joined
Apr 2, 2016
Messages
151
Reaction score
74
Location
Henrico, VA
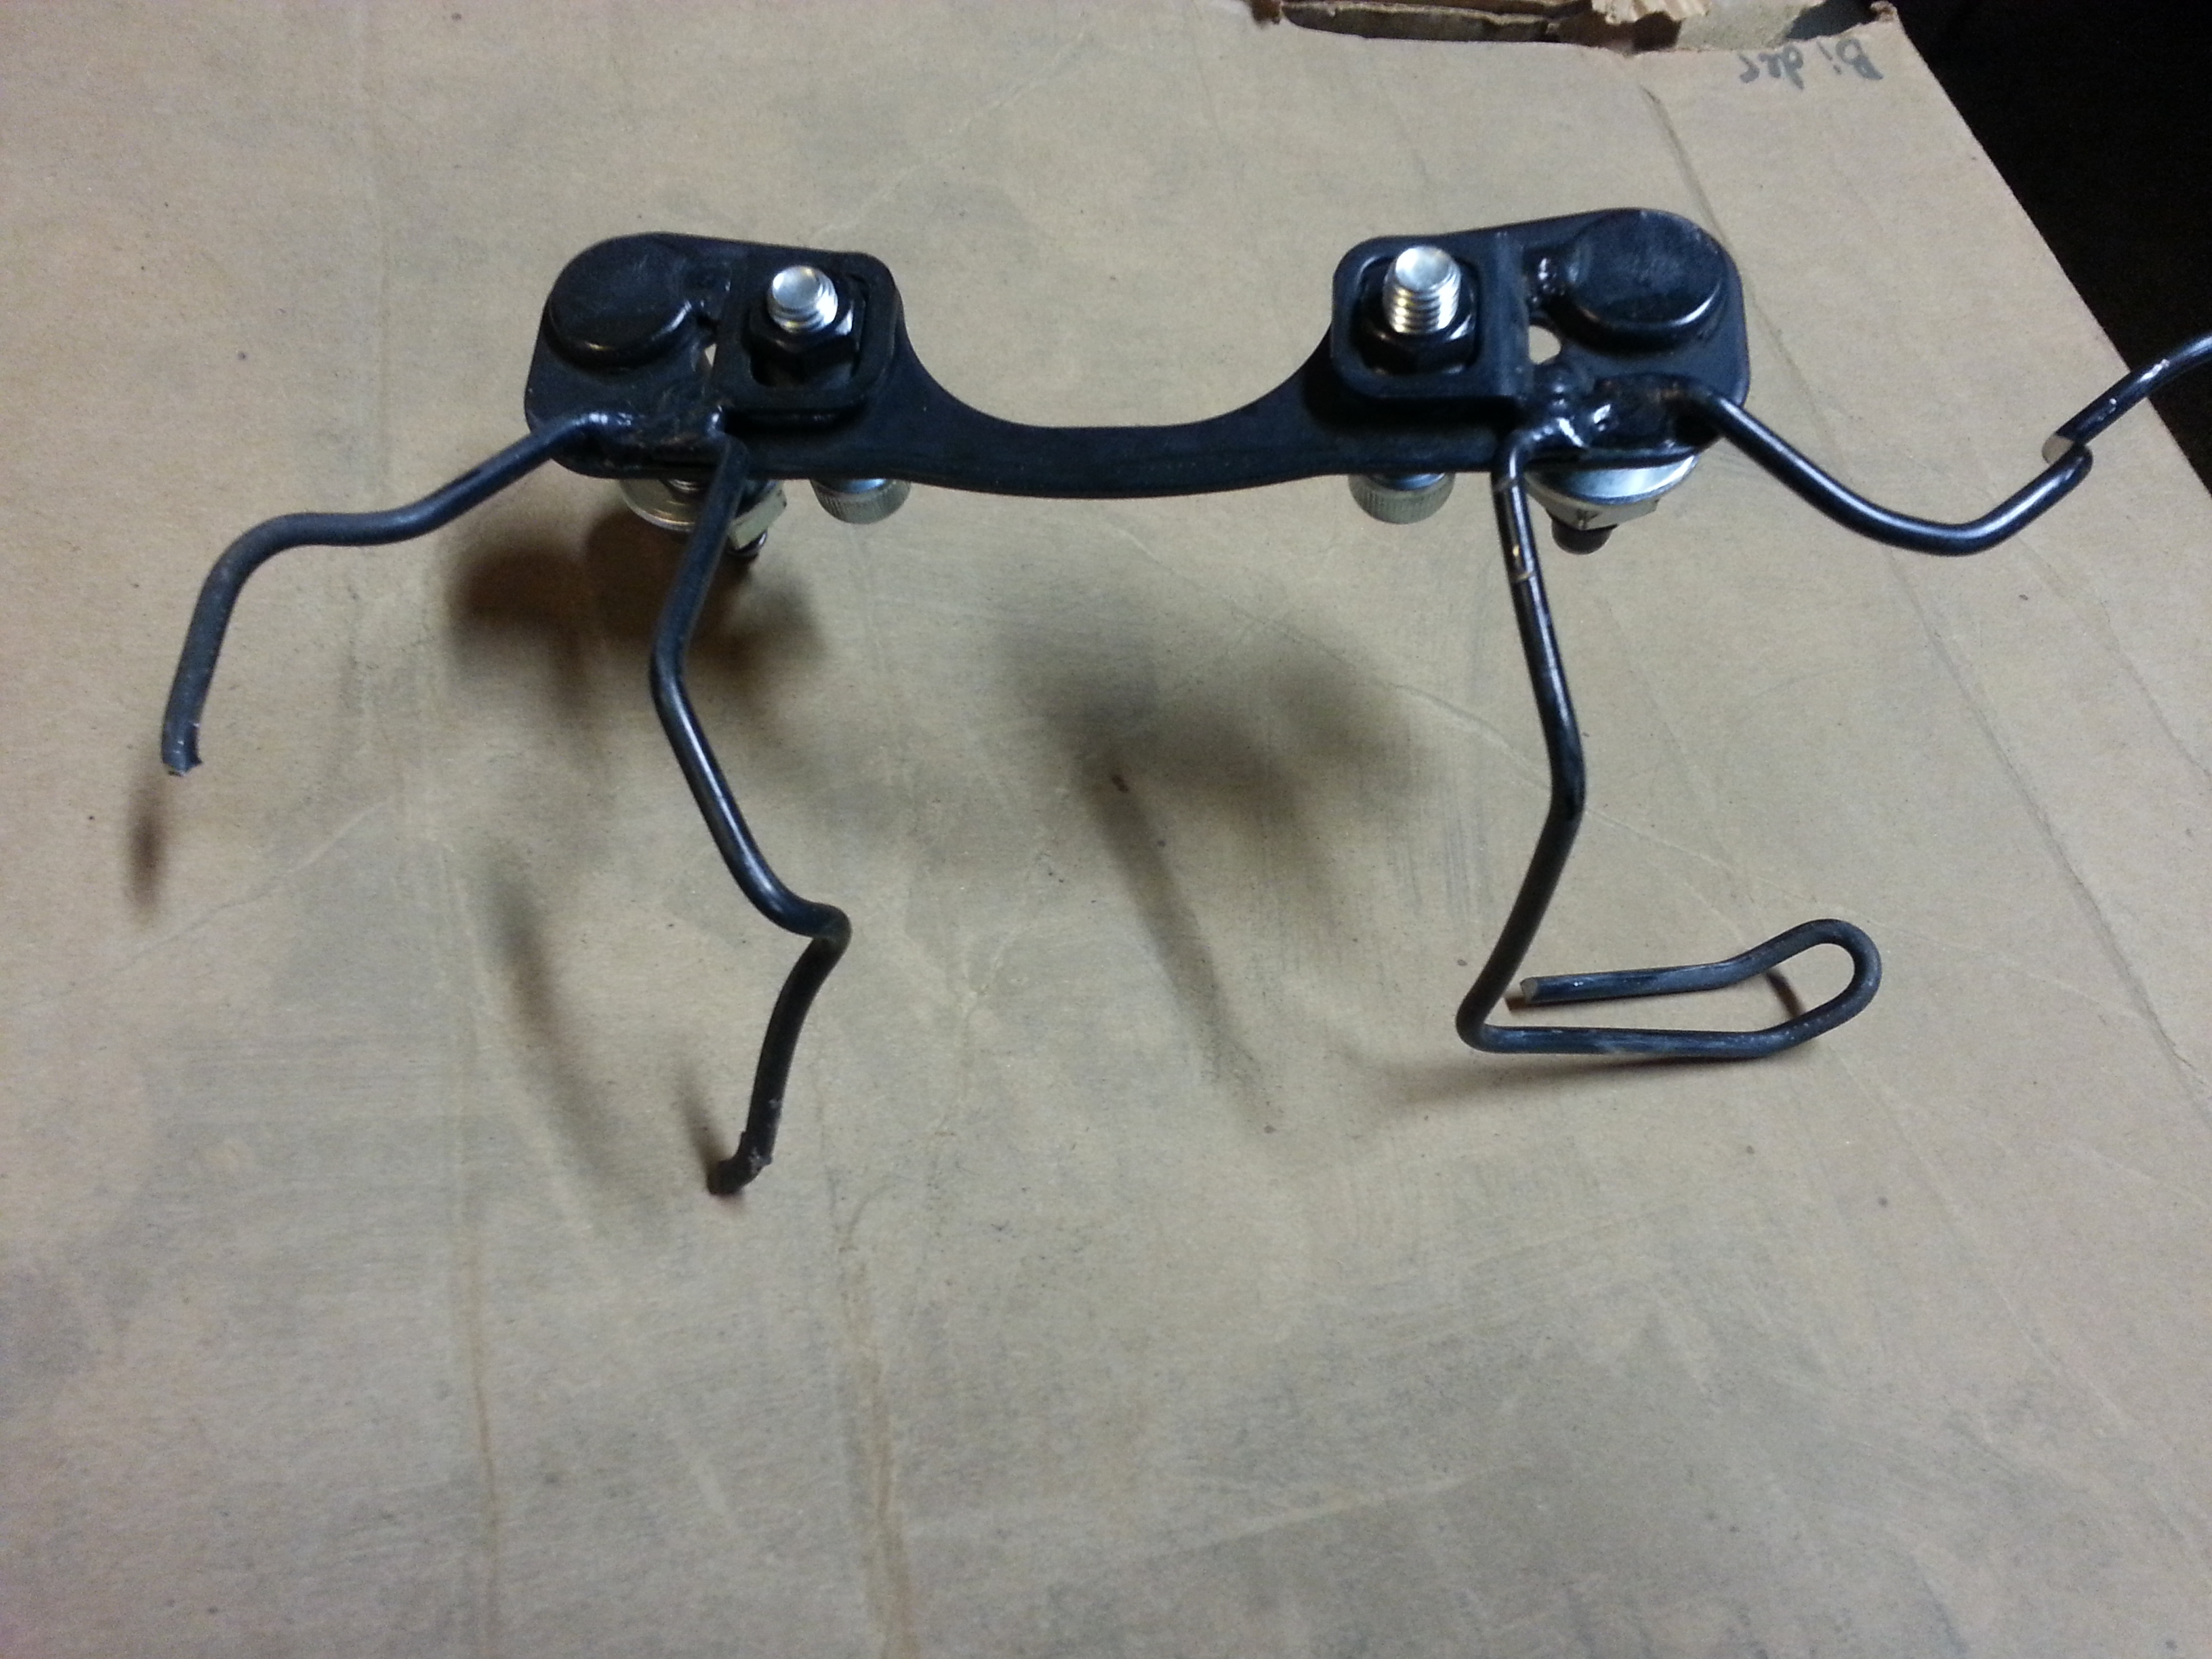
I'm looking for help installing a set of 1" risers I bought (just the 2 blocks, not the bridge version). I thought it would be simple, just remove the handlebars, replace the bolts with longer ones, and button it back up and take the test ride. However, it says I need to remove the black plate that the bolts are welded to that is mounted on the bottom side of the triple tree. Well, that sounds easy enough, except for the fact that there are two wire loops welded to the plate that all the lines and hoses run through. It's the steel wire loops that keep everything nice and together going from the top side of the triple tree down into the belly of the beast.

I'm a little bewildered on how to get all the wires out of a sealed loop. I only see two options, one unhook every single cable,line, etc from both sides and feel them through the steel wires, then remove the bottom plate, or two, take snips and cut the steel loops. I don't wish to do either of those, not to mention, that plate is not reused, so now all my cables, lines, wires, etc, all would need to be wire tired to make them tidy again.

I'm having a hard time thinking about going from a nice steel wire loop that does and looks good to wire ties.

I assume this wasn't an issue with previous models, and I can't find anything on it, but surely I'm missing something obvious, or these risers don't fit a 2013 without some modifications.

Anyone else run into this issue (and solved it?).

Their tech support is down until Tuesday, so I was hoping someone might be familiar with the issue before then. If not, no worries.

Thanks!

 
Part #12 for reference. Everything from both sides runs through the loops. The instructions mention nothing about unhooking everything and pulling them through the loops.


I cut mine off with a bolt cutter then removed the plate. I'm not sure you have a 3rd option that you could "wish not to do any of these 2 options"? :)

 
Last edited by a moderator:
Those 2 long OEM bolts were welded to the bracket that's part of the wire as you can see here on mine:

U28HcUg.jpg


Last edited by a moderator:
Thanks Mike! That's exactly what. I feared and didn't want to do. I guess you have to do that for all risers, unless you want to unhook everything, right?

Did you just wire tie everything back to something on the triple tree? Or did you just tie the left stuff together and let it float wherever it ended up, and same for the right side?

 
Dude, Cover the tank w/ a pad, and lay it all out gently. I cut the loops w/ a mini grinder, then remove the top tree, then the damn black basket and nuts. It really helps to have a friend hold the nuts while you start the bolts. I received the bad news in the Gen Mar instructions.

You can do it and it is worthwhile. Go slow and lay it out in order.... no better way to get to know your bike than to tear it apart (a little).

 
Thanks Mike! That's exactly what. I feared and didn't want to do. I guess you have to do that for all risers, unless you want to unhook everything, right? Did you just wire tie everything back to something on the triple tree? Or did you just tie the left stuff together and let it float wherever it ended up, and same for the right side?
Yes, I was able to keep the #27 tie wrap. I use a new tie wrap on the right side to keep the cables in place.

 
It's a piece of cake. Like Roger says, use a Dremel or some bolt cutters (tin snips may not get through the wire because it's pretty thick).

Tip: before starting to cut, remove the handlebars from the triple tree and lay them across a towel on either side of your upper fairing panels - get them out of your way a bit. Then loosen and remove the triple tree with the wire loom and studs still attached. It won't be able to go far, but the wire loops will slide up the cables and hydro lines a bit and you can maneuver it around for a better cutting angle. If you cut carefully and near the "base" of the plate the wires are mounted to, you can re-use the plate/wire loom again if you ever remove the risers from the bike.

 
Maybe I'll bite the bullet and do it today, since it's raining. I had them pulled completely down until I ran into that issue, so it shouldn't be an issue.

Thanks for the tips guys.

 
I just did this project last week on my new FJR. I cut the looms with slightly over-sized Craftsman brand wire snips. That is the first thing you do in order to get the cables out of the way. Then follow the instructions, you now toss the loom bracket. It's really much easier as a two person job. Then when you remove the triple tree, and this is where the second person really comes in handy, it slips right off the forks when you take the pressure off of the forks by pressing downward on the luggage rack. The blocks need to be attached with the enclosed bolts while off the bike. Not enough clearance for the wrenches otherwise as they hit the frame work. Bolts go in from the top side. Now tighten down and torque to spec.

When I got it all back together, I snipped the zip tie attaching cables on the left side, which were attached to the frame, to free up the cables when turning the forks. I then loosely attached them back with a zip tie to the frame so they didn't just float around. Also, take a look at how much the brake line is stretched when turning the forks, you might want to loosen the retainer clip and give it some slack. Torque everything to spec. Just make sure nothing is floating around in there and you're done.

On my first ride, I think they are going to make a huge difference in long distance comfort.

 
Well, I installed them today. I expect I'll be returning them, not because they don't work, but just the general frustration with the install and the belief that whoever made and sold them has never actually installed a pair or gives a crap. To be fair, there is a note on the instructions saying if you have any issues, please call them instead of leaving negative feedback, which is what I will do tomorrow.

The new hardware? SAE, not metric. WTH? Why in the Wild World of Sports would you make a part for a Japanese/Metric bike and put all SAE hardware in it? They switched from using a metric Socket Head Cap Screw to using a SAE Hex Head bolt. Well, news flash. If you put a hex head where the SHCS was, a socket won't fit down in the counterbored part of the handlebars to tighten the bolt. Nice. Lovely attention to detail. I went and got a SHCS for it, put it in, and, like DallasFJR mentioned, you need to install it all before you put the triple tree back on. Again, another detail completely not mentioned anywhere. In the end, I put it all back together and I can wiggle the bars when they are torqued properly. I over torqued them a little and they still wiggle. How? I don't know, since it's all on pins, but they do.

Now that I'll send them back, it's nice to know that I had to partially destroy a factory part to get them to work. Wonder who's supposed to pay for that replacement? (only being sarcastic, as I'll have to live with the cuts now)

I really did not want to go with the helibars or the motorrad one's and both sets appear to bring the bottom of the bars back further than I'd like. I really just wanted to go up. My arms are fairly long, so I'm not trying to get them closer to me, just higher.

I guess I'll be rethinking my choices this week. It was raining so I didn't get to ride with them, but just sitting on the bike on the center stand, it seemed to be just the position I was looking for, and I'm questionable about riding them too much since they wiggle.

Thanks for the help from those who had experience with it. With that help, it went pretty easily.

 
Last edited by a moderator:
Well, that sounds like a bummer, but once the holiday weekend is over and they are there, maybe they can help you with the wiggle. I bet its something small...

 
I installed these 1 inch blocks last weekend. It went well while on the side stand to remove everything. I used a mini-sawsall on the loops. Installing the triple tree did not go well at all until I read the valuble information on the FJR forum.

Got the wife and son to help get the bike back on the center stand and the triple tree slipped right on. Had to torque and re-torque the handle bar bolts to keep them from moving.

So far it is better than stock. Need to go on a ride longer than 30 minutes.

Thanks for the knowledge.

 
Top