• If you have bought, sold or gained information from our Classifieds, please donate to FJRForum and give back.

    You can become a Supporting Member or just click here to donate.

Relay Arm, modified for easier lube service

Yamaha FJR Motorcycle Forum

Help Support Yamaha FJR Motorcycle Forum:

This site may earn a commission from merchant affiliate links, including eBay, Amazon, and others.

FJReady

Well-known member
FJR Supporter
Joined
Jun 28, 2005
Messages
1,295
Reaction score
218
Location
Newburyport, MA
I bought a relay arm on Ebay back in October that I saw here referenced here originally. Thanks bseelbach.

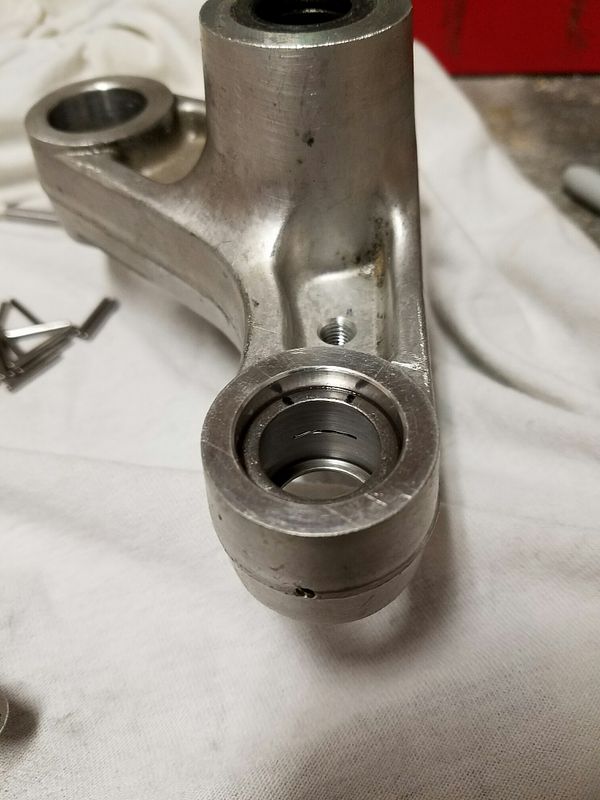
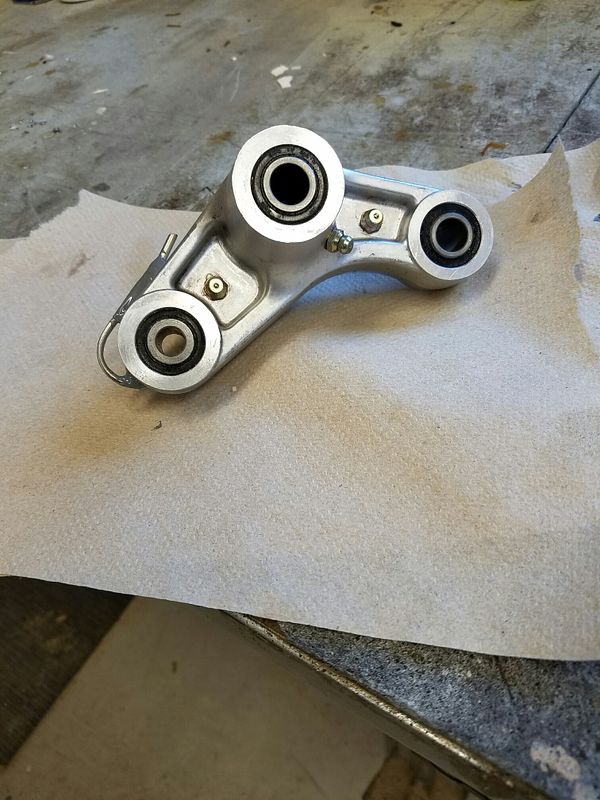
My intention was to mod it to add some zerk fittings to allow lubing the bearings without having to remove the relay arm from the bike.

Problem is, the non ES and ES bikes use different relay arms. I didn't know that when I bought the used relay arm. But I modified it anyway to prove out the technique. It works great on my workbench, but I want some real world use and feedback.

My photobucket account is acting up and I haven't been able to upload photos (or link to older ones) so I have no photos to post here just yet. PM me and I can email them if you're interested.

Anybody willing to pay me $75 for this arm?

 
Oh, shit, I just deleted my emails. I will go check the trash bucket for them.

EDIT: That was close, found them. I can't open the attachments until I get to work tomorrow though. My computer won't let me download or open anything.

Dave

 
Last edited by a moderator:
FJReady has sent me some photos of his handiwork, so I will provide a photo assist here:

Here's 1000 words on how the grease gets into the bearing needles:

RelayArm_LubeMod1.jpg


There is a corresponding slit ion the outer bearing race to allow the grease to pass through the needles (opposite the slit shown) and give the old grease a place to vent from.

His prototype has 3 zerk fittings, one for each pivot.

RelayArm_LubeMod2.jpg


We've discussed that maybe the only critical one is the one for the frame pivot that (otherwise) requires the center stand to be removed (left in the above image).

The other two, the wider, center dog bone attachment points, and the rear lower shock attachment pivot, are both easily accessed with the bike just up on the center-stand.

Since you can't remove the bolt or inner bearing race, that frame pivot requires a place to vent the old grease while pushing in the new. That is the reason for the "Turkish Coffee Spout" tubing as shown.

Here's that most difficult pivot fitting being greased on the workbench mock up.

20161205_202044_resized.jpg


I can definitely see one of these going into my 2014 when they are available. IMO, this is one of the worst Preventive Maintenance jobs we have to do on our FJRs, and this mod should make it trivial after the initial install. I have no doubt those bearing will last forever given a steady diet of fresh grease.

 
Last edited by a moderator:
Thanks for the photo assist Fred. I suppose you'll want the Frugal Yankee NERDS rate for your relay arm mod.
tonguesmiley.gif


I think I'll be doing Chuck's non ES arm in a couple weeks, you want to get yours to me? You can be guinea pig for the ES model.

 
How does the grease get to the two outer zirk fittings? Did you have to drill side holes? I believe the casting is solid where the zirk fittings are. I could be wrong though.

Edit: Ok, I think I get it now. yes holes were drilled from the side. A tube in one end and set screw in the other. Correct?

RelayArm_LubeMod2.jpg


Last edited by a moderator:
I believe what our friend did, was first remove the bushings/ outer bearing races, then drill first through the vent/exit holes,

right past the bearing hole and into the casting up to where the zerk fitting sits.

(opposite of the way the grease flows)

Then he drilled through the side of the (solid) casting to intersect with the end of the first hole,

creating the holes for the zerk fittings.

He then had to drill and tap the zerk fitting holes and insert the fittings.

He then took the bearing races/bushings over to the band saw and cut 2 slits in each bushing 180 degrees apart.

A little sanding and polishing, then he carefully oriented the slits with the newly created grease passageways,

and tapped the bushings home.

.......... or it was ANCIENT ALIENS!
smile.png


Brilliant work, by the way!

I'd love to copy it if I may.

Thanks, David.

 
Last edited by a moderator:
Pretty close on the description Dave. I didn't use my bandsaw, however on the outer race. I think that material is too hard and the band saw blade would have raised a hell of a burr. I used a very fine grit .025" thick slitting wheel in my Dremel tool.

The front bearing gets two slits, the rear bearing gets only one as you simply slide the rear bearing inner race side to side to purge the old grease while pumping in the new. Of course you can do the rear one in the traditional manner. No zerks required.

 
Very nice. I once had a Suzuki enduro bike RMX 250 It had grease fittings on shock and swing arm linkages. They used a different way to get grease in there. Bolts were drilled length wise, grease fitting at head. cross drilled at bearing surfaces. Excess grease was pushed past seals. Lubed from center of bolt no need to cut slots or drill linkage.

I like your idea. Drilling a bolt would prove very difficult depending on hardness. Keeping it centered might even be harder.

 
Very nice. I once had a Suzuki enduro bike RMX 250 It had grease fittings on shock and swing arm linkages. They used a different way to get grease in there. Bolts were drilled length wise, grease fitting at head. cross drilled at bearing surfaces. Excess grease was pushed past seals. Lubed from center of bolt no need to cut slots or drill linkage.
I like your idea. Drilling a bolt would prove very difficult depending on hardness. Keeping it centered might even be harder.
I like that idea, "Option B". Wouldn't be to hard for me. So many ways to skin a cat. Ooooooops,can I say that?
not_i.gif


Dave

 
Very nice. I once had a Suzuki enduro bike RMX 250 It had grease fittings on shock and swing arm linkages. They used a different way to get grease in there. Bolts were drilled length wise, grease fitting at head. cross drilled at bearing surfaces. Excess grease was pushed past seals. Lubed from center of bolt no need to cut slots or drill linkage.
I like your idea. Drilling a bolt would prove very difficult depending on hardness. Keeping it centered might even be harder.
This has been talked about before. Sounds like it would work but........

Pumping grease through the bolt would not get to the bearings, it would just go between the bolt and the bearing "spacer".

Not sure how easy to would be to drill through the spacer?

 
From a structural standpoint, it seems to me that putting a couple of slits in the outer bearing race, and drilling grease paths in the relay arm would cause less weakening of the assembly than drilling the main bolt hollow, and then cross drilling holes in the inner race. The thrust of the suspension is perpendicularly applied to that bolt (as a pin). Hollowing it out would reduce its shear strength significantly.

I like the OPs solution better. The only tricky part to doing his version of the mod would be getting the slitted bearings installed aligned properly with the greaseways.

 
Pretty close on the description Dave. I didn't use my bandsaw, however on the outer race. I think that material is too hard and the band saw blade would have raised a hell of a burr. I used a very fine grit .025" thick slitting wheel in my Dremel tool.
The front bearing gets two slits, the rear bearing gets only one as you simply slide the rear bearing inner race side to side to purge the old grease while pumping in the new. Of course you can do the rear one in the traditional manner. No zerks required.
Awesome! Great idea with the Dremel wheel. A much better choice.

In the back of my mind I was thinking the bearing race would put up one hell of a fight

in the band saw. That stuff is really hard!

I'm really impressed with the work you did.

I don't have a shop anymore, but I'm going to ask a friend to let me have-att in his shop.

Thanks to you, that part is only going to come off the bike once. :)

I got a great buy on a 2004 FJR1300 ABS after someone test rode it and dropped

it in the dealer parking lot. (Needs new mirror and paint on 1 fairing & the saddle bag)

The bike only has 6,600 original miles and was owned by a 70 yr old man.

The first time I sat on it, they had it overpriced at $5,800.

I bought it 2 days after it hit the deck for $2,200. Whoo hoo! :)

I'm going to make her look like new and ride her for years to come.

I already predict that your mod will be the best thing I ever do to the bike.

I'll be eyeing up the whole underside for possible new zerk locations.

My little Yamaha XT225 came from the factory fully equipped with zerks

in the rear suspension, and I'm totally excited to upgrade my new bike.

Thanks again for thinking outside the box and sharing it with us.

 
The next place I'll be looking for zerk fittings as the swingarm. At least in the dogbone location. I forget what the inside of the swing arm pivot bearings look like. But that can be done pretty easily during routine servicing of the drive shaft and U-joint.

FJR is pretty easy bike for most routine service tasks.

 
The next place I'll be looking for zerk fittings as the swingarm. At least in the dogbone location. I forget what the inside of the swing arm pivot bearings look like. But that can be done pretty easily during routine servicing of the drive shaft and U-joint.
FJR is pretty easy bike for most routine service tasks.
I'm thinking about the swingarm also.

We just had our first snowstorm up in Buffalo, and I just got done stuffing the FJR into it's resting place in my garage.

It's in there so tight, I won't even be able to get to it until spring time. (or even LOOK at it)

Such a shame.

If I want to park my car in the garage, then there is no space left to work on the bikes.

If I leave the car outside, then I have to dig it out or plow around it every time if freakin' snows.

That's just too inconvenient in an area where it's possible to get 6 or 7 FEET of snow from time to time.

I AM looking forward to drilling some holes for additional zerk fittings.

It will be super nice working with aluminum for a change.

 
The main swingarm pivot is pretty well protected, up high in the frame. Same for the steering stem. An FJR could easily go for 100k miles or more with no regular greasing of them. DAMHIKT :rolleyes: That bike is still on it's original wheel bearings too.

It's those darned relay arm pivots that constantly get all the road spooge blasted onto them that are the know weakness.

 
Top