Wicked Webby's Handle Bar Adjustment Guide

Yamaha FJR Motorcycle Forum

Help Support Yamaha FJR Motorcycle Forum:

This site may earn a commission from merchant affiliate links, including eBay, Amazon, and others.

Wicked Webby

Right is Harder than Wrong.
Joined
Apr 24, 2007
Messages
1,632
Reaction score
0
Location
Anoka, MN
Hello All,

Well, I decided to post this guide to get rid of some misinformation regarding the handle bar adjustment on the Generation II FJR's(06-07). This will show my adjustment from the middle position(stock) to the forward position(more aggressive riding position). I know some people have successfully adjusted their bars without lifting them off of the triple tree(I call it blindly). This guide is the way I chose to do it. Either way you choose to, I hope this guide gives you the information your looking for.

Start off by placing a towel over the gas tank, fairing area, and gages to protect it during the adjustment.

TOOLS REQUIRED: 2.5 MM allen wrench, 6mm allen wrench, 17mm socket with extension, med flat head screw driver
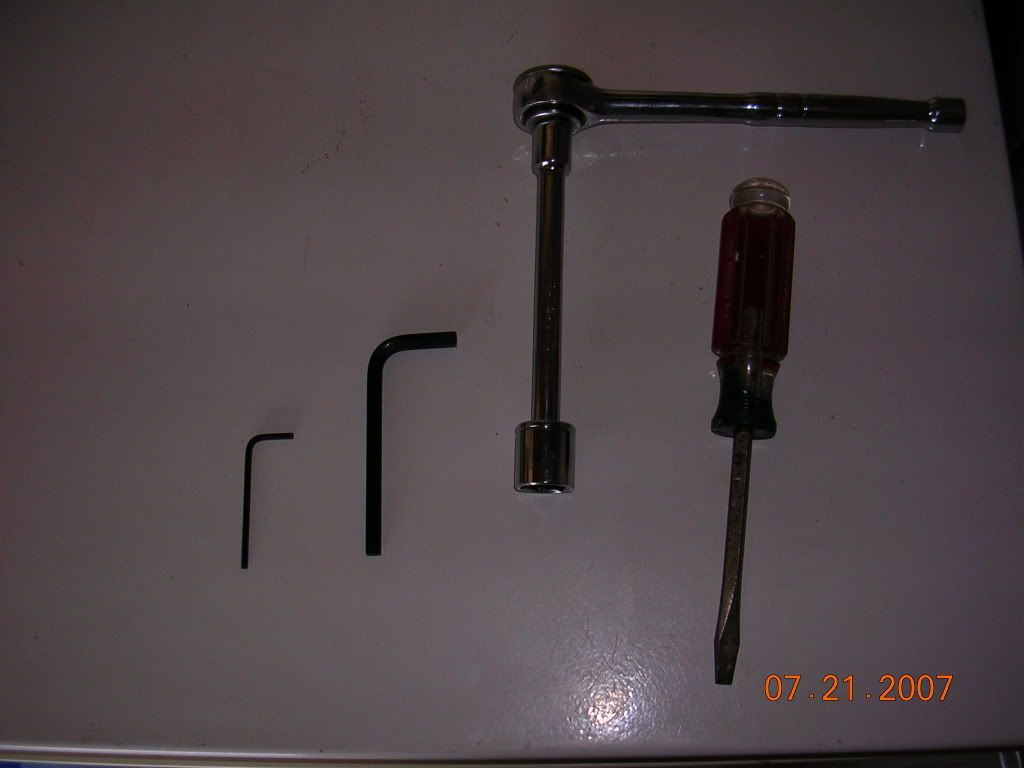
DSCN5256.jpg


FIRST REMOVE THE HANDLE BAR CAPS (2.5mm Allen wrench):
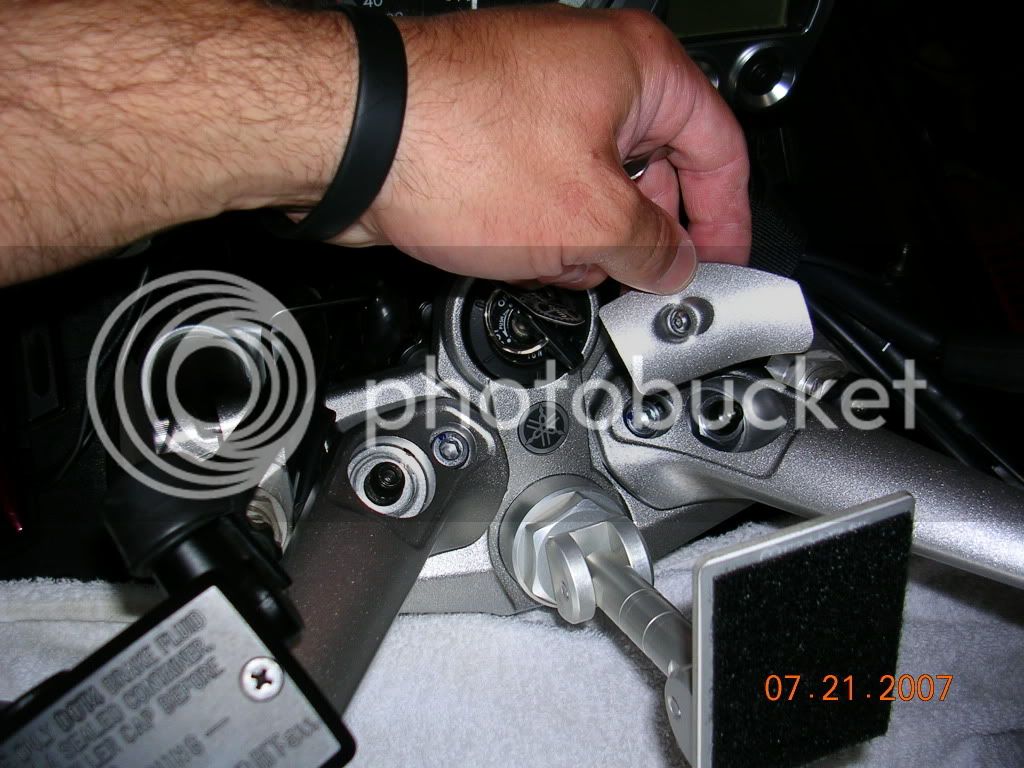
DSCN5247.jpg


SECOND REMOVE THE 6MM ALLEN BOLT AND 17MM NUT (If you are using a standard size socket you may need to have it only partially set in the extension at first to start removing it because of the threaded head that supports the handle bar cover.)
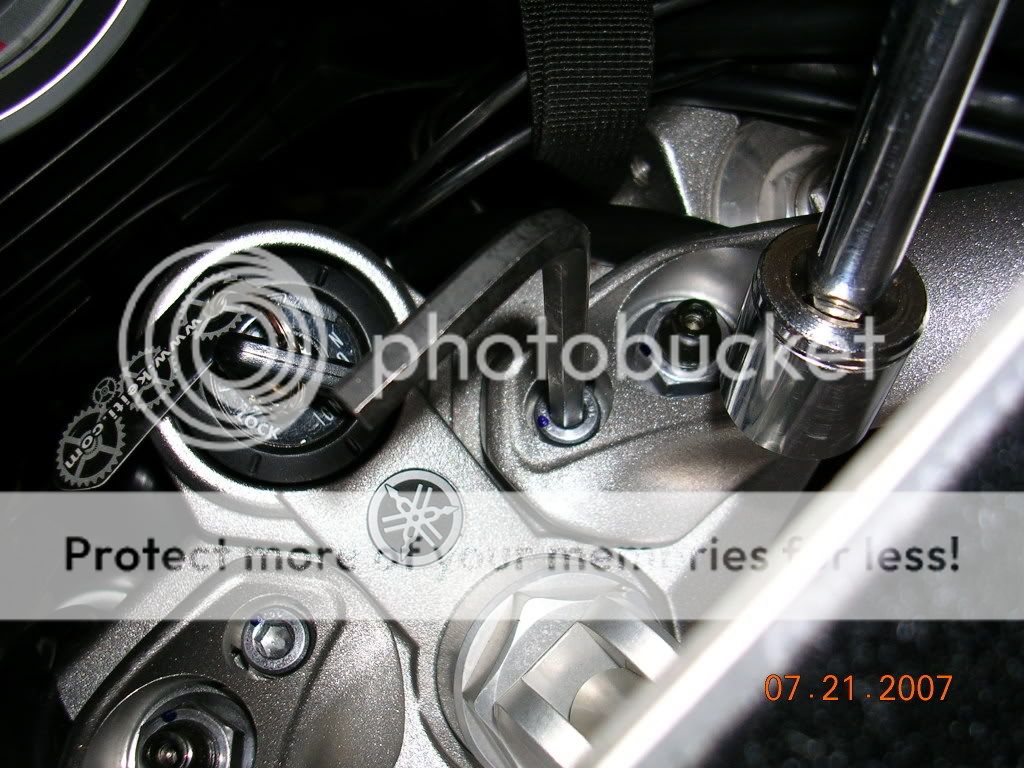
DSCN5248.jpg


DSCN5249.jpg


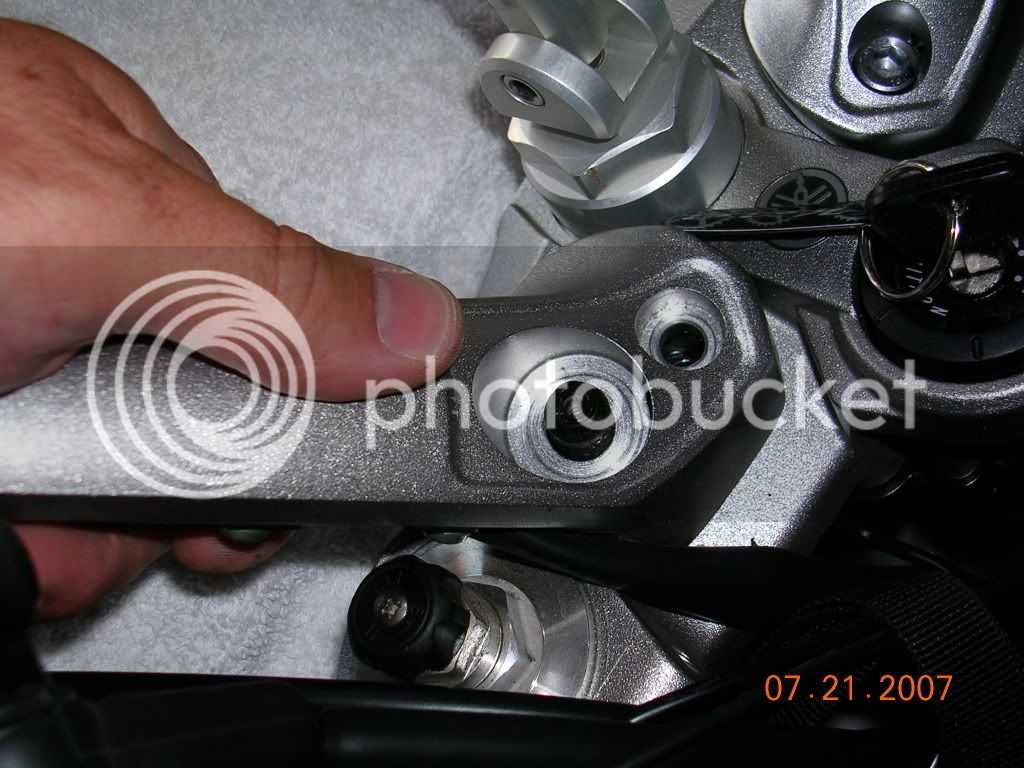
Notice the pins underneath the handle bar plate. LEAVE THEM ALONE THEY DO NOT GET REMOVED!!!!
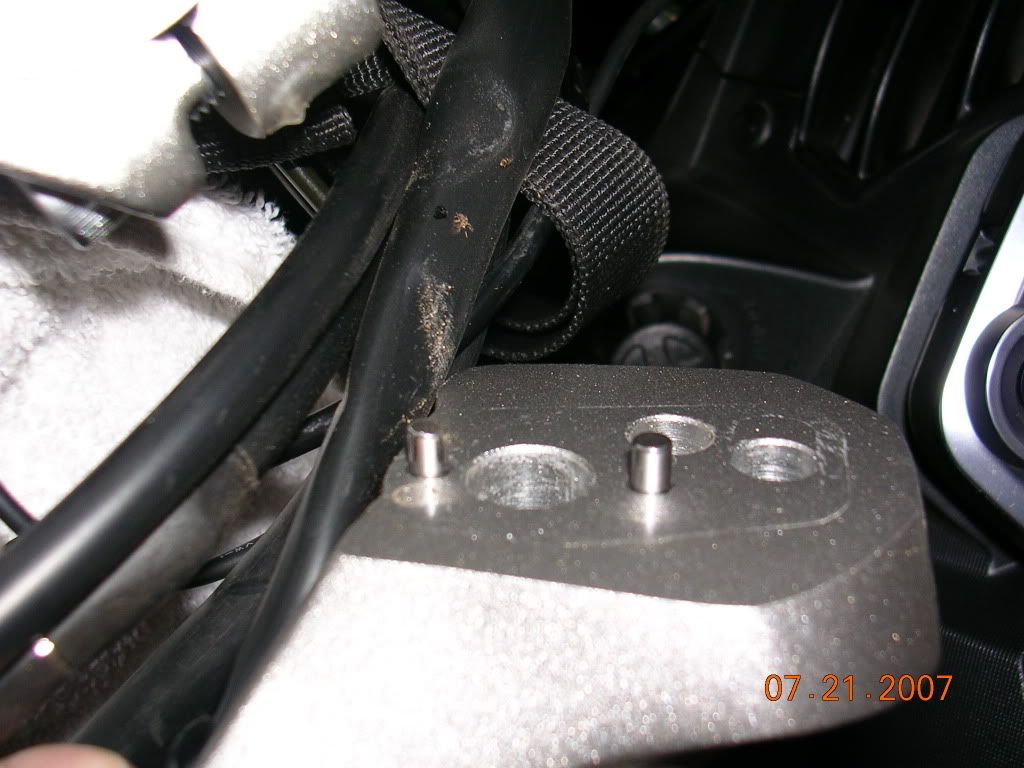
DSCN5250.jpg


Place the handle bar off on its side(on the towel)and secure it so it will not fall off the towel/bike.

Now take a look at what your dealing with:
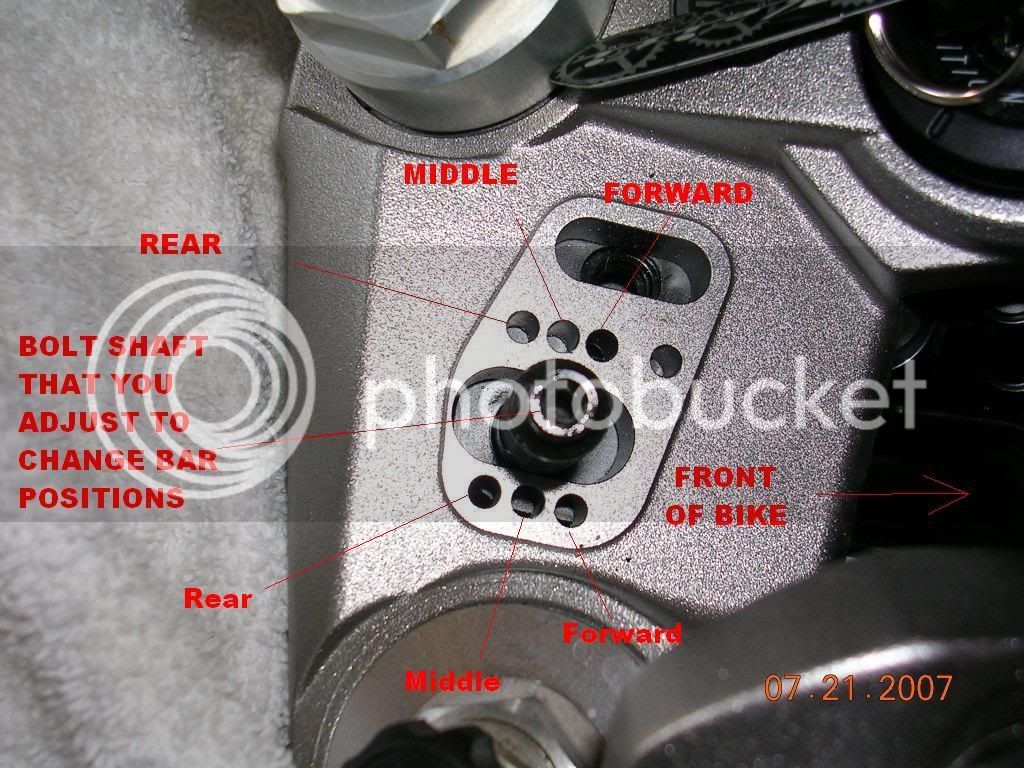
DSCN5251edit.jpg


THIRD, START PUSHING/PRYING THE SHAFT INTO THE POSITION YOU PREFER

(Forward, Middle , Rear; it should come stock in the middle position) UPDATE: When adjusting another fellow members bike, I

found that using the 6mm allen was much easier to pry with(and easier on the soft metal).

Note: I first used my hand to start moving the shaft forward and then assisted this by gently prying

the shaft into the forward position. Be careful not to mark up the soft aluminum when doing this.
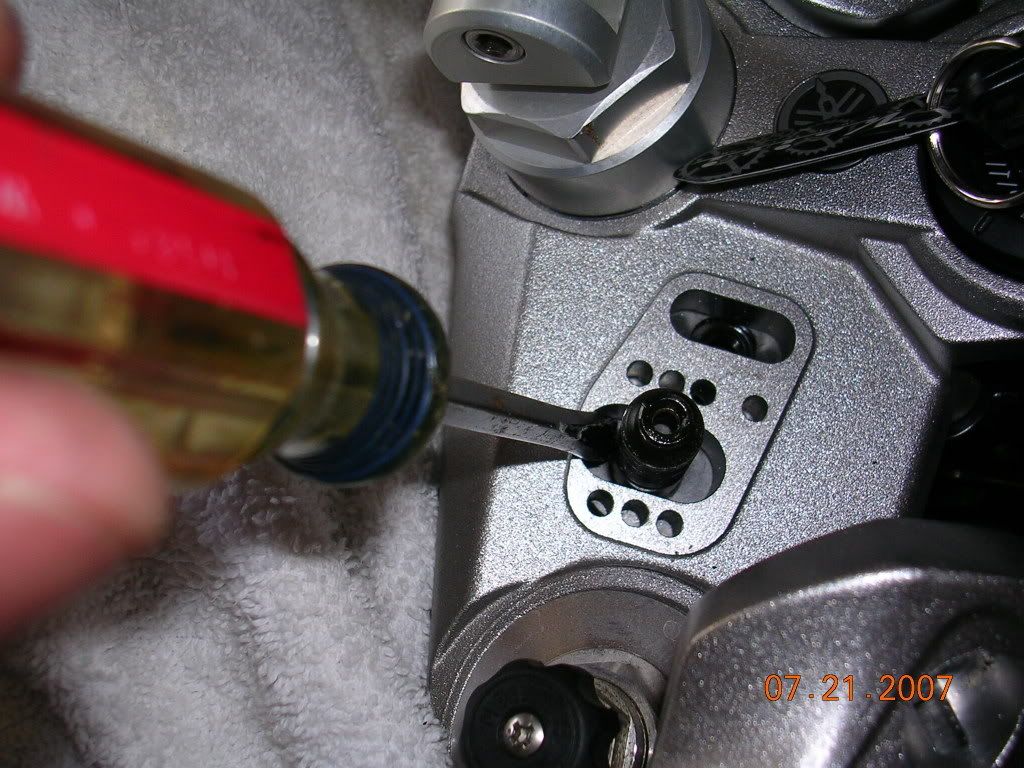
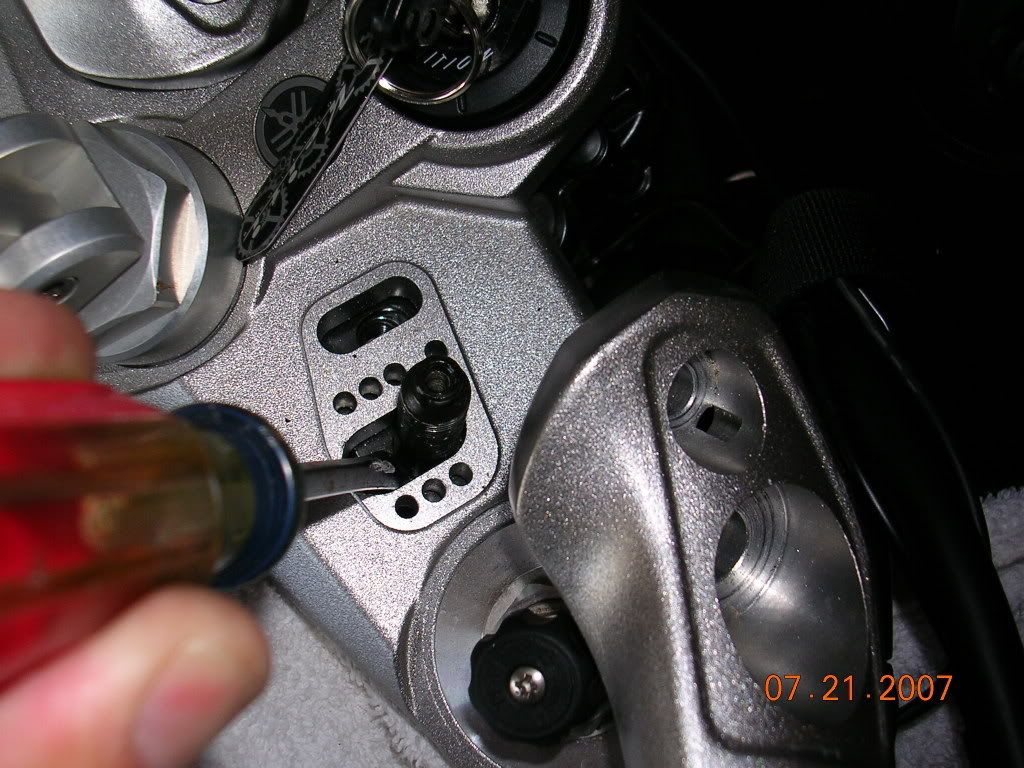
DSCN5252.jpg


DSCN5253.jpg


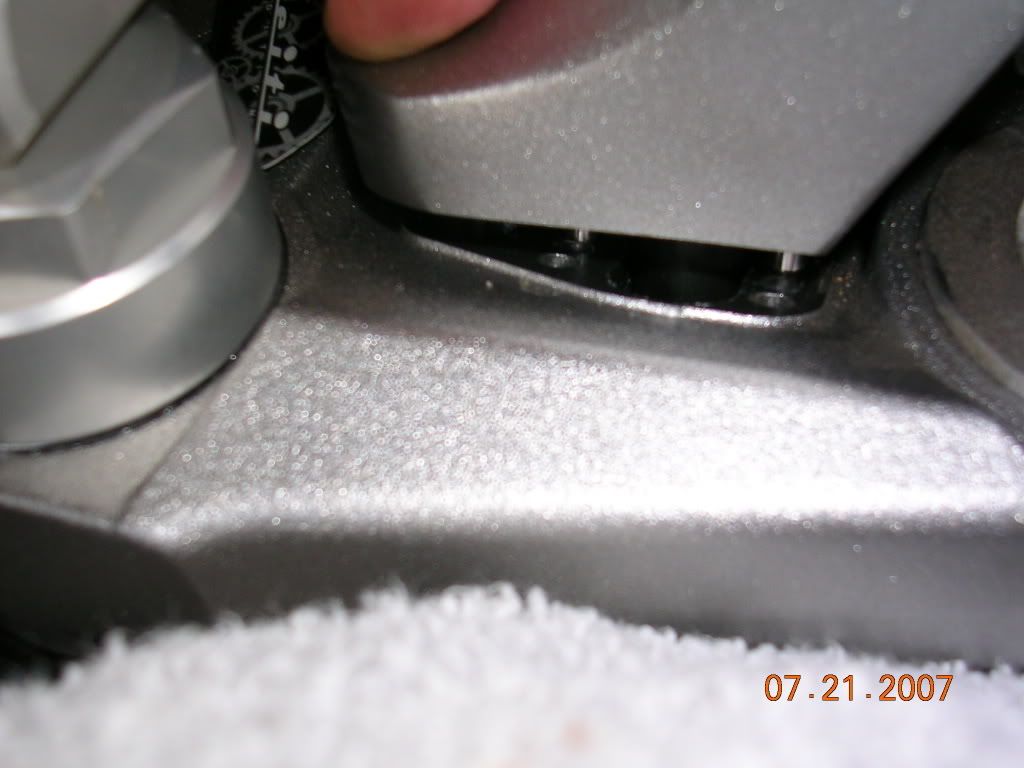
NOW POSITION THE HANDLE BAR BACK INTO PLACE AND DOUBLE CHECK THAT BOTH PINS

ARE IN THE CORRECT POSITION(Forward, middle, rear)
DSCN5254.jpg


Now tighten down the 6mm allen bolt and the 17mm nut.. Remember that you may have to slightly separate the

socket from the extension to get the 17mm secured tightly if you are using a short socket. Then re-secure the

handle bar caps with the 2.5mm allen bolt. I tightened the 17mm nut and 6mm allen bolt good and tight..The way it

felt when I loosened it up. They were pretty darn tight. The covers I snugged tight but did not go crazy on.

DSCN5247.jpg


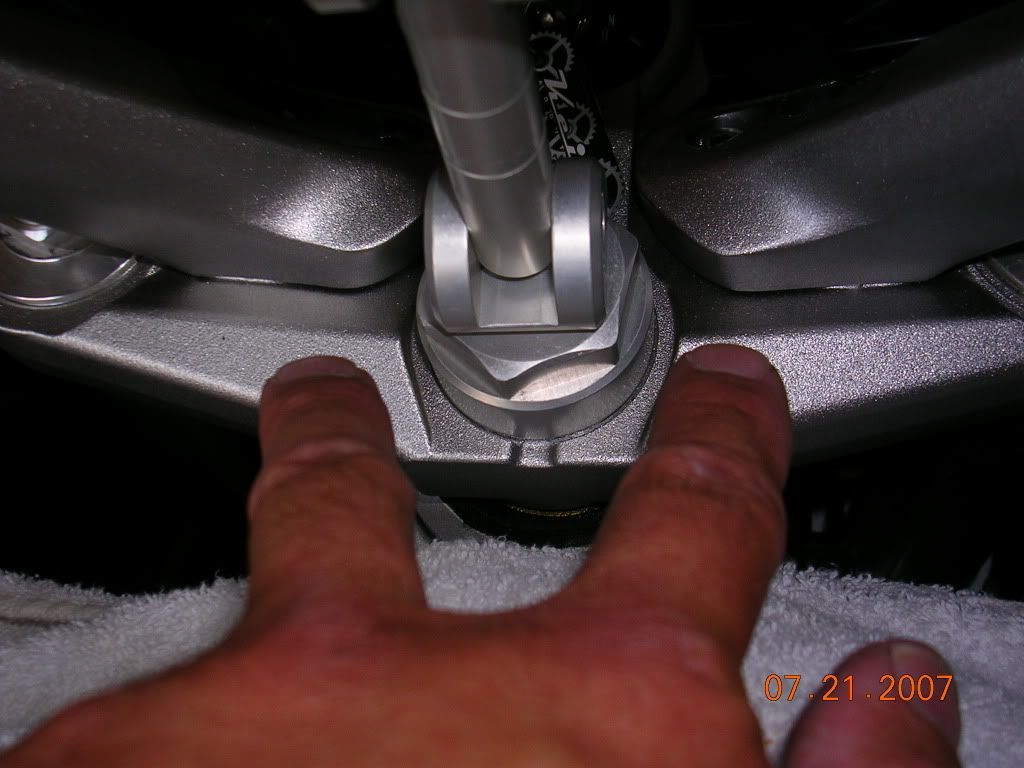
Now do the other side. After completed check them both to see that they have both been properly adjusted(even).
DSCN5255.jpg


DONE!!!

IMPORTANT DISCLAIMER: REMEMBER TO PUMP UP YOUR CLUTCH AND FRONT BRAKES GOOD AFTER THIS ADJUSTMENT.

WHEN THEY ARE TIPPED OVER THEY CAN LOSE SOME PRESSURE AND NEED TO BE PUMPED BACK UP. DO NOT JUST DRIVE OFF AND GO FOR A RIDE. YOU MAY NOT HAVE ENOUGH BRAKE PRESSURE OR CLUTCH PRESSURE TO OPERATE SAFELY!!!!

Hope this helps clear up and confusion about this adjustment. REMEMBER: THE PINS DO NOT GET REMOVED!!

WICKED WEBBY

:D

 
Last edited by a moderator:
Perhaps you'd like to edit your post to get rid of some additional misinformation.

Both handlebars need to be adjusted ( moved ) together, as a pair, at the same time.

The mounting bolts are attached to a plate beneath the triple clamp and are free to move easily

when all are loosened, no prying necessary.

If your only repositioning the bars it's not necessary to turn them upside-down

or even lift them off the studs.

Also, the pins need only be removed if you wish to change the angle of the bars,

not their front-to -rear position.

A search for both of these issues would turn up loads of feedback.

 
Excellent post. So no need to do both at the same time?

I'd just add one thing: I'd definitely get a helper to avoid laying down the bars. Reason they 'lost pressure' is because air got in the system. I'd bleed both the clutch and brakes myself to be perfectly safe, especially with the brakes, but if you feel them the same as before, guess you got lucky and all bubbles were purged.

Finally, would you mind giving us your opinion on how the bike feels in the forward position? I was thinking about doing the same thing, being used to a bit more forward riding position on my BMW. Again, great contribution buddy.

JC

 
Perhaps you'd like to edit your post to get rid of some additional misinformation.Both handlebars need to be adjusted ( moved ) together, as a pair, at the same time.

The mounting bolts are attached to a plate beneath the triple clamp and are free to move easily

when all are loosened, no prying necessary.

If your only repositioning the bars it's not necessary to turn them upside-down

or even lift them off the studs.

Also, the pins need only be removed if you wish to change the angle of the bars,

not their front-to -rear position.

A search for both of these issues would turn up loads of feedback.
Ok, cant find anything on search, but I take it you can adjust the bars both front to rear and the angle? From SLK50 post it seems you only have to remove the bolt and loosen the 6mm and readjust them. Now for the angle--how is that changed?

 
Perhaps you'd like to edit your post to get rid of some additional misinformation.Both handlebars need to be adjusted ( moved ) together, as a pair, at the same time.

The mounting bolts are attached to a plate beneath the triple clamp and are free to move easily

when all are loosened, no prying necessary.

If your only repositioning the bars it's not necessary to turn them upside-down

or even lift them off the studs.

Also, the pins need only be removed if you wish to change the angle of the bars,

not their front-to -rear position.

A search for both of these issues would turn up loads of feedback.


ACTUALLY SLK50 you are VERY VERY VERY WRONG.

The adjust-ability range of these bars is only as far as the connecting points(not pins!) allow(the 6mm allen and 17mm bolt shaft). No matter if you remove any pins or not. You cannot do the "DUAL adjustment" as you stated without lifting the pins out of their respective holes(Front, middle, rear positions) UNLESS YOU ALREADY REMOVED ONE. Also, the only part of the mounting plate that is "free to move easily" is the 6mm allen side of the connecting points! The 17mm shaft bolt is adjustable but requires steady pressure to re-align to the different positions. THE ONLY MISINFORMATION ON MY POST IS YOUR INCORRECT POST.

Rls,

The reason why the people that have removed any of the pins referred to it as "a hard task taking at least a half-hour and damaging tools" is because they were'nt designed to come out and/or be adjusted that way. The 6mm allen is free to move easily, BUT I wouldn't want my bars to be able to move/slide into a different position that easily by just releasing the pressure on a 6mm allen and the 17mm bolt shaft. They were'nt designed to be adjusted like that. Nor are they adjusted anymore because of the fact that they can only be adjusted within the range of the 6mm and 17mm bolt shaft. Here is what SLK50 is reffering to. This guy did not even address the adjustment of the shaft bolt because he did not know how to adjust the bars correctly. He just used logic to try and figure out how to change the bars and decided to pull pins. Decide for yourself:

https://chornbe.com/motorcycles/fjr/handlebarpins/

ELP JC,

Thanks for your info. I agree that I would of like a helper to avoid "pressure issues". It would be pretty hard to get any air in the lines below the master cylinder by this method UNLESS you were opening the master cylinder too(pulling lever). BUT it could happen, So good point. Normally the loss of pressure comes from the hose getting bent or slightly "kinked".

I do like the more forward position. It is not a drastic change BUT a change no less.

Wicked Webby

 
Last edited by a moderator:
I think you're reading more into my post than I wrote.

But I don't think I am "very very very wrong".

I speak only from my own personal experience. No "logic" involved.

I've done the handlebar adjustment four separate times on my own bike.

First, to relocate them to the rear position. Second, to remove the outboard pin in order

to change the grip angle. Third, to replace said pin and return to the stock grip angle.

And forth, to verify what I am about to say.

When both handlebar bolts and nuts are removed and both handlebars are lifted just

high enough to clear their pins, then both studs ( protruding from the upper triple clamp )

will move freely from front to rear without any prying or undue pressure.

The last thing I want is to sound like like some smart-ass know-it-all

posing as some sort of technical expert.

 
I think you're reading more into my post than I wrote.But I don't think I am "very very very wrong".

I speak only from my own personal experience. No "logic" involved.

I've done the handlebar adjustment four separate times on my own bike.

First, to relocate them to the rear position. Second, to remove the outboard pin in order

to change the grip angle. Third, to replace said pin and return to the stock grip angle.

And forth, to verify what I am about to say.

When both handlebar bolts and nuts are removed and both handlebars are lifted just

high enough to clear their pins, then both studs ( protruding from the upper triple clamp )

will move freely from front to rear without any prying or undue pressure.

The last thing I want is to sound like like some smart-ass know-it-all

posing as some sort of technical expert.


SLK50,

Are you saying when you had the pin removed you were able to change the "angle/position" of the bars greater than the 17mm bolt shaft and 6mm allen allowed?

Why did you return the second pin?

I wasn't speaking of your logic..the other thread poster logic I linked.

I started this thread so do-it-your selfs wouldn't have to mess with their bars 4 different times. I am glad you returned your pin though.

WW

 
Last edited by a moderator:
Hold on there bucco. Are you saying the bolt shaft can be adjusted and not just the angle of the bar? I'll have to take another look!

 
Ok Wicked, let's take this down a notch or two, shall we.

I want you take a moment and read this post carefully

and think about what I'm saying before you respond.

In your original post, well written and beautifully photographed I

might add, you clearly show a screwdriver "prying" on the

handlebar mounting "stud". Forget about the "pins" for moment,

they're for locating the handlebars and maintaining the same angle

between them and not the issue here. The reason you needed to"pry"

on the stud is because you chose to adjust your bars one side at a time.

The studs are indeed linked together below the triple clamp.

If you were to loosen both handle bars at the same time ( better yet

remove both screws and nuts ) then there would be no need to pry on the stud.

You still have to lift the bars enough to clear the pins ( mounted in the

bottom of the handle bars ) from the triple clamp. It is not necessary to

"remove" the rather permanently installed pins to reposition the handlebars.

I replaced my pins because I saw no benefit ( to me ) in being able to adjust

the angle of the bars and felt more confident with them in place.

I would have no trouble admitting I'm wrong but your original post ( and your

response ) simply does not jive with my own personal experience.

I sincerely hope the rest of your day goes well.

Regards.

 
Gentlemen - SLK50 and Wicked - I thank you both for your posts - and I think you are both correct. :blink:

Wicked - I agree with you about the good sense in leaving the pins as they are - and SLK, I agree that if you loosen both sides then the nuts move in the slot without the need to pry (because both are attached to a free-floating 'plate' underneath)

you're both right.

PS - once again, great write-up Wicked. :D

 
Ok Wicked, let's take this down a notch or two, shall we.I want you take a moment and read this post carefully

and think about what I'm saying before you respond.

In your original post, well written and beautifully photographed I

might add, you clearly show a screwdriver "prying" on the

handlebar mounting "stud". Forget about the "pins" for moment,

they're for locating the handlebars and maintaining the same angle

between them and not the issue here. The reason you needed to"pry"

on the stud is because you chose to adjust your bars one side at a time.

The studs are indeed linked together below the triple clamp.

If you were to loosen both handle bars at the same time ( better yet

remove both screws and nuts ) then there would be no need to pry on the stud.

You still have to lift the bars enough to clear the pins ( mounted in the

bottom of the handle bars ) from the triple clamp. It is not necessary to

"remove" the rather permanently installed pins to reposition the handlebars.

I replaced my pins because I saw no benefit ( to me ) in being able to adjust

the angle of the bars and felt more confident with them in place.

I would have no trouble admitting I'm wrong but your original post ( and your

response ) simply does not jive with my own personal experience.

I sincerely hope the rest of your day goes well.

Regards.

SLK50,

Ok. I am not sore at you(no more..hahahaha!!!). Communication is key. I do agree that you can prolly adjust the bars together at once BUT.. I did not want to tear up the soft metal pin holes that creates the seperate bar positions while attempting to do this blindly. I posted this instruction thread because a friend of mine, a YAMAHA Service Manager at my Local Dealership, was telling me how he recently had a 06 FJR in the shop with all six(3 on each side)adjustment points stripped out from forcing the adjustment points. I am not saying that is how yours are BUT I bet you will agree how easily they can strip if you cannot see what your doing. Also, he informed me that the adjustment of the bars was a, "dealer service only adjustment" and most people that tried to do this themselves were removing pins(incorrect method and according to him a safety issue) and/or doing what you just described(stripping method). I wanted to adjust my bars and couldn't find any info out there except for the "removing pins method." I asked him to give me the play by play. So, I decided to offer his dealerships method up to my fellow members.

Thanks for Input,

Good day to you too!

WW :)

P.S. Thanks Bull for your Comments. I hope it can offer some help to my fellow owners.

As we all know, there are many ways to skin a cat.

 
Last edited by a moderator:
[quote name='Wicked Webby'

P.S. Thanks Bull for your Comments. I hope it can offer some help to my fellow owners.

As we all know, there are many ways to skin a cat.

I think it's absolutley bloody fantastic when the good members of this site post up a techie-how-to-fix article. You have no idea how many times I've made adjustments to the FJR, making my move only after having researched posts like your own, prior to any hands-on exploring even beginning. Since this is my first FJR, the knowledge on this site is incredibly useful.

I tip my hat to all kind hearted posters - well I would if I were wearing one, and I'm not, but you know what I mean,

thanks again - Bull

 
Last edited by a moderator:
I'm with SLK50 on this one. I myself did remove the outer pin on each bar..which DOES allow the angle on the bar to be changed. I am aware of the potential safety issue, and after examining the forces at play here, am 100% confident that with one remaining pin, and the two bolts torqued properly, bar movement is only possible under impact.

Changing the angle of the bars so they "swept out" a bit more made a vast improvement in wrist comfort.( i was experiencing severe pain..)

The Shop manual, for those that actualy bother to get one, does say to adjust both bars at the same time. I have also done this (per the manual) and found it to be a reasonably quick and easy proceedure.

I do however appreciate having some good photos of the parts in question, and do thank WW for the time and trouble of posting them.

KM

 
This is an older thread, but I thought I would share my handlebar repositioning experience for the new guys. I wanted to move my bars back into the furthest rear postion.

I tried and failed twice earlier today...1st try full unbolt as described in the beginning of this thread, then a variation on that -only to have the sliding bolts "slide" back forward before I could get it tightened down. Frustrated! :angry: Removing the bolts completely made the whole apparatus too wiggly. Trying to get the 6mm back in was not working easily. So I gave up.

Then read tonight a suggestion to take a small mirror and flashllight and look at the bottom of the triple tree to see how it all fit together. When I did that, it all came clear! The sliding black plate that guides the bolts from the bottom, is connected to the black wire harness guides that are in front of the steering column. :eek:

I removed both of the small covers to expose the 17mm nut and 6mm hex bolt. Loosened them up on both handlebars...but did not remove them.

Then, on the left bar 1st, with the socket and allen wrench in place for minor adjusting, and kneeling on the left side of the bike, I lifted the bars just enough for a gap to appear & the pins to come into view. I set a flashlight on the tank to improve my view of the pins and could clearly see the pins and target holes. As I lifted the pins clear, I applied pressure TO THE WIRE HARNESS GUIDE - NOT THE HANDLEBARS OR BOLTS- on the side I was working on ....and the whole thing just slid back. I wiggled a little and loosend one of the bolts a little until the pins fell into the furthest rear holes. Then I tightened the 17mm & hex bolts just enough to hold it in place.

Repeat on other side...no problem. Then tightened both sides one final time and replace covers. Whole thing took 10 minutes. :yahoo:

The key that I found was the relationship of the wire harness guides to the sliding mechanism on the botom of the triple tree. The mirror & flashlight idea was invaluable. One important note. Be very careful with the wires that are on the starboard side handlebar. They come really close to the connection point and if you are careless, you could pinch it in that connection point and mess something up.

Good Luck! :D

 
Last edited by a moderator:

Latest posts

Top