We users have not-so-affectionately renamed this application Mapsucks because it's just plain awful software. It's clumsy, tedious, slow, obnoxious, useless, and annoying. Worth every penny of its price, though, and the only way to reliably get data into your Garmin GPS device and have it look the way you expect it to look.
For reference, I have version 6.14.1. The current version is 6.15.6, which I've not downloaded yet.
When you start the program you see this:
Most of what you see will be as you left it when you last exited the program. The area in view, the tool in use, the detail level, etc. It comes up where you left it last.
Looking at the tool bar at the top, you see a couple of zoom buttons, a zoom scale pull-down, and a detail selector. Then transfer buttons, to or from your GPS device. Finally the tools. Maps, zoom, move, waypoint, route, select, and measure. To do
anything, you have to have the right tool. You can't move the map with the zoom tool, you can't drop a waypoint with the route tool, you can't zoom with the waypoint tool. That actually sounds reasonable when you put it that way, but as you'll see in other programs, it's not.
To make a route you can either use the route tool and just click along a series of points, or create a list of waypoints and add those to a route. The route tool sounds easier, but on a map of any useful scale you won't be able to place your points accurately. You can place them generally and then zoom in on them to refine their position, but your route may change severely when the waypoint moves. So I'll just drop a series of waypoints. I'll start with a gas station near my home, which I would use for the initial fill-up of my fictitious IBA ride. It's at the intersection of Jenks Avenue and highway 390, so I'll find that. Select Find on the menu, pick Find Places, then pick the Intersections tab. You fill it in to get something like this:
You click Find, it gives you a list of possibilities (in this case just one, and it's
correct) and you click Make Waypoint. Then you get a dialog about the waypoint's name and whatnot, and you can OK that.
Stepping aside for a moment, pray that you do not need to find an actual street address. The dialog for an address, which every other application I will use in this "review" can do on a single line, breaks the data into at least four, probably 5 fields. For example, my office is at 421 Oak Avenue here in Panama City. On any of the other programs I can find it with "421 Oak, 32401" and be done. In Mapsource, you put 421 in the street number field, get Oak Ave by clicking the Select button by street, entering Oak, and picking Oak Ave from the list of up to 100 "Oaks" that comes up, then entering Panama City in the City field, Florida in the State field, and if needed, 32401 in the Zip field. Then you click Find and a list (usually the one item you wanted) comes up. Pick it and be happy. Back to our routing problem.
Repeat the find for the destination, a gas station at Richmond Highway and Backlick Road in Ft. Belvoir, Virginia. Once that is set, then go to the Edit menu, New Route, and add the two waypoints. You get this route:
Perfectly useful, yet short of my 1500-mile requirement. Gotta make it longer, and what better way than to start out in entirely the opposite direction? So lets go towards New Orleans, cut north along the Mississippi river all the way to St. Louis, then head East.
I'll be picking Waypoints by clicking the map with the waypoint tool, then adding those to the route. We should talk about how the tools actually work, I suppose.
The Map tool is used to select an area of the map which will be downloaded into your GPS device as a detail map. Older Garmin devices like my 2610 do not have the whole country preloaded in ROM at street level, just major highways. You want streets and addresses and POIs, you have to load the detail maps, which take up memory, so you only load the ones you'll be using. Turns out my 128-meg card won't hold the maps for even this trip, so I have to cancel. Or get another CF card. Detail maps are selected by clicking the parts of the country you need. They range in size from whole states to two or three per state, and take up a few megabytes of GPS memory each. The region turns pink when you select it, and when you transfer data to the device, you want to have the Maps checkbox selected.
The Zoom tool is easy. Just draw a box on the map and the region in the box zooms to fill the screen. To zoom out with the tool, use the right-button and drag the tool around. It'll do something, you just get no indication on the display what it will do; generally it zooms out a little bit. Best way to zoom out is to use the pull-down selector at the left of the toolbar.
The Hand tool is used to drag the map around to move your view. You can also use the mini-map to move the map around, and you can even use that no matter which tool is selected. How modern! Except the main map doesn't actually move until you finish with the mini-map, so maybe you got in the right place, maybe not.
The Waypoint tool (the little flag) is used to drop waypoints on the map graphically. Select the tool, click the map, name the waypoint. Couldn't be easier. Well, it could, if you could move the map or change the zoom while on the map, but you can't, you have to change tools. So putting a series of waypoints down across any distance means switching between zoom, hand, and waypoint tools.
The Route tool is used to try to click a route directly on the map. You click a point and it drops a point just like a waypoint, and starts a route. The next point you click is the next point of the route, until you get them all in. You can switch tools to get elsewhere on the map and when you reselect the route tool it picks up where you left off, but just dropping waypoints and then routing them as a list is easier. If you do use the route tool, hit escape after dropping the last point to complete the route. If you hit escape accidentally and need to continue, you can use the route tool and pick up at the last point, but it's a new route, not a continuation of the previous route. To continue the route, you have to click the last point with the
select tool, which then changes to the route tool, and you can continue. And if you expected the points you selected while using the route tool to be in your waypoints list, they're not there. They are via points on the route, and look like waypoints on the map, btu do not show in the waypoints list.
The Select tool is used to select an item on the map, usually a waypoint or route. You can right-click a map feature and get a pop-up menu which will allow you to drop a waypoint or start a route. Usually I use the Select tool select something I'm trying to delete.
The last tool is the Measuring tool. Select it and click points around the map, a series of lines appears as you click, and information about the distance covered and are contained is shown at the bottom of the screen.
Back to dropping waypoints for my route. I'll put one where I-55 crosses I-12 in Louisiana. Let's put another one along I-64 way up in Illinois. I'll put one more in Pennsylvania on I-79. Then I'll add those to the route by getting Route properties and using the insert waypoints button. The displayed route changes to a series of straight lines between waypoints until you hit Recalculate or OK. The screen looks like this:
The resulting route is exactly what I want (because I've been practicing and I knew exactly where to put the waypoints) with a couple of exceptions. It's about 200 miles too long, and I want to use I-470 to bypass "downtown" Wheeling, WV. I'll just drop a new waypoint at Hwy 90 and Hwy 98 in Spanish Fort, Alabama, and use that as my start. A simple edit of the route properties, delete the first waypoint, insert the new first waypont, and click OK.
I'm going to do what they said can't be done to move the route onto I-470. It turns out in newer Mapsource versions that you
can click the route and drag it to move the calculated route. Zoom in on the area around Wheeling, and use the select tool to click somewhere on the route along I-70. It doesn't always work, but when it does, you get the straight black lines leading to the adjacent routing points, and you can drop the point anywhere you like and the route recalculates. Here's screen shots:
Now the route is pretty much exactly where I want it, and it's a good length, at 1577 miles. I have no idea how long it's going to take to ride it, because Mapsource doesn't provide any scheduling information, time per distance, or anything like that.
A couple of other picks at the program. As you zoom, the detail doesn't necessarily stay at an appropriate level. You
cannot get minor streets until you are down at the 1 mile scale, and then only if you've selected Highest for your detail level. But zoom out to say, the 20-mile level and leave detail at highest, and you might see something like this:
Where's the freaking roads in that? Overwhelming amount of useless information at that level. Pick medium for detail to clear it up. But remember to go back higher when you zoom in so you get all your streets.
Another pick is the availability of printed information. There is none. It will print the map displayed on the screen. As is. Nothing else. Oh, wait. If you highlight a route, get Route Properties, and pick the Directions tab, there is a Print Directions button there. Strangely enough, that printout includes time information, for length of legs and for total trip time, but I do not know how to adjust the speed factors used to calculate those.
Last pick at the program is its performance. Many times when you make a menu selection, change the detail level, move the map, etc. it may be 5, 10, 15 seconds or so before the display catches up to you and you can move along with what you were doing.
One new feature that I think started with this version is the ability to send the route to Google Earth as an overlay. Here's this route, and zoomed in to the Memphis area:
Finally, to get your waypoints, routes, and maps into the GPS device you use the Transfer menu. You can send to the device or retrieve from it. You get a dialog that look like the following, and for once with this program the process is clear and straightforward.
Next post, Delorme Street Atlas.
(Edit: Forum software combined my 3 posts into one. No big deal.)
This is Delorme Street Atlas 2009. I'll say at the start that this is my favorite of the packages, probably because I've been using Street Atlas for automotive mapping and GPS navigation since the 2004 version. The package includes software for your Palm or Pocket PC/Windows Mobile device, and data from the laptop can be downloaded to the mobile device. I have a bluetooth GPS receiver that Street Atlas can talk to, either from the laptop or from the mobile device. It also recognizes the GPS built into my HTC phone. Street Atlas also exports .GPX files, so I do all my routing in Street Atlas, save the gpx and use Mapsource to get it into the Street Pilot.
When Street Atlas starts up you see a screen like this:
I happen to have mine starting on my hometown. The screen is laid out with a minimum of interference with the actual map display. The map display remains the major portion of the screen unless you choose to enlarge the tabbed area at the bottom. The program never covers the map itself.
At the top is a toolbar for instant access to common functions such as setting start and end route points, stops and vias, turning the GPS interface on and off, and transfering data. The bottom is a series of tabs for different tasks such as searching, routing, and printing. At the right is a set of buttons which can be used to change the zoom scale or pan the map, and even change its orientation to any arbitrary rotation.
The main area is of course, the map. Your cursor serves as a locator, a selector, a zoom tool and a pan tool. Also, the bottom line of the map area describes whatever's under the cursor in real time, city, street name, zip code, route, etc.
Clicking on the map centers the map at that point.
Dragging down and right draws a box to zoom the map in. Dragging up and left draws a scale to pick a zoom out level. Zoom levels are 2 (the entire continental US and much of both oceans) to 16 (about 400 feet covers the screen.) The current zoom scale is shown at the top right, above the zoom and pan buttons. The arrows next to the zoom display can select any of 8 sub-levels within each zoom level, so 5-1 through 5-7 lie between 5 and 6.
Moving the pointer to the edge of the map changes it to a hand so you can drag the map from that edge. Thus you have zooming and positioning without changing tools. Very nice.
You can right-click any point on the map to get a pop-up menu from which you can get information on nearby POIs, perform routing operations such as dropping a start point, via, or end point, or get information about the point, such as what town, county, and state it's in along with its zip code. Still no need to change tools.
Very nice!
Let's start the route. Pretending I don't know from the above post that starting in Panama City will be too long, I'll set my start point at the intersections of Jenks Avenue and Hwy 390. Unfortunatly, Street Atlas will not search for an intersection, just an address, but since it's right down the street I know where it is, I'll right-click it, select Create Route, and Set as Start. Now zoom out, move to Virginia, zoom in on the target, and create a finish point. Initial route looks like this:

Well, again, too short, so let's add the points to move the route. Street Atlas calls them vias, and if you insert them with the via tool, it automatically keeps them in a logical order, not just the order you click them. There is an easy way to reorder them if need be, and we'll see that later. Anyway, zoom in on I-55 and I-12, pick the white button at the top, click it on the ramp I'll use to get onto I-55, then click the white button again to turn it off. Note that this is the first time I've actually changed tools to perform a task. I could have just as easily right-clicked the ramp and dropped a via from the pop-up without changing tools. I'll do that for the rest of the vias, but the button is useful for a series of vias in an area that of the map that doesn't require the map to be moved around or zoomed.
EDIT: Added 5-8-10
You could also add Stops rather than Vias. A Stop is the same thing as far as the route is concerned, except you can set a delay period for the stop, and specify it as end-of-day, fuel, or simply assign a time period to it. End-of-day and Fuel can coincide on a stop. By setting a fuel stop, the fuel prefs set in the route preferences (shown later) will be reset to full, and the range calculated from here. An end-of-day stop stops the schedule in the reports until the start-of-day time set in your route preferences. By simply setting a duration, with or without fuel, you're adjusting the schedule for subsequent stops or vias. So basically a Stop is a Via with duration, so the schedule reflects the stopped time. When exported to a GPX file there is no difference, they both export as route points, using the rtept designation in the GPX file. Route points imported from a GPX file become Stops in Street Atlas.
After all the vias, the almost finished route is shown here:
To fix the length, I'll set a new start point to Spanish Fort, AL, and I'll move the finish point to a slightly more convenient gas station. All I have to do is drop new points. Street Atlas knows that a new finish point means to move the end of the route, and when I drop a new start point it asks if I want to move the start point or start a new route. I pick move for this.
I can get a directions window at the bottom by clicking the Route tab, then the Directions button at the bottom left. The directions window has columns for turn time and distance (from the last turn,) instructions, what road you're going on to, exit number if appropriate,and times and mileage from both the finish and the start. Looks like:
Times are calculated from preferences you enter. You set your average speed by road type. You can also set road types to Preferred, Standard, or Avoid, so you can route without tolls when possible.
You can also set travel time per day and fuel mileage and cost. The route will show a "B" icon for recommended fuel breaks, and a moon icon for end-of-day based on these.
Now that my route is finished I can get some printouts to carry with me. Street Atlas does not present the standard Windows print dialog, but instead makes you use the Print Setup button first if you need to select a printer or set its properties. The print button goes directly to output. Pick the print tab at the bottom, then the route button at the bottom left. When you pick the print button, you have many choices. You can print an overview map, a directions list, a set of strip maps, a turn-by-turn view, or a "travel package." The screen looks like:

Overview map and directions are obvious what they print. Street Atlas USA highlights every other line of directions with a gray box which makes for good readability, easier to keep your place on the page. The turn-by-turn report shows each turn on a mini-map so you can see your path through the ramps. The strip map is a map of sections of the route, with selectable lengths from a few miles to several hundred miles per page. It prints the route vertically (not North up) and directions to the side, with lines connecting the directions to the map point they occur. Pretty nice. The best report is the travel package, though. This is again selectable for miles per page. It prints a large North-up overview at the top of the page with directions that occur on that page listed at the bottom. This layout is absolutely
perfect for tank bag map windows. Here are half-size samples of the printouts:
If I had a need to re-order my vias, I would select the Route tab at the bottom, then the Advanced button at the left. You then see a list of vias in the route, and you can highlight one, move it up or down or delete it. (You can also delete a via from the map by right-clicking it and using the popup menu.) If you insert a via from this screen, it goes after the currently highlighted via rather than being auto-ordered, so if you need to go to New Orleans then Jacksonville and then Memphis, it's easily done. Screen looks like:
Edit: added 5-8-10
You can save the route for later retrieval. Click the Route tab, then the New/Edit button to see the File button. Click File and a pop-up displays, where you can pick Save.
This is a good time to discuss the two file models Street Atlas uses. Out of the box it is in "Simplified" mode, and only one route and one draw layer can be open at a time. On the Options tool at the top you can pick Change file management and go to "Advanced" mode, which allows the display of multiple routes and draw layers simultaneously.
We know what a route is, we've been building one. When you save the route, you make a file which contains the route information, and nothing else. It's not the same as saving the "current file" in Mapsource, or as we'll see later, Streets & Trips. Saving a route saves only the current route, not the others on the screen. Each route file contains only one route, and each route lives in its own file. You can open the route file later using Import on the File button. You can import multiple routes (or GPX files) and they will all be on the screen, but all except the current route will be "ghosted" as seen here:
So what is a draw layer? A draw layer can contain any number of objects such as text flags, routable roads (you can add roads not yet in Delorme's maps,) symbols, and waypoints. Waypoints added to a draw layer can be exported as a GPX file, separately from the route, and the GPX file will import into Mapsource as a list of waypoints. They have the
wpt designation in the GPX file. In the Advanced file management mode, you can have multiple such layers displayed at any time. Only one layer is active, and new waypoints drawn will be added to that layer. Inactive layers are not ghosted as inactive routes are. Waypoint and Draw layers can be turned on and off for clarity, if needed.
To add waypoints (as opposed to routepoints) you need to go to the Draw tab and click the File button to get another dialog at the bottom. On there click New, and pick Waypoint.
Then click Done, and you return to the normal Draw tab buttons. The top right button in the Tools box is Waypoints. Click it and the cursor pointer changes. Click on the map to drop and label a waypoint. When a set is created click the File button on the Draw tab, then click Export, pick GPX as the type, and you get the waypoints on that layer in a GPX file. Here's a small set of nearby waypoints:
Creating the waypoint GPX file is a separate step from creating the route GPX file. Street Atlas will not do them as a single export. A waypoint layer can be imported as well, by importing a GPX file which contains waypoints using the import button on the draw menu. The default icon for a waypoint is a red flag, but many different symbols are available. The current symbol is used for an import.
Now to get my route into my Street Pilot. The file export is on the Route tab, and the New/Edit button. I name the route in the field by the file button, then use the file button to pick Export. GPX files is one of the available types, so I use that.
Street Atlas can also download directly to an attached Garmin device, but it has severe limitations in doing so. A large route may not fit, as Street Atlas uses about a quadrillion points to identify the route, sends the route as that points list, and your Street Pilot runs out of memory and the route gets truncated. For a short route, it works well, although you have to recalc the route in the device once it's there.
Now that I have a GPX file I load it up into Mapsource. It shows as a set of straight lines, so I just recalc the route in Mapsource:
Now it's just a simple matter of using the Transfer menu to send it to my Street Pilot.
Street Atlas USA is about 40 bucks, and registered users can upgrade for a discounted price each year. I usually do every other year's package.
Microsoft Streets and Trips is next. This is S&T 2010 I'm using. This is a really really nice program, rather easy to use, makes nice maps and routes, but before the 2010 version it didn't play well with others. It uses its own file formats and was not capable of importing or exporting from other programs. Fortunately there are free utilities out there to handle that part. You can use GPS Utility, avaliable for download from their page
here. Starting with 2010, though, you can now import and export GPX files directly using the Data menu.
Startup screen looks like this:
You have the map view as the main area, Legends and Overview to the left, and toolbars and menus at the top. That's how it
always starts, and it's the view if you pick File, New on the menu, but starting with 2010 you can change the default start. On the Tools, Options dialog you can specify to save the current view on exit, or save the current view as the default at any time. I have Large buttons unchecked on the View, Toolbars menu.
The cursor can be a pointer which can select items on the map. Hold the left mouse button and move to drag the map around. Hold the right button and draw a box, then click in that box to zoom. Finally, no tool switching, starting with 2009! (2008 had separate tools for panning and for zooming. Not as messy as MapSource by any means, but still less convenient that Street Atlas.) You can also click on the sliding scale in the toolbar to zoom. You can right-click a point on the map and use the pop-up menu to zoom or drop a route point as well. You can also pan the map by moving the cursor to the edge, where it turns to an arrow. Holding the mouse button then moves the map in the general direction of the arrow.
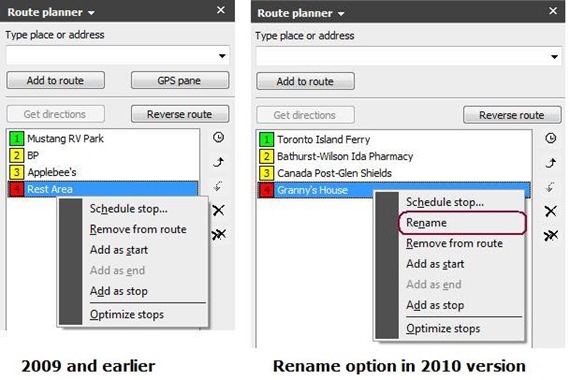
Set the start point to the same intersection used before, Jenks and 390 in Panama city. You can use the Route Planner to find the street, or right-click the intersection and use the popup menu. The point's name will default to the address or whatever feature may have been found nearby. Before S&T2010, that's what you lived with.
Now you can right-click the point in the route planner or on the map and pick Rename. Oddly, Rename is not on the popup if you right-click the point on the map, nor is there a button for it in the route planner window. All the other functions are on both popups and have buttons.
After setting the end point in Fort Belvoir, click the Get Directions button and you get an initial route like this:
Unlike Street Atlas USA, Streets and Trips shrinks the map to give you the new information, the directions list. I'm not real fond of that myself, and consider it a misuse of screen real estate. Usually I click the X to close the Directions window whenever it comes up. You have to ask for it though to get the route to calculate. Before you close it, look for a prompt that your construction information is out of date. Click that prompt if it's there. Up-to-date construction information shows on your route as a red area, as seen here just south of Atlanta. The directions list will show you the scheduled dates of that road work.
Also unlike Street Atlas USA, Street and Trips lets you grab the route line and move it to change the route, rather than adding via points. Personally I see little difference in the processes, and I still think Street Atlas is a bit easier. Drop a via where you need it and the route comes to it. Either is much better than Mapsource's way of dropping a waypoint then manually adding it to the route, or trying to get the select tool to click the route and become a route tool that you can drop a new via point with. Anyway, grab a point on the route (the pointer turns to a hand when it's ready) and drag it up to I-71 somewhere in northern Kentucky. You can barely see the line shown in the screen shot:

You can also drop a point anywhere on the map and it will become a point on the route. Streets & Trips call them Stops. Find the place on the map where you want the route piont, right-click, pick Route, Add as stop. It inserts it in a logical point in the sequence, as Street Atlas did when dropping a Via point, and you can use the Route Planner window to rearrange if desired.
One feature Streets & Trips has that the others don't is that button at the bottom of the Route Planner, Optimize Route. That takes the stops and figures out the best sequence in which to visit them. That lets you play scattergun with your desired route points without trying to figure the best way yourself. In a separate exercise of curiosity I dropped 48 stops, one for each state's capitol building in the continental US, then put my start and end points at that gas station near my house. As I dropped the points it tried very hard to keep them in a good order, and I did better than that by several hundred miles with a little manual sequencing. The Optimize button cut it by another 400 hundred miles from my best effort, and made
much better use of the Interstate system for routing than I had. Took it almost 4 hours to calculate, though! For the curious, starting here in Panama City I would travel 13,349 miles over 7 days, 10 hours of riding time (that's time on the bike, not counting resting, eating, sleeping, etc.) to visit all 48 capitols. But if I had a month to kill and an unlimited food/fuel budget, there's other things I'd want to travel to see . . . .
Anyway, back to
this trip. I dropped a point on the ramp from I-10 West to I-55 North in Louisiana. That moved the route over and added some miles, but I see that if I stay on I-55 out of Memphis instead of cutting east on I-40, I can add Arkansas, Missouri, Illinois, and Indiana to my ghey states map with a very small difference in the route mileage. So here I'm zoomed in on I-57 and I-64 to mark the ramp as a stop.

A couple more of those to get the same route we had before, and we see (again) that the route is too long. Move the start point by clicking on it with the pointer and you can drag it over to US 90 and 98 near the Spanish Fort exit of I-10 on Mobile Bay. Or just zoom in on the location and drop a start point. The new start point is put on the beginning of the route, but the old start point becomes the first stop point; you have to remove it. Get Directions to force a recalc and we have what we want. Save it and get some printouts. We can print an overview, directions, strip maps, and turn by turns. The strip maps are very much like what Street Atlas USA calls travel guides, but Streets and Trips seems to leave a little more white space on the pages. Like Street Atlas you can select the miles per page for these.
Some samples of the printouts:
Now for the new feature of 2010 we've all been waiting for: GPX export. Click the Data menu and pick Export to GPX file. Give it a name and save it. Done!
The process at this point is just like Street Atlas: open the GPX in Mapsource, recalculate to turn the straight lines into a route, and upload into your GPS receiver. With some receivers all you need to do is copy the GPX file to its memory card and find it in the receiver's menu.
If you don't have 2010 yet, you do it the old-fashioned way: I used GPS Utility and opened the S&T .est file, and got a simple list of waypoints like this:
Connect your GPS to the PC, and once you've configured your GPS device in GPS Utility, all you have to do is Upload All, and the waypoints and route dump into the GPS. You select and activate the route, and you'll need to recalculate in the device. As mentioned before, you may get a slightly altered route, so more waypoints will keep it closer to what you intended. My example only has a few waypoints so I didn't encounter this, and I don't use Streets & Trips for my actual personal routing (preferring Street Atlas) but I've been informed that the GPS Utility has a limit of 10 waypoints in the unregistered version. Registration is 60 bucks, so you'd do better to get the current Streets & Trips.
One more item worth mentioning: Streets & Trips will not show multiple routes simultaneously. Any map file only holds one route, and all points defined as stops are part of that route. When you export a GPX file they go in as routepoints, using the
rtept gpx command. For points Garmin treats as waypoints you can add pushpins. You can't right-click a point on the map to create a pushpin, you have to use the pushpin tool on the button bar. There are hundreds of icons and colors to choose from for pushpins. Pushpins go into a GPX file as waypoints, using the
wpt gpx command. In Street & Trips, pushpins are exactly the same thing as waypoints in Mapsource.
Yet they are so much more! For those of you that want to keep sets of data, pushpins are now your very best friend. Pushpins belong to sets. A pushpin set can be created by importing data from an application such as Excel, from a mapsource GPX file containing waypoints, or by selecting a pushpin, getting its properties, and putting in a new pushpin set. Pushpins can have labels that show as a dialog arrow, and the labels can be hidden to get them out of the way. Individual pushpins, or entire pushpin sets, can be hidden. Hidden pushpins are not exported in a GPX file. Finally, pushpins can contain hyperlinks to external data. Pushpins, or sets of pushpins, can be added to the route as stops. Data formats supported for import include GPX, Excel, Access, and Outlook Contacts.
Street and Trips is about 40 dollars. There doesn't appear to be a discounted upgrade path from older versions that I've been able to find.