Gas Cap Modification

Yamaha FJR Motorcycle Forum

Help Support Yamaha FJR Motorcycle Forum:

This site may earn a commission from merchant affiliate links, including eBay, Amazon, and others.
Since the Tanji is low lying cell, maybe back flow could be a bigger issue in this situation?
Indeed the lower position probably makes it back-flow the easiest, although Mcavan, Sampson, and Jaz cells all do the same thing.

In a nutshell, the stock tank/ cap configuration allows an absurd amount of pressure to build up. Unless you ride only at night in the cold, at some point we'll all see difficulties.

For you folks with higher ( CG ) mounted cells, I'd recommend a check valve somewhere between the cell and tank. I'm pretty sure the Tanji cell couldn't over come the valve once the fuel was level in both tanks.

GZ

 
I just had the above noted problem happen on my '03. It's the first time in 100,000 Km's. I too have an aux tank and at first couldn't see any connection that the aux tank may have with the problem, however, I do have a theory.

The odd time, I may have opened the aux tank to refill the main when the main wasn't quite ready to be refilled. The aux tank may have then overfilled the main. The excess gas having then gone out the vent. Some of the excess gas may have varnished up the vent and ball causing it to stick.

Just my theory.

 
Well I had my charcoal canister plug up on the way to WFO 5 and destroyed the orange grommet trying to unplug the vent before I discovered it was the canister and this year on the way home from WFO 6 I had my cap plug up and I had to ride the whole way home with my gas cap open! I'm thinking of changing my fuel cap to one of these: https://www.terrapowersports.com/product.as...1&bmode=cat

Yes I know someone could walk up and open it but that can be done now with my fuel cell, any other thoughts?

 
When I first installed my aux tank (Tanji) I would open the aux tank after the fuel gauge went down a couple bars. Over the next 60 miles the gauge would slowly go back up to full then start to go down again. All normal. In the last year or so it hasn't been doing that. Only once coming back from the west coast last year did the gauge go back up to full after opening the aux. Mostly it stays at two bars down for a bit then after it reaches three bars it stays there for a couple hundred miles then starts down again.

I've had intermittent problems with the main tank pressurizing since August. Every time it was rather warm and at high altitude. The first was in Casper, Wy coming back from WFO-6 & WeSTOC. I had parked the bike at the Motel 6 and was unpacking when the aux tank started dumping fuel at a pretty good rate. I had forgotten to close the aux tank valve and luckily the maid warned me before I lost too much fuel. It happened again as I approached Cloudcroft, NM last week. The gauge went from three bars to on reserve in a couple of minutes!! :angry2:

Well today I removed the ball from the gas cap. Noticed an immediate difference. After the ballectamy within 15 miles the gauge went from three to four bars once I opened the aux tank. Oh hot damn!! I think it's feeding properly again. Thanks Radman. :yahoo: :) Now to run a couple of tanks of gas through it to make sure. :)

 
Last edited by a moderator:
I know - resurrecting this old thread is like trying to get a sneak preview of "Zombieland". But this is the specific issue I was researching. It doesn't seem to have reached a conclusion and some of the detailed photos are now gone. The page I had linked to for "some time in the future" (read now) is dead as well ( https://n4rnv.home.mindspring.com/id1.html ).

so was the consensus that it's the check ball or what?

now being as that the bike is going back together now and i'm doing all the little projects that have been waiting until the right time. you know, those that aren't ride-stopping or even a big enough deal to bother with until in the area for something else. reassembling the fuel tank is my "something else" for this one.

 
My interpretation was clean as preventative maintenance. The last thing I want to worry about in the event of a tipover is one more place for gas to leak out. Rather, I'd prefer to have the safety net.

From Radman above

Also, using brake cleaner and a wand/nozzle, spray the cleaner into the back hole on the cap. The cleaner should flow out from around the seal ring etc.
YMMV, but it's easy to give a squirt of cleaner each oil change. No problems yet on my '03. That's ultimate proof positive, right? Lack of a problem in a single sample point...

 
I'm real tempted to simply trim a coil or two off the spring, then reinstall it. I've heard mine releasing pressure on a hot day and it vents, then there's a significant pause before it vents again. I'm just thinking a little less pressure there will allow it to vent earlier, and perhaps cause fewer issues.

 
My interpretation was clean as preventative maintenance.
i do that - as documented here

https://www.fjr-tips.org/maint/ff/ff.html

but that didn't prevent me from getting a face full of fuel in SLC during the 03 IBR when I went to open the gas cap and a stream of gas spewed up out of the tank. only my prescription glasses saved me from getting it in my eyes.

 
I finally got around to disassembling my gas cap and figuring out what is going on in there. It is NOT what has been previously assumed and discussed. I'm appending this onto the end of this previously existing thread, rather than creating a new one, as it makes sense to keep all the information on this fix together in one place. I was pointed to this thread for some tips on the dis-assembly. For that it was of great benefit.

Disassembling the cap and applying this "fix" is relatively minor surgery. You just need to have a clean workplace and be a bit careful about some of the small parts. Anyone that has ever done any carburetor work should not be intimidated in the least. Before beginning removal, you should flip open your fuel cap and stuff a small rag or paper towel into the filler neck before removing the cap assembly to keep small parts and dirt out of the tank.

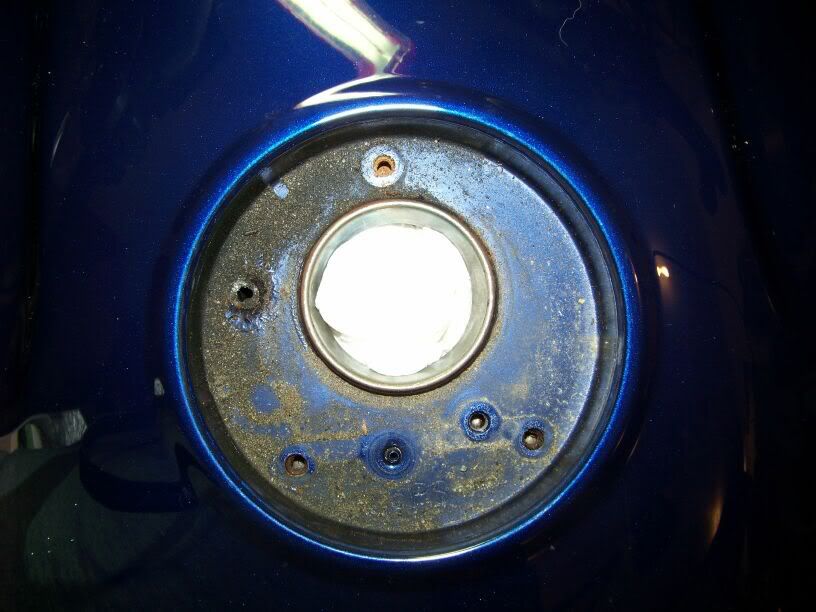
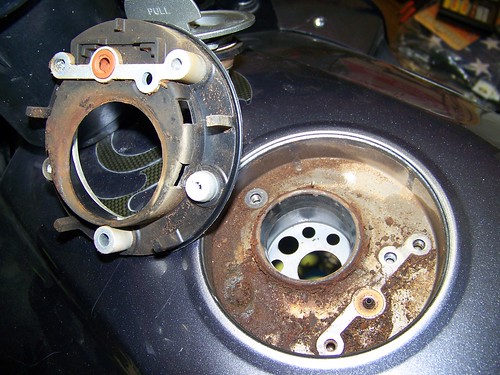
When you remove the screws and pull off fuel tank cap assembly from the tank, you will most likely find a cruddy mess lies underneath, in what we will call the "well area" of the tank. Here's my 33k miles of spooge:

100_1194.jpg


So, your first job is to carefully clean the entire well area. Clean the well well.
wink.gif


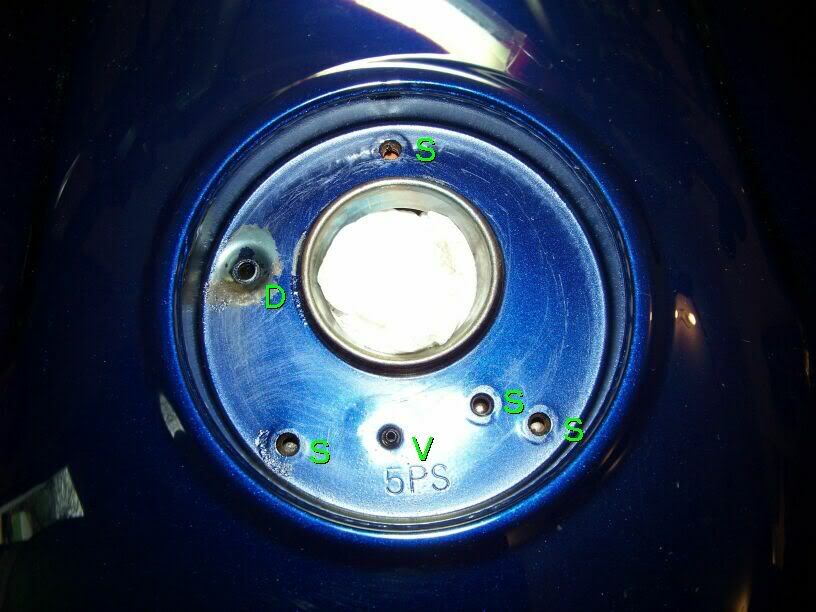
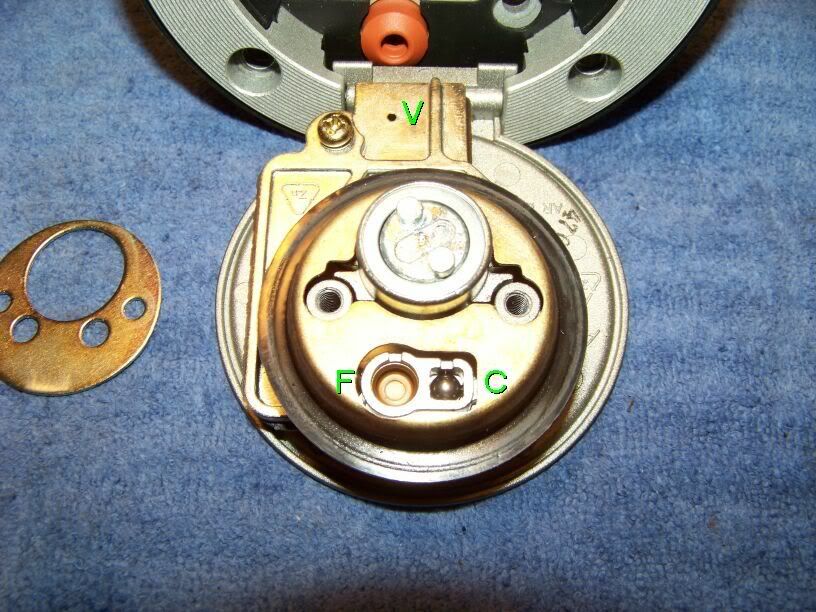
Here's a post clean-up picture identifying each of the various orifices and holes (front of bike is up)

100_1196.jpg


S = Screw holes

D = Drain

V = Vent

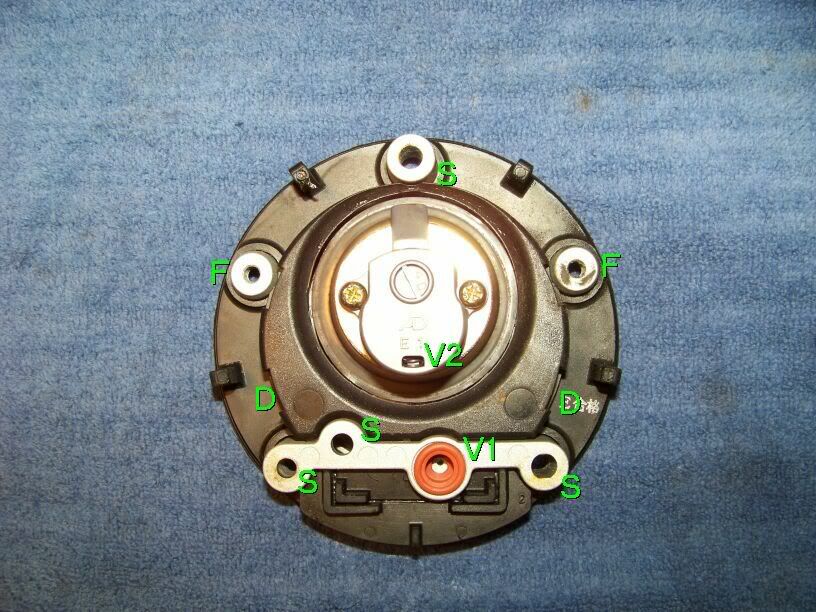
And here is the corresponding under side of the cap assembly.

100_1195.jpg


Note that only 3 of the 5 screws from the top ring of the cap hold the assembly onto the tank, plus one short screw from underneath the cap. The other two screws are "fakes" that just thread into the ring.

S = Screw holes

F = Fake screw holes

D = Drain

V1 = to Vent line

V2 = Tank vent

Here we can see the pathway for the tank venting. Pressure from within the tank would enter the cap at V2, pass through the cap assembly and exit the cap via the famous orange grommet at V1, and be passed out through the vent tube.

Fuel filling overflow is drained down into the well area via the two rectangular slots in either side of the cap assembly's rubber seal (marked D) and then drains off from the slightly depressed area in the well. That drain line is completely sealed from the tank when the lid is closed so it does not come into play for venting. Note that this drain hole depression is directly beneath one of the "fake" screws. You'll want to ensure that you always use one of the shorter screws in those fake screw locations so you do not inadvertently block off this drain hole.

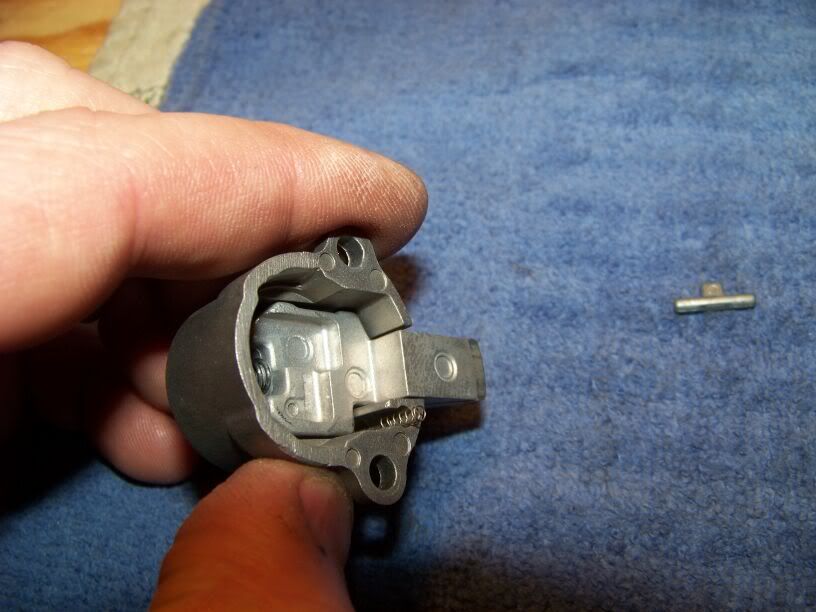
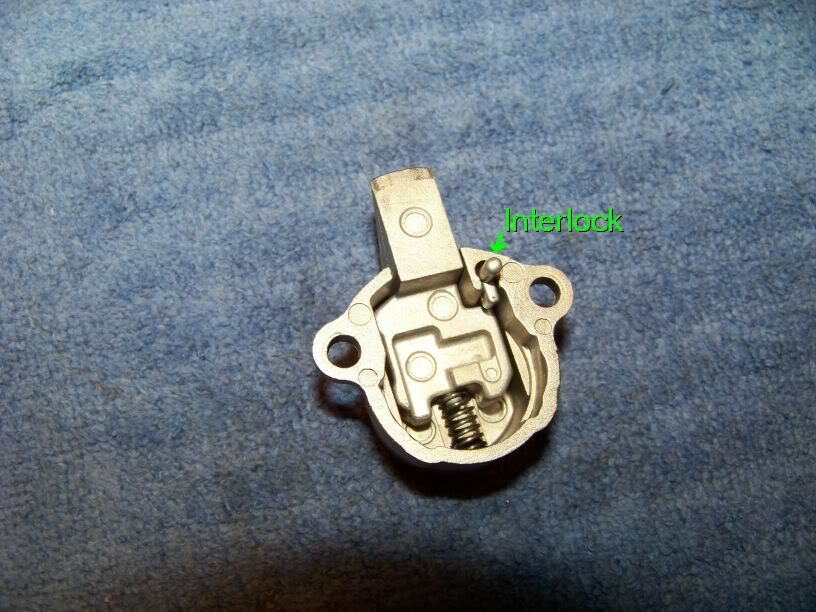
First you'll want to remove the key from the cap. To do that you need to press down the rubber tank sealing ring on the cap. There is an interlock (shown later) that prevents the latch from being locked and the key removed unless the cap is fully seated. By depressing the ring you'll be simulating that.

Now it's time to disassemble the cap assembly. You'll want to do this on a clean workbench. Definitely not on top of the bike.

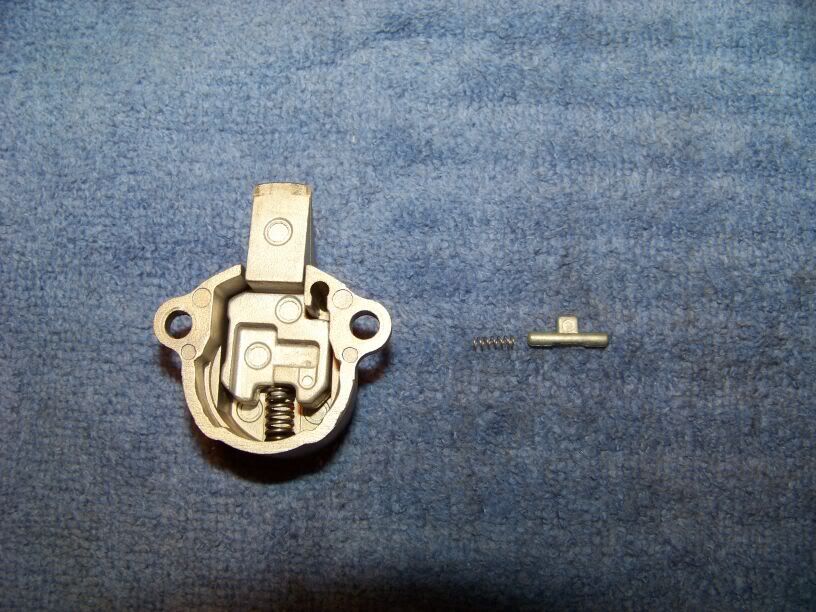
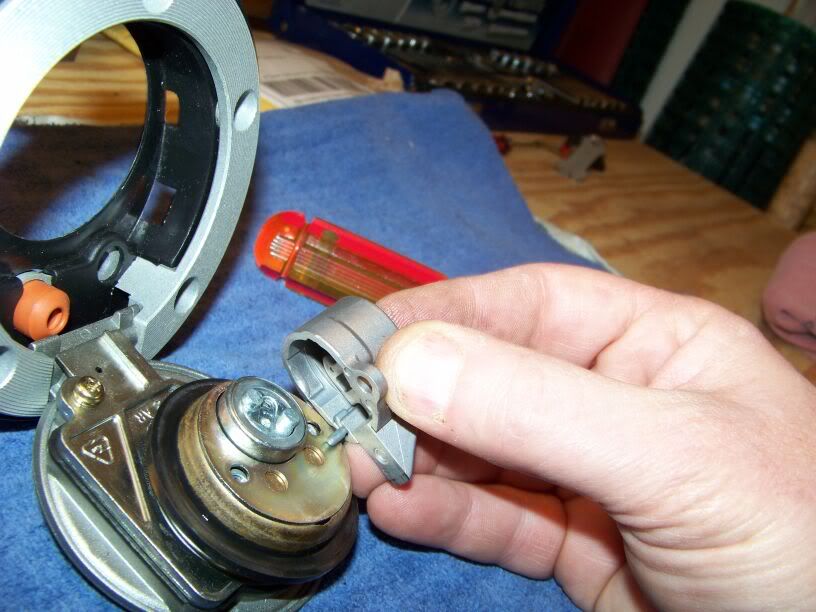
Flip open the cap lid and remove the two small screws that fasten the latch body to the cap. You'll feel some spring tension as you release these screws. More likely than not, when you go to lift off the latch, a small tee shaped widget and spring will probably fall out.

100_1206.jpg


The widget is the key interlock we were talking about before. You can replace the spring into the appropriate hole and then slide the widget back into place as below. Or not. If you'd like the ability to remove your key from the gas cap with the cap open, you can eliminate the key interlock feature altogether by simply leaving the small spring a tee shaped widget out of the cap.

100_1207.jpg


100_1208.jpg


100_1198.jpg


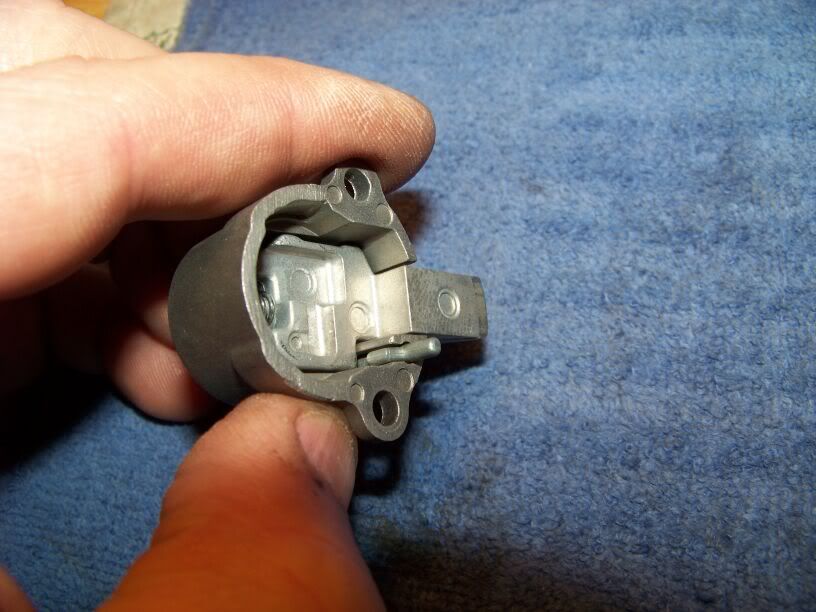
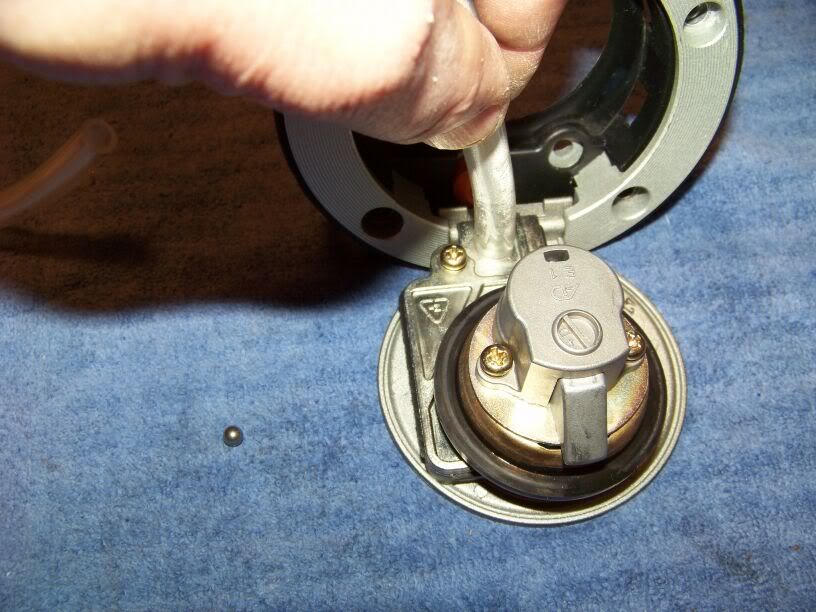
Set the lock subassembly aside and let's get back to the cap and integral vent. Here's what's left of the cap after latch is removed.

100_1201.jpg


Some of the prior assumptions were that the plate that you now see on top must somehow move to allow venting. That is not true. There are lots of small gaps and cracks (arrows) that will allow plenty of air flow. There is no need to drill any additional holes in that plate to improve the venting.

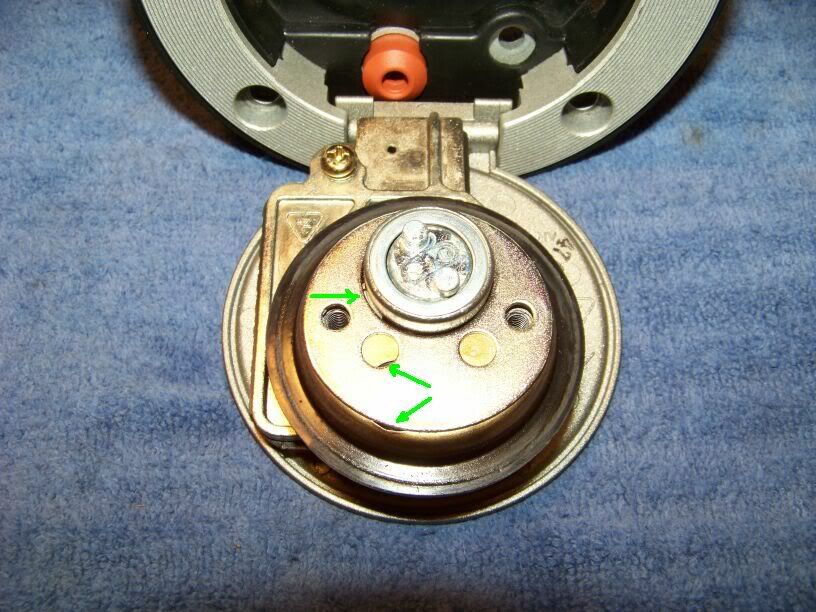
Next remove that top plate and you will see the important parts of the tank ventilation. There are two vent paths:

Path C has a steel bearing fit snugly into a bore, that is used as a check valve.

Path F has some sort of a filter-looking restrictive thing jammed into it.

If the tank is under vacuum the ball bearing will be drawn away from the seat in the bottom of its bore and will allow air to pass freely into the tank. When the tank is under positive pressure, the escaping air will push the ball bearing up in its bore until it seats. Then the only path for exhaust ventilation will be through the more restrictive path.

The restrictive thingee is apparently there just to make it harder for the tank to vent, thereby building up positive pressure in the tank. It doesn't actually filter the incoming air as that is supposed to circumvent it through the unfiltered check valve. If the filter becomes clogged or overly restrictive, when the ball bearing closes off the tank, the tank will over pressurize. If the ball gets jammed in a sealed position when the fuel in the tank cools this could easily result in an imploded tank.

100_1203.jpg


My "fix" for tank over-pressurization and potential implosions is to just remove the ball bearing. That, along with ensuring the vent hoses are clean and clear is all that is needed. Remove the steel ball and set it aside. Then re-assemble the cap in the reverse order of dis-assembly.

If you decided earlier that you want to keep the key interlock feature, just tip the latch assembly sideways as you reposition it on the cap so the spring loaded widget doesn't fall out again, and then hold the latch body firmly to the cap (don't push on the latch itself) until the screws are installed.

100_1209.jpg


After completing the mod, you can test the ease of venting by pressing the end of a piece of vinyl or rubber hose to the small vent hole in the hinge side of the cap and alternately blowing or sucking on it. You will find that you now have free flowing ventilation in both directions

100_1210.jpg


Last edited by a moderator:
My wife would open up a can of whoop-ass if I stole one of our her bath towels for a motorcycle how-to photo shoot. None of my garage rags ever looked that good, you're a brave man Fred W.

I think you've also hit on the root cause for the boiling high altitude fuel geysers in another thread. :good:

 
My wife would open up a can of whoop-ass if I stole one of our her bath towels for a motorcycle how-to photo shoot. None of my garage rags ever looked that good, you're a brave man Fred W.
I think you've also hit on the root cause for the boiling high altitude fuel geysers in another thread. :good:

Dat's not one of momma's good bath towels....that's Fredsy's blankee.

(Good job, Fred!)

 
Very nice write up Fred, thanks for adding to the Forum knowledge. :good:

 
The resurrection of this thread reminded me that I have never done any maintenance on the gas cap of my '05 with 80k miles on it. So, I went down to the garage and pulled off the cap. There was no spooge under it, just a little bit of dust. I took the cap apart and found everything sparkling clean inside as well.

I have experienced a few small gas geysers when opening the cap on a very hot day. Based on Fred's analysis I guess the restrictive material in the venting path of the cap is either too restrictive by design or clogged from use. I removed the ball from the check valve and put the rest back together. The only harm I can see is that it may allow more to drip out in the parking lot if I fill it and park in the sun. We'll see. I can always put it back if it gives me trouble.

 
Geezer,

Yep, that was my thought too. Nice that the mod is completely reverse-able.

But I really don't think we are going to see much additional leakage.

Nothing was previously preventing the gasoline from being forced out the restrictive path.

But I did tuck my little ball bearing jewel away just in case... ;)

However, I think the risk of gas geysers and imploded tanks may have been reduced significantly.

 
About the little ball. I heard from an expert that the ball is only there to stop fuel flow if the bike ever lands perfectly upside down.
exactly...it works perfectly :blink:

4480135529_5cbb674e3a.jpg


back to our regularly scheduled thread:

just opened mine up to find this below...last of my brake cleaner and some WD40 and it's cleaned up 90%

4498596278_4ebe4fd2cc.jpg


contemplating neutering (spay Isabella) with ball removal and would also do the key removal thingy too

thanx Fred and all...no pressure geyser for me...just hope not ever again unattentive with a nonstopping gas pump nozzle and I'm good to go

:yahoo:

 
Last edited by a moderator:
I finally got around to disassembling my gas cap and figuring out what is going on in there. It is NOT what has been previously assumed and discussed.................
RH pointed me here from here

Wowza, Fred awesome write up. This totally explains the drama that many of us have experienced. I'll be taking out that "T" ...removing the key is something I've always wanted (next to do away with the key entirely). that bearing is coming out .....the upside to removal for me is well beyond any detriment of not having it there. No brainer.

Thanks for this great overview.

Uhhh, and now let's figure out how to do away with the key altogether in the fill cap :)

 
Last edited by a moderator:
I'm pretty sure I don't understand exactly what the little ball does...

BUT, if it has anything to do with stopping fuel flow OUT of the tank one needs to think long and hard (actually, short and simple suffices) before messing with it. The risk of crashing and having gasoline run out of the cap onto the pinned rider or passenger may or may not be slight but the other side of the equation is that the result can be horrific - and it doesn't take much leaked gas to do it.

Bill


Latest posts

Top