Replacing the TPS

Yamaha FJR Motorcycle Forum

Help Support Yamaha FJR Motorcycle Forum:

This site may earn a commission from merchant affiliate links, including eBay, Amazon, and others.

ionbeam

2 FUN
Joined
Jun 24, 2005
Messages
8,817
Reaction score
1,783
Location
Sandown, NH
This project is rated 3 out of 5 for difficulty

bandaidsm.jpg
bandaidsm.jpg
bandaidsm.jpg
bandaidclr.jpg
bandaidclr.jpg


========================================

Parts:
Yamaha TPS P/N 5PS-85885-01-00 for both Gen 1 and Gen 2 FJRs

Location on the FJR:
The TPS is on the cylinder #4 end of the throttle body rack.

tpssm.jpg


TPS3sm.jpg


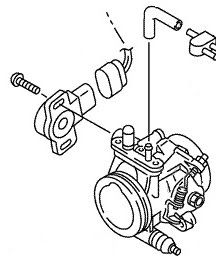
The bottom screw has limited access because it is located right next to the frame. But for this screw the TPS replacement would be quick and simple.

Tools:
T25 tamper resistant Torx bit a.k.a. security Torx bit with an offset ratchet driver wrench

offsetwrench.jpg


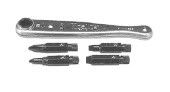
--or-- you can buy a T25 Torx wrench that is available with different arm lengths, you need a very short arm for this job. You can buy this too here.

36340pix150.gif


12mm socket, Tank pivot bolt
10mm socket, Tank screws by steering stem
4mm wrench, Body work, Allen head screws,
Allen wrench, screw that hold the rubber shield to the tee bar
A multi-meter would be very helpful but not absolutely required

Prepare:

  • I'm not going into the whole tank removal because it has already been done very well here at FJRTech:
  • Reminder: Unclip two hoses from the left side of the tank
  • Raise and prop tank leaving all hoses and wires connected if possible
  • Remove rubber cover from Tee Bar
  • Move wires out of the way from TPS -- O2 wires are in this area
  • Unplug TPS connector by pressing down on the tab on the connector -- DO NOT pull on the wires
My way

  • I put a shop towel under the TPS to catch screws and tools as I repeatedly drop them
  • I used a short step ladder, clipped my trouble light to the top tread -- aimed at the work site, used the other treads as a tools and parts trays handy to my work site
  • Chair to sit comfortably
  • Relax, plan to go slow

Begin Replacement:

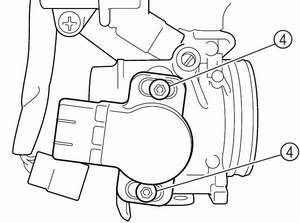
  • Remove bottom screw from the TPS while you are still fresh and cheerful
  • Remove top screw from the TPS
  • Pull the bad TPS off, it should come off freely
  • Be sure that the rubber shaft seal came off with the old TPS, view new TPS and compare
  • Gently push on new TPS trying to align the center with the rectangular post on the throttle body rail
  • Twist the new TPS against the internal spring until the slots align with the screw holes
  • Install lower screw just enough to stop any looseness but do not tighten
  • Install upper screw just enough to stop any looseness but do not tighten
  • Follow FSM procedure to electrically align the TPS
  • My results which should work for you too:Rotate the TPS until the multi-meter reads ~650 ohms and lightly tighten so that the TPS won't move when the throttle is rotated
  • invoke the diAG screen and check diAG code 01. How-To is here. (Post #3)
  • verify TPS reading is within spec per FSM (15-17 closed and 97 to 100 open) mine read: throttle closed 15; throttle wide open 98-99 when the resistance was set to 650 ohms (bad TPS was set to 620 ohms yielding 14 to 97)
  • tighten the two TPS screws, confirm via diAG that you are still in spec
  • verify hoses & wires are clear of moving parts and still attached, start engine
  • confirm idle speed; confirm engine runs smoothly and linearly follows TPS. You may need to tweak the idle speed.
  • you may want to mark the top screw with a line across it to the TPS body so you that can visually verify that the TPS adjustment hasn't moved should you want to check it at some later time
  • use Locktite blue on the rubber cover screw; seems like overkill but it's Yamaha's way
  • sprits the left side rubber wellnut and rubber hose holder with a good silicon spray to facilitate reconnection
  • reassemble
  • road test to confirm it works when hot
  • done, beverage of choice
 
Last edited by a moderator:
Adding a link to this in the service section of the 06 bin-o-facts -- let me know if that's a problem, and I'll remove it.

 
Ionbeam,

Thank you for a darn good write-up. Makes me want to grab my toolbox, lift the tank and replace a perfectly-functioning TPS :) .

Stef

 
In several previous threads the TPS has been discussed, described, diagnosed, maligned, cursed and criticized to death so I didn’t think to describe the TPS here.

TPS = Throttle Position Sensor. Job: Tell the Electronic Control Unit (ECU a.k.a. computer) what the throttle is doing. The TPS sits on the throttle body rack and is coupled to the throttle plates so that the TPS coupling rotates in lock-step with the plates. How it works is described here.

 
Last edited by a moderator:
WTF is a TPS? Being an Office Space junkie, I think of Lumberg, not Yamaha.
Is also the most often failed component when the weirdies start. Major surging, on-off running behaviour, poor rideability, wife leaving, dog listless, kids running away, volcanos erupting-the usual shit. Nice write-up Ion.

 
Last edited by a moderator:
I just replace my TPS yesterday - that write up made it easy! I ordered the tools and the part last week and did the whole job in about 30 minutes. During the test ride afterwards there was not one surge, hiccup or stall. I am thrilled. The old part has been "going" for along time (erratic occasionally but not unrideable) and finally failed (making the bike unrideable).

Here is my question. How important is the rotational position of the TPS?

I do not have an Ohm meter (will buy one if needed - no problem). I put the TPS back on approx where the old one was as far as the clockwise/counter-clockwise rotation. The DIAG screen showed 16-98 both times I tested. The bike seemed fine as far as performance, idle, etc...

Was I lucky to get it placed correctly? Should I check that it is at 650 OHMs or leave well enough alone? Also, since I know nothing about ohms, etc... is the measurement taken with the TPS plug disconnected and the OHM meter measuring across two contact points inside the end of the TPS? I am looking at the one I removed and there are three metal male connectors inside the plug end of the TPS. Connect the meter across the two outer ones? Or is it from a contact on the TPS to ground on the bike?

Thanks a lot for any assistance.

Allen

 
I put the TPS back on approx where the old one was as ...The DIAG screen showed 16-98 both times I tested...Was I lucky to get it placed correctly?
Got your PM this morning ahamlin01. The reading on your DIAG screen is just fine. Spec is 15-17 and 97-100. You got lucky B) If you have 16-98 then the resistance has to be correct. Cool! :yahoo:
I got your PM also - thanks!

For those who DO need to do the OHM meter thing (that's technical, eh?) what is the correct connection to use? Is it easy to describe?

 
I replaced my TPS about a week ago following this procedure. It is an excellent write-up. Took about 45 minutes, and now the FJR runs fine again.

I used a set of alligator clips attached to my VOM wires to get the resistance readings. Mine ended up 15-100 on the diagnostic screen.

Thanks for the writeup.

 
Ionbeam,

I'm printing your process out as I type, this is going into my binder of proceedures. Excellent !!!

Thank You for taking the time to do this !!

KD-

 
How do you know that this part is bad? I'm guessing that you can test it with an ohm meter and see if it is within the limits listed. I have an 06 so I have time before the warranty is up, and I will be buying the YES, so isn't this covered by the warranty? Great write up , I'll print it out and put it in my service manual.

 
Ion,

Thanks for posting the procedure. My'05 with 10,500 miles is running fine, so maybe I'll do it when it's mothballed for the winter.

 
The tech at a local dealer replaced my TPS today. He removed the fuel tank. He loosened the air filter case mounting so he could shift the throttle body assembly up a bit away from the frame. This gave him more clearance to remove the TPS lower mounting bolt. He spent about 1 hour 30 minutes on the job. He must not have had a specialized tool to access the lower mounting bolt. He also used the Diagnostic Mode to adjust the TPS.

Runs fine. Ran fine before.

 
Remember when, not too long ago, when the TPS recall came out, and I was the one loudly proclaiming, "I ain't replacing mine! Why fix what ain't broke?"

Well.................................

Mine broke!!! :angry2:

Long story, but after 3 months of non-use whilst undergoing crash repairs, my perfectly functioning 95,000 mile TPS got sick. After getting the FJR roadworthy recently, it only took a day before some very slight hiccups appeared. A couple of days later, it was running like total horsecrap sometimes. First check of the diagnostic screen showed no problems, but the second check showed a fubar'd TPS, as I had suspected.

Off to the search feature for some research, and I found several outstanding threads by ionbeam. All became clear. Ordered the TPS from U Motors and the L-key Torx 25 security wrench shown above by ionbeam. It was a 20 minute fix. Easy-peasy.

Thanks ionbeam!!!! You made this one easy.

Some various notes:

- Since my TPS fell under the recall, U Motors charged me for the TPS but will credit me the price when they receive my old toasted one back along with the VIN for recall purposes.

- I didn't remove the rubber right side cover, just folded it out of the way. Nor did I remove the fuel tank hoses on the left side. Just hinged the tank up and held it there with rope a la the Warchild method.

- Thanks for the, "Be sure that the rubber shaft seal came off with the old TPS, view new TPS and compare" advice ionbeam, cause mine didn't come off with the old and I doubt I would have caught it without your warning.

- I didn't use a multimeter. Just the diagnostic screen. Upon installing the new TPS, idle position read 13. I simply rotated the new TPS until it read 16, tightened, and checked full throttle value - 99. Perfecto!!!!

Very easy to do this. Small fingers help. The proper tools are critical. (see first post above) Take your time. No problemo.

Ionbeam has done a lot of TPS diagnosing and repairing that has helped the rest of us out greatly. I owe you a beer, bud! Great job and many thanks.

Though I can't say I am too disappointed getting 95,000 miles out of my 'defective' (recall) TPS, I am glad to say my FJR is running top notch once again and it was a relatively painless ordeal.

:yahoo:

 
Top