you come to Switzerland Kaitsdad you drink yourself silly on some fine Swiss beer ( Feldschlösschen) on my dime
GEN II Plastic and Cowling Removal
#21
Posted 25 November 2009 - 04:06 PM
you come to Switzerland Kaitsdad you drink yourself silly on some fine Swiss beer ( Feldschlösschen) on my dime
#22
Posted 17 March 2010 - 06:06 PM
Thanks for the info. If I have the cojones to tear it apart, it will save me a couple hun by not taking it to the stealer, er dealer...
Botajet
ps: Since I'm new here, what's the cutoff between Gen I and Gen II machines?
#23
Posted 18 March 2010 - 05:10 AM
#24
Posted 21 March 2010 - 08:38 AM
#25
Posted 09 June 2010 - 06:14 PM
Eric we have a nut and bolt store here in Lynchburg Va. It's called Valley Fastners, should be some store of this type near you. That would be a good place to match up what you need. Hope this helps.
#26
Posted 11 June 2010 - 06:00 AM
Eric, Ive used the below link to replace OEM fasteners and screws on my FJR. They're called Babbitt's online, and the site has a great way of showing each part and location (in an exploded view). The only shortcoming is that they're rather slow sending out parts and don't offer fast shipping - all via ground shipping. I hope this helps...
http://www.yamahapar...d/1/Yamaha.aspx
#27
Posted 27 January 2011 - 04:46 PM
however did get a link through a 08' owner's personal web page.
Thanks again, needed this to replace my new mirror's.
RR
<i>My Kando</i>
<strike>1992 Concours-'Grace'</strike>
The simultaneous feeling of deep satisfaction and intense excitement that people experience when they encounter something of exceptional value.
#28
Posted 27 March 2011 - 05:59 PM
"No two objects can occupy the same space at the same time, but they will try." Spoilsport's 3rd law.
#29
Posted 04 April 2011 - 08:00 PM
#30
Posted 23 May 2011 - 05:07 PM
I started at step 5, since I only needed to remove the side cowlings.
As others have said, the secret is to take it slow and steady, don't force anything. When you're stumped, stop and relentlessly apply logic.
BTW, before I do this again I'll have a few extra plastic bayonets, just for peace of mind.
I used a sophisticated system to keep track of the multitude of fasteners.

envelopes by JimNtexas, on Flickr
I did notice some minor differences from the original post and what I found on my 2008 Advanced Edition:
5b - only one screw on the bottom cowl

FJR Bottom Cowl by JimNtexas, on Flickr
5c - only two plastic bayonets per side (sorry, no picture)
after 5f: On my bike there were two Phillips head screws on the inside of the left cowling that connected it to the thin plastic inner cowl.
After you do all the steps in the original post the cowling is still attached until these two are removed.
Their heads are on the side of the cowl facing towards the wheel. You can barely get them off with a 3" phillips. This picture shows the sockets on the inside of the left cowling that the screws go in to.

FJR left cowl inside view by JimNtexas, on Flickr
Again, thanks for this super useful thread!!
Edited by JimNtexas, 23 May 2011 - 05:27 PM.
Yamaha FJR1300AE - Ninja 250
IBA #34994
Chandelle Flying Club
#31
Posted 23 August 2011 - 12:36 AM
I did this yesterday as my screen motor was jammed, due to the rubber gasket falling off into the mechanism. It is held in place by double sided tape. I removed all this old tape, cleaned and degreased everything and applied new tape. How come the smallest jobs take the most dismantling.
I checked the spiders on the front at the same time. Everything was OK. Here is betting now I have checked/moved these connectors I'll get spiders failure in the near future!
Well at least I know how straight forward removing the front cowling is now, if a little time consuming, putting it all back together.
Andy
FJR 2007 Modifications- Russell seats, CB +4+2, PC V +Auto tune, Ohlins rear + Ohlins 20mm fork kit and springs, HIDs, G2, TPMS, All Balls steering, 50mm mirror spacers. TL1000 guards. Tyres PR2(7k) Angel ST (3K) Dunlop Roadsmart 2
#32
Posted 23 October 2011 - 04:31 PM
#33
Posted 23 October 2011 - 05:19 PM
Try it today, and belive it or not, I still stuck at step 1! The 2 screws retaining the "W" are supposed to be 3mm hex screws, but my 3mm hex screwdriver is too big to fit the screws, and my 2,5mm is too small! Damn!
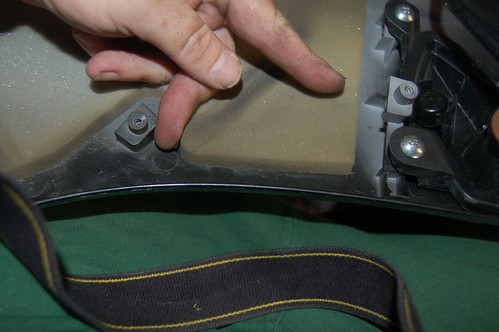
Those 2 hex screws are 3mm. I just confirmed this by using two different hex wrenches, and a vernier caliper.
Perhaps your 3mm hex screwdriver isn't 3mm?
My FJR: 'Spirit'
My Biker Blog
Suspension upgrade, PC-V and Staintune cans. Now I really gotta watch my speed...
#34
Posted 30 October 2011 - 01:50 PM
#35
Posted 20 December 2012 - 12:52 AM
Hey what a great post , i will be doing this this weekend as i have already go so fare & said OMG how do i get that ect !!!!!!
I am sure just by reading your post i may get a little further.
Once again thaks for the intro to fairing dismantelment.
Adrian
FJR1300AP - 2008
#36
Posted 23 December 2012 - 10:03 AM
Thanks for this post. I used it to remove the lower fairing and plastic as needed to change my engine coolant.
#37
Posted 23 December 2012 - 04:02 PM
Any ideas or thoughts or am I just missed something here.
2010 FJR, there seems to be one more screw not mentioned here. It's in the front center about 7 inches up from the bottom of the fairing, just about behind the Yamaha symbol, is a screw that I can't get to that needs to come out.
Holding on to anger is like drinking poison and expecting the other person to die. - Buddha
#38
Posted 23 December 2012 - 05:17 PM
Are you pulling the nose off Pops?
--G
#39
Posted 23 December 2012 - 10:01 PM
Yes.
Holding on to anger is like drinking poison and expecting the other person to die. - Buddha
#40
Posted 23 December 2012 - 10:06 PM
Yes.
Why?


