2016 headlamp adjuster knob set screw - help

Yamaha FJR Motorcycle Forum

Help Support Yamaha FJR Motorcycle Forum:

This site may earn a commission from merchant affiliate links, including eBay, Amazon, and others.

ndivita

Well-known member
Joined
Jul 9, 2005
Messages
378
Reaction score
77
Location
Sedona AZ in the Village of Oak Creek
For the life of me I don't know what I'm doing wrong. I managed to reattach the right side but the left side screw will not grab the thread in the adjustment post through the knob. It grabs the thread without the knob. Nothing acts like it's stripped.

I'm stumped.

This is the last step of a successful battery replacement.

Help.
 

Attachments

  • 16803057435377953341990383182166.jpg
    16803057435377953341990383182166.jpg
    991.4 KB · Views: 0
Bit of a pain to get it lined up. Are you using the crappy JIS (or Phillips)? I replaced mine with Allen hex socket head on my 2011. Definitely easier to manipulate. Do you have to remove these to change battery on Gen III?
 
Using JIS with correct head. I've tried every angle imaginable.

What size hex head would I need?

It is desirable to remove these knobs in order to remove/loosen the upper dash panel to eliminate the interference in battery replacement.

Any advice is welcome.... I'm at a loss.

Thanks for your prompt response.
 
Something tells me you just don't have the hole lined up right with the knob on. I assume you tried moving the knob left and right and up and down while you had the screw in it?
 
Something tells me you just don't have the hole lined up right with the knob on. I assume you tried moving the knob left and right and up and down while you had the screw in it?
I'll probably keep trying but I feel I've tried every orientation. Obviously I'm doing something wrong. Just can't figure it out. The angle of attack is difficult. Had no issue with right side knob or screw.
 
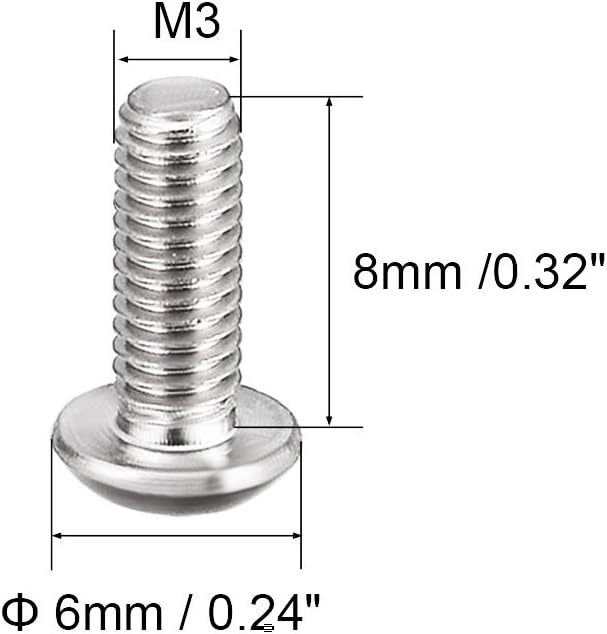
Like RK, I replaced my '15s with small socket head screws. IIRC, I used stainless M3 X 8. My local Do-It-Best Hardware store is my go-to for metric fasteners.

Good luck!

~G

Edit to add - Before I remove the dash panel I rotate the headlight adjusters for easier access. Reinstall and then rotate adjusters back to original position.
 
Last edited:
Dumb question. Does the thread pitch matter here? Or will any hex head M3 x 8mm screw work?


51TivntNPKL._AC_SL1100_.jpg
 
I had that panel off my '08 doing a lot of wiring removing and shifting around with audiowize. When we put it back on, I was on the left and he was on the right. His went right on and I struggled with the left for a long time. Of course he's audiowize and I'm a 70-year-old geezer with shaky hands and lousy eyesight. But the left was trouble. I think I rotated the adjuster cable to get a different angle of attack.

I think you will find a wide selection of stainless steel metric socket head cap screws at one of your local Ace Hardware stores in Sedona.
 
Make sure you're still on the correct side of the post with that screw. I've never had trouble with mine but I did manage to put the knob on backwards, if I recall, one time and the screw would not catch the hole on the opposite side.
 
This may be a silly suggestion to some, but before I found out that I don’t need to remove the headlight adjuster knob on my ‘06 for panel removal, on assembly I stuck a toothpick into the hole on the adjuster shaft. Then, taking a mental note of the toothpick’s direction I pushed the knob onto the shaft with the hole on it pointing in the same direction as the toothpick was pointing. After that, I tried to find the hole on the shaft with the toothpick again through the knob. That was much easier to do, because the holes didn’t have to align perfectly, It was enough to just have a small overlap to be able to push the tip of the toothpick in, which helped to align the holes perfectly to inset the screw.
 
Make sure you're still on the correct side of the post with that screw. I've never had trouble with mine but I did manage to put the knob on backwards, if I recall, one time and the screw would not catch the hole on the opposite side.
Thanks. In my case the knob has a semicircle shaft and is molded on the inside to fit just one way. The screw goes in but won't catch the threads on the adjustment post. On just one side.
 
This may be a silly suggestion to some, but before I found out that I don’t need to remove the headlight adjuster knob on my ‘06 for panel removal,
His is a 2016. The Gen3 is constructed differently. The knobs MUST be removed.
Thanks. In my case the knob has a semicircle shaft and is molded on the inside to fit just one way. The screw goes in but won't catch the threads on the adjustment post. On just one side.
I found my 2013 can be a PITA too. I have to wiggle the knob up & down ever so slightly. It might help if you install the screw into the backside of the threads without the knob in place. This might clean up the threads enough to work easier. Or see if you can find a thread tap somewhere.
 
Good luck as I’m not a patient type either and just left both of the knobs off my ‘16 after I replaced the battery last summer. When I’m feeling exceptionally patient one day I may attempt to reinstall them. 🤞
 
Bit of a pain to get it lined up. Are you using the crappy JIS (or Phillips)? I replaced mine with Allen hex socket head on my 2011. Definitely easier to manipulate. Do you have to remove these to change battery on Gen III?
Replaced mine with an Allen head as well and haven’t looked back. Found it at Ace Hardware.
 
FYI, there was a write-up about this lack of battery access a year or so ago. You make a small modification to allow battery removal/replacement without having to remove the whole dash. With the right side battery cover removed, hold the battery in place above the battery holder. Now mark the plastic lip of the dash piece that the battery contacts at the forward left corner of the battery. You could also eyeball this from above with the battery in place. It is only a small "V" in the step-down plastic lip that needs to be removed to allow enough space for battery removal. Use a Dremel or Rotary tool and grind that "V" out, and you can then simply push back on that dash piece a bit, tilt the battery as you lift it, and remove the battery without disassembling half the bike cowling. And you'll never have to fiddle with the headlight knobs again, at least for battery removal. The attached photos show how I grooved mine. I actually went a little deeper than necessary, but if you leave a bit more at the back, when you place the side cover back in place you can't even see the modification. This isn't a big deal for our Southern friends who may have to do this once every 6 years or so, but for us Northerners we typically remove and replace our batteries every year for winter storage, at least those who wish to have easy access to put the battery on charge periodically thru the storage months. Hope this helps.
 

Attachments

  • 20230401_095525.jpg
    20230401_095525.jpg
    3.2 MB · Views: 0
  • 20230401_095558.jpg
    20230401_095558.jpg
    1.4 MB · Views: 0
Top