Broken part confirmation

Yamaha FJR Motorcycle Forum

Help Support Yamaha FJR Motorcycle Forum:

This site may earn a commission from merchant affiliate links, including eBay, Amazon, and others.
I did once do this, you can see pictures of how I did it here.

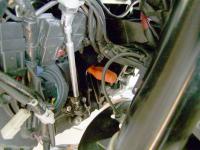
You can get to that buried screw with a thin screwdriver as in this pic:
(Click on image for larger view)


Possible, but not the right way of doing the job.
Thanks for posting this. I too fell prey to the piss poor engineering. Had an '06 that I dropped harder than I did my '16 and never had this happen. I ordered the stay, the front plastic, and the instrument cluster plastic, all damaged when I dropped the bike on a crested driveway. My bike went over onto the T-Rex bars, then continued past that point. My wheels were between 10 and 11 O'clock when I got out from under the bike and when we got the bike up, I noticed my mirror laying on the ground. I was thinking, "oh, I'm going to have to find a mirror" until I picked it up and saw ABS plastic and pot metal attached to the mirror, with the nuts intact as well. It was then that I noticed the gaping hole in my fairing and the stay had snapped and was still attached to the mirror. I just went from an $80+ dollar part to over $600. I finally got all the parts in and plan on ripping into it and doing some other upgrades at the same time. This will make the front end repair much easier.
I plan on setting up my Go Pro and putting together a step by step of the work. Once I edit that, I'll post it up for everyone else to use. I will be replacing my windscreen with a Cee Bailey, my exhaust with a Two Brothers Carbon Fiber, sending the scratched plastic off to a recommended body shop, and spooning on new Road 6GTs. Late Summer I plan on starting back on my original ride to Tail of the Dragon and checking that off my bucket list.
 
UPDATE

I did not make further attempts to remove the screw buried 3” from the pit of despair holding on the front most nose cowl piece.

I took a little advice from several people and made I hope is a forever repair

1. Made some templates of approximate length and bend

IMG_2239.jpeg

2. Modified and fitted 1/2”stock to use as brackets and purposely roughed up the underside.

IMG_2232.jpeg

3. Used JB Weld to cover the crack and as a base between the brackets to fill in gaps and help adhere them.

IMG_2230.jpeg

IMG_2231.jpeg


IMG_2234.jpeg


IMG_2233.jpeg

4. Drilled holes for stainless steel bolts and nylon nuts.

camphoto_342241519.jpeg

As mentioned by a previous member it’s pretty dang tight but spacing washers and patience seemed to work.

IMG_2237.jpeg

IMG_2238.jpeg


Now off to the other maintenance items.
 
Last edited:
UPDATE

I did not make further attempts to remove the screw buried 3” from the pit of despair holding on the front most nose cowl piece.

I took a little advice from several people and made I hope is a forever repair

1. Made some templates of approximate length and bend

View attachment 4587

2. Modified and fitted 1/2”stock to use as brackets and purposely roughed up the underside.

View attachment 4588

3. Used JB Weld to cover the crack and as a base between the brackets to fill in gaps and help adhere them.

View attachment 4589

View attachment 4590


View attachment 4592


View attachment 4593

4. Drilled holes for stainless steel bolts and nylon nuts.

View attachment 4594

As mentioned by a previous member it’s pretty dang tight but spacing washers and patience seemed to work.

View attachment 4595

View attachment 4596


Now off to the other maintenance items.

Draining and replace coolant

image.jpg
 
Top