


sapest
Well-known member
Fit2Go Review
(sorry for the long story, but I thought full disclosure was entertaining, if nothing else)

When Doran removed themselves from the motorcycle TPMS market, I started looking for an alternative. I wasnt interested in anything that used a smartphone. I wanted something that would wake up right away, had a minimal installation footprint, and a small head unit. Fit2Go’s TPMS seemed like it would tick all my boxes. I found other, similar products on eBay; one thing I really liked about the Fit2Go was that it was a sealed head unit. Where I live in the PNW it rains. A lot.
However, Fit2Go does not sell their product in North America. Not yet anyway. They are working on the certifications, and have recently received (earned?) their FCC approval. A forumite suggested I use a UK based Internet retailer; when I tried that and entered my Canadian address, the sale was blocked with a notice that I needed to call the retailer, which I never bothered with. A friend of mine was on holidays in Spain, so I had the product shipped there, and my friend brought it back to Canada (Calgary). Now I had a reason to ride to Calgary, so off I went. All in, the price was about C$155.00. (not including my trip to Calgary, or the flight from Spain to Calgary) There were some wrinkles during the order process, since their website didn’t want to create an order with a Canadian billing address, so I had to overcome that also.
The packaging and contents are very straightforward; from their website –
https://fit2gotpms.com/michelin-tyre-pressure-monitoring-system-bike-fit2go-tpms/
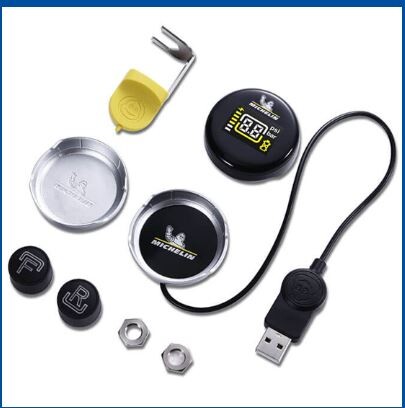
Our unique ‘plug & play’ kit comes as standard with:
The first thing I noticed was that the sensors are about 50% smaller than the Doran ones.
I had some questions unanswered by the documentation.
When you charge the head unit, the bottom 2 bars are white, not yellow like the others. I thought this meant the unit was not fully charged, but it really means that the yellow bars each represent 20% of the battery charge, and the (last) two white bars each represent 10%.
It wasn’t clear to me how the sensor reacted to a tire swap or just a removal. From one of the many emails I traded with Fit2Go –
In short and to be as concise as possible.
When the sensor is added to the tyre valve it will calibrate to the pressure that is held within the tyre. This pressure is transmitted to the bike receiver via an RF signal when the wheel is in motion.
If the sensor is removed from the tyre valve it will return to the factory setting and forget the pressure that was stored.
The sensor can be added to another tyre and the calibration process will start all over again.
When the sensors are first installed, you have 3 minutes to get moving so the sensors wake up and talk to the head unit. If you run out of time, the display remains blank. I found that you have to remove the sensors, take the head unit out of the holder, and wait at least 5 minutes before trying again. What seems to work best is to install the sensors, place the head unit in the holder and go. The shortest pairing time was about 3 minutes, the longest, about 8 minutes. Once the sensors are paired, the display wakes up after only a few tire rotations. This time delay only happens on the first pairing between the head unit and the sensors.
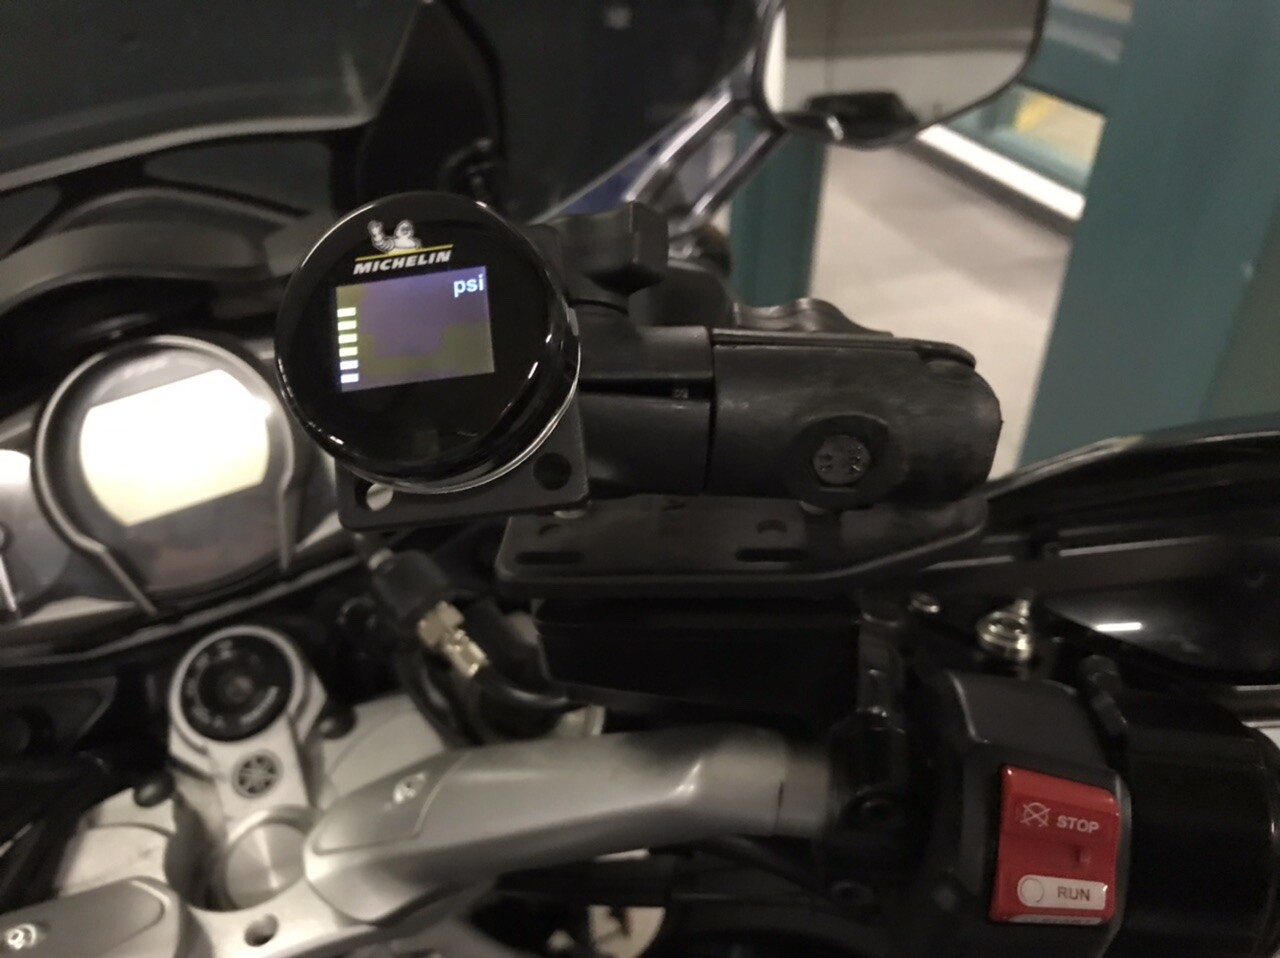
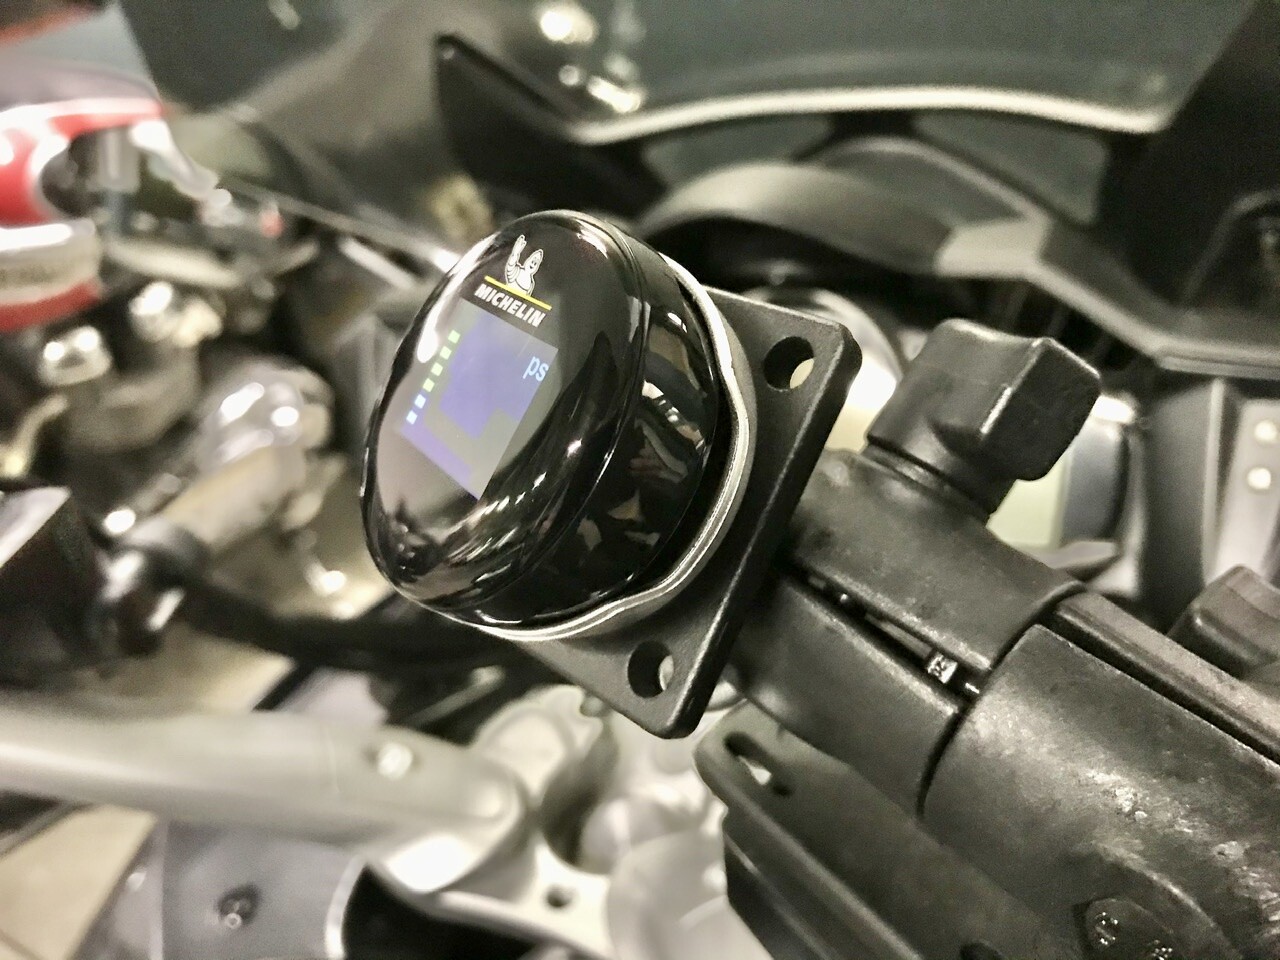
I had some RAM bits laying around and ended up installing the unit like this -
I have 83 degree valve stems, and had to rotate the front one in order to provide clearance for the sensor.
After about a month of living with the unit:
The display is easy to read, even thru dark sunglasses and a tinted visor. I think is uses the same technology as the FJR display, hard to read in the rain, bright enough otherwise.
The sensors wake up within 4/5 bike lengths of movement. (The Doran unit could take as long as 5/6 minutes)
The battery was discharged one bar, 20%.
It just worked, no fuss no muss, pop the head unit into the holder, back the bike out of its parking slip and the display was active.
With the unit was installed and operating properly, I was looking forward to giving this product a workout during my Vancouver-Ottawa-Vancouver 8900 km trip. Unfortunately things didn’t quite work out that way. Montana has an 80 mph speed limit on their Interstates. At the first bridge transition, I was doing about 90 mph and watched the head unit lift up and fly out of the holder. End of test!
Once home I contacted Fit2Go and they generously offered to send a replacement. They also suggested using some dble sided sticky buttons to hold the head unit in place within the holder. I think the unit wasn’t properly placed in the holder, something that I found was easy to do.
(notice the head unit is not flat in the holder, you can see the gap in the notch of the base unit)
They also suggested that a flatter install was recommended, but if I cant read the display, what’s the point?
The new bits showed up fairly quickly, considering where they were coming from. They sent a new head unit and holder. (& the sticky buttons) But nothing is easy, and this unit would not pair with the sensors. After 4 attempts, I emailed again and was asked to return the second head unit and original sensors for ‘further testing’. Within 2 weeks I received a different set of sensors and head unit. This (third) head unit sports both FCC & CE certification marks. This gear paired right away. (within about 2 minutes)
I didn’t like the dble sided tape approach, since it was my plan to remove the head unit when parked. I found that Velcro makes an “Industrial Strength Low Profile” product (who knew?) that is also water resistant. One square inch will hold 1 lb, according to their documentation. I used a single strip; so far, so good.

I have been living with this setup for about 4 months now. The ‘charged’ bar has decreased by one. I have not tried to hit giant holes to see if the head unit will stay in place, but we have plenty of bad road around and I haven’t lost this one yet.
If I were asked what to change:
The head unit mounting – maybe a screw on/off style would be better.
The charging cable is too short, in fact I would suggest removing it and replacing it with a female USB connection.
Some reviewers have suggested the alarm lamp, which is a white light, isn’t that attention getting. Perhaps red is a better choice.
If I were asked what to add:
A lean angle sensor and/or accelerometer/decelerometer function.
If the sensor batteries last 3 yrs, worst case (if say I cant buy replacements) is that I have a simple TPMS for $50 a year. $1 a week to know what the tire inflation pressures are seems like a fair deal.
Of course YMMV.
-Steve
(sorry for the long story, but I thought full disclosure was entertaining, if nothing else)
When Doran removed themselves from the motorcycle TPMS market, I started looking for an alternative. I wasnt interested in anything that used a smartphone. I wanted something that would wake up right away, had a minimal installation footprint, and a small head unit. Fit2Go’s TPMS seemed like it would tick all my boxes. I found other, similar products on eBay; one thing I really liked about the Fit2Go was that it was a sealed head unit. Where I live in the PNW it rains. A lot.
However, Fit2Go does not sell their product in North America. Not yet anyway. They are working on the certifications, and have recently received (earned?) their FCC approval. A forumite suggested I use a UK based Internet retailer; when I tried that and entered my Canadian address, the sale was blocked with a notice that I needed to call the retailer, which I never bothered with. A friend of mine was on holidays in Spain, so I had the product shipped there, and my friend brought it back to Canada (Calgary). Now I had a reason to ride to Calgary, so off I went. All in, the price was about C$155.00. (not including my trip to Calgary, or the flight from Spain to Calgary) There were some wrinkles during the order process, since their website didn’t want to create an order with a Canadian billing address, so I had to overcome that also.
The packaging and contents are very straightforward; from their website –
https://fit2gotpms.com/michelin-tyre-pressure-monitoring-system-bike-fit2go-tpms/
Our unique ‘plug & play’ kit comes as standard with:
- Magnetic display mount
- USB-powered inductive charger
- Two sensors to replace the original valve caps
- Two locking wheel nuts with accompanying spanner (optional fit)
- Installation instruction
The first thing I noticed was that the sensors are about 50% smaller than the Doran ones.
I had some questions unanswered by the documentation.
When you charge the head unit, the bottom 2 bars are white, not yellow like the others. I thought this meant the unit was not fully charged, but it really means that the yellow bars each represent 20% of the battery charge, and the (last) two white bars each represent 10%.
It wasn’t clear to me how the sensor reacted to a tire swap or just a removal. From one of the many emails I traded with Fit2Go –
In short and to be as concise as possible.
When the sensor is added to the tyre valve it will calibrate to the pressure that is held within the tyre. This pressure is transmitted to the bike receiver via an RF signal when the wheel is in motion.
If the sensor is removed from the tyre valve it will return to the factory setting and forget the pressure that was stored.
The sensor can be added to another tyre and the calibration process will start all over again.
When the sensors are first installed, you have 3 minutes to get moving so the sensors wake up and talk to the head unit. If you run out of time, the display remains blank. I found that you have to remove the sensors, take the head unit out of the holder, and wait at least 5 minutes before trying again. What seems to work best is to install the sensors, place the head unit in the holder and go. The shortest pairing time was about 3 minutes, the longest, about 8 minutes. Once the sensors are paired, the display wakes up after only a few tire rotations. This time delay only happens on the first pairing between the head unit and the sensors.
I had some RAM bits laying around and ended up installing the unit like this -
I have 83 degree valve stems, and had to rotate the front one in order to provide clearance for the sensor.
After about a month of living with the unit:
The display is easy to read, even thru dark sunglasses and a tinted visor. I think is uses the same technology as the FJR display, hard to read in the rain, bright enough otherwise.
The sensors wake up within 4/5 bike lengths of movement. (The Doran unit could take as long as 5/6 minutes)
The battery was discharged one bar, 20%.
It just worked, no fuss no muss, pop the head unit into the holder, back the bike out of its parking slip and the display was active.
With the unit was installed and operating properly, I was looking forward to giving this product a workout during my Vancouver-Ottawa-Vancouver 8900 km trip. Unfortunately things didn’t quite work out that way. Montana has an 80 mph speed limit on their Interstates. At the first bridge transition, I was doing about 90 mph and watched the head unit lift up and fly out of the holder. End of test!
Once home I contacted Fit2Go and they generously offered to send a replacement. They also suggested using some dble sided sticky buttons to hold the head unit in place within the holder. I think the unit wasn’t properly placed in the holder, something that I found was easy to do.
(notice the head unit is not flat in the holder, you can see the gap in the notch of the base unit)
They also suggested that a flatter install was recommended, but if I cant read the display, what’s the point?
The new bits showed up fairly quickly, considering where they were coming from. They sent a new head unit and holder. (& the sticky buttons) But nothing is easy, and this unit would not pair with the sensors. After 4 attempts, I emailed again and was asked to return the second head unit and original sensors for ‘further testing’. Within 2 weeks I received a different set of sensors and head unit. This (third) head unit sports both FCC & CE certification marks. This gear paired right away. (within about 2 minutes)
I didn’t like the dble sided tape approach, since it was my plan to remove the head unit when parked. I found that Velcro makes an “Industrial Strength Low Profile” product (who knew?) that is also water resistant. One square inch will hold 1 lb, according to their documentation. I used a single strip; so far, so good.
I have been living with this setup for about 4 months now. The ‘charged’ bar has decreased by one. I have not tried to hit giant holes to see if the head unit will stay in place, but we have plenty of bad road around and I haven’t lost this one yet.
If I were asked what to change:
The head unit mounting – maybe a screw on/off style would be better.
The charging cable is too short, in fact I would suggest removing it and replacing it with a female USB connection.
Some reviewers have suggested the alarm lamp, which is a white light, isn’t that attention getting. Perhaps red is a better choice.
If I were asked what to add:
A lean angle sensor and/or accelerometer/decelerometer function.
If the sensor batteries last 3 yrs, worst case (if say I cant buy replacements) is that I have a simple TPMS for $50 a year. $1 a week to know what the tire inflation pressures are seems like a fair deal.
Of course YMMV.
-Steve