Lessons Learned on changing the CCT

Yamaha FJR Motorcycle Forum

Help Support Yamaha FJR Motorcycle Forum:

This site may earn a commission from merchant affiliate links, including eBay, Amazon, and others.
#6 and #7 are what you need. Most of us have used the updated OEM part with no problems, but Radiohowie for one used an aftermarket manual tensioner. I replaced my CCT on the 2005 several years ago. I think you will notice a significant difference in engine noise, especially during warmup.

 
I just checked both on the Yamaha USA & Canada parts websites and there was a part number change for the chain tensioner with the introduction of the Gen III in 2013. They did not update the part numbers for any of the previous years models however. Based on what Twigg posted earlier it would appear that the new Gen III part is interchangable with earlier models but I just can't prove it through the parts listings. The Gen III chain tensioner is part # 1MC-12210-00-00 in case you were wondering.

 
That's the part I got, but not the one I ordered. Seems that at least RonAyres is substituting.

Fitted the Gen 1 just fine.

 
That's the part I got, but not the one I ordered. Seems that at least RonAyres is substituting.
Some replacement parts are considered to be 'backwards compatible' and will replace any older part in the field as well as being suitable for current use. No matter what P/N for the item you ordered you will receive the latest part. This also consolidates the number of parts that need to be manufactured and stocked. It's a good thing :)

 
I ordered a new CCT and gskt from Parkshark.com today. My next valve check comes up in about 2K, and that should be a good time to do this. Since I was ordering a couple other minor parts anyway, I went ahead and got everything for the valve check and CCT replacement too. Now I'll be ready to go without delay.

 
Update - all parts arrived as ordered. CCT has the desired "blue dot". A buddy is coming over Sunday to assist with a valve check and CCT replacement (along with a new set of spark plugs, coolant flush, and a brake/clutch flush. I've printed and read this thread many times. It's time to take a deep breath and do it.

I would NEVER attempt this without this thread. Huge kudos to our friends for taking the time to help us.

 
Update - all parts arrived as ordered. CCT has the desired "blue dot". A buddy is coming over Sunday to assist with a valve check and CCT replacement (along with a new set of spark plugs, coolant flush, and a brake/clutch flush. I've printed and read this thread many times. It's time to take a deep breath and do it.
I would NEVER attempt this without this thread. Huge kudos to our friends for taking the time to help us.
That's odd ... I ordered the part with the part# for the blue dot, and I got the part with the green dot :D

Whatever, the change was straightforward, just a little fiddly is all.

 
Update - all parts arrived as ordered. CCT has the desired "blue dot". A buddy is coming over Sunday to assist with a valve check and CCT replacement (along with a new set of spark plugs, coolant flush, and a brake/clutch flush. I've printed and read this thread many times. It's time to take a deep breath and do it.

I would NEVER attempt this without this thread. Huge kudos to our friends for taking the time to help us.
That's odd ... I ordered the part with the part# for the blue dot, and I got the part with the green dot
biggrin.png


Whatever, the change was straightforward, just a little fiddly is all.
Green dot?

Ruh Roh!

That goes to one of the French detuned FJRs. Your FJR will now top out at 100mph...max.

Better go back in with the Blue Dot.
Not true ... The French model tops 175 mph if you add a little garlic to the gas :p

 
Just to correct my previous post #105, when I unpackaged the CCT, in fact, the dot is green. I confirmed it as the correct part number and it's going to get installed on my bike.

 
Time for a dumb question. I adjust valves on my dirtbikes all the time, requiring retracting the CCT, so that is why I ask the following:

Why do we need to tywrap the cam chain to perform the CCT replacement?

Is there that much slack in the chain that it will spin and skip a tooth on the cams?

I would think the weight of the chain would keep it in place on the teeth.

Does the insertion of the CCT cause the chain to move enough to skip a tooth?

It takes a lot of work on my dirtbikes to move the chain one tooth.

Is the lower gear the issue?

Sorry again for the dumb question, just asking.

I read on another forum about using a No. 8 socket and a slotted screwdriver inserted into the socket, then a vice grip on the screwdriver, to break the lower bolt free. Sounds promising.

 
Last edited by a moderator:
Time for a dumb question. I adjust valves on my dirtbikes all the time, requiring retracting the CCT, so that is why I ask the following:Why do we need to tywrap the cam chain to perform the CCT replacement?

Is there that much slack in the chain that it will spin and skip a tooth on the cams?

I would think the weight of the chain would keep it in place on the teeth.

Does the insertion of the CCT cause the chain to move enough to skip a tooth?

It takes a lot of work on my dirtbikes to move the chain one tooth.

Is the lower gear the issue?

Sorry again for the dumb question, just asking.

I read on another forum about using a No. 8 socket and a slotted screwdriver inserted into the socket, then a vice grip on the screwdriver, to break the lower bolt free. Sounds promising.
There is a chance the cam chain will skip a tooth, yes.

Why risk it for the sake of a tie-wrap that fits very easily around the chain guides.

 
...Why do we need to tywrap the cam chain to perform the CCT replacement?Is there that much slack in the chain that it will spin and skip a tooth on the cams?

I would think the weight of the chain would keep it in place on the teeth....
There is a chance the cam chain will skip a tooth, yes.

Why risk it for the sake of a tie-wrap that fits very easily around the chain guides.
If you are changing the CCT with the valve cover in place there is a chain guide in the valve cover (Item 5) that should prevent the chain from skipping a tooth on the cams. But, there is enough slack that you can skip a tooth on the crank sprocket. One tooth on the crank sprocket is way more significant than a tooth on a cam gear sprocket. You may get away with one tooth on the crank, but two teeth, well, you don't want to go there.

Item 5:

CamChainGuides_zps7fbbb13e.jpg


Last edited by a moderator:
Finished mine yesterday. Few observations, although nothing really earth-shattering:

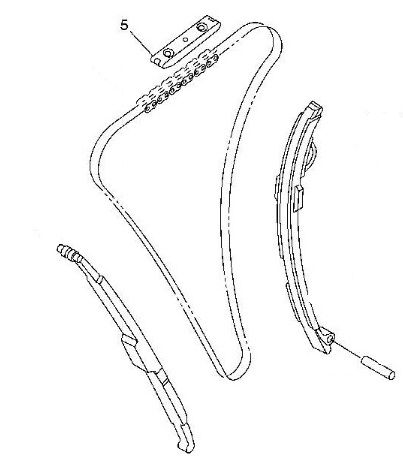
1. Being paranoid about the cam chain moving on me, I placed a zip tie around each chain guide under the cover. Since I was checking valves at the same time, and had the cam cover off, I also zip tied the chain to each cam gear. That baby didn't move. Looking back, if someone is planning to do this at the same time as a valve check, it may not be necessary to remove the timing cover. Start with the center plug to reveal the crank bolt. Then check your valves. If none need adjustment, then you can just zip-tie the chain to the cam gears for the CCT replacement and leave the timing cover on.

2. The "cut a slot in the bolts so you can use a long screw driver to start them" idea is ingenious. Once snug, I was able to use a wrench to tighten them up.

3. To keep the CCT paper gskt from moving around, I put just a spec of high-temp RTV on two spots. One less thing to worry about.

4. I also put a spec of RTV on the retraction access bolt washer to keep it from flopping off while I was moving it into position.

5. I was sure that if I didn't cover the frame hole on the inside, something was going to fall in there. So I covered the hole with some painter's tape (the blue tape). When re-assembly time came around, I just used my screwdriver that I was snugging bolts up with to poke a hole in my painter's tape, giving me the best of both worlds.

6. The "how-do" says to exercise the new CCT back and forth a couple turns so that you can feel it against the cam chain. I did that and was successful. However, when finished with that exercise, I noticed that the chain was not very tight. The how-do then says to rotate the engine and this was very helpful. In just 2 rotations, the new CCT tightened up the chain very well - and it was much tighter than the original CCT.

The result of this is a much quieter start (especially a cold start). I now know that my original CCT was MUCH weaker than the replacement part. I'm sure part of that is because the upgraded part is a stiffer spring. But how much of that is my original CCT spring fixing to crap the bucket and grenade my motor? I'll never know, but I feel much better now.

 
Last edited by a moderator:
First, thanks to the OP for the tips on CCT swap. I just did mine tonight on my ’05 and it was no big deal at all. I had the old CCT removed in 1 hr but it was another 2 before I got everything buttoned up. I also used a shortened 8mm wrench for the bottom bolt which clears the clutch cover… worked great. I did cut a slot in both CCT bolts and the top one went in easily but for the bottom, I used a rubber hose to push against the bolt while rotating it and got it threaded in no time at all. My new CCT also would not stay in the retracted position so I left the little “key” in place during installation. I spent 20 min fooling around with the screw at the end of the CCT before I read the OP’s tips and then got it installed quickly using long tweezers and a screwdriver. And yes, the new CCT is clearly stronger than the old unit.

Here’s a few pictures….

Regards,

Brendan


I'm in the process of doing my first valve check/adjustment. I decided while I have everything apart, I may as well replace the CCT. The idea of using small ignition type of wrenches is what got me over the hump. I had a set of these (SAE size) in my old tool box and found that a 5/18 fit nicely on the 8mm bolt. I was able to get the bottom bolt out in about 10 minutes. Thanks for the excellent write up! You can never have too many tools!


Latest posts

Top