My 3D printed helmet lock solution

Yamaha FJR Motorcycle Forum

Help Support Yamaha FJR Motorcycle Forum:

This site may earn a commission from merchant affiliate links, including eBay, Amazon, and others.
If I were to loose my glasses...
There you go loosing things again.
Here I go, having to defend my honor on the internet :lol: This is what happens when I don't proof read. I do know the correct word, I just can't get my touch type fingers to get it out sometimes. I am also guilty of a lot of tow instead of two mistakes too.

 
A 3d printer would be super cool to duplicate some of those teensy plastic bits like washers or push pins that are ridiculously pricey. I've seen prices drop below the 1k mark, perhaps closer to $300-500 is the magic tipping point. How did you get the design into the printer, was this CAD or did you scan it?

 
Which printer do you have? I have a Ditto+ by Tinkerine Studios a more or less local company in the Northwest. Your writeup is very nicely done. It would be interesting to read about any other FJR/Motorcycle projects that you develop. Although I have printed dozens of objects - I have not developed anything (seriously) for the bikes yet. Printed a couple of things off of thingiverse for fun but my first serious project awaits. I already have helmet locks mounted to a GIVI mount.

Steve

I have a 3D printer and I've created various bits and pieces on it. This was what I did over the weekend.
 
Not to rain on the OPs parade or "piss in anyone's cornflakes", but I really like Scott's lock location (hanging on the side) a lot better than the OPs (hanging off rear rack) or the standard "Guardian" license plate bracket location as in any of those rear mount locations the helmet is hanging upside down just asking for something to enter the interior, whether that be leaves, rain or a passing Great Dane.
wink.png


Last edited by a moderator:
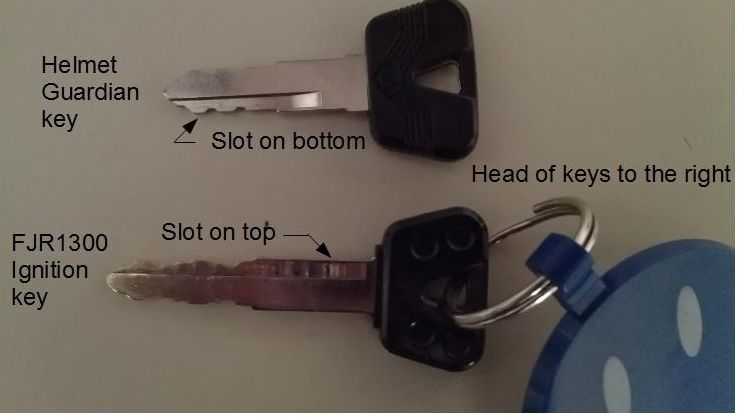
Regardless of using the OP's lock mount solution or the Townsend bracket (which I have and agree with Fred's comments), be aware that the lock used from the "Helmet Guardian" can come in one of two flavors. If you wish to re-key to the FJR ignition key (documented on the forum) you need to start out with the correct flavor of the "Helmet Guardian" supplied lock. I found this out the hard way...having received the wrong lock type in my initial order from A&S Powersports . You can see what I'm referring to in the pic below.

https://s1312.photobucket.com/user/richsp51/media/FJR1300Stuff/HelmetLock/Keycomparison_anotate_gpg_crop_zps1ca69746.jpg.html

Fortunately, Josue at A&S was able to help me with an exchange after comparing the keys of some they had in stock with the pic that I sent him. They had 30 in stock! So, if ordering a "Helmet Guardian", be aware of the lock types and request a lock with a key type that matches the FJR ignition key from the get go.

 
Last edited by a moderator:
The only issue with the 3 D printed lock is if helmets are locked and it rains. I guess you can use them as a way to store rain water for drinking later??
I've got one of these locks on order and will mount it with TownsendFJR's bracket on the "uphill" side of the bike when parked on the side stand. This matches the location Yamma Momma had them installed on my 1970's bikes, and allows the helmet to rest against the bike -- wait for it -- with the opening facing down! No rain, no trash, no Great Dane urine.

Now, why didn't my state-of-the-art, top-of-the-line, sport touring motorcycle come equipped with this inexpensive, but extremely convenient, little device?
The thread I think it is almost a year old eh?

 
^^^^^^^^^^^^^^^^^^^^^^^ Hmmmm. Wonder how that happened when I normally cruise through with the "View New Content" button?

 
Curious about a couple things. You said, "I've got a 3 D printer." I'm thinking you have access to one at the shop? Or do you own it? Which brings up my next question, how much are those rascals? When I first heard about them years ago, they cost a fortune.Next: what material did you print it with? What's it made out of? How strong is it? How much does it cost to make something like this once you have the printer all ready?

I spent some time in tool and die shops doing support work for both wire and "sinker" EDM machines. These printers were the next big thing back then, but I've not heard much about them since... I retired from tool and die shops due to the volatility of manufacturing in Florida. I grew tired of dealing with reduced hours and being laid off and decided to jump to a different field.

Gary
You can buy em or you can assemble them. It's kinda like cars back in the early 1900s with a ton of manufacturers and a bunch of open source designs which are out of date every 9 months (but still quite workable). Building one is a huge rabbit hole if you like those things. Buying one is a bit easier but don't expect it to work right every time. It's more like a machine shop machine than a modern desk jet printer. Think how finnicky xeroxes were in the 80s. If I bump my printer I have to re-dial the bed in to ensure a good print. Also the accuracy of the prints is no where near that of a machine shop. Tolerances is are in the .5-1mm range often in the x-y range, and about .2mm in the z.

Another thing to consider is unless you want to print designs other people have come up with, you really need to get ahold of a cad program, and that's another rabbit hole. I spent about a month (30 hours) learning solidworks enough to be able to print decently complex parts. And solidworks is 7k+ if you buy it outright. I'm taking class at a technical college so I merely pay 175/year for it, but it's a badass package. I've been doing finite element analysis (computer stress simulations) with it on a frame I'm designing to learn how.

 
A 3d printer would be super cool to duplicate some of those teensy plastic bits like washers or push pins that are ridiculously pricey. I've seen prices drop below the 1k mark, perhaps closer to $300-500 is the magic tipping point. How did you get the design into the printer, was this CAD or did you scan it?
$300-500 is going to be hard as it needs to be steady in 3 axis during print, though not for large amounts of torque like a mill would have to be. So the frame is likely going to be 120+ just by itself minimally. There are many cheaper printers but the cheaper they are usually the more things you have to check on it. They're very dumb machines usually, they do what they're told and don't have any feedback loops other than 1-2 temperature probes and some homing stops. For instance for quality prints I need to re-level my bed (2-3 minutes process) anytime I bump the printer or accidentally pull up on the bed with any force. Think of a bike where you didn't know if the tires had air in them or oil or gas every time you started it out without checking with a guage (not included).

As for getting designs into the printer, generally people use something like repetier host to control the printer. Printers talk in .STL files, which are just solid body shapes. Any good cad program can output .STL files. Cad programs have their own formats, equivalent to .psd files for photoshop. You can either make your own designs and thus STL files or you can download them / buy them from online locations, of which there are quite a few. Repetier host takes the files and runs them through a slicing process which turns them into layers that the printer can handle, this is called gcode, which is somthing that cnc machines use as well. It's like that old log programming language. Go here at this time, this speed, then here then here. Imagine breaking a circle up into 1000 line segments, that's what this does.

Anyway the full process is:

CAD -> STL -> Repetier -> Slicer -> Gcode -> Repetier -> (USB) -> Printer -> Filiment -> Object

The full workflow goes like this: CAD -> Cad File -> Export STL -> Repetier Host -> Slice

 
Curious about a couple things. You said, "I've got a 3 D printer." I'm thinking you have access to one at the shop? Or do you own it? Which brings up my next question, how much are those rascals? When I first heard about them years ago, they cost a fortune.Next: what material did you print it with? What's it made out of? How strong is it? How much does it cost to make something like this once you have the printer all ready?

I spent some time in tool and die shops doing support work for both wire and "sinker" EDM machines. These printers were the next big thing back then, but I've not heard much about them since.

Gary

I own a 3D printer; they can be expensive, I think mine was $1500. The material is ABS plastic and it's quite strong! Those parts are probably less than 10 cents in materials.
At CES this last time, Makerbot announced printing filaments in limestone, metal and wood.

https://store.makerbot.com/filament/composite

 
Badass videos at that link, Bounce. The 21st century is moving in, whether we're ready for it or not.

 
Top