Valve check-ever been tempted to re-shim the entire valvetrain?

Yamaha FJR Motorcycle Forum

Help Support Yamaha FJR Motorcycle Forum:

This site may earn a commission from merchant affiliate links, including eBay, Amazon, and others.

blassoff

Its just the dog in me, baby
FJR Supporter
Joined
Sep 4, 2009
Messages
530
Reaction score
101
Location
Villanova PA
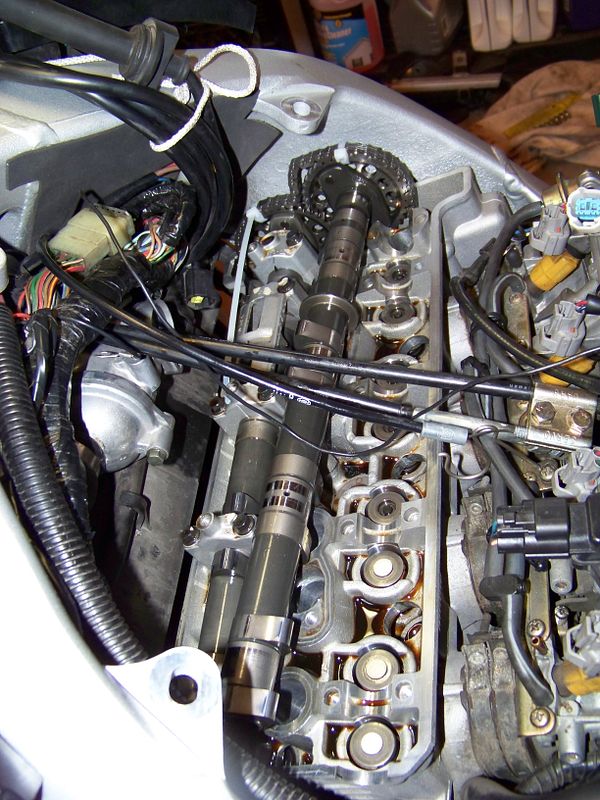
So I went ahead and did the valve check on my own. SO freaked out that I invited a "bunch of bikers" to the house so I cancelled the tech section I had planned. Valve-check proceeded without incident except that everything is kinda tight. All exhaust valves are .200 except for cylinder 4 which is .180. Intakes are all .150 again except for cylinder 4 which is .138. I tried to lift the intake cam, but since cylinder 4 is next to the crank (and I didn't want to let the cam chain loose) I couldn't get enough clearance to remove the riser and change the shim. I'm gonna find me a local mechanic and make him let me participate in the operation. I changed the CCT, but the original was perfect. 46000 miles and the engine was always quiet.

So everything is kinda tight. I'd like the exhausts to be around .220 and the intakes at .180. So yea, I'd like to re-shim the entire freaking thing.

Questions: the CCT I bought is a green dot (not blue). It doesn't lock into a retracted position. I don't think it matters, but what'd a y'all think. 2. Is it horrible that I continue to ride with the intake on 4 so tight? Am I going to do any damage if I run the motor for a week or two before I change the shims?

Dats it. Thanks all! Baz

 
The new CCT should be a 1MC-12210-00-00, they shouldn't sell you any of the older models.

I'd hope it wouldn't lock in it's retracted position.

Mind you the first generation of the CCT's could fail anytime.

I work to roughly %75 on valves, so ideally:

Exhaust 0.229 mm

Intake 0.199 mm

Not that I've had to swap one out on a FJR yet.

 
nevermind. All of a sudden the forum has gone stoopit and will not allow me to post the link I want. Go to jakewilson.com and search for pro-x valve shim. The normal kit comes in .05mm increments. Your search will show .025mm increments. If yer gonna be anal, be accurate.

 
Last edited by a moderator:
It's a bit unusual for ALL valves to be out (or at least marginal). Especially if this represents a significant change from the last check.

Is this the first valve check for this bike? If not, how was it the last check?

How many miles? (total as well as since the last check)

VERY important - was the engine fully cool when you did the check?

There is a possibility that things are carboned up thereby reducing the clearance. Some advocate a liberal Seafoaming (or Ringfree treatment) prior to doing a valve check. I haven't done so but...

On my last valve check at ~80,000 miles, I had all exhaust valves in the middle of the range. A number of intakes were at the minimum specification and I expect to need to reshim these at the next check - due right about now.

 
Last edited by a moderator:
Comments below:

All exhaust valves are .200 except for cylinder 4 which is .180. Intakes are all .150 again except for cylinder 4 which is .138.
FJR Valve clearance specs are: Exhaust 0.18mm - 0.25mm, Intake - 0.15 - 0.22, (0.18 Exhaust or 0.15 Intake is in spec)

So, all of your valves are in spec with the only exception being Intake #4, if that was correctly measured. But the fact that you say the valve measured 0.138 mm makes me believe that you are using inch based feeler gauges and converting to metric. I would suggest that you just spend the few bucks to get the correct, more accurate, metric feelers.

IMO, a valve that is in spec when checked will not gain anything for being re-shimmed. But, if I were going to bother doing a reshim, I'd go ahead and put everything in the upper - middle of the range so you don't have to do it again real soon.

I tried to lift the intake cam, but since cylinder 4 is next to the crank (and I didn't want to let the cam chain loose) I couldn't get enough clearance to remove the riser and change the shim.
The intake cam will come out with the chain Ty-wrapped to it. You do have to slacken the CCT fully, remove all the cam caps, and then once you lift the cam out of the bearings a little bit you can lift the left end of the cam to produce even more clearance to the journals and then roll it forward out of the way:

100_3798.jpg


I'm gonna find me a local mechanic and make him let me participate in the operation. I changed the CCT, but the original was perfect. 46000 miles and the engine was always quiet.

So everything is kinda tight. I'd like the exhausts to be around .220 and the intakes at .180. So yea, I'd like to re-shim the entire freaking thing.
When I reshimmed at 75k miles (3rde valve check) I needed to adjust all 8 of my intakes, but the exhausts were still all fine. So I just lapped the shims down to size using a micrometer and very fine sandpaper. Did not take all that long and it allowed me to hit the target clearances dead-nutz with no waiting for parts. It also allows better accuracy (as accurate as you are with the micrometer) as compared to replacement shims that only come in 2.5mm increments.

Questions: the CCT I bought is a green dot (not blue). It doesn't lock into a retracted position. I don't think it matters, but what'd a y'all think. 2. Is it horrible that I continue to ride with the intake on 4 so tight? Am I going to do any damage if I run the motor for a week or two before I change the shims?
The green dot is the latest marking for the newest CCTs. I've found that none of the newer paint dotted CCTs will lock in the retracted position like the originals did. Just use the metal key to install them.

Will you do damage running the bike as is? Not likely. You've been running it with those clearances for a long time now, and just did not know it. A couple of weeks will not allow your engine to grenade. But I wouldn't just forget about it and leave it for another 25k miles.

 
Last edited by a moderator:
Don't see why the metric feelers are more accurate? 0.001" = 0.0254 mm

If your metric set has 0.13, 0.14, through 0.27 in .01 mm increments then OK they offer finer detail.

The gauge sets I've seen are similar to this:

25-blade gauge measures clearances from 0.04 to 1mm. Blade sizes:0.04, 0.05, 0.06, 0.07, 0.08, 0.09, 0.10, 0.15, 0.20, 0.25, 0.30, 0.35,0.40, 0.45, 0.50, 0.55, 0.60, 0.65, 0.70, 0.75, 0.80, 0.85, 0.90, 0.95 and 1mm. Blade Lengths: 3 in. long

0.05 mm increments in the range we need. The inch gauges offer finer detail -- 0.0254 mm increments

I'd recommend stuffing a rag or paper napkin in all those round openings offering access to the head bolts. I mishandled a shim, dropped it, and it disappeared down into one of those holes to the level below. It must have rolled when it touched down because it disappeared and was very difficult to find. I found and extracted it with a small magnet mounted on a soft, flexible alloy rod. Worst mishap I've ever had tinkering on a machine.

I'm amazed there are no bearings on the camshafts. The supply of oil must be generous from that small hole in the camshaft at each cap location. The centrifugal force from the camshaft rotation and the oil pump pressure must really propel the flow of oil.

 
Don't see why the metric feelers are more accurate? 0.001" = 0.0254 mmIf your metric set has 0.13, 0.14, through 0.27 in .01 mm increments then OK they offer finer detail.

The gauge sets I've seen are similar to this:

25-blade gauge measures clearances from 0.04 to 1mm. Blade sizes:0.04, 0.05, 0.06, 0.07, 0.08, 0.09, 0.10, 0.15, 0.20, 0.25, 0.30, 0.35,0.40, 0.45, 0.50, 0.55, 0.60, 0.65, 0.70, 0.75, 0.80, 0.85, 0.90, 0.95 and 1mm. Blade Lengths: 3 in. long

0.05 mm increments in the range we need. The inch gauges offer finer detail -- 0.0254 mm increments
Using metric gauges you have a resolution of 0.01mm for each measurement. Using inch based gauges you have a resolution of .001" which = 0.0254mm, therefore the metric gauges are capable of measuring in 2.54 times smaller increments, or 2.54 times more accurately.

When using feeler gauges (either inch or metric) you do not always use a single blade to achieve a particular thickness, For instance, if you were attempting to measure 0.21mm with the gauge set you described you would use the 0.05, 0.06 and 0.10 stacked up to make 0.21 mm. It works the same way with the inch gauges, just that they are more than twice as thick per increment.

 
Last edited by a moderator:
I'm not a fan of stacking gauges for this application.

The available shims for purchase are in increments of 0.025 mm. I'm not into making thinner shims via sanding, etc.

0.001 inch = .0254 mm.

If you're using inch gauges, each 0.001 up or down corresponds almost exactly to an available shim.

Going beyond this degree of precision for this application is overkill in my opinion. Where's the value?

 
+ 1 on the sanding down your own shims. It's really easy to do and a great pass-time while watching your favorite ball game. FWIW, metrics have always made me nuts. I worked with them for years in my old tool and die days. But I always refused (and still do) to measure with them. Using a simple calculator, I converted all metric measurements to thousandths of an inch and did my work that way. Simple enough to do: any metric number... divided by 25.4

So I take any metric measurement (like for example, 1 mm), and divide it by 25.4 --- which = .03937 or about 39 thousandths of an inch

Just my opinion

Gary

darksider #44

 
Was into my '09 over this past winter. Like the OP, all the intakes are at minimum except one on #4 that is just under spec. Plan to go into it again this winter and shim all the intakes to mid-spec. Hopefully that will be last adjustment needed. Curiously, all exhausts were right in the middle.

I'll replace the tensioner with the latest version and use the Fred method on the intake cam...hope it works out as well!

--G

 
Going beyond this degree of precision for this application is overkill in my opinion. Where's the value?
That is your opinion, and you are certainly welcome to it. But you're really just being argumentative. First you replied to my post that you didn't see how metric feelers were any more accurate, and then when I told you how they are you now say that it doesn't matter?

Having increased precision in making a measurement is never a bad thing, IMO. For one thing, it gives you objective data that support how the parts are wearing over time. Yeah you can also do that with the inch gauges by adding some additional subjectivity such as "tight .007" or "loose .006", but you can do the same thing with the metric gauges and increase the resolution.

Stacking the gauges (to achieve intermediate steps) is how they are designed to be used. If they did not intend for you to stack them they would provide the feelers in .01mm steps. You do want to be sure to wipe the gauges clean before stacking, but if you are worried that you'll be increasing the total stack up enough to matter, don't. Checked that theory with a micrometer proves that the dimensional increase is insignificant.

As for just using the available replacement shims, vs. custom sanding them: The factory shims the engine with shims varying in .01 mm increments. They only make the replacement shims in .05 mm increments to simplify the stocking of parts. Yes, some aftermarket sources have them in half increments. If going through the hassle of pulling the cams to access the shims, I'd prefer to do as accurate a job of setting those clearances as the factory does.

 
Last edited by a moderator:
+1 on the metric gauges. I'm likely to get a chance to try the shim-sanding with the next check (4 intakes were at minimum the last time). In addition to the ability to get better precision (whether or not it matters), once it is apart to determine which shims are needed I don't want to leave it that way while I go to the local dealer to see whether they have the needed shims in stock. Knowing my local dealer, they would be happy to order the ones I need and I would have them in less than a week! I thought about getting a shim kit and while the individual shims are cheap and cover a wide range, there are only a few of each of the sizes that are likely to be needed and only come in 0.05mm increments. As others have observed, the exhaust valves were all pretty close to the middle of the range - wonder if there is a reason for more apparent wear on the intakes? Also wonder how accurately Yamaha sets them at the factory.

Fred - how did you retract the blue-dot CCT and keep it from closing? I was thinking about leaving the screwdriver in place clamped with a small vice grip and/or duct tape. In addition to tie-wrapping the cam sprockets to the chain, did you do the same to the lower sprocket?

 
I used a roach clip medical grade hemostat to clamp the little screwdriver holding my CCT.

I suspect that Yamaha intentionally sets the intakes on the tight side of spec, though I can not guess why. At my very first valve check @25k miles they were already all on the tight side and only drifted just below spec on the 3rd time around.

I found that the factory shims varied in thickness by as little as .01mm (measured with a micrometer). Here's what mine were:

Intake Clearances Before

0.13 0.14 0.13 0.12 0.13 0.13 0.14 0.13

Shims As Found

1.79, 1.79, 1.81, 1.81, 1.81, 1.81, 1.80, 1.79

New Shims (sanded)

1.72 1.73 1.74 1.73 1.74 1.74 1.74 1.72

Intake Clearances After

0.21 0.20 0.20 0.20 0.20 0.21 0.20 0.20

So, in retrospect, yes I could have just jammed in eight new 1.75mm shims (a shim kit would only have had 3 of them) and my clearances would have been:

0.18 0.18 0.19 0.18 0.19 0.20 0.19 0.17

But the big question to ask is: How long would it be before that 0.17 went below the 0.15mm spec and I'd have the opportunity to do this all again?

 
Last edited by a moderator:
Well, now that YOU are the expert I will invite you down to my workshop in Richmond (only 240 miles from Villanova) to help when I check my valves sometime in the next few weeks. I bought ALL of the gaskets, o-rings, etc, plus I bought those special cover plates to get rid of the messy plumbing.

Stuart

 
Well, now that YOU are the expert I will invite you down to my workshop in Richmond (only 240 miles from Villanova) to help when I check my valves sometime in the next few weeks. I bought ALL of the gaskets, o-rings, etc, plus I bought those special cover plates to get rid of the messy plumbing.
Stuart
Cool Beans. I'll certainly give it a shot. Long process, but worth the effort.

Stu: I took my time through the process, changed the CCT, changed spark plugs, replaced a plug cap that I previously ripped, Removed the PAIR system and installed Dave Wynn's plates, and measured each valve set at least twice. I started Friday afternoon and didn't fully clean up the garage until Monday. Oh, and a little RTV will make the valve cover gasket behave.

Lemme know when and I'll see what I can arrange.

Baz

 
Last edited by a moderator:
Sorry Fred: I misspoke. The tight intake valve was .127 (not .138) (or .13 in your book). And yes, I did measure it accurately. I have a reasonable quality set of Chinese angled feeler gauges and I am able to read a micrometer having used one in a previous employ. Also, I used to work (and play) on a 1976 Porsche 914 which also liked to have her valves adjusted from time to time. I have multiple tool sets, almost exclusively METRIC.

See, here's where I was going with my original query; Almost all of my valve clearances are within spec. That said, they're all on the low side of spec. I'd much prefer to have them in the middle. At 46,230 miles, this was my first valve clearance check. The picture you have is great (that's precisely what I'd hoped to be able to accomplish). I tied both cams to the timing chain and removed the cct. I didn't feel like I couldn't get sufficient slack to pop the shim and riser on the #4 cylinder. So I put everything back together. Bike runs well except for that off-idle hesitation is back. I figure I'll run her a couple of thousand miles and then re-tackle the tight valves.

Thanks to all for the input! Really do appreciate it!

Baz

 
Why the hell does everyone want their valve clearances to be "in the middle"???

"In the middle" only means you're losing out on the maximum valve lift you get when they're "on the money". And valve lift equates directly to valve duration, and the longer the valves are open, the more fuel you get in and the more exhaust you get out.

Are folks trading off possible performance gains because they're too lazy to adjust their valves according to MamaYama's schedule???

i shake my head in amazement.

Paging Haulin'Ashe to the courtesy phone........

 
Last edited by a moderator:
Why the hell does everyone want their valve clearances to be "in the middle"???...
For me it's simply a matter of having a little wiggle room for the clearance to change over time and still be in spec Putting your clearances somewhere other than the spec'd min or max lets that happen (not that FJR clearances tend to move much). My last valve check yielded two that needed a change.. one intake and one exhaust, both at or just below minimum spec so I put them in the middle somewhere. This is probably more critical for the exhaust than the intake but I like'm something other than the min/max. Seat Time.... I'm also concerned with Seat Time. If all 16 valves are at minimum clearance this would give maximum lift and duration but minimizes their time closed (ie, "seated) during which they transfer heat to the head and cool off... and I just couldn't live with knowing that despite whatever performance gains I might see..

I'm just kidding on that last part...but I do like'm in the middle!
punk.gif


Mr. BR


Latest posts

Top