Apologies for the lack of progress postings. I caught something that has left me sick as a dog. Yesterday I made the decision to work it off & spent time in the workshop. Here is what conspired.
I needed to replicate the lower side panels, and set about making this as painless as possible. I didn't want this to turn into a time-sucking magnet and went about it in a manner that would require the least set-up time for the greatest return.
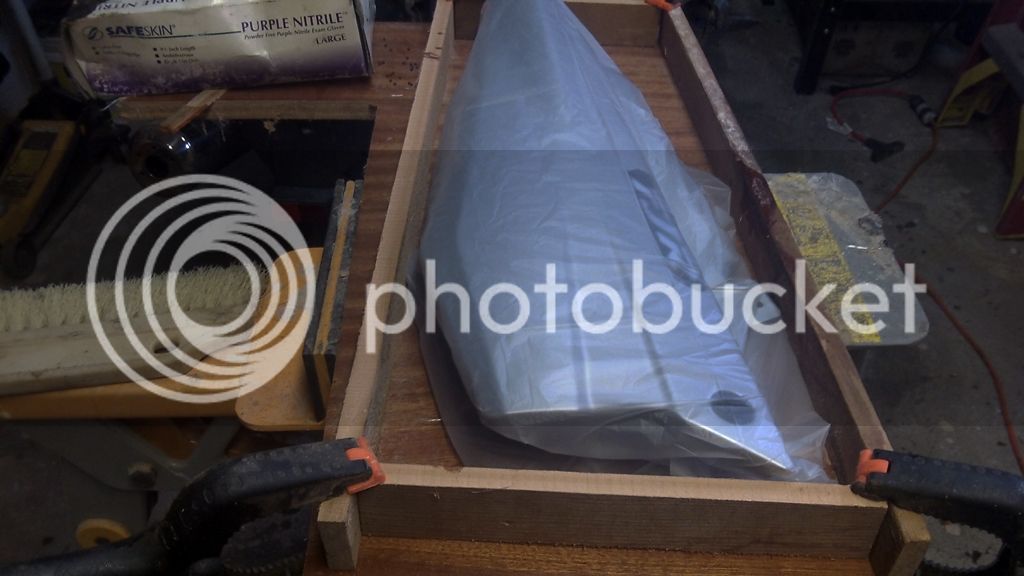
The first pix illustrates my minimum requirements: Quick set up for the part copy. The part to be replicated is trapped in a single layer of polyethylene trash bag. Room has to be left around the bag and the bag should not be stretched too tightly over the part. Resin won't stick to that & the bag won't allow the resin to contaminate my tupperware. The part was surrounded by a wooden curb of 2" wood strips to define the work area. Resist the urge to nail the frame together as this is a non-productive step & will come back to haunt you later. This will become evident later in a few pix.
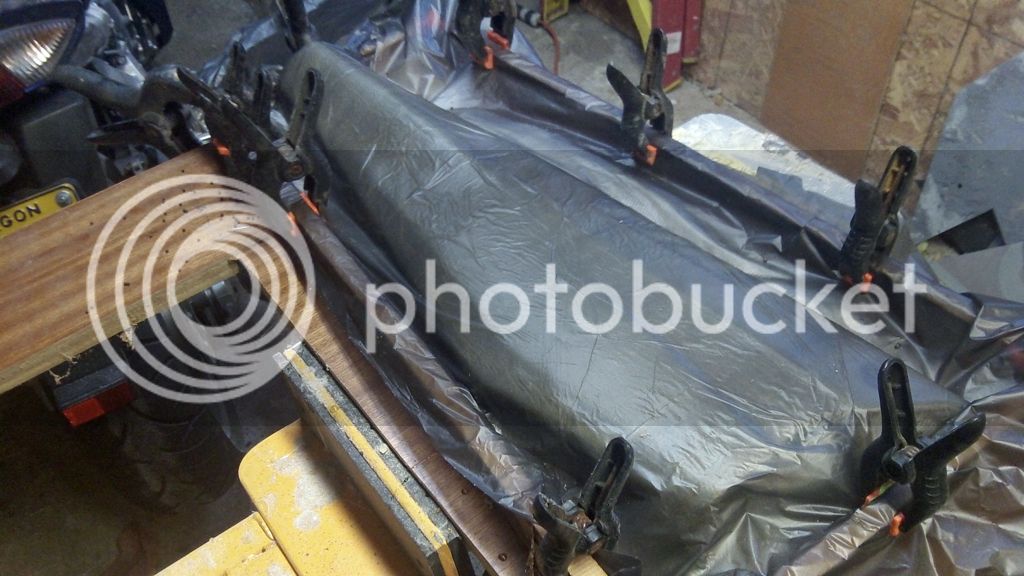
Mix up a small batch of resin measuring carefully the resin & hardener. No need to be wasteful & mix too much! This took about 2 ozs of resin. Paint the plastic covered part, and then lay down a layer of fiberglass cloth over the top. Tease away the major folds & wrinkles with a brush or plastic squeegee. The cloth will become clear once it has become saturated. Add another layer of fiberglass cloth over the top of the last layer & smooth out the folds as before. Epoxy is slippery to work with, it doesn't require a lot of muscle to do this.

Over the top of the sticky stuff an additional layer of plastic is draped over the part and curbing. Clamps are the tools at hand & priceless at this step. Leave some slack in the plastic around the perimeter between the part and the curb, but the plaster overlay should not touch the work area table top.
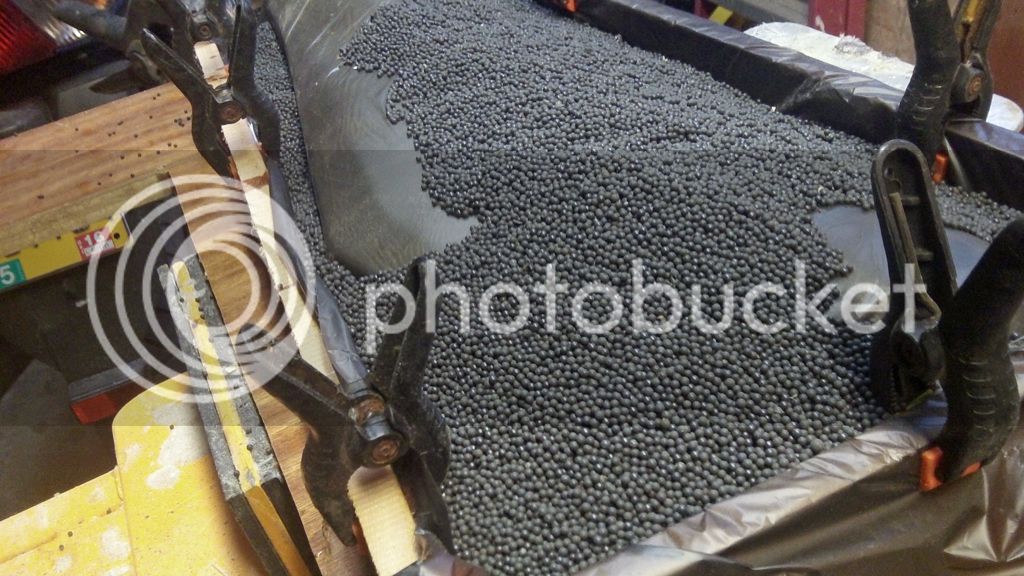
It helps to have about 10 lbs of lead shot laying around, and I suppose sand would work as well... pour this over the part. The idea is to stretch the plastic around the part which will squeeze-out the excess resin. Allow about ten minutes to pass for the lead to do what it has to do, then remember to loosen the clams around the curbing to allow the lead to push the excess resin further down the sides of the part.
Once the resin has hardened, the lead shot is removed by undoing one set of clamps & removing a section of the wooden curbing & raking the shot into a bucket. (glad you did not nail the wood pieces together?). The plastic sheeting can now be removed from the part by giving it a little tug... resin won't stick to it.
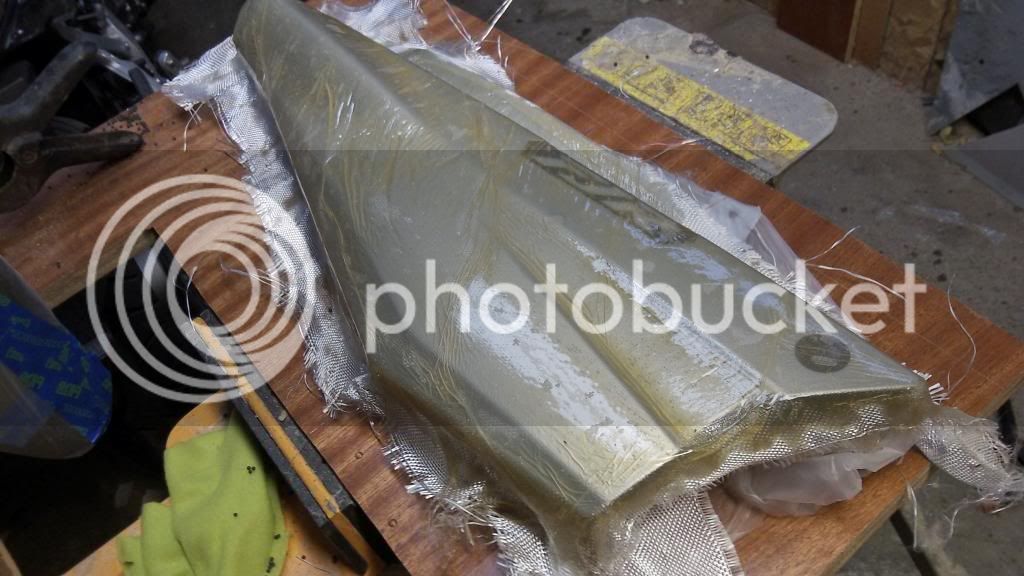
The excess fiberglass cloth is cut away ( I prefer to sand it), and the part can be examined. Some sanding will be required as a few "wrinkles" of resin will become evident upon close inspection... the part has to be sanded anyway though, right?
I am using only the top surface of the part we made here, if the whole part copied was the focus, then the sides would have to be given more attention than what I required. If this is ever the case, examine the part for NEGATIVE ANGLES! You can see how removal of the copied part may become little difficult if you were attempting to replicate a basketball, or a life-sized copy of the motor.

I have to go see the Doc today, but afterwards I am spending time in my workshop... have to do something with these panels, no?
I needed to replicate the lower side panels, and set about making this as painless as possible. I didn't want this to turn into a time-sucking magnet and went about it in a manner that would require the least set-up time for the greatest return.
The first pix illustrates my minimum requirements: Quick set up for the part copy. The part to be replicated is trapped in a single layer of polyethylene trash bag. Room has to be left around the bag and the bag should not be stretched too tightly over the part. Resin won't stick to that & the bag won't allow the resin to contaminate my tupperware. The part was surrounded by a wooden curb of 2" wood strips to define the work area. Resist the urge to nail the frame together as this is a non-productive step & will come back to haunt you later. This will become evident later in a few pix.
Mix up a small batch of resin measuring carefully the resin & hardener. No need to be wasteful & mix too much! This took about 2 ozs of resin. Paint the plastic covered part, and then lay down a layer of fiberglass cloth over the top. Tease away the major folds & wrinkles with a brush or plastic squeegee. The cloth will become clear once it has become saturated. Add another layer of fiberglass cloth over the top of the last layer & smooth out the folds as before. Epoxy is slippery to work with, it doesn't require a lot of muscle to do this.
Over the top of the sticky stuff an additional layer of plastic is draped over the part and curbing. Clamps are the tools at hand & priceless at this step. Leave some slack in the plastic around the perimeter between the part and the curb, but the plaster overlay should not touch the work area table top.
It helps to have about 10 lbs of lead shot laying around, and I suppose sand would work as well... pour this over the part. The idea is to stretch the plastic around the part which will squeeze-out the excess resin. Allow about ten minutes to pass for the lead to do what it has to do, then remember to loosen the clams around the curbing to allow the lead to push the excess resin further down the sides of the part.
Once the resin has hardened, the lead shot is removed by undoing one set of clamps & removing a section of the wooden curbing & raking the shot into a bucket. (glad you did not nail the wood pieces together?). The plastic sheeting can now be removed from the part by giving it a little tug... resin won't stick to it.
The excess fiberglass cloth is cut away ( I prefer to sand it), and the part can be examined. Some sanding will be required as a few "wrinkles" of resin will become evident upon close inspection... the part has to be sanded anyway though, right?
I am using only the top surface of the part we made here, if the whole part copied was the focus, then the sides would have to be given more attention than what I required. If this is ever the case, examine the part for NEGATIVE ANGLES! You can see how removal of the copied part may become little difficult if you were attempting to replicate a basketball, or a life-sized copy of the motor.
I have to go see the Doc today, but afterwards I am spending time in my workshop... have to do something with these panels, no?