I thought the ST1100 plastic was a bi$#h ...

Yamaha FJR Motorcycle Forum

Help Support Yamaha FJR Motorcycle Forum:

This site may earn a commission from merchant affiliate links, including eBay, Amazon, and others.

Nanahanman

Well-known member
Joined
Mar 21, 2013
Messages
295
Reaction score
59
Location
Toronto
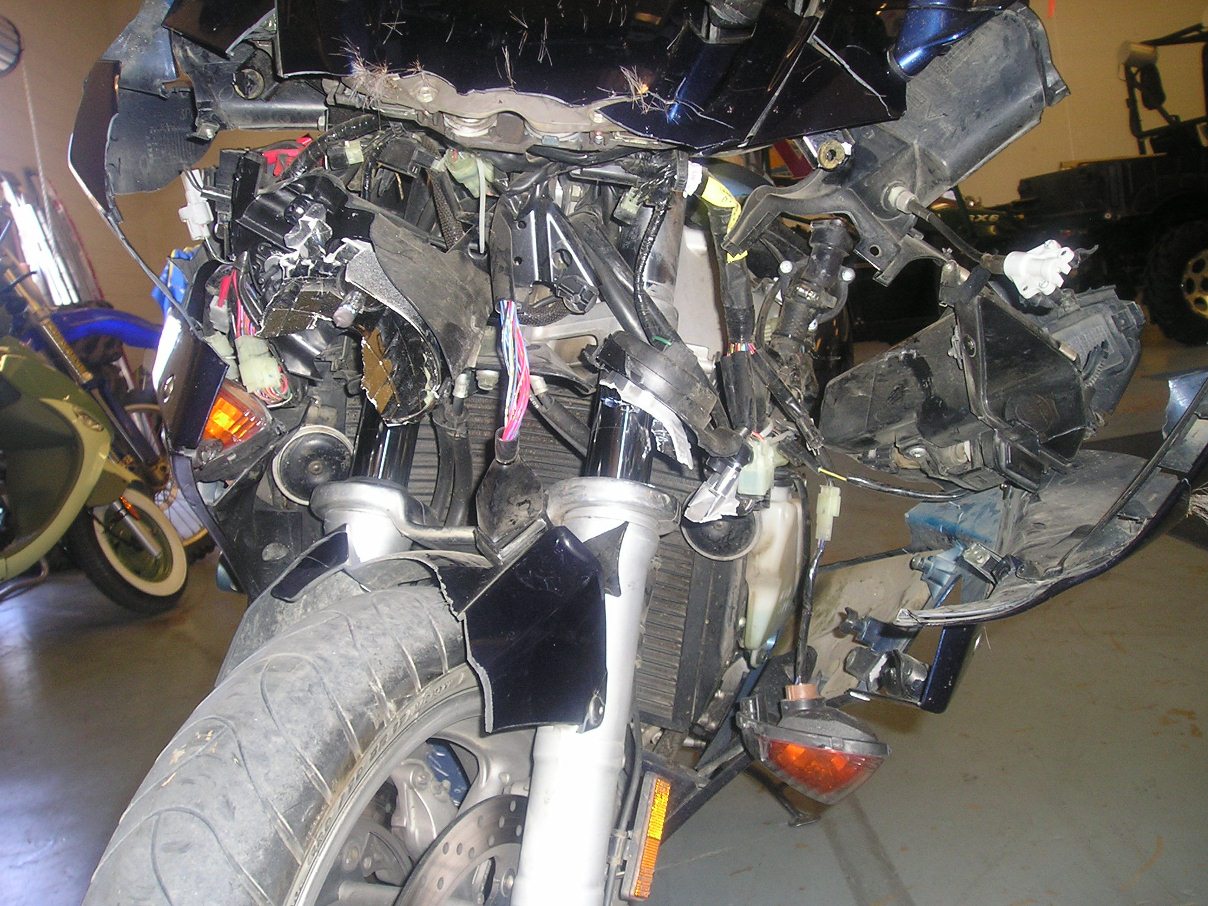
So I wanted to replace the horns with some FIAAM blasters and while in there, get the windscreen auto retract disabled.

Could not get to the little connector without releasing the front cowl. There was no facial grimace or use of language that could get me access.

Now I have worked on an ST1100 for some years and thought that was a bit....problematic...to get into, but this FJR takes that to a new level of insanity!

What's with all these cheap plastic fasteners!?

I did manage to sort it all out even though Yamaha cleverly disguised the retract jumper to look like it was part of a continuing harness.

The "jumper" part of the mating connector was actually a 6" long wire loop that ran back into the harness stuffed under the instrument cluster, juuuuuuuust out of reach.

Those lower front cowl Phillips screws required a unique tool to remove.

The jumper is still connected, the wire cut, and has been kept available for a switch.

Anyway, horns in, jumper out and I now have a good grasp of the procedure for the Tupperware Party
smile.png


Oh, and a few Bandaids on my hands!

 
And in the FAQs section, Kaitsdad's Gen-II fairing and cowl removal.

The nose cowl is easy to remove, once you realize it's the LAST piece to come off. You start with the lower fairing and work your way forward and up.

And for any Gen-I guys looking and saying "But what about us??" some guy full of god-like wisdom has a similar thread for Gen-I bodywork.

 
Kaitsdad's step-by-step saved me from becoming a gibbering idiot the first time I removed the plastics on my '09, coincidentally to install a pair Hella Supertone horns..

 
Someone should take beer* and a camera over to Fairlaner's to document the Gen III procedure. At each step requiring a photo, hand him his beer*.

(Take a video camera too, so we can be entertained by an intoxicated man trying to assemble a motorcycle.)

*Or his beverage of choice, of course.

 
It's interesting how some people assume I didn't read up on this job before starting.

I'm not a total lunatic...at least not yet :)

Researched the links and looked at the pics before and during the work.

Even with those resources, it's a bear of a job!

 
Someone should take beer* and a camera over to Fairlaner's to document the Gen III procedure. At each step requiring a photo, hand him his beer*.
(Take a video camera too, so we can be entertained by an intoxicated man trying to assemble a motorcycle.)

*Or his beverage of choice, of course.
The sooner the better too. My frame sliders just arrived today and I am hesitant to tear into the plastic on a new bike.

 
It's interesting how some people assume I didn't read up on this job before starting.I'm not a total lunatic...at least not yet
smile.png


Researched the links and looked at the pics before and during the work.

Even with those resources, it's a bear of a job!
Well, some people (me) might do it that way. We just wanted to make sure you knew you had resources available, or anyone else reading this that might venture to do it themselves.
biggrin.png


Practice makes perfect...after a dozen or so times you'll be a pro at it!

Seriously, once you learn all the little tricks, you can undress the ol'girl pretty darn fast.
coolsmiley02.gif


--G

 
Last edited by a moderator:
I still get stuck with the fastener thingy on the back when undressing the ol girl.
biggrin.png


Last edited by a moderator:
I dunno...maybe it's cause mine is Gen 1...I found the retract plug after (only) removing the 4 panels surrounding the cockpit. For the horns, I only removed the 2 inner black panels surrounding the top of the fork sliders. My panels have only been off for (WFooshee's) AVCC install or engine removals. I've learned to flex the panels to replace turn signal bulbs. And don't Gen 2 sliders fit in the gaps of the side panels, so no removal needed. I was able to install my R&G sliders, that fit through the panels with guidelines of WFooshee to properly make the hole. And my nose assembly has never been removed.

Lucky me?

bike.gif


but yeah do what I did and many do...make an order with RonAyers.com and get extras

I have a couple of all the plastic fasteners or threaded grommets...a number of each panel bolt...the plastic washers on colored panels...a set of caliper bolts...a set of tank hold down bolts...even a drain plug (can use a final drive plug with magnetic for the crankcase oil drain), drain plug crush washers, dada dada dada

 
Last edited by a moderator:
Any Tupperware bike has it's nuance's to take apart. I is a matter of doing it once or twice and you wont have a problem. A pick for the plastic rivets and you are set.

The BMW K 1200 LT was also a pain the first time or two, but you will remember the second or third time no problem.

Waite to you loose a headlight, then you will do a little cussing. Just did mine on Wednesday, and no fun even the second time.

Time with the bike doing maintenance will get you comfortable with it all, it really is no big deal.

 
Now that I have done it once, it won't be so bad next time.

The trickiest part was the lower front cowl screws. Even with a stubby, it was tight.

As it turns out, the perfect tool is a unique "screwdriver handle" style 3/8 ratchet that I loaded up with a Phillips bit and presto! The handle rotates like a screwdriver and that turns the drive.

I bought it 3 years ago 'cause I thought it was cool and it sat in my kit, unused. Happy to have it now!

As for opening up the bike with no prior research, well, I won't even admit to how much stuff I took apart looking for the battery
rolleyes.gif


Received the shop manual in the mail yesterday so that should help.

Also printed up an 11x17 coloured wiring schematic and laminated it.

Very handy!

 
Got the aftermarket FZ1 mirrors today and installed.

All plastic back on and pretty much all the fasteners aligned without too much bad language.

Whew!

Hope that's it...for now.

 
Late to the party, but no point in starting another thread.

My recently-purchased '09 had a slightly bent right hand mirror bracket.

"Oh, I will just take this side plastic piece off after dinner, straighten it with a crescent wrench, and pop it back on."

And so it began...

I got about 1/2 way into it and figured I HAD to be overlooking something that simplified this plastic 3-D puzzle, so I clicked my way to here and followed the links.

To my horror (equal with self-satisfaction) I was proceeding just as suggested.

(night falls)

I found some tiny disconnected plugs hiding in there and discovered that someone had installed LED strips next to the headlights. Cool!

...except one wasn't working. Foo. I'd have to get back to this in the morning.

(the next day)

I traced the wires, checked continuity, and finally found that the installer had not soldered very well to the pin inside the connector for the right side running light. No problem. I'll just take out a bunch more fasteners of random lengths, types, thread pitches, surface finishes, and drive styles, and pop that light out of there.

(you know, there was an article once that demonstrated Japanese efficiency by listing the various fasteners found in a Honda compared to a Chevy - the Honda used the same fastener over and over while Chevy dedicated a gang of engineers to optimize every fastener for its specific application, resulting in 1000's of different fasteners in one vehicle. Yamaha missed that article)

It's a good thing this stuff is not-too-old ABS because I was just bending it this way and that (I often work with ABS at my job - it's tough stuff unless it's been cooked).

Got the connector out. Got the wire re-soldered. Got the LEDs working. Cool!

Straightened the mirror mount. Very close to perfect.

Buttoned it all back up. (Scuffed the front panel edge by the storage box. Foo.)

All done!

2 screws leftover. One chrome finished.

????

I need a road map to find out where they go. Nothing blew off on the highway and all the seams line up better than before, so I will keep them in a bag 'til next time it's apart.

Is there a "fastener map"? You'd need a fiber optic camera or bore scope to get pictures of them all.

Thanks,

J

 
...(you know, there was an article once that demonstrated Japanese efficiency by listing the various fasteners found in a Honda compared to a Chevy - the Honda used the same fastener over and over while Chevy dedicated a gang of engineers to optimize every fastener for its specific application, resulting in 1000's of different fasteners in one vehicle. Yamaha missed that article)

...

2 screws leftover. One chrome finished.

????

I need a road map to find out where they go. Nothing blew off on the highway and all the seams line up better than before, so I will keep them in a bag 'til next time it's apart.

Is there a "fastener map"? You'd need a fiber optic camera or bore scope to get pictures of them all.

Thanks,

J
Not got a fastener map, but I have a pictorial of how I took my '06 (near enough the same as any '06 - '12) here. It might help you.
Oh, yes, the connectors. If they're all different, even an average motorcycle mechanic can't get them wrong ;) .

 
Top