Is this ticking?

Yamaha FJR Motorcycle Forum

Help Support Yamaha FJR Motorcycle Forum:

This site may earn a commission from merchant affiliate links, including eBay, Amazon, and others.
That is definitely a cam chain tensioner. Sounds just like mine did. $80 in parts and a little labor and you are good to go. Had mine covered under my YES warranty. Guess it was good for something.

 
Spent most of the day running around in the holiday traffic mess, two sears (at malls) autozone, advance, pepboys, and Kmart (figured they sell craftsman now) and no dice on the wobble extension. Plenty of 3/8 and stubby 1/4, but none for the situation. I am going to try harbor freight and northern tool tomorrow. If they don't have one I will just order the wobble online along with the CCT and hopefully have them for next weekend.

 
I too may be tackling the CCT replacement. I have been reading threads and saw what was written to awitowsk. I'm going to order some 1/4" drive wobble extensions and I had one question in particular.

The screw driver turning the tensioner fully CW, what happens while pulling CCT out? Do you need to turn it CW first? Also, is it possible to keep the screw driver in it while installing it as the manual states? The manual also doesn't say to turn the screw driver CCW after installation, how does the plunger go to it's proper position? Not having a CCT in hand I don't fully understand.

 
If you completely turn the CCT screw CW the spiral shaft inside the CCT plunger will ‘jam’ fully retracted and stay that way until the screwdriver is turned CCW again. If you don’t jam the screw fully CW the plunger will extend as soon as you take the screwdriver out. I don’t know if this is a ‘feature’ of the design or if it just works out this way. The shop manual tells you to keep the screwdriver in the screw slot because they don’t expect the CCT plunger to jam fully retracted.

When installing the CCT you would have it in position to be installed with the gasket in place then you would insert the screwdriver and turn it CW to retract the plunger. Install the CCT and tighten the bolts with the screwdriver holding the CCT plunger retracted. When you remove the screwdriver the plunger should pop out and fully extend on its own. When I released my CCT plunger it went out as far as the weak spring let it go. It’s my opinion that my CCT spring was too weak and did not push out the cam chain slipper as far as it needed to go. I’m freelancing when I say to turn the CCT screw gently to ensure that the plunger is extended. You won’t have to turn hard at all to feel that the plunger is completely out, it will feel like you hit a wall, this is the proper position. Your new CCT with a stiff spring should automatically pop out and extend until the cam chain slipper takes up all the chain slack. Again, my CCT plunger stopped at the first sign of mechanical resistance and did not take up all the any slack.

 
Last edited by a moderator:
I now see the light. Thanks for the clarification ionbeam. :yahoo:

I'll attempt this around Christmas when I have some time off to spend the day trying to get into those cramped quarters. :dribble:

 
Last edited by a moderator:
I too may be tackling the CCT replacement. I have been reading threads and saw what was written to awitowsk. I'm going to order some 1/4" drive wobble extensions and I had one question in particular.
I ordered the CCT online from Flatout motorsports, I have had good service from them in the past, $60.

Since sears didn't have the wobble I am stopping by harbor freight after work, they have it listed on their site, hopefully it is in stock.

I will take a few pics of the process once I make some progress.

 
I was at Lowes picking up a few things tonight and on the way out thought I would check for a wobble. I have never checked their tool selection before and as I walked up to the tiny row of handtoolls thought there wasn't chance, but sure enough they had a 6" 1/4 drive wobble ~ $6.

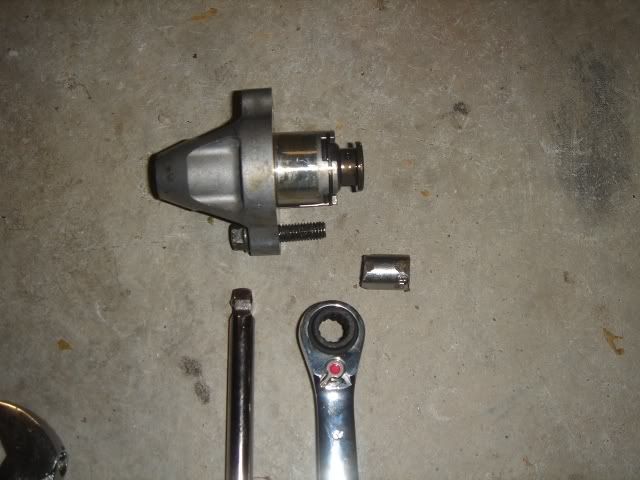
Thanks Ionbeam, wobble did the trick. I was worried that it still didn't seem to fit, but with a little persuasion from a mallet the drive went in enough. With good pressure to keep the socket on the bolt came loose. The next design aggravation was as I backed the bolt out the socket bottomed against the frame, and I couldn't wiggle the bolt loose by finger. I ended up grinding a cheap socket down shorter and was able to get the bolt the rest of the way out. In the future the extra clearance of shortening the drive end of a socket would make it a little easier. Why such a long bolt Yamaha? Half the length would have worked just as well and easily came out. I had already removed the allen bolt holding the idle screw for some work room, so the tensioner came right out the bottom. The CCT seems to operate fairly smoothly and looks to have been at about half extension judging from the oil marks. It does have very little strength. With my thumb on it when I release it it barely pushes out. Hopefully the new one will be a noticeable difference.

To remove the CCT its pretty easy with the right tools. I removed the right fairing, seats, and propped the tank up. With a 8mm and 10mm ratcheting box wrench removed the top bolt and adjuster bolt. Screw the flathead adjuster the whole way in to lock closed for easy removal. Then the bottom bolt was the 8mm socket and 6" 1/4" drive wobble. Then move the idle adjustment and its out.

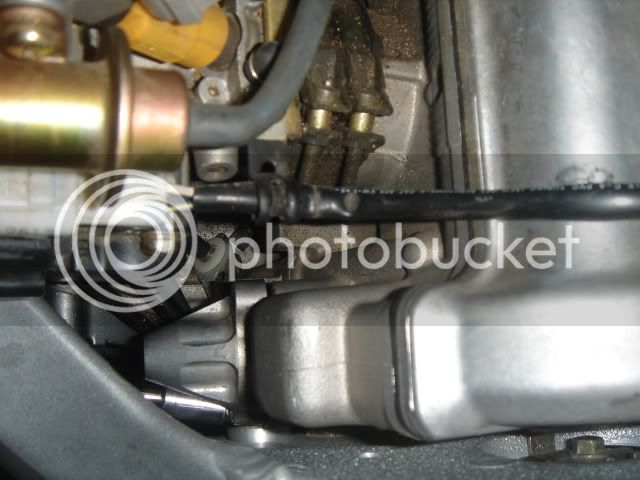
Top view of CCT and bottom 8mm bolt.

DSC07747.jpg


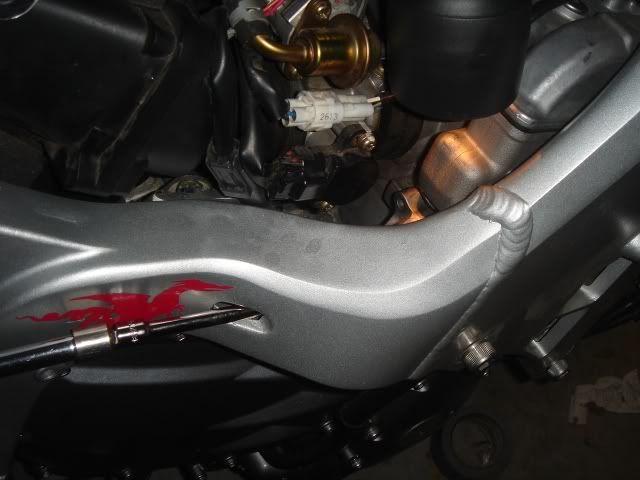
Extension through the frame.

DSC07745.jpg


Bottom view looking up at the bottom 8mm and tight clearance.
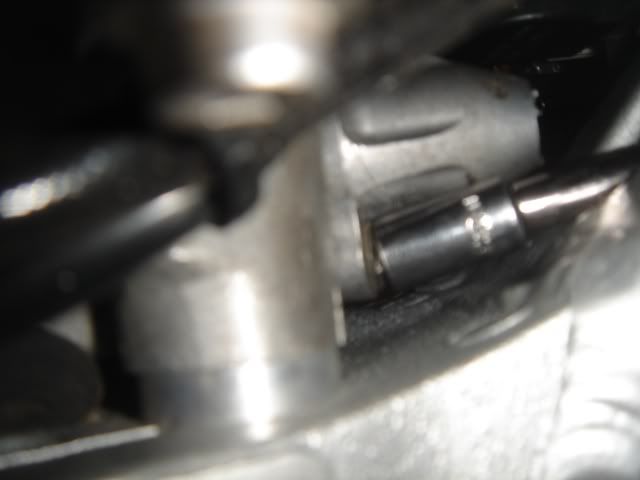
DSC07753.jpg


CCT fully extended.

DSC07760.jpg


Socket wrench, wobble and shortened socket I used.

DSC07755.jpg


awitowsk - Great job! When will you be putting in the new CCT?

I may be doing this soon too. Great pix doumenting this. I have the wobble and extra socket to cut down. What I'd like to know is, will the new CCT go in as easy as it came out?

Keep us posted.

 
Last edited by a moderator:
Yes, awitosk, thanks very much for documenting your tensioner adventure, and pictures (as always) make the post. Though it appears to be OK, I hope the CCT turns out to be the noise source for you. I suppose that you'll have a better idea when you have a new one in hand.

Looking at the last two of your pictures one can see how large a range the adjuster extends. Looking at how the coiled spring exerts the pressure via the spiral ramped slot, it seems like the pressure at full extension would necessarily be considerably less than the "fully wound" spring. But I guess if it's good enough for clocks, it should work the same here.

As to the screw length, don't forget that these little bolts are only threading into the alloy case, and the CCT is rather important bit of hardware. If the screws were to back out, bad things would happen fast. If you do find some new allen head replacement screws, I'd probably go with the same length and even ise a little blue loctite on them. Just make sure the size you pick has a substantial allen key size, so you won't risk stripping the heads getting them out next time.

When this is all over maybe you (or someone) could capture all of this into a single document that can be uploaded and retained for posterity on one of the various FJR Tech Web Pages. As our FJRs age this seems like something more of us may be doing preventively. I'm not saying that you would ever do this, but people have a habit of deleting images from their image hosting accounts and then the posts loose all their pretty pictures. ;)

 
Last edited by a moderator:
Top