


Link to all my Gen II mods
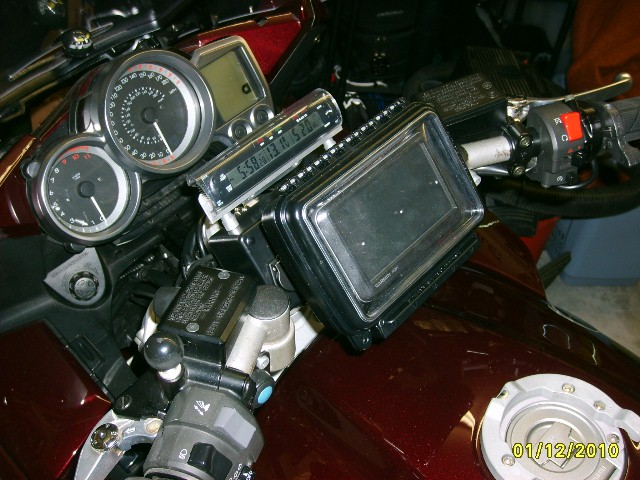
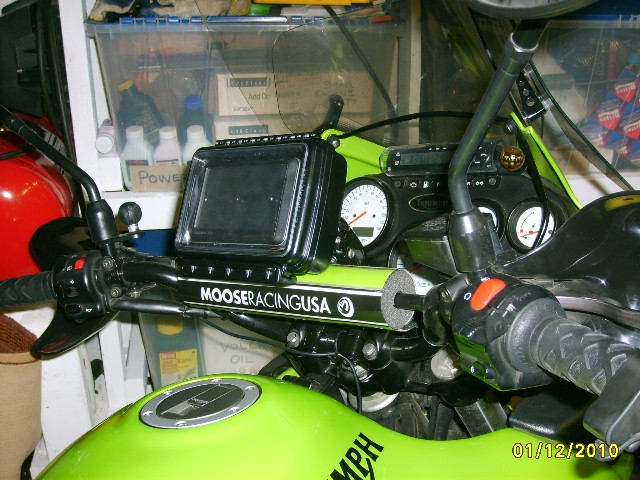
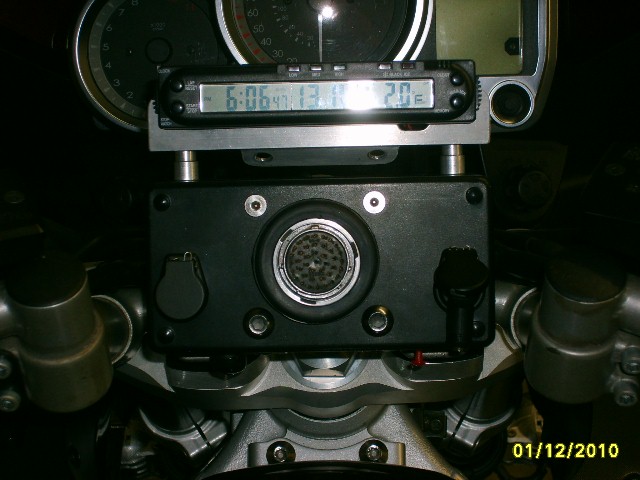
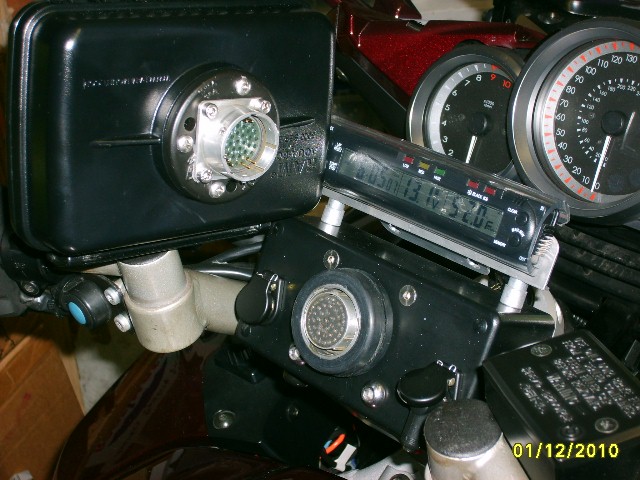
Although there are a number of waterproof GPS units out there, I decided to go the route of using a standard auto unit protected from the elements by a waterproof case. With less than $200 spent on GPS receiver, I figured I would be more likely to upgrade it sooner since very little money was invested now. Normally when I shell out a bunch of cash on something, I tend to use it until it dies, even if it is severely outdated. In the following pictures, you will see the Base Mounting Pod and AquaBox (with GPS inside) installed on the bike. There is also an after-market clock/voltmeter/thermometer mounted on top of the Base Pod.
As with a lot of my accessories, I also can use this same AquaBox setup on my Triumph Tiger:
MAIN GOALS
My ultimate goals for the bike electronics included GPS navigation, FRS bike-to-bike communications, MP3 player, and cell phone. I’m not a very trusting person so I also wanted to be able to remove the electronics from the bike quickly anytime I stopped longer than just a gas fill-up. I already have an FRS system from Moto-Comm for each of my helmets (currently 3) that allow auxiliary input, so I didn’t really want to invest in another system such as AutoCom or StarCom to integrate everything. The helmet systems are the wired type and it would be nice to go to wireless someday, but for now I will have to make the best of it.
THE PURCHASED PARTS
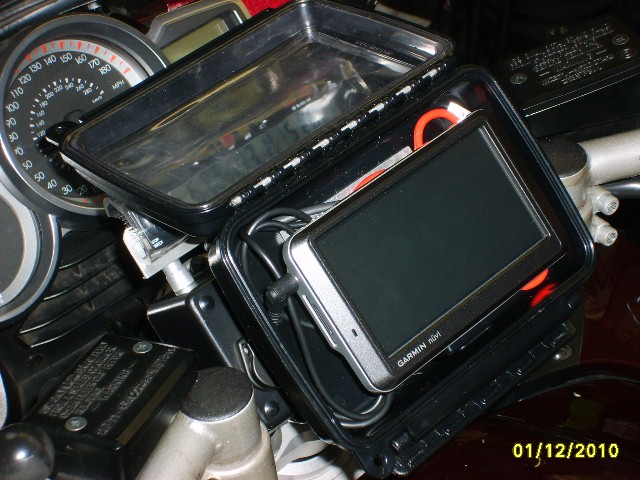
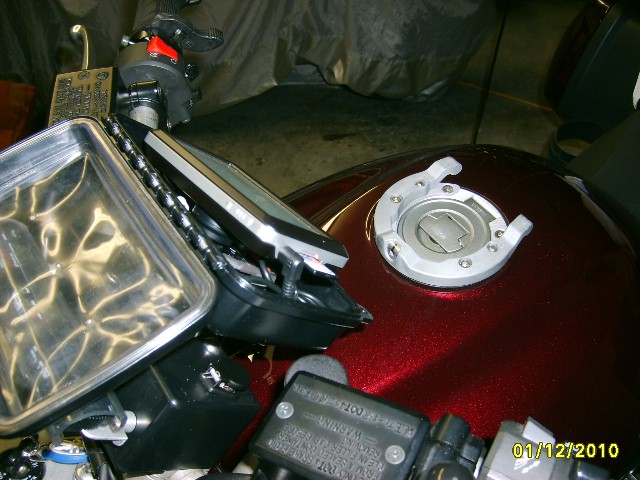
I chose to buy a Nuvi 780 because my wife had one and it accomplished the last three items on my wish list (nav, MP3, and Bluetooth to cell phone). Since Garmin discontinued them recently, I found a second one at a very reasonable price. The Nuvi 780 comes with a nice docking cradle that includes connections for the wiring. I wouldn’t trust it to keep the GPS attached to the bike by itself, but inside the RAM AquaBox, it works great and allows me to remove it quickly from the AquaBox for installing in the car. The AquaBox is a model RAMHOLAQ6, which fits the Nuvi nicely and has ample room for my additional custom wiring.
AND THE CUSTOM PARTS
It seems like I never can find 100% of the parts that I need to complete a project so I have to make a few of them. My main goal here was to come up with quick disconnect method for not only mounting the GPS, but connecting it’s wiring as well. Required wiring connections included 2 wires for power and ground, 3 wires for audio output, and 2 wires for microphone input. The other connection that might be needed someday is for an external antenna, but I doubt it’s needed on a motorcycle. I have several bikes that I want to use this GPS on so I think it was worth the effort to make a “modular” system but would consider this even if I only had one.
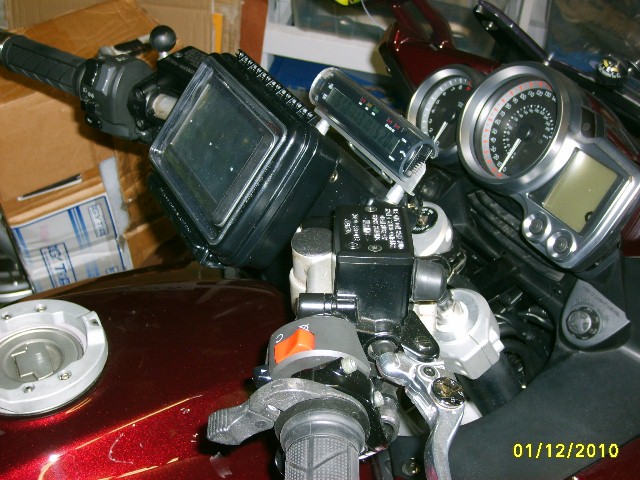
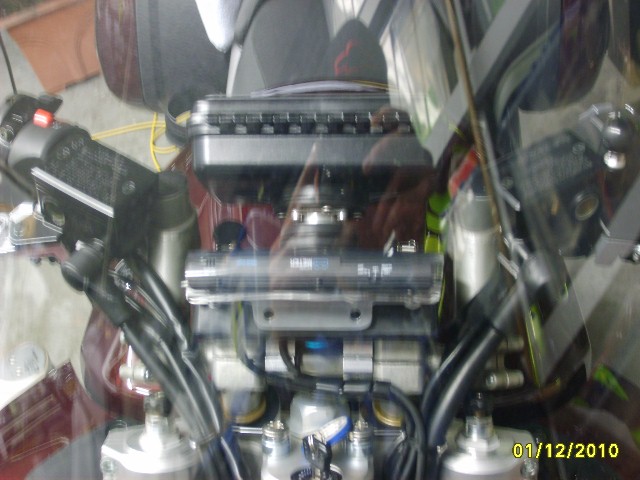
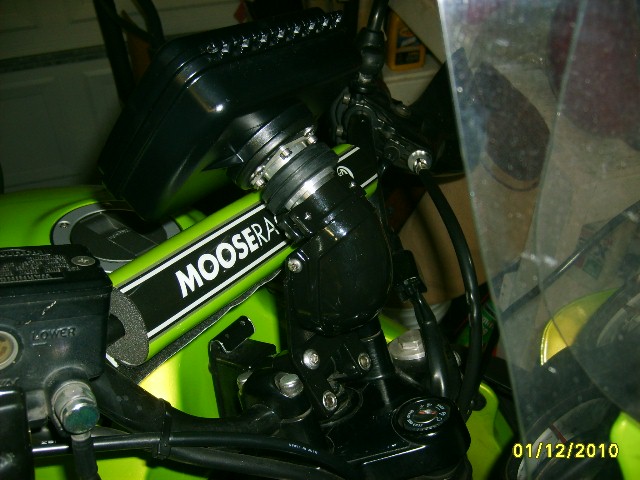
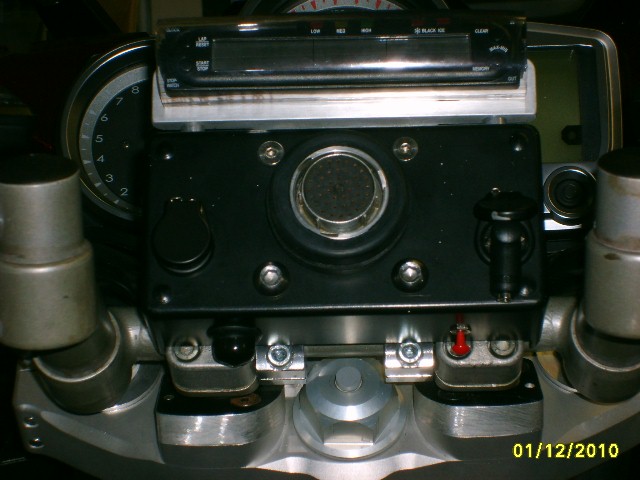
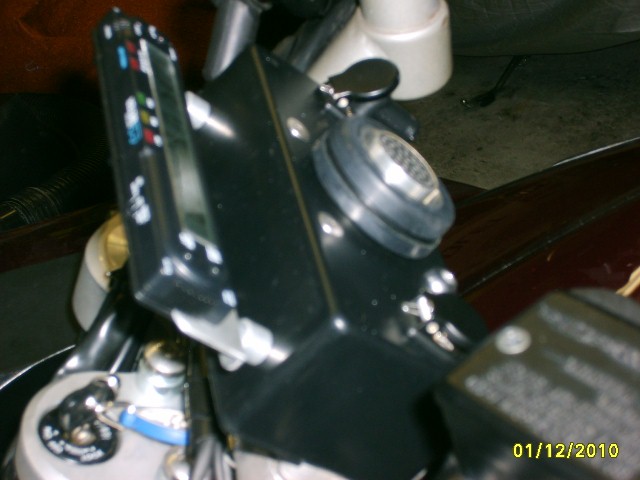
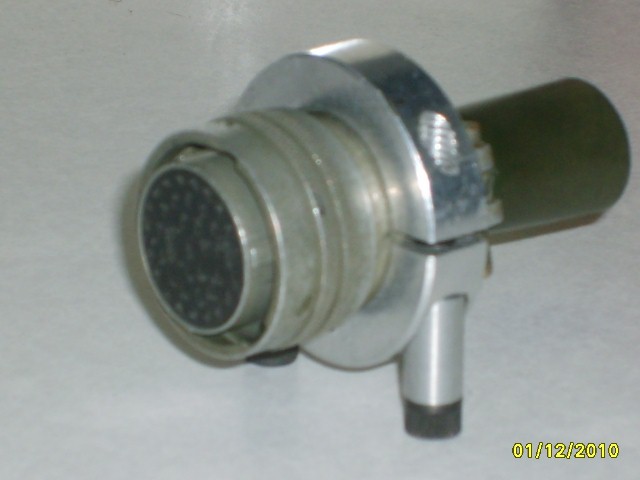
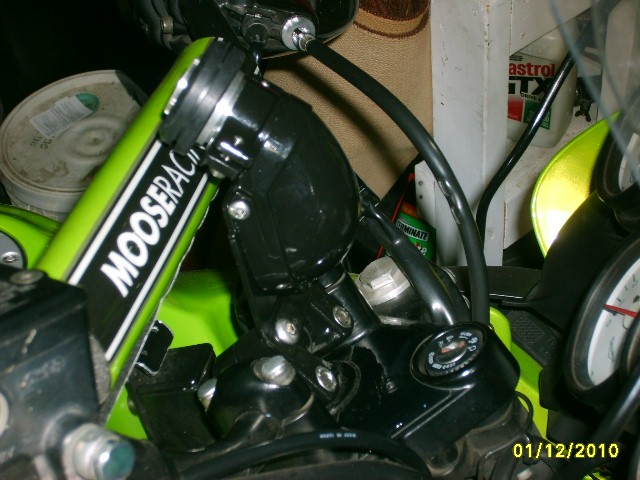
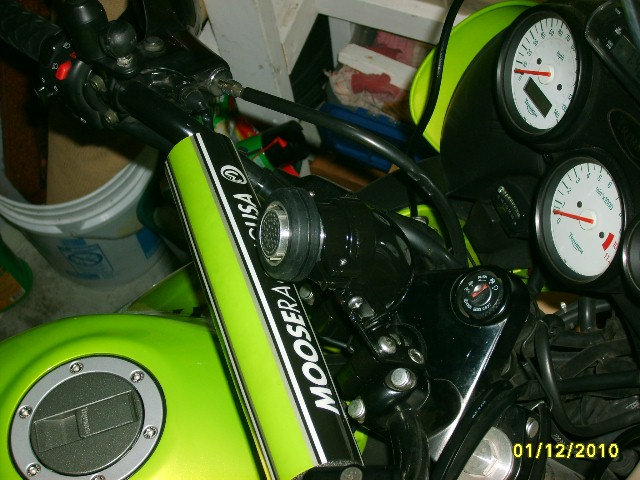
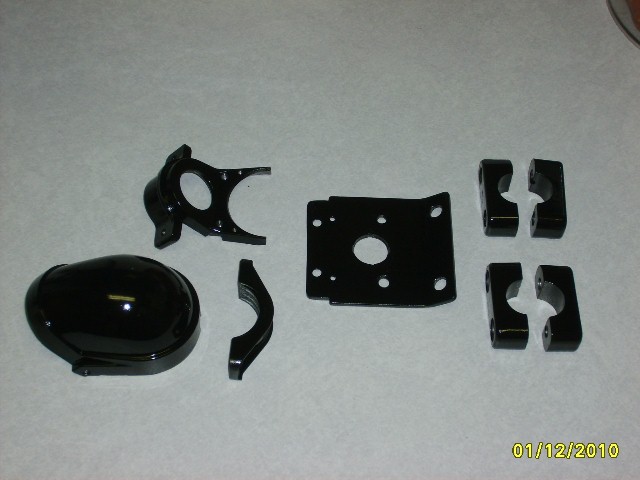
After an extensive search, I found some military connectors (Type MIL-DTL-26482) that were strong enough to actually mount the GPS while also allowing the connections to be made simultaneously. Rather than mounting the GPS (via RAM ball mounts or similar), adjusting it to the correct viewing angle, and then hooking up all the connections, it is done in one simple step. The bayonet style military connector attaches with a 1/4 turn of the collar and “pulls” the two halves together to make the wiring connections. There is a positive click when it is fully engaged. The connector I’m using has 41 possible connector pins (way overkill), but I chose it because of its housing size (Shell Size 20) and because the local surplus store had used ones for $2/each (they sell for $60 new, wow!). There’s nothing wrong with having a little room for expansion") . The base connect pod fabrication time probably accounts for a majority of this project. The housing is a project box from Radio Shack (p/n 270-1805) and it matches the Aquabox nicely. Inside I used some aluminum MX hand guard clamps (Moose p/n M6002-11) along with a shaft collar to mount the connector securely to handlebars. I also added a large grommet (Pep Boys-Motormite-HELP) p/n 42305) to the collar of the connector to make it easier to turn with gloved hands. Here is the base connector mounted on two of my bikes:
. The base connect pod fabrication time probably accounts for a majority of this project. The housing is a project box from Radio Shack (p/n 270-1805) and it matches the Aquabox nicely. Inside I used some aluminum MX hand guard clamps (Moose p/n M6002-11) along with a shaft collar to mount the connector securely to handlebars. I also added a large grommet (Pep Boys-Motormite-HELP) p/n 42305) to the collar of the connector to make it easier to turn with gloved hands. Here is the base connector mounted on two of my bikes:
The Tiger mounting was done a bit different with a cast aluminum electrical housing I found at Lowes, some 7/8” split bar clamps, and a custom fabricated plate. Sorry, it’s a little hard to see with its fresh coat of black paint.
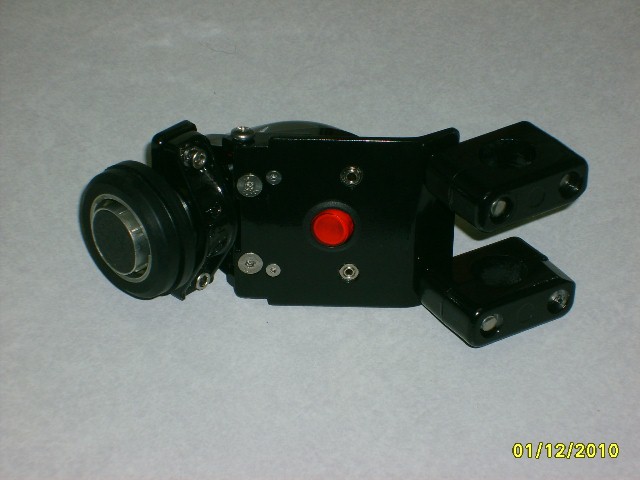
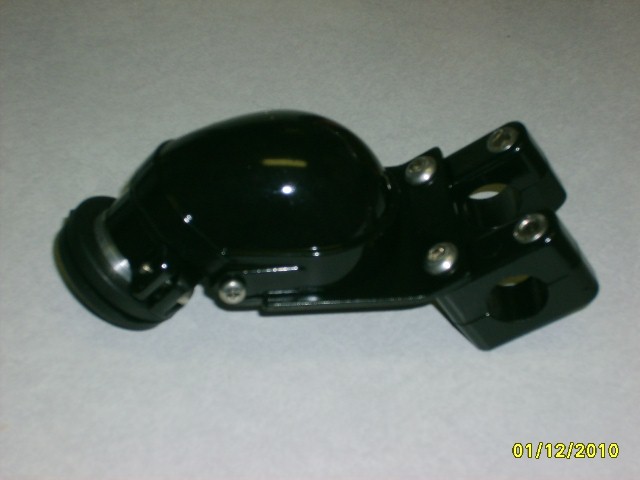
The connector has 5 keyways to keep it aligned. The connector half with the pins is mounted to the back of the AquaBox, while the receiving half mounted to the various bikes has the sockets. For safety, you always want the 12V supply coming through recessed sockets so there is less chance of a short circuit when disconnected. After the initial adjustment of the base connector for viewing angle, it ends up in the same position every time you install the GPS. Earlier with the RAM ball mounting, I found myself having to play with the adjustment every time I reinstalled the GPS on the bike. Here are some shots of connector halves:
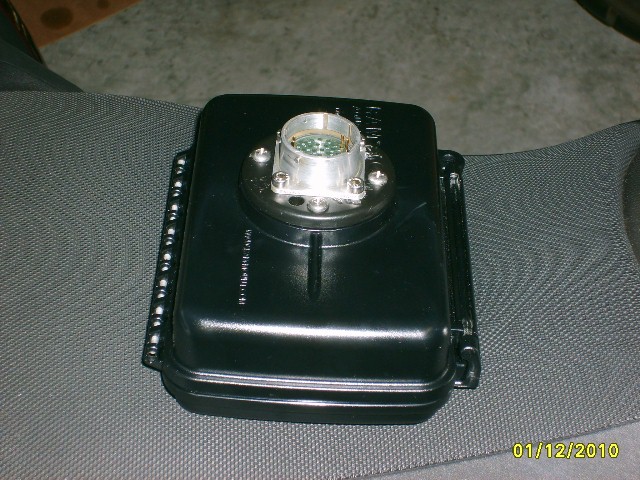
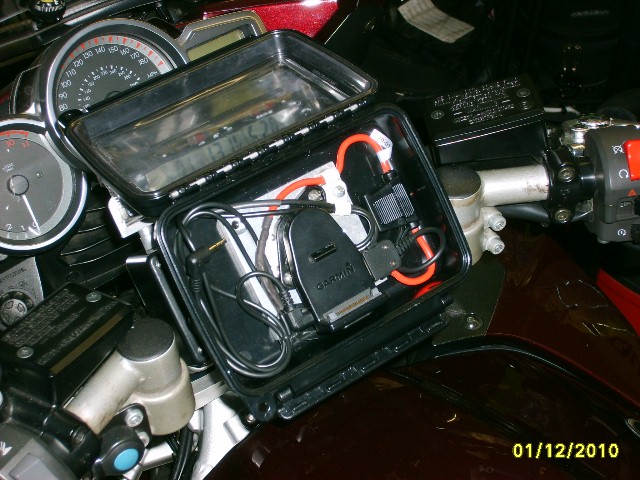
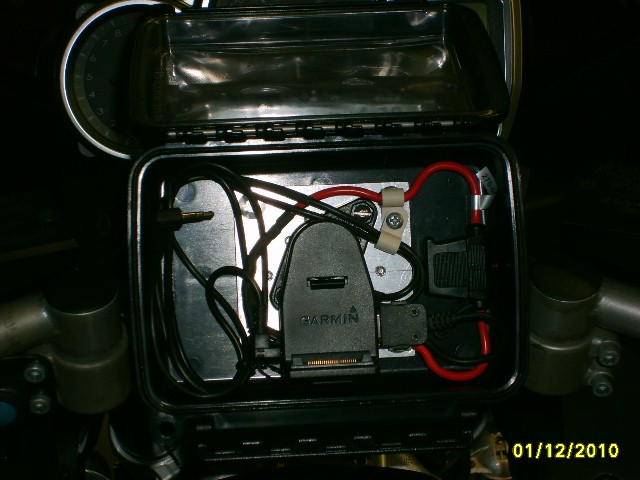
I also had to make an aluminum adapter plate (unpainted square plate in pictures) to allow mounting of the military connector directly through the AquaBox to the Garmin cradle. I also needed to attach the supplied Garmin cradle to this same aluminum plate and RAM adapter p/n RAMHOLGA22 worked perfectly. The way I did it, the AquaBox is merely sandwiched between the mounts and really doesn’t see any load, besides the weight of itself.
THE WIRING
The project included wiring inside the AquaBox, and wiring each of the bikes with the matching base connector. Inside the Box, I needed to run from the GPS cradle to the military connector. For safety and convenience, I also added a low amp fuse inside. Power for the GPS comes from the glove box auxiliary power port circuit. You need to remove a panel to get to the OEM fuse so I added a 2A fuse to protect the GPS wiring and it’s a little easier to get to. In the pictures, you will see I’m still using the 1/8” headphone connector directly into the GPS unit (bypassing the cradle), but this will change shortly when I do some soldering inside the cradle for audio.
Physical mounting of the base connector on each bike ended up being a little different but the wiring was the same, power, audio, and mic. Even though I tapped into an FJR circuit that is only on when the ignition is on, I still I added a lighted switch in the power line so I could switch it off when desired.
HOW IT ALL WORKS
I tested the functionally of the Nuvi 780 with my wife’s GPS before buying mine (she actually let me do it!). One concern I originally had was that you can’t get to the power slide switch without opening the AquaBox. Luckily the Nuvi senses external power and turns on automatically. It also senses when external power is lost and turns off automatically. Perfect - I will never need to touch the power switch. The other thing that was a must was the ability to switch between music player and maps easily and independently adjust volume for each. The Nuvi does all that - great job Garmin! I’m sure there are other GPS’s that do this as well.
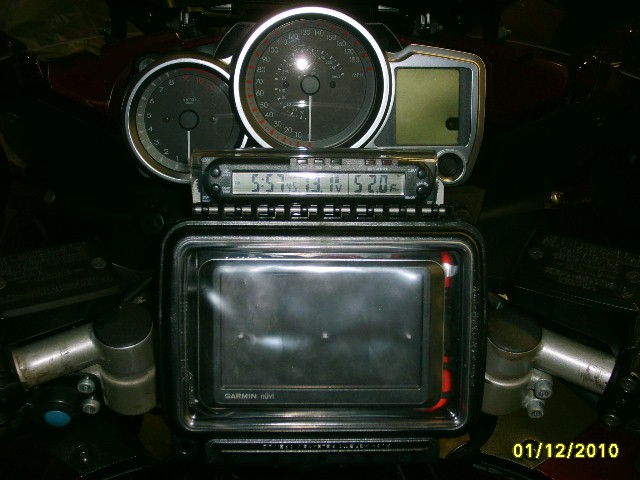
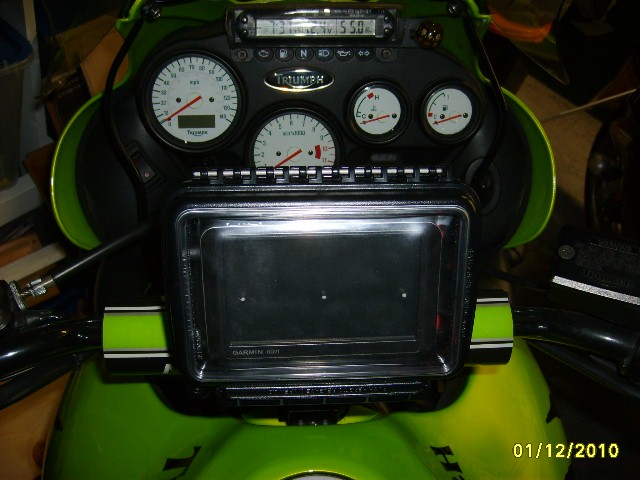
Removing and installing the AquaBox from the bike is a pure joy, if you respect a sturdy industrial feel. I have a cap that covers the bike connector when not in use. It all looks a bit big and bulky (mostly because of the AquaBox), but everything is made from aluminum or plastic so the weight is relatively low. The AquaBox clear membrane doesn’t inhibit the Nuvi touch-screen in any way. As delivered, the membrane is a bit wavy, but I found if you position the GPS in the Aquabox so that it stretches it slightly when the lid it closed, it straightens out nicely. I foresee needing a sunvisor in the bright sun, but that probably is needed on any M/C GPS (that’s the next project and parts are purchased).
My MP3 music is stored on a 16GB memory card. The ball mount of the OEM Garmin cradle allows the GPS to swivel enough for easy access to the SD slot, yet the GPS is held flat by the touch screen membrane when the lid of the AquaBox is closed.
Although there are a number of waterproof GPS units out there, I decided to go the route of using a standard auto unit protected from the elements by a waterproof case. With less than $200 spent on GPS receiver, I figured I would be more likely to upgrade it sooner since very little money was invested now. Normally when I shell out a bunch of cash on something, I tend to use it until it dies, even if it is severely outdated. In the following pictures, you will see the Base Mounting Pod and AquaBox (with GPS inside) installed on the bike. There is also an after-market clock/voltmeter/thermometer mounted on top of the Base Pod.
As with a lot of my accessories, I also can use this same AquaBox setup on my Triumph Tiger:
MAIN GOALS
My ultimate goals for the bike electronics included GPS navigation, FRS bike-to-bike communications, MP3 player, and cell phone. I’m not a very trusting person so I also wanted to be able to remove the electronics from the bike quickly anytime I stopped longer than just a gas fill-up. I already have an FRS system from Moto-Comm for each of my helmets (currently 3) that allow auxiliary input, so I didn’t really want to invest in another system such as AutoCom or StarCom to integrate everything. The helmet systems are the wired type and it would be nice to go to wireless someday, but for now I will have to make the best of it.
THE PURCHASED PARTS
I chose to buy a Nuvi 780 because my wife had one and it accomplished the last three items on my wish list (nav, MP3, and Bluetooth to cell phone). Since Garmin discontinued them recently, I found a second one at a very reasonable price. The Nuvi 780 comes with a nice docking cradle that includes connections for the wiring. I wouldn’t trust it to keep the GPS attached to the bike by itself, but inside the RAM AquaBox, it works great and allows me to remove it quickly from the AquaBox for installing in the car. The AquaBox is a model RAMHOLAQ6, which fits the Nuvi nicely and has ample room for my additional custom wiring.
AND THE CUSTOM PARTS
It seems like I never can find 100% of the parts that I need to complete a project so I have to make a few of them. My main goal here was to come up with quick disconnect method for not only mounting the GPS, but connecting it’s wiring as well. Required wiring connections included 2 wires for power and ground, 3 wires for audio output, and 2 wires for microphone input. The other connection that might be needed someday is for an external antenna, but I doubt it’s needed on a motorcycle. I have several bikes that I want to use this GPS on so I think it was worth the effort to make a “modular” system but would consider this even if I only had one.
After an extensive search, I found some military connectors (Type MIL-DTL-26482) that were strong enough to actually mount the GPS while also allowing the connections to be made simultaneously. Rather than mounting the GPS (via RAM ball mounts or similar), adjusting it to the correct viewing angle, and then hooking up all the connections, it is done in one simple step. The bayonet style military connector attaches with a 1/4 turn of the collar and “pulls” the two halves together to make the wiring connections. There is a positive click when it is fully engaged. The connector I’m using has 41 possible connector pins (way overkill), but I chose it because of its housing size (Shell Size 20) and because the local surplus store had used ones for $2/each (they sell for $60 new, wow!). There’s nothing wrong with having a little room for expansion
. The base connect pod fabrication time probably accounts for a majority of this project. The housing is a project box from Radio Shack (p/n 270-1805) and it matches the Aquabox nicely. Inside I used some aluminum MX hand guard clamps (Moose p/n M6002-11) along with a shaft collar to mount the connector securely to handlebars. I also added a large grommet (Pep Boys-Motormite-HELP) p/n 42305) to the collar of the connector to make it easier to turn with gloved hands. Here is the base connector mounted on two of my bikes:
The Tiger mounting was done a bit different with a cast aluminum electrical housing I found at Lowes, some 7/8” split bar clamps, and a custom fabricated plate. Sorry, it’s a little hard to see with its fresh coat of black paint.
The connector has 5 keyways to keep it aligned. The connector half with the pins is mounted to the back of the AquaBox, while the receiving half mounted to the various bikes has the sockets. For safety, you always want the 12V supply coming through recessed sockets so there is less chance of a short circuit when disconnected. After the initial adjustment of the base connector for viewing angle, it ends up in the same position every time you install the GPS. Earlier with the RAM ball mounting, I found myself having to play with the adjustment every time I reinstalled the GPS on the bike. Here are some shots of connector halves:
I also had to make an aluminum adapter plate (unpainted square plate in pictures) to allow mounting of the military connector directly through the AquaBox to the Garmin cradle. I also needed to attach the supplied Garmin cradle to this same aluminum plate and RAM adapter p/n RAMHOLGA22 worked perfectly. The way I did it, the AquaBox is merely sandwiched between the mounts and really doesn’t see any load, besides the weight of itself.
THE WIRING
The project included wiring inside the AquaBox, and wiring each of the bikes with the matching base connector. Inside the Box, I needed to run from the GPS cradle to the military connector. For safety and convenience, I also added a low amp fuse inside. Power for the GPS comes from the glove box auxiliary power port circuit. You need to remove a panel to get to the OEM fuse so I added a 2A fuse to protect the GPS wiring and it’s a little easier to get to. In the pictures, you will see I’m still using the 1/8” headphone connector directly into the GPS unit (bypassing the cradle), but this will change shortly when I do some soldering inside the cradle for audio.
Physical mounting of the base connector on each bike ended up being a little different but the wiring was the same, power, audio, and mic. Even though I tapped into an FJR circuit that is only on when the ignition is on, I still I added a lighted switch in the power line so I could switch it off when desired.
HOW IT ALL WORKS
I tested the functionally of the Nuvi 780 with my wife’s GPS before buying mine (she actually let me do it!). One concern I originally had was that you can’t get to the power slide switch without opening the AquaBox. Luckily the Nuvi senses external power and turns on automatically. It also senses when external power is lost and turns off automatically. Perfect - I will never need to touch the power switch. The other thing that was a must was the ability to switch between music player and maps easily and independently adjust volume for each. The Nuvi does all that - great job Garmin! I’m sure there are other GPS’s that do this as well.
Removing and installing the AquaBox from the bike is a pure joy, if you respect a sturdy industrial feel. I have a cap that covers the bike connector when not in use. It all looks a bit big and bulky (mostly because of the AquaBox), but everything is made from aluminum or plastic so the weight is relatively low. The AquaBox clear membrane doesn’t inhibit the Nuvi touch-screen in any way. As delivered, the membrane is a bit wavy, but I found if you position the GPS in the Aquabox so that it stretches it slightly when the lid it closed, it straightens out nicely. I foresee needing a sunvisor in the bright sun, but that probably is needed on any M/C GPS (that’s the next project and parts are purchased).
My MP3 music is stored on a 16GB memory card. The ball mount of the OEM Garmin cradle allows the GPS to swivel enough for easy access to the SD slot, yet the GPS is held flat by the touch screen membrane when the lid of the AquaBox is closed.
Last edited by a moderator: