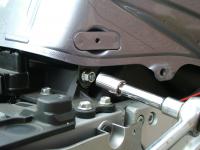
Stripped bolt and fix

Yamaha FJR Motorcycle Forum

Help Support Yamaha FJR Motorcycle Forum:

This site may earn a commission from merchant affiliate links, including eBay, Amazon, and others.
It was raining here most all day, so I decided to install a new air filter and the new iridiums that have been sitting in my garage. Removed the tank and noticed that one of those bolts was ready to give up the ghost. I went to Lowes and got some hex head bolts to use as replacements. They had the exact size and length M6.0x20mm. I thought I could get one more use out of the OEM ones and reinstalled them - What a DUMB#<&. :angry2: The head of one is now stripped so it will be a SOB to get out next time. But at least I have the replacements ready to go. I just need to remember that I put them in the tools kit under the seat.

 
Last night I broke the head off one of those two tank hold down bolts when putting the tank back after replacing the spark plugs. I've tinkered on a lot of bikes and I don't remember ever wrestling with a gas tank the way I have to with the FJR. Damn I was pissed! Some super engineering work there. :rolleyes:
Had you slackened the tank's rear nut? [SIZE=8pt](Click on image for larger view)[/SIZE]

Nope. Only found this thread after the mishap.

But I did do one thing right ... I just walked away.

The plugs are done, the tank isn't going anywhere with the 1-1/2 bolts in place, and as sure as God made little green apples, I just knew if I tried to fix it on the spot, I'd muck up the one good bolt left.

I'll slay that dragon the next time I need to lift the tank.

One of the few good things about getting older is that I am finally realizing that I can slay all the dragons, but I just don't have to take them all on at once.

 
Hmmm....

Another good example of why one should have access to the service manual of any bike they are going to wrench on.

B)

Or check the bin O facts or fjrtech.. Do some searching here.....ect, ect...

On another side and pretty funny note.. Some of us know a new (owner) member here (he will remain nameless.. unless he confesses) that

couldn't figure out how the "W" windshield cover bracket came off of his '08... He got impatient, figured you must just "UNSNAP IT"...

Hahaha!!! Now he has a Velcro secured W bracket.. :blink:

WW

 
Last edited by a moderator:
Hmmm....
Another good example of why one should have access to the service manual of any bike they are going to wrench on.

B)

Or check the bin O facts or fjrtech.. Do some searching here.....etc, etc...

WW
Yeah, well, I have the service manual for this bike as I have had for the several other bikes I've owned. Nowhere on p 7-1 or anywhere else in the aforementioned manual does it state, "Plan to wrestle with your gas tank." Nor did I think it would be necessary to search on the Internet for something as simple as this.

A poor design is a poor design is a poor design.

I believe that is how this thread got started -- not whether or not the original author had access to a service manual.

;)

 
How-D;

I've been a lurker on this site but wanted to add a reply in case this helps someone with a rounded out socket head cap screw. As a tool and die maker it was not uncommon to have rounded out a socket head (SHCS) while dis-assembling a stamping die for routine work. There is one technique used before resorting to drills/extractors.

Take a good steel drift pin that is slightly larger than the hex opening

Center it over the opening

Hit it with a 12-16 oz. ball peen hammer

What you are attempting to do is to collapse some material INTO the hex opening. It really is a matter of feel for how much for with the hammer is required

Now take a straight length of the hex wrench you were using, Apex pneumatic bits work really well for this. Drive the hex into the opening, you are broaching the hex shape. If you've collapsed enough material into the rounded opening it might now have enough grip to allow removal of the offending fastener.

If this doesn't work there's always the tried and true method of using a small punch/chisel and hammer to rotate the fastener until it breaks free where you can spin it out. I've found that the fasteners on Japanese vehicles are quite soft and easily deformed. Any fastener that didn't "feel" right when I removed it gets replaced as I know it will cuase me trouble later down the road. I also don't go with torque values unless it's a motor internal component. Almost all external component fasteners are there merely to hold the component onto the bike. As such, I use Loctite (blue or purple) and snug it down with a 1/4" drive set. Excess torque will merely make it more difficult to remove the fastener later and could even lead to stripped/rounded heads. Everybody has a different method, this is just mine that I've gleaned from 25 years. Hope it helps someone.

 
Top