Valve Adjustment

Yamaha FJR Motorcycle Forum

Help Support Yamaha FJR Motorcycle Forum:

This site may earn a commission from merchant affiliate links, including eBay, Amazon, and others.
Thanks to all of you for the help. I read the FJR tech how-to and it doesn't look too overwhelming, but I need to study it more. For those that have done this, a few questions:

Does anybody actually replace the cam cover gasket and 1/2 moons? If you use sealant, which sealant to you prefer (perhaps RTV red)?

Timing Cover - same question - replace gasket or not, seal or not, and sealant if so?

Do I need to replace the cooling pipe o-ring or should it be re-useable?

Other than shims (if needed), can you think of any other materials/parts that I will need?

While I'm in there, I'm going to replace my coolant and my spark plugs. And I think I'm going to perform the under tank heat shield mod.

I'm on my way...
The timing cover seems tough and pliable. I did not replace. As always YMMV.and it would not be a bad idea to have one on standby.

No sealant needed on timing cover gasket, but I did use Permatex Hylomar (blue racing) sealant on the valve cover gasket for tack and to help seal. Hylomar is really easy to clean up and is designed for parts that will be reused multiple times.

Always change the cooling pipe o-rings. They deform and should not be reused. Also have some plumbers grease to get a good seal.

Change the CCT if you have not already. You will need replacement coolant, but don't get the orange stuff.

Good luck, it's easier than you think.
I use Yamabond 4 gasket sealant to tack the gasket and hold it in place. I also use the yamabond to tack the valve cover gasket in place. I use the Honda (HP4?) coolant. I do replace the timing cover gasket just because it doesn't alway come off cleanly and it's cheap.

 
Once again thanks - I'll order the timing cover gskt and the o-rings. I'll dig into the micro-fiche and if I need help figuring it out, I'll re-post.

I do use the Honda pre-mix coolant, as reccommended by this site. It was changed about 14 months and 20K miles ago. Still looks serviceable, but while I've got the plastics apart, I might as well do this.

Same with the spark plugs. I've got about 15K miles on these. No change in gas mileage or the way the motor runs. I think I'll stick with the stock plug.

Regarding shims, the procycle set that is mentioned in this thread is still available. Is that still the kit of choice? It's more expensive than buying individual shims, but I'd rather have whatever I will need when I get into the motor. Unless ya'll can think of the standard range of shims that I might need - I could just buy 2 or 3 of each of those and maybe take a chance?

I have read about changing the cam chain tensioner - what is it about the GEN I tensioner that is subject to problems? I thought I would check the valve lash and if any of the shims needs replacement, since I was disassembling the motor, I would change the tensioner. So, to do that, do I just order a Cam Chain tensioner from any Gen II model? Is it a direct bolt on? Do I need any other parts besides the tensioner?

This is great help that even the shop manual can't provide. I don't know what we did before the internet. Prolly just broke stuff.

 
Last edited by a moderator:
If I'm not mistook, when you look up the tensioner part number, it has been superceded by the Gen2 number (better spring mechanism), but yes, any Gen2 tensioner works (get the little gasket too). Do your valve check first, swap out shims as necessary, verify cams are in the right position per the FSM, then replace the tensioner (i.e., tie strap the chain at the crank end). If you look up the tensioner threads, there are helpful hints on tools and slotting the tensioner bolts to make it easier to reassemble, etc.

When I looked at a couple of bikes I did, I'm guessing the nominal shim Yamaha used was .185, so get a few on either side of that and you should be good. You may not need any at a low mileage, and you may be able to swap a couple here and there.

 
Last edited by a moderator:
1308613665[/url]' post='870380']Dropped the bike off today for the valve check service. Damn! $$

I usually do the routine maintenance, but this was a little out of my comfort zone. Good thing it's only needed evry 30K. I'll be riding all over the east coast and then out to Glacier and back from GA this fall, so I needed to have it done beforehand. I WILL learn how to do this for the next one.

Beleive that!
I don't know which dealer you took it to. But I work for one of the dealers in your area. If you are paying $600 for the valve adjustment, then you are paying too much. We would charge 4 hours labor at $79/hour for that job which comes out to $316.00

 
I think I've said this a bunch, but checking the valves is really, really easy. I'm not a mechanic. I can see people with money being okay paying someone $300 or so and that's great for them but there's no way I'd pay anyone more than $75 to check them. Seriously.

 
OK - I spent some time studying everything I could get my hands on this morning. I'm getting more comfortable and I'm confident I can do this now.

I find it interesting that 89% of the people polled on this forum did not need any shims for their first adjustment. 72% didn't need any for their 2nd adjustment so that chances are I'll just be checking and verifying/recording the current setting. If that is the case, I'll hold off on the Cam Chain Tensioner mod until I actually open up the motor. I did confirm that the Gen II CCT is the only one available now (Yamaha P/N 5JW-12210-10-00)

I'm still on the fence about buying the shims. The kits are not very useful because they will offer a ton of shims I'll never need. I'd like to get about 3-5 shims of the 6 most popular sizes (3 sizes up and 3 sizes down from 1.85 mm), but apparently, Hot Cams no longer sells such a shim kit - someone correct me if I'm wrong or if they know of a reputable vendor that offers this type of kit. Failing that, maybe I'll spread the job out over 2 weekends and order the correct shims (and the Gen II CCT) after I check it out if I actually need a shim. I'd hate to do that though - it takes away another riding weekend.

Can anyone give the torque spec for the cam cover and the timing cover bolts?

Also, can someone please confirm that part number 29 and 38 are the gskt and o-ring for the timing cover? The fiche calls this part the "oil pump cover", but I think this is my baby. Synonomous terms?

timingcoverfjr.jpg


Like wise, please confirm that part numbers 25 (2 each) and 31 are the cooling pipe and t/s o-rings respectively:

coolingpipefjr.jpg


Appreciate ya'll helping out a Noob!

 
Last edited by a moderator:
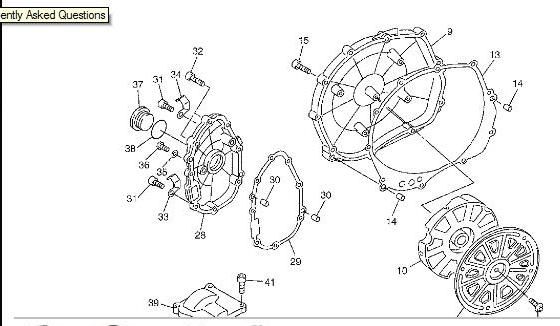
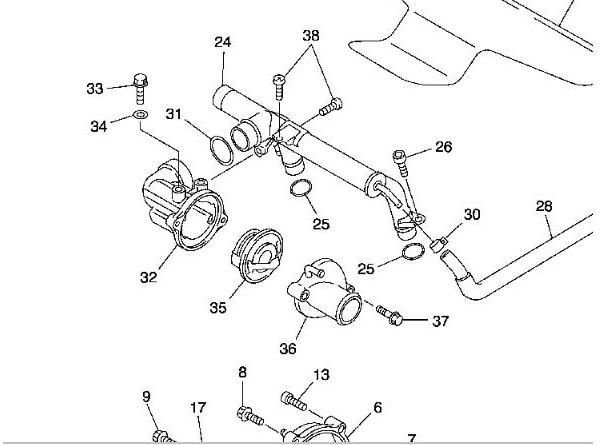
In your diagram, 29 is the timing cover gasket and 38 is the gasket for the timing cover access plug. Don't forget the 0-rings #25 and 31 in the diagram below that. The O-rings are essential to replace.

I hope you don't mind me also posting the PM you sent me. I think the questions were very good, and may help others that are considering this.

1. Would you agree that if my valves are all in spec, there is no need for me to upgrade the CCT at this time? I have no noise what so ever, and I'm keen to listening for it. I mean - why take the engine apart if I don't have to? I have to do more reading, but if I change the CCT, I have to pull the motor out? It would appear that there is a frame piece in the way?

2. I'm trying to get my arms around the idea of avoiding removal of the timing cover to check the valves. If I remove the timing cover plug, I can get access to the bolt that I can use to turn the motor. Or I could just leave the plug alone and rotate the rear wheel to turn the motor. What I can't understand is how will I identify the timing marks to position the cams just right to actually make the valve lash check?

3. Can you explain a little more about the pin you refer to on the timing cover?

4. If I need to change some shims, would you agree with FJR tech's suggestion to just move the cams (one at a time) over while still engaged into teh chain in lieu of removing them? This seems safer to me - ensures that the chain stays tight and the cam timing doesn't change?

Anyway - I've got a ton of paranoid questions on this. I think I can do this, but I'm very nervous about it. After all, this is my baby - my real kids are all grown. Thanks in advance for any tips and help.
All good questions. I'll do my best:

I think the newer CCT is a much better device, and changing it while doing a valve adjustment makes sense because 90% of the work is already done. That said, if you are not experiencing noise and chain slop, there is no reason to change what you have for now. Many original CCTs have gone well past 50-70K miles without a problem. Keep in mind your CCT is actually version 2 and not the version 1 that failed in 2003 and early 2004s. I changed mine because I definitely had a lot of chain noise when starting out on a cold engine and decelerating against engine compression. You can always do this later, and from your description, that would be my recommendation.

I found the visibility and access made removing the timing cover well worth-while. In my case, the gasket remained intact and it was basically a matter of removing the cover and reinstalling it when finished. If there was some big benefit like not needing to remove the fairings, I could see taking this shortcut, but I don't see the point. Note the manual says to turn the crank counter-clockwise. That is wrong...go clockwise with it.

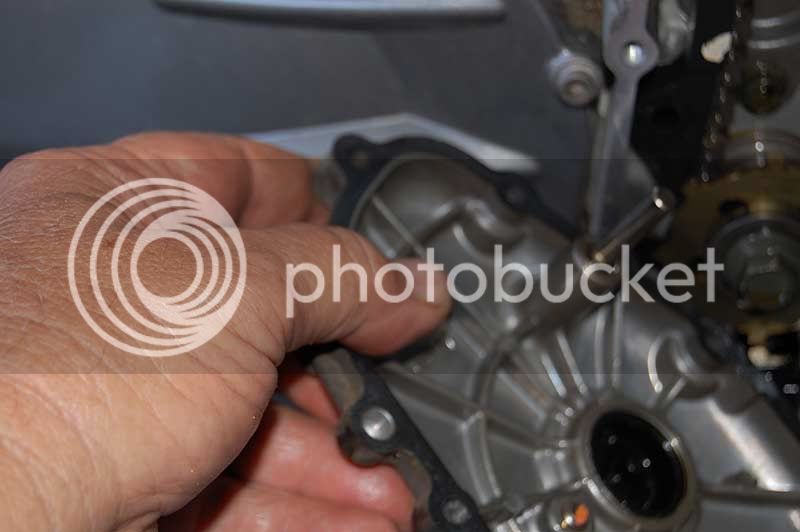
There is a metal dowel that helps align the timing cover with the case. It also holds the timing chain left slipper in place. You can see it here as it appears if it comes out with the cover, and in the next photo as it should look when in place and retaining the slipper (
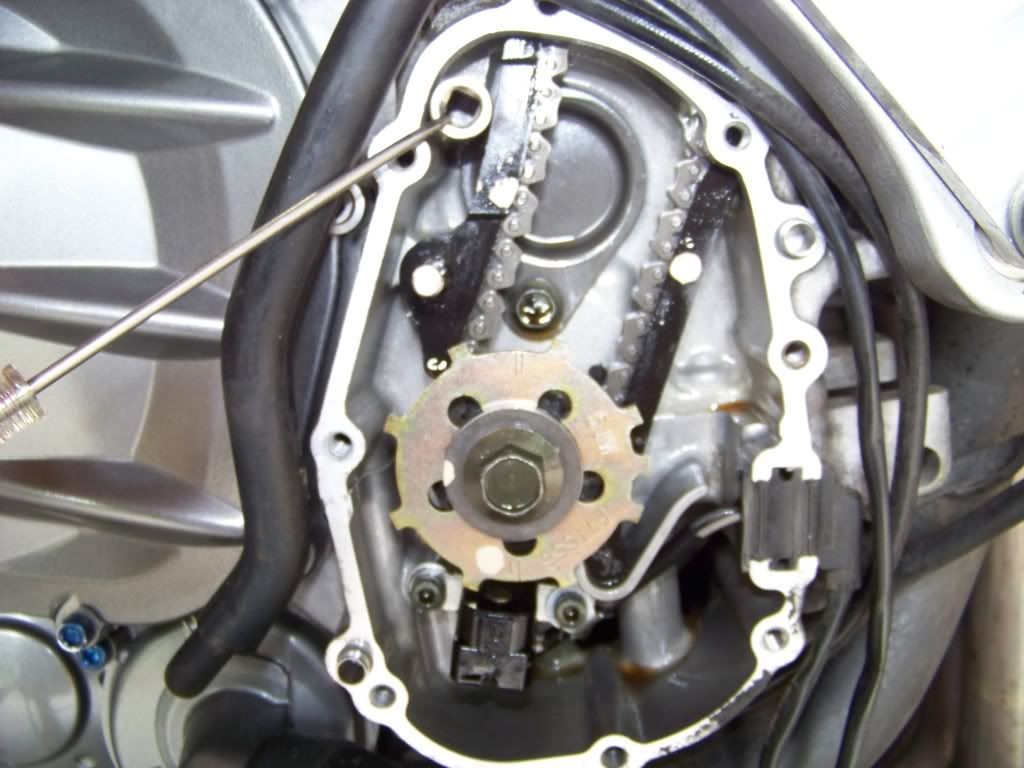
photo credit Radio Howie). If it comes out, this will allow the chain to go slack. Just replace it without allowing anything to move, The second photo (Photo credit Fred W) also shows a 12mm socket being used to keep the chain tight during CCT transplant.

chain02.jpg


100_1590.jpg


I didn't have to remove the cams and hopefully the same will be true for you. I used zip ties to hold the chain to the cam sprockets. You could mark the chain position on the crank sprocket and tie the cam sprockets and nothing will move. That would be my approach. I took a lot of time making sure every thing was marked and secured in the TDC position so if anything slipped I could re-position it.

One other note of caution if you remove the timing cover. Be sure to carefully reposition the wires and clips for the signal generator. If you pinch or damage that wire, your bike may not run. Note correct position of the signal generator wire:

valveshim015.jpg


One more thing to be careful of...the rubber cushions under the valve cover bolts will do their best to get lost. Be sure to remove these and place them in a safe place. They don't just stick in the cover (don't ask how I know). Note in this image the throttle cables are moved aside and the cooling pipes removed in preparation for removal of the valve cover.

valveshim016.jpg


If you really want to make a difference, get rid of this shit:

valveshim019.jpg


Note the missing cushions?

valveshim020.jpg


Last edited by a moderator:
Tom:

Thank you for contributing your answers to this thread, which are very informative.

If you really want to make a difference, get rid of this shit:
I've read about this "AIR" Stuff - what is it, what does it do, and what benefit is it to get rid of it? Sure looks a lot cleaner under the tank without it.

 
The FJR uses an AIR injection system that provides fresh air at the exhaust valve under certain conditions to assist combustion in the catalytic converter and reduce hydrocarbons. For various reasons, that system is not entirely reliable, can cause backfiring with aftermarket exhaust, and takes up a lot of room in the engine area that makes every thing from valve checks to throttle body synchronization maintenance more difficult. A lot of us just choose to remove it. There are a number of approaches, and they work equally well. Here is onethat uses caps and plugs to seal off the AIR injection system and can be done very inexpensively. I used the cover plates by Wynpro for $50 and think it's a cleaner look, even though no one but me ever sees it.

FWIW, this will not make your bike run miraculously better, but coincidentally, I became much more attractive to women, added 2-inches to my waistline from the beer consumed whilst saving time during a throttle body sync, and even Beemerdons said JSES.

 
Last edited by a moderator:
I like the Iridium Plugs as I'm convinced they perform longer...there are good arguments from the forum engineers it doesn't matter, but I just know I've run mine 40k miles with no noticeable problem...heck, for $35 bucks on a $14k machine...

 
Bumpsie....

It's time for my first scheduled valve check. I called the most highly reccommended yamaha dealer in the State. The estimate? $1,000.00!!

I'm going to re-think doing it myself.

Using the horrible search feature on this forum (sorry mods, but it's true), I looked, but could not find a picturesque "how to" on valve adjustement.

Can anyone point to a linky?

Edit - Any other tips is appreciated. If I tackle this myself, I will buy the freaking $100.00 shop manual. I've never done a valve lash adjustment on a bike. I've done brake pads, fork seals, regular maintenance, etc. I'm prolly only suffering from "Kennedy-itis" ("The only think we have to fear.....") - still, before I get into it, I'd like to know more.

Edit again - As RadioHowie points out, my American History is cloudy and I confused FDR with JFK.

Thanks.
no advice here and your confidence is growing...I'm confident I can check my valves, I'm not at all confident I can adjust them if they are out of kilter...and then the shims?

if interested (it's definitely a-ways from you), my mechanic is a good ole boy in Tylertown, MS 100miles from Kenner off I-55. He swapped an engine, and fixed a burnt valve in the head all made the bike work perfectly afterward. This guy swaps engines all the time, and rebuilds them when riders do stupid things like overheat them. Specializes in Harleys Air Cooled, and all years Goldwings. Also love racers, so all types of crotch rockets. My FJR was the first feej he ever worked on, but quipped that to him, it was a bored out FZ1. So, again (admittedly I provided a service maual) this is my go to guy and always will be.

CAVEAT: He raised his rate from $52hr to $60hr Jan 1st. So rebuilding my head cost all of $520 or 10hrs labor.

 
I'm still on the fence about buying the shims. The kits are not very useful because they will offer a ton of shims I'll never need. I'd like to get about 3-5 shims of the 6 most popular sizes (3 sizes up and 3 sizes down from 1.85 mm), but apparently, Hot Cams no longer sells such a shim kit - someone correct me if I'm wrong or if they know of a reputable vendor that offers this type of kit.
Shim kits

https://www.powersportsplus.com/parts/detail/aftermarket/XP-4114411.html

https://www.ebay.com/sch/?_nkw=HCSHIM02&clk_rvr_id=403757098527

 
Well, I broke down and bought a hot cams set from Amazon from a vendor offering it for $63.00 shipped. Guess I can't really complain about that. I also ordered all of my gaskets and 0-rings. Taking Tom's advice, I'm going to hold on the CCT for now. Everything should be here by Thurs/Friday, so for now, it's all over but the crying. I'm at 25,2xx miles right now. A decent sized ride is coming up (1 more camping trip before winter), but at least I have my stuff now in case I get rained in for a weekend or something.

I would never even consider this if it weren't for the forum. It's neat that people would take the time to photograph and write about this so that others can benefit from the help. I'm showing my age I guess. For those of us old enough to be "pre-Internet" mechanics, please remind me - WTF did we do before computers?

Oh yeah now I remember.... we broke a lot of stuff... :rolleyes:

 
Last edited by a moderator:
One other piece of advice (it has been covered before, but....) make sure you cover/plug ALL openings with rags or tissues to prevent small items becoming big problems. Particularly spark plug and coolant openings. :rolleyes:

Don

 
I'll agree with Tom that you don't HAVE TO change the CCT, but while you've got the thing apart (right fairing off, timing cover off, etc.) you should consider doing it while it's open.

 
I'll agree with Tom that you don't HAVE TO change the CCT, but while you've got the thing apart (right fairing off, timing cover off, etc.) you should consider doing it while it's open.

I agree, we have changed several CCT at various tech days. We have pulled several out that were Gen II with 25K to 40K that were noticably weaker than a new CCT. Yes they were fine, just sayin' there definietly was a difference in the tension the used CCT provided. Consider it preventitive maintenance.

 
Top