Oh Shit! OMG.....now what?!

Yamaha FJR Motorcycle Forum

Help Support Yamaha FJR Motorcycle Forum:

This site may earn a commission from merchant affiliate links, including eBay, Amazon, and others.
OK Guys here it is: I got calmed down and with a butt load of Kroil I got number one inched out without breaking. I hope this picture will do the job. The threads rolled and stripped in the head. It was either over-torqued or some jack-wagon put plugs in a hot head...

<a href="https://s475.photobucket.com/albums/rr120/squeal1/?action=view&current=DSCN0353.jpg" target="_blank"><img src="https://i475.photobucket.com/albums/rr120/squeal1/DSCN0353.jpg" border="0" alt="Photobucket"></a>

<a href="https://s475.photobucket.com/albums/rr120/squeal1/?action=view&current=DSCN0352.jpg" target="_blank"><img src="https://i475.photobucket.com/albums/rr120/squeal1/DSCN0352.jpg" border="0" alt="Photobucket"></a>

 
DSCN0353.jpg


DSCN0352.jpg


Sorry bout that. Try this...

 
Got a name or number for FJRay's shop? I am in Far North Idaho. So I am going to have to travel a long way no matter what...

 
OK Guys here it is: I got calmed down and with a butt load of Kroil I got number one inched out without breaking. I hope this picture will do the job. The threads rolled and stripped in the head. It was either over-torqued or some jack-wagon put plugs in a hot head...
Sorry to hear this Tyler. I hope the dealership can show you some love and not ruin your holidays! I really feel for you my friend!! :(

 
Looks bad, especially near the end of the plug...focus is a wonderful thing.

Is it possible that plug only had about 3-4 threads into the engine?

DSCN0353.jpg


DSCN0352.jpg


Last edited by a moderator:
Sorry about the focus. It is an auto focus camera and that is the best of the four. I was trying to get a close up. No..believe me it was all the way in. That rolled thread at the tip fought me all the way out. I cant wait to see what it did to the threads in the head...boo.

 
There has got to be more to this story looking at those plugs. Very strange being buggered up only on the end of the plugs. You also seem to have a lot of carbon build up too. Better pic's would help. I might suggest moving the camera back some. You can always Zoom in with the software later. At this point I would definately pull the head regardless. I don't care how good of a mechanic you might be you are bound to get some aluminum chips down in the pistons if you try and do it on the engine. Just my opinion for what its worth.

Good Luck,

Dave

 
Sounds like it can be fixed it in place if you got all the plugs out. Give me a shout at 541-536-8556 and I can talk you through it and then you can decide if you want to give it a try yourself or if there is a good mechanic in your area, I can send the kit. Anybody that has ever worked on old VW heads would be able to do the job.

I have had good results with Helicoil's over the years and other folks don't like them. I don't know if there is enough room in the FJR head for the bigger inserts or not.

 
<Possibility>

Initially the plugs weren't fully seated, as combustion gasses were allowed to seep up through the loose threads carbon built up on the bottom two or three threads. Then when you tried to remove the plugs they can't unscrew because the threads are clogged with carbon. The results would be thread distortion or removal as the harder than aluminum or steel carbon is forced to unscrew, with the help of a 1 foot long wrench or larger.

</Possibility>

 
Been sitting here looking at my spare engine and I don't think doing it in place will work. The problem is that once the coil is installed you need to get inside it to break off the instalation tab and with only a 10mm hole I don't think you can reach to the bottom with needle nose to break the tab. I will do some measuring in the AM.

 
Yes, I had pretty well already determined that. Then you are talking about running a drill and a tap down there. Pretty hard to get a tap in there plus the chance of getting a lot of filings in the cylinder. I am resigned to shelling out the big bucks for the head to be pulled and done right. I cannot be worrying about this motor while on rallys. Or any other time for that matter. That was kinda the point of all this preventative maint.

 
Worst case scenario - the head comes off for repair at a stealership = unknown tech at high dollar prices.

Best case scenario - Ray pulls the head for you. Ohh, that sounded bad.. :unsure: but = known excellent tech at reasonable prices.

 
Looking at the Timesert website it should work withuot removing the head as there is no tab to remove. I have had good luck packing the tap with grease to contain the chips. I also do the tapping with the exhaust valve open and blow out the chamber with air. if any chips are left behind they will get burned up and they are soft. If it was mine I would go for it and expect good results. Looks like the kit is around 115.00 and the 10 MM kit is what you want.

 
Just my 2 cents... If you have determined that the head is to come off, why go to the expense of repairing a damaged part. I am sure that there are heads out there that would easily interchange and probably cost less than the anticipated expense of the repair. If it were me, I would find a good head, clean it up and slap it on... No damaged threads, no potential future problems with the inserts and bang you're done.... Rich

 
Last edited by a moderator:
Can you confirm for us the removed plug is a NGK CR8E?

The plug appears to be heavily damaged at the end (melting?) and has a carbon ring above the damage. This almost looks like it penetrated too far into the head. Were you experiencing anything you would describe as a ping during operation? Are the pipes unusually blued like the engine ran hot?

 
Looking at the Timesert website it should work withuot removing the head as there is no tab to remove. I have had good luck packing the tap with grease to contain the chips. I also do the tapping with the exhaust valve open and blow out the chamber with air. if any chips are left behind they will get burned up and they are soft. If it was mine I would go for it and expect good results. Looks like the kit is around 115.00 and the 10 MM kit is what you want.
This would be my preferred approach. In addition, I would have someone turn down some guides for the drill & tap; using something like delrin. Nothing too fancy, just a loose fitting cylinder to drop into the head recess with a loose fit for the drill and a similar set-up for the tap. The one thing I obsess about with these sort of jobs is proper alignment.

You have had a number of good suggestions. It might be a good idea to list them all with good/bad points which might help to come to a rational conclusion.

Good luck whichever way you choose to go.

Don

 
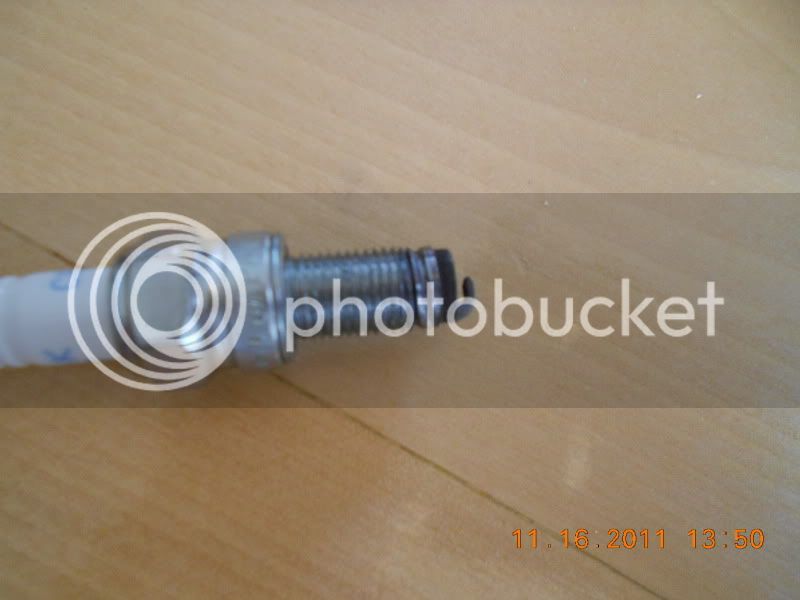
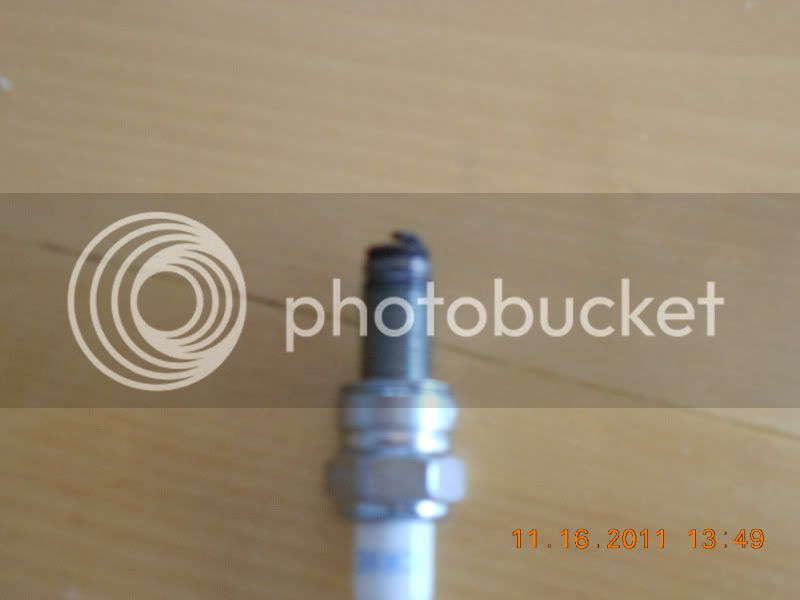
First, assess the thread damage. You may be able to just chase the threads with a greased tap and be back in business. I can't tell from your plug picture how much damage would have been done to the hole. But if the threads are too messed up, do yourself a favor read up on the "Time-sert" information.

Their insert is actually a smaller outside diameter than the helicoil ones, so there is less head material to be removed. There is also no drilling. You use their special double diameter tap to do all the cutting and rethreading in one fell swoop. The tip has a section that threads into the old damaged threads, then there is an enlargement boring section, and the final section cuts the new outside threads into the head for the insert.

Their longer reach spark plug re-thread systems are made exactly for this type of situation with deep spark plug wells. No special home-made guides are needed because it will align itself via the old buggered threads and hole. No tabs to break off because the solid insert is expanded in place to hold it using the tool.

This also makes a superior heat transfer interface, which is important for spark plug applications. The time-sert is actually harder than aluminum, so the threads will be better than new when completed. You just need to take your time and go at it easy.

As for the inevitable metal chips, make sure that the piston is down (per instructions, so you don't run the tap into the piston crown) with no valves open. Grease the tap well (goop it on) to make sure you catch most chips during cutting. You can also back out and clean the tap and re-grease it one or more times during the cut. When you're done with the thread cutting, attach a small diameter vinyl hose to a shop vacuum and feed the hose into the spark plug hole. Work it around in there to pick up any metal pieces that fell in. The rest will blow out the exhaust on first start.

PS - I have no relationship with Time sert. I just recently rescued a SAAB 9-3 that had blown the spark plug clear out of the aluminum head using this technique. I think that any competent mechanic should be able to pull off this repair. If the alternative is to remove the head and (likely) replace it with a used one, why not try the Timesert repair first?

PPS - After browsing your photobucket account, I think I can see the root cause of your problems.

You've got a car tire on that bike! :nono: Now, didn't we warn you about bad stuff happening with those things?

Sorry for poking fun in your moments of distress. But I just couldn't resist. :p

 
Last edited by a moderator:
Man what a serious bummer. Glad the forum is helping out--SQUEAL is a really great guy and would do the same for anyone. This September I went to Canada with Greb. Squeal and his wife cooked us an awesome breakfast at their house at 5:30am! Good luck man--at least you've got many months of shitty weather to get this worked out.

 
Last edited by a moderator:
Top