Audiovox CC install question

Yamaha FJR Motorcycle Forum

Help Support Yamaha FJR Motorcycle Forum:

This site may earn a commission from merchant affiliate links, including eBay, Amazon, and others.
I did not hook a vaccum canister yet, but did not experience any surging while going up and down hills. Is the vaccum canister necessarry, say when I'm fully loaded?
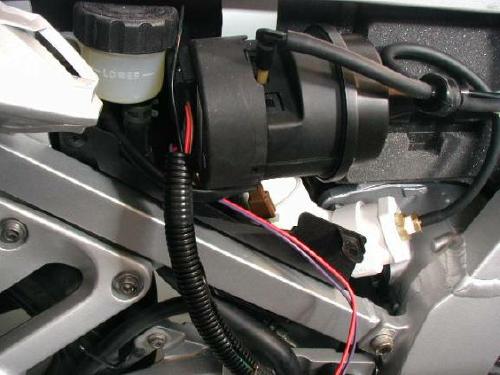
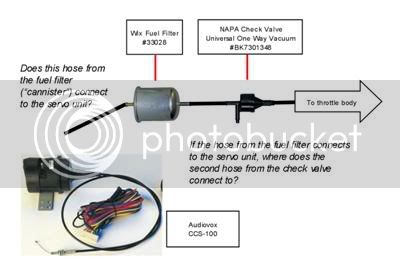
I put one in just to be sure. My idea was to use a fuel filter from a 86 or so Nissan, the number is in one of the cruise threads I made somewhere. It was small enough to fit in the tray with the servo, and my cruise has been smooth as silk in all aspects. Your call.

 
From my experience with and without the canister:

The cruise control will work without the canister. The cruise control will work better with canister.

It seemed to make the cruise's throttle actuation stronger and quicker. Sometimes when going uphill it would not accelerate quickly at all without a canister, and does just as well as flat ground with the canister.

I went to the plumbing section of lowes and found a short section of about 1" diameter tube, pre threaded, and endcaps to fit. Drilled a hole and installed a vacuum F plug from autozone, expoxied it in place, and then epoxied the ends on. Spray painted black. All under $10.

I used the cruise for a few months without the canister. I loved it at first, cause anything was better than what I had before. After I used it for a while, the little quirks kept bothering me, and it seemed weak in general, so I installed the canister and all was right!

 
Found the info on the filter I used for a canister-

Vacumn reservoir

Wix fuel filter #33028 6mm hose ends, HT: 4.724", DIA: 2.440

Originally fits 85-86 Nissan Pulsar/Sentra 1.6 carb mtr.

No offense to the can builders, but this can is perfect for the job, and quite compact, as well as inexpensive and readily available.

 
Found the info on the filter I used for a canister-
Vacumn reservoir

Wix fuel filter #33028 6mm hose ends, HT: 4.724", DIA: 2.440

Originally fits 85-86 Nissan Pulsar/Sentra 1.6 carb mtr.

No offense to the can builders, but this can is perfect for the job, and quite compact, as well as inexpensive and readily available.
Where can I get one, at Kragen/Autozone? Does this fuel filter still need the check valve I keep reading about, or is it ready out of the box?

 
1871_1.gif


I found this picture of the filter you used, how is this connected to the CC?

 
Just put it between the hose from the TB's and the CC unit, using a check valve (Napa Balkamp #730-1347) on the inlet side. Simple as that. Available wherever fine auto parts are sold. :D

 
Last edited by a moderator:
Sooo... that means

TB > hose > check valve > hose > canister > hose > CC?

With the filter/canister -CI- (round side toward TB) or -D- (round side toward CC)?

Sorry, I'm trying to visualize the set-up. Thanks!

 
Sooo... that meansTB > hose > check valve > hose > canister > hose > CC?

With the filter/canister -CI- (round side toward TB) or -D- (round side toward CC)?

Sorry, I'm trying to visualize the set-up.  Thanks!
Even though the canister setup is different, this photo, I think explains what radman is describing. The difference being that the wix filter is just inline and not tee'd off as shown. I'm guessing that the wix filter has some kind of marking that indicates the inlet/outlet.

image039.jpg
Yes it does, though, being a carb and not a FI filter, it doesn't matter, one of the nice things about using this unit. That, and it's same sized hose ends that fit the same hose as the CC uses, plus it's compactness and durable (non-plastic) construction, makes it ideal. And yes, that is the correct order of connection. As I said before, my CC just sits in the tray, no solid mounting required, and the filter sits alongside, so that the CC unit is firmly prevented from undesired movement. This allows for easy servicing of it and any components underneath should it be required. The CC works nicely here, it does not move rather than it moving the cable as one might think. The seat pan kinda locks everything in place. The filter stores what appears to be an ample supply of vacumn, as well as smoothing any possible surges or otherwise in the system.

Tip-for those of you using the tray for your PCIII mount, try behind the bar under the passenger seat usinf 3M hvy duty velcro. Fits perfectly! Cable more than long enough routed correctly.

 
Last edited by a moderator:
I went over to napa auto this am to get the fuel filter and check valve, instead I came back with a napa gold 3031 fuel filter. It is a little smaller and fits right in front of the tank ahead of the tool tray. Cost around $4.00 The CC now hooks up with no lag. I'll be interested to test it now with my pillion.

 
Okay, maybe I'm a little hung over but I can't visualize the multiple hose connections. Anyone care to clarify?

CCprojectCustom.jpg


The remaining connection on the check valve is unused, so you need to cap or plug it.

That fuel filter appears to be quite small with a small volume (filter media reduces the volume). I have little or no speed reduction when going up steep grades with my 17 cubic inch canister.

 
Okay, maybe I'm a little hung over but I can't visualize the multiple hose connections.  Anyone care to clarify?
CCprojectCustom.jpg
Everything looks fine in your diagram, except the check valve I bought from Napa has one inlet and one outlet as per rads P/N.

 
Thank you, skyway! I'll look for check valve #730-1347 (the 730-1348 was the one that came up on the NAPA website search).

 
I made my canister from flexible black PVC with capped ends and a barbed nipple along the left side of the rear fender under the seat:

P8131693.JPG


This gave me good volume and total part cost was about $3.50. PVC available at Home Depot, and the tube extends to the back end of the fender. BTW the end caps are white, I just put some tape over them to mimic the black of the tube.

Also, I strongly recommend tapping vacuum from all four nipples (why would you want one throttle body sucking more air than the others?) and using four individual check valves (why would you want one nipple to affect the others?)

-BD

 
Last edited by a moderator:
Thanks for all the research getting this kit put together! :clap: I still have not installed mine... :erm: I am not very coordinated when things get technical. :dntknw:

Any volunteers want to tackle this project with me?? :friends:

The :drinks: are on me! :)

Adam

 
Top