Beyond Frustration--Mirror Mount Bracket Snapped

Yamaha FJR Motorcycle Forum

Help Support Yamaha FJR Motorcycle Forum:

This site may earn a commission from merchant affiliate links, including eBay, Amazon, and others.
These days steel frame bicycles are competing with aluminum or alloy frames. Anyone who knows bikes will tell you a steel frame rides better than an aluminum frame. Good steel is VERY light and wouldn't add an ounce to the FJR's profile. Yamaha just has to step up. Hell, if they'd just stop using cast aluminum, the part would be better. Cast aluminum is shit metal that should probably only be used to make cheap folding chairs or something.

The problem would be in machining every single part and the block of metal it would take to be able to pare it down to a lightweight stay. As a reference, my dad used to make special satellite battery cases for Hughes Aircraft. The finished part was a 3oz tube with 4 small ears. The the tube was cut lengthwise into 4 identical, curved pieces. Because aluminum tube did not meet specs, each part started out as a 4 or 5 pound block of aluminum, hollowed out and machined. Those little bastards were expensive, and we recycled thousands of pounds of aluminum every year. I'm betting Yamaha would not be thrilled about having to do that.

 
Evening John,

I stand corrected. Rubik it is.
smile.png
Hey, don't blame me just because my wife can't spell.
innocent.gif


Man I hope she doesn't see this post or I'm in deep......

 
Last edited by a moderator:
These days steel frame bicycles are competing with aluminum or alloy frames. Anyone who knows bikes will tell you a steel frame rides better than an aluminum frame. Good steel is VERY light and wouldn't add an ounce to the FJR's profile. Yamaha just has to step up. Hell, if they'd just stop using cast aluminum, the part would be better. Cast aluminum is shit metal that should probably only be used to make cheap folding chairs or something.
I agree. It was probably more about cutting variable cost than it was about reducing weight. Making that stay from pot metal would be cheaper than it was previously when made from steel.

I was always a fan of steel bicycle frames, even during the early hoopla of aluminum and exotic carpet fiber. Steel frames can flex (repeatedly) while alloy or fiber composite frames are very stiff, and will crack when flexed. "Steel is real", was the mantra.

 
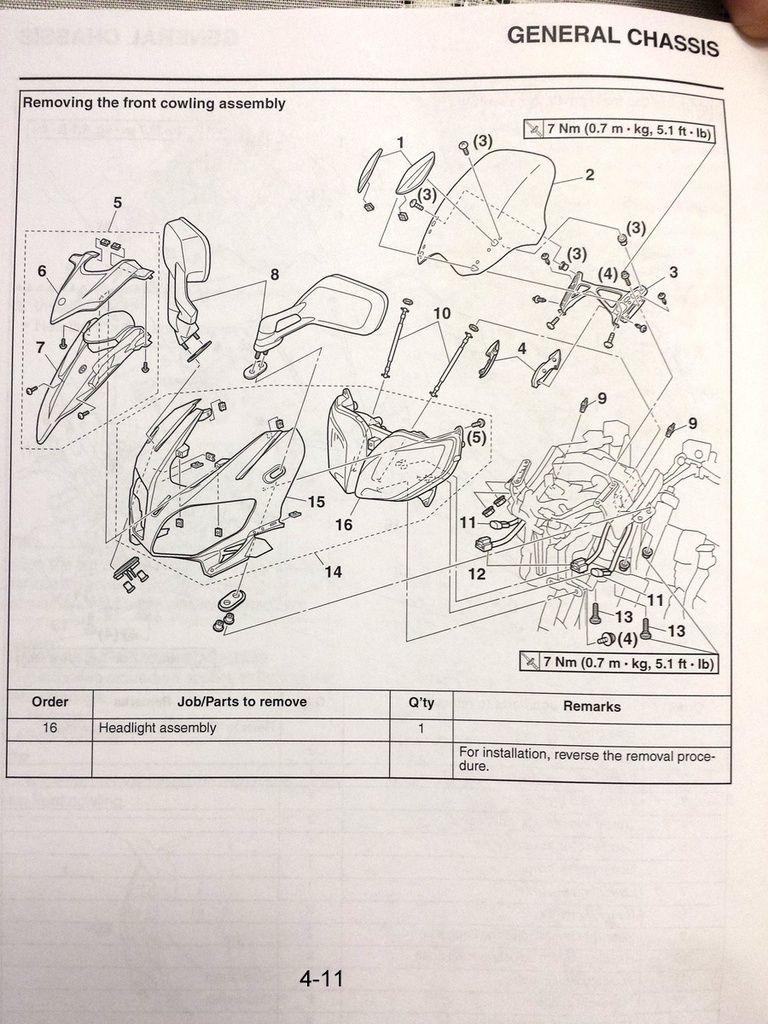
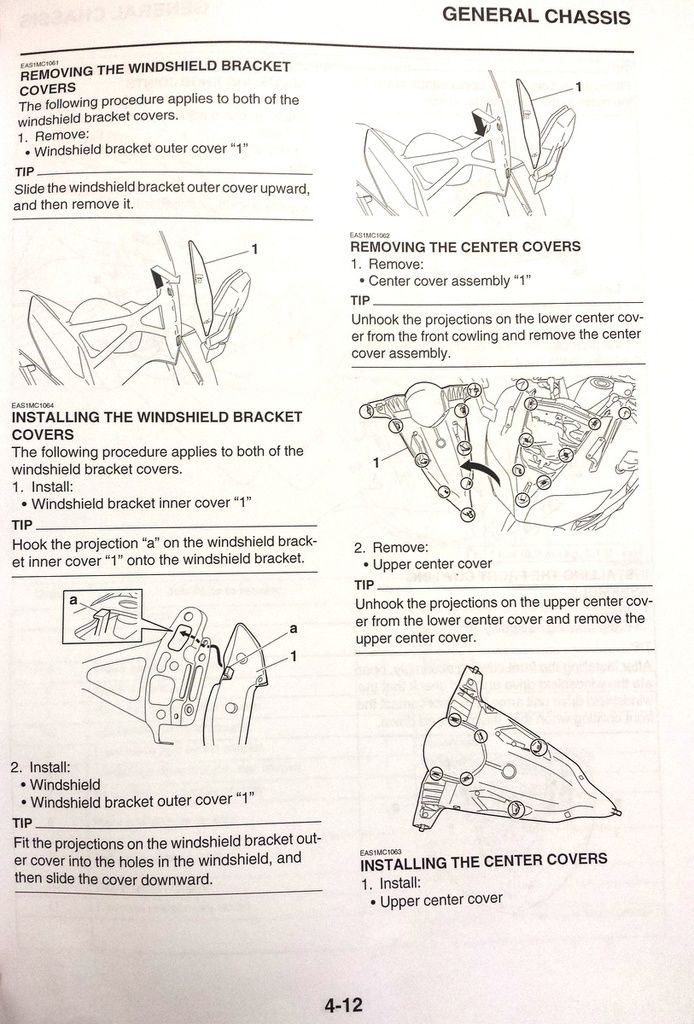
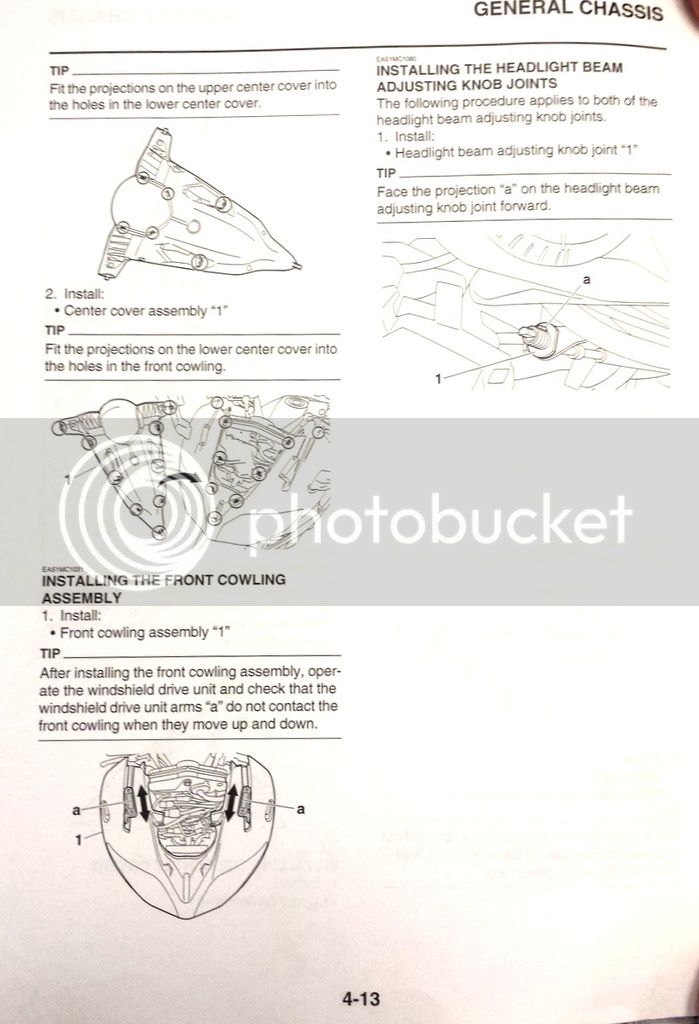
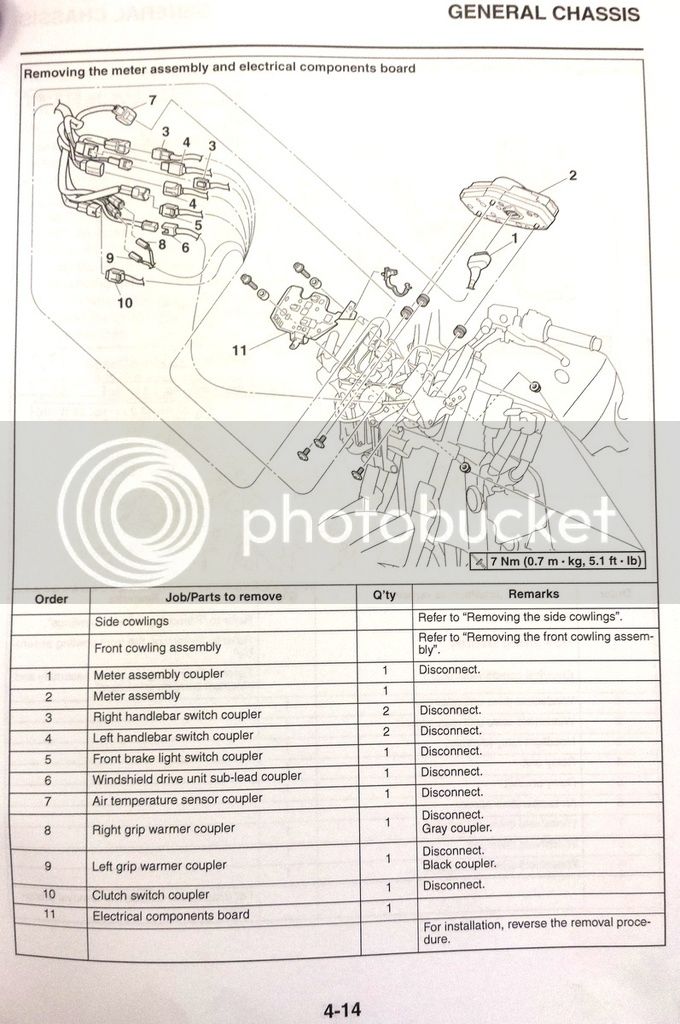
When mine broke, I first did a JB Weld repair without taking the entire fairing off. When that broke, I knew that to do a proper repair i would need to remove and replace the bracket. I used the factory service manual for instructions. There is also a nice PDF elsewhere in this forum that has photos showing how to remove the fairing pieces. The advantage of the service manual is that it shows the exact order in which you should remove parts. Reverse the order to re-assemble. Here are the scans and a photo of tools I used along with some comments I wrote at the time. After I installed the new bracket, I repaired the old. First tacked it together with JB Weld, then reinforced with aluminum straps held in place with machine screws and nylock nuts. Now I have a spare. I'll makd a PDF and see if I can get a link to it from my dropbox account.

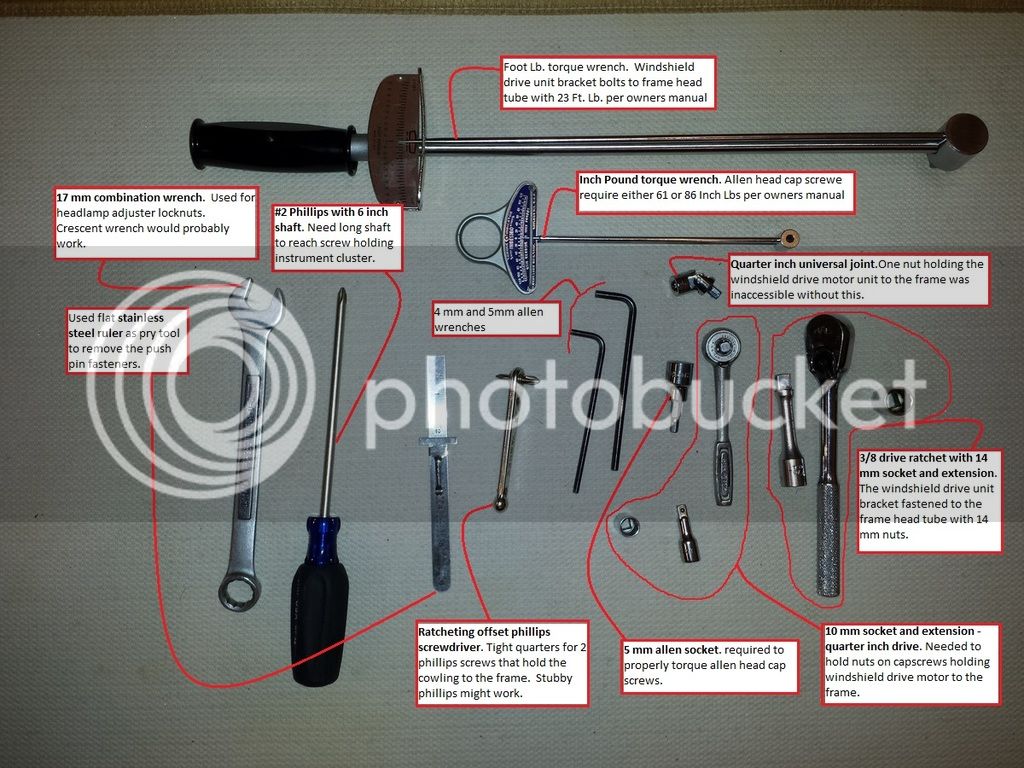
Tools RequiredNothing too exotic. If you do your own maintenance, you probably already have them in your tool box. There are lots of hex head cap screws with 10 mm nuts that require 5.1 foot pounds (61 inch pounds). My large torque wrench is not accurate at that level. Fortunately, I inherited an inch pound torque wrench that is tailor made for the job.

Tools-annotated_zpse9edox3v.jpg


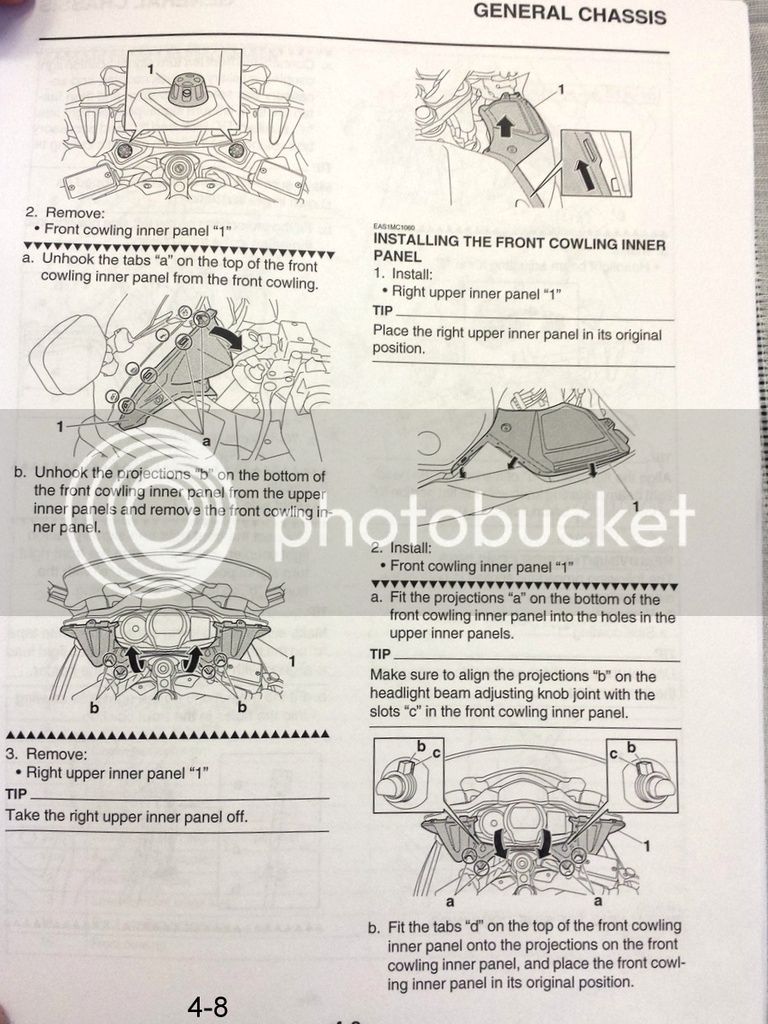
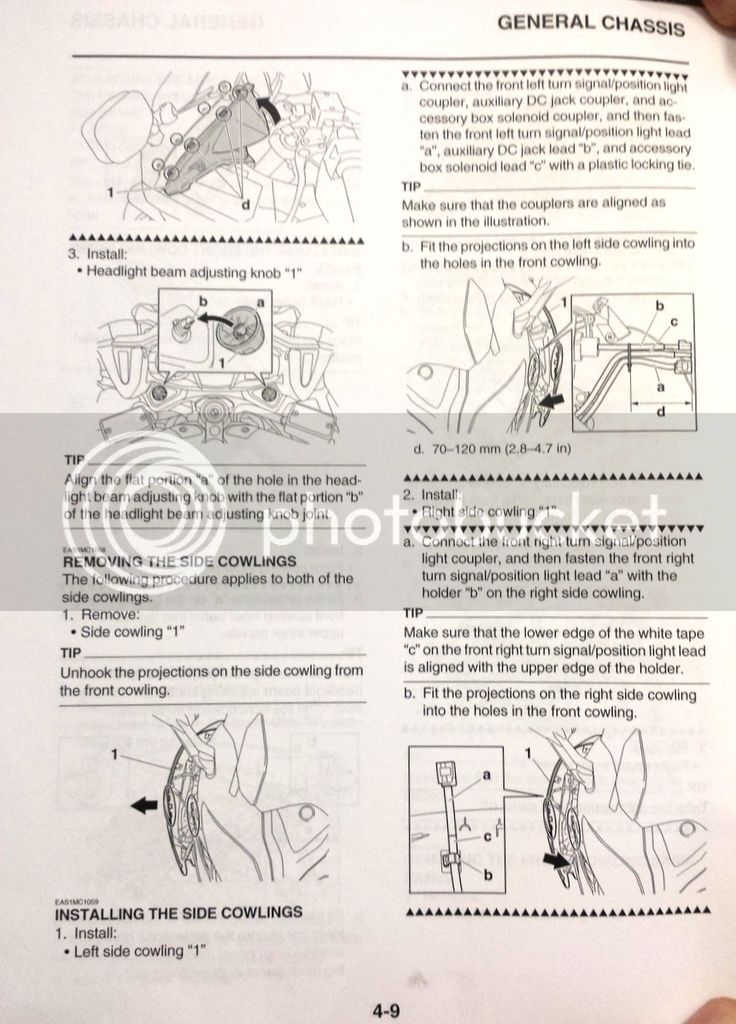
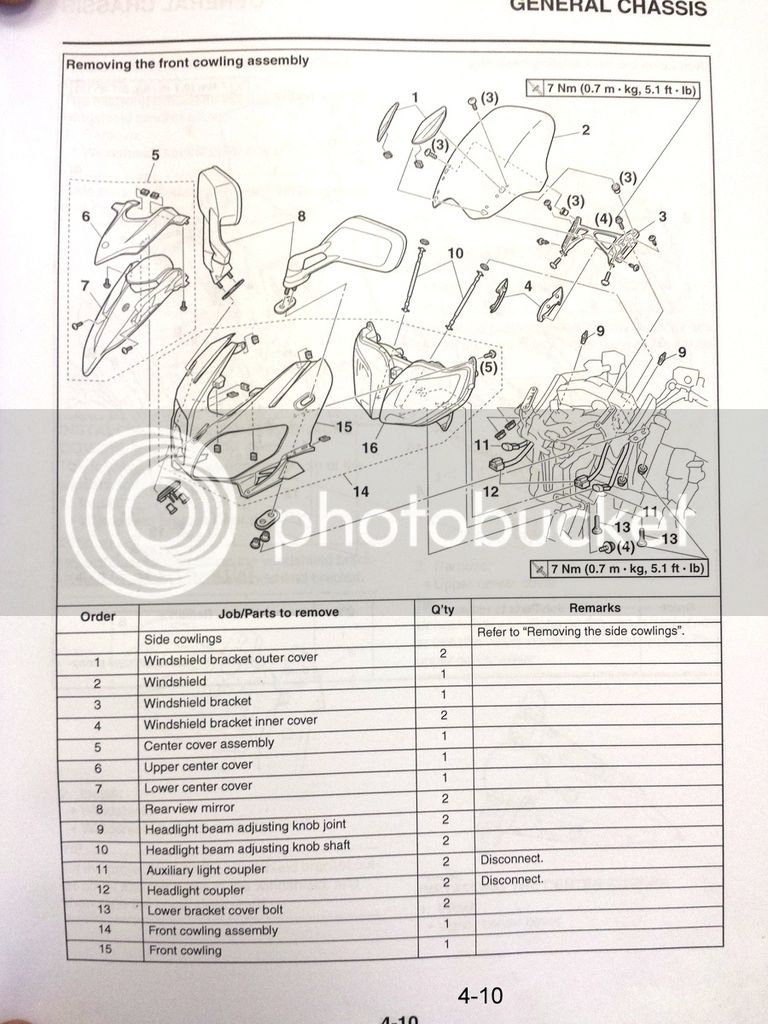
ProcedureThere are good directions with excellent photos elsewhere in this forum for removing the side cowlings. Inspired by them, I was going to post photos of the rest of the tear down. But after completing the procedure and examining my photos (poor quality), I concluded that the best guide is the factory service manual. At first glance there doesn't seem to be much detail there, but it's plenty to get the job done. The factory manual shows an exploded diagram and a list of which parts to remove and the order that you need to remove them. There are also some useful tips. Here are the pertinent service manual pages:

  • 4-8 and 4-9 – Tips on removing and re-installing the side cowlings
FJR%20Manual%204-8_zpsrdvj9aft.jpg


FJR%20Manual%204-9_zpstybj9bia.jpg


  • 4-10 – Front cowling removal. Make sure you have a good strategy for saving the fasteners you remove. I can't emphasize this enough. You don't want to be searching for fasteners when you start re-assembling things
FJR%20Manual%204-10_zpsscbpoggp.jpg


  • 4-11 – Continuation of front cowling removal.
FJR%20Manual%204-11_zpsfhikgqge.jpg


  • 4-12 – Tips on removing the windshield bracket covers
FJR%20Manual%204-12_zpsyurgbujr.jpg


  • 4-13 – Tips on installing the windshield bracket covers and headlight adjuster knobs
FJR%20Manual%204-13_zpslaag5lkx.jpg


  • 4-14 – Disconnecting electrical connections and removing the instrument cluster. This is easier than you might think. All connections use unique connectors. You can't go wrong. Most are right out in front of you. The only exception is the power to the windshield drive motor which is below the “electrical component board” and thus hidden from view.
FJR%20Manual%204-14_zpsrwgcfl9h.jpg


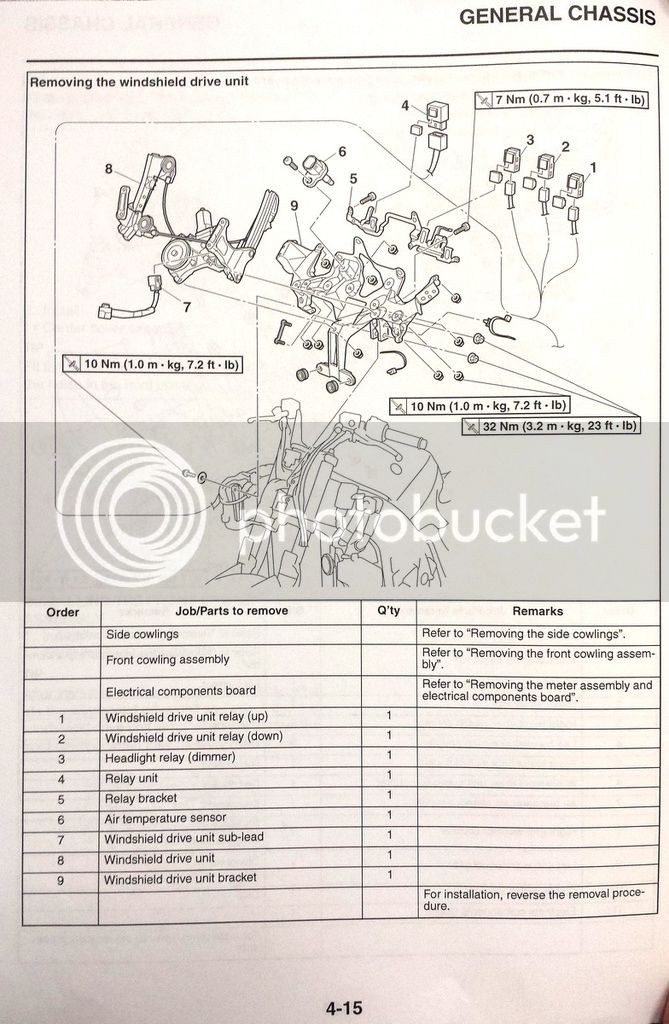
  • 4-15 – Windshield drive unit. This was remarkably straightforward. You don't need to remove all the relays. They come off as an assembly. Only one of the 10 mm nuts that hold the windshield drive unit caused a problem. I need to buy a 1/4” drive universal joint to re-install it.
FJR%20Manual%204-15_zps8ybkupei.jpg


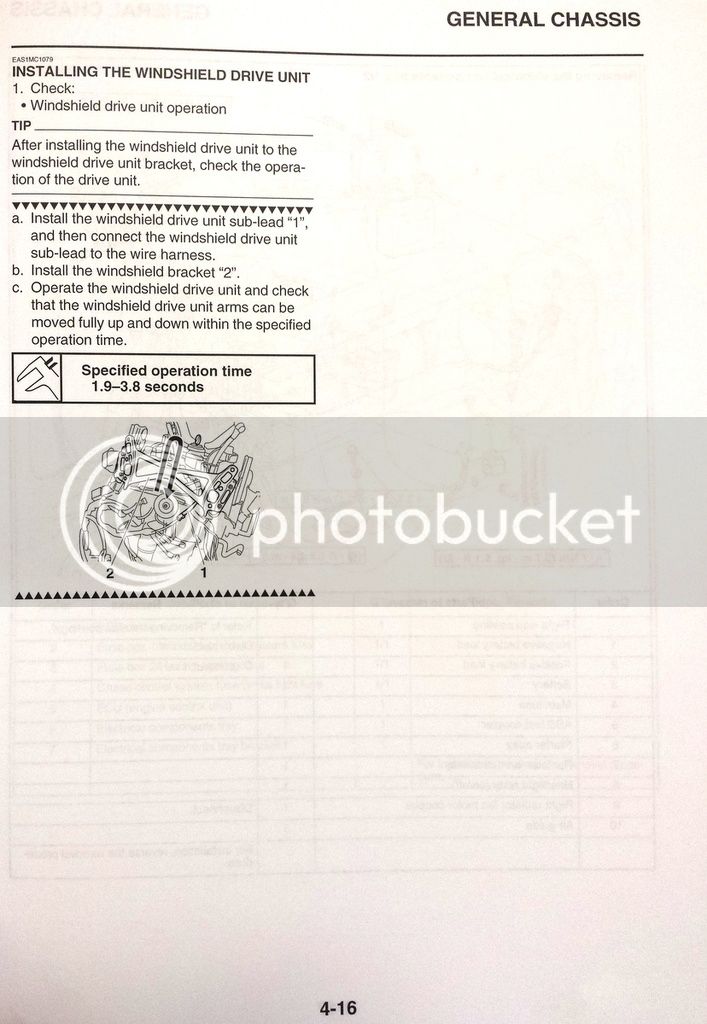
  • 4-16 – Tips and specs for the windshield drive unit.
FJR%20Manual%204-16_zpsjaq32e0s.jpg


Allow yourself plenty of time. I tore it apart one day then reassembled the next after a good night's sleep. I had previously ordered a replacement windshield drive unit bracket casting. You will be working in tight quarters. If something seems stuck, keep looking for that extra bolt you forgot to remove.


Latest posts

Top