


tfrazie
Member
This is my first post not counting my initial introduction about me and how I came to buy (steal) a 2012 FJR with ~4,000 miles. I've taken from this group so much in the way of mods, HOW-TOs, and general information that I wanted to share just a little something I came up with on my own. At least, I couldn't find, by extensive searching on this forum and others, how driving lights mounted to the Canyon Cagewould look or whether or not the Canyon cage would go on without problems to my FJR equipped previosly with Motorcycle Larry's Highway Pegs.
So BLUF (bottom line up front): Driving lights (Denali D2's) look great mounted to the Canyon Cage (IMHO I think better than mounted on fender mounts I purchased from Twisted Throttle) and the MCL Highway Pegs do work with the Canyon Cage with a minor modification to the left MCL bracket. Although the MCL Pegs and Canyon Cage is compatible with that modification, the Canyon Cage requires a different (longer) highway peg to be practical.
Before I get into some of the detail, here's how it all looks together.

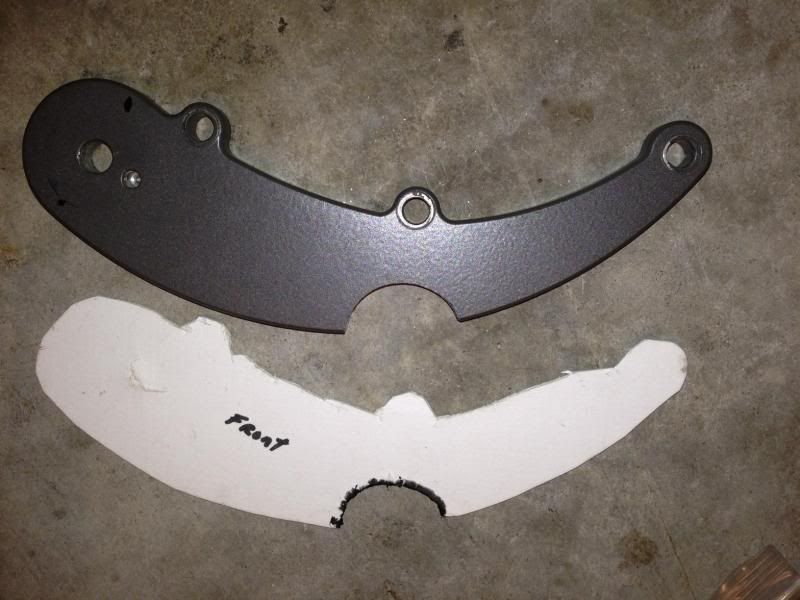
The right-side MC Larry Hi-way mounting bracket installs without interference with the Canyon Cage. (As I said, I had already installed the MC Larry Highway pegs prior to my installation of the Canyon Cage.) But there is interference with the left-side MC Larry Bracket. So I made a template, as mistakes were not an option here, and filed a half moon depression in the painted bracket that allowed the enough relief in the bracket from the interference it created with the cage. The bracket is white metal (or perhaps aluminum) and VERY easy to file. I did not apply a finish to the bare metal I exposed. That bare metal is barely visible and I figure the corresion will be very slow and very slight.You may disagree given the ease in which a little paint could have been applied.
Here is a pic of the modified part and the template. The template really only need to be accurate with regard to the mounting holes and the interfering surface:
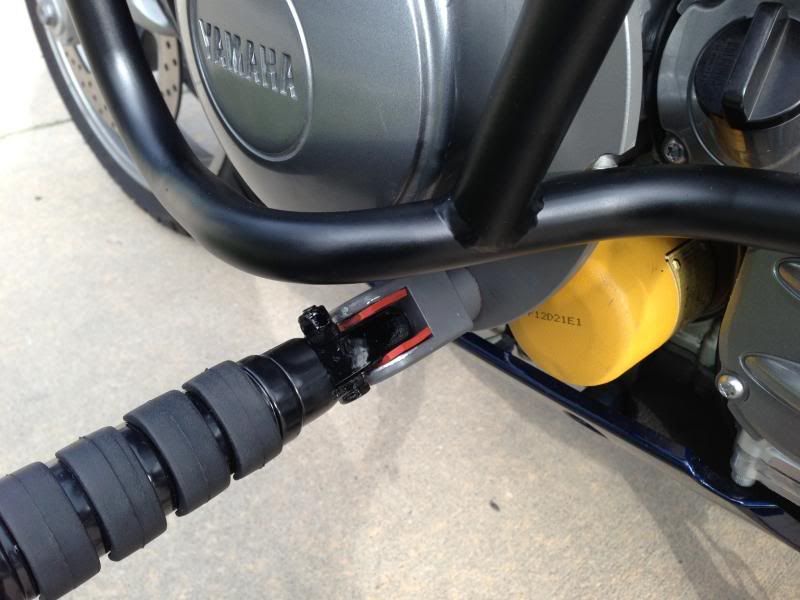
Here is a pic where you can just see the crescent shaped cutout (cut by file) where the cage and the bracket come together just above my beautiful yellow long oil filter. Although the pic doesn't show the filed crescent in it's best light, it's a perfectly smooth, perfectly shapped half moon that was easy to do with the file taken to the soft metal.
Another similar pic pulled back a little further:
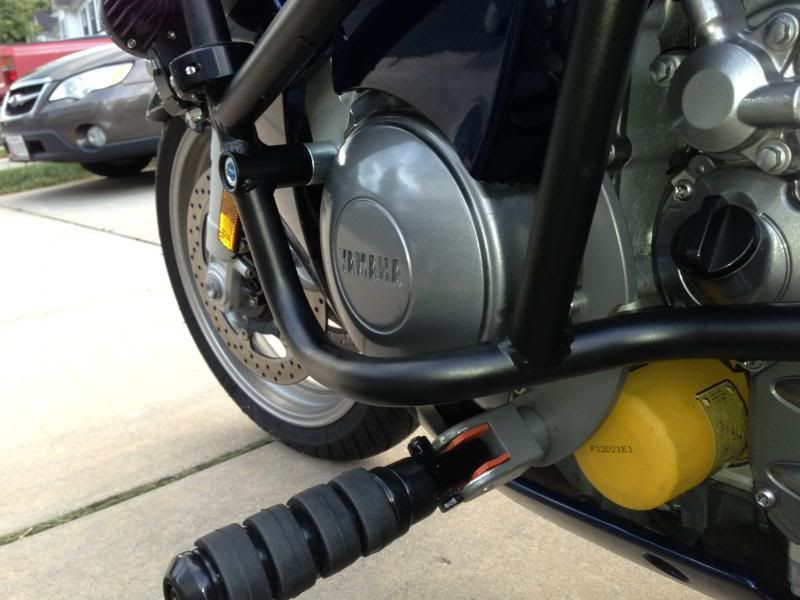
Note that the left side MCL bracket and peg can be removed or loosened (to remove the oil filter if you've used the longer filter) without removing the Canyon Cage. The right side MCL bracket and peg cannot be removed without removing or loosening the fasteners on the Canyon Cage but I can't forsee why that might be necessary.
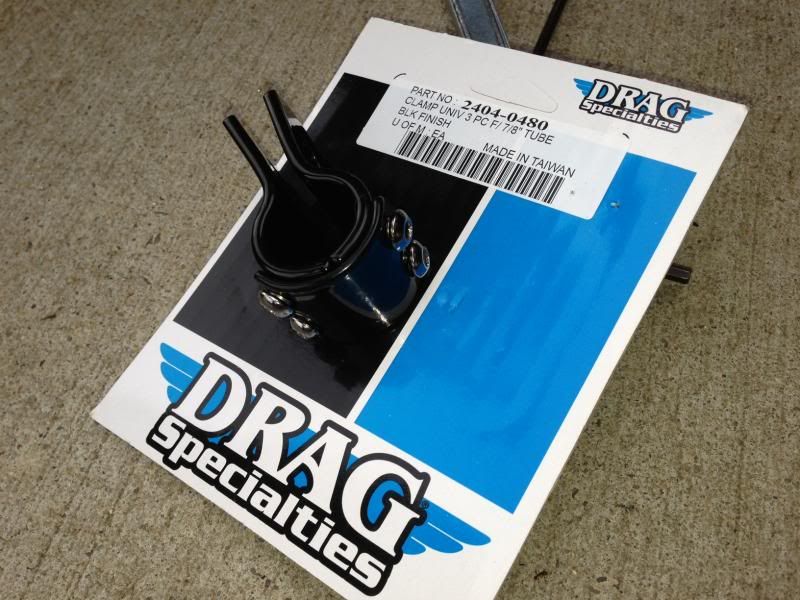
The next issue with the MC Larry pegs and the Canyon Cage installed together... The cage pushes your leg further out away from the bike. It turns out that this restricts your footing to the outside 2 inches of the MC Larry pegs. Before I had installed the cages I had planned on mounting some pegs to the cage so I bought a set of Rivco Products Anti-Vibration Highway Pegs Black PEGSBK from eBay. I also bought a set of Drag Specialties Three-Piece Frame Clamp 7/8" Black 77-6016B from Amazon.
Here is a pic of the Drag Specialties 7/8" black clamp
Here is a pic showing the differences in sizes between the MC Larry Highway Pegs (an exact match to the stock FJR pegs) and the Rivco Pegs. It's significant. I've gotten a little more length of of them due to the way I mounted them which I'd never repeat due to the amount of work (more on that later).
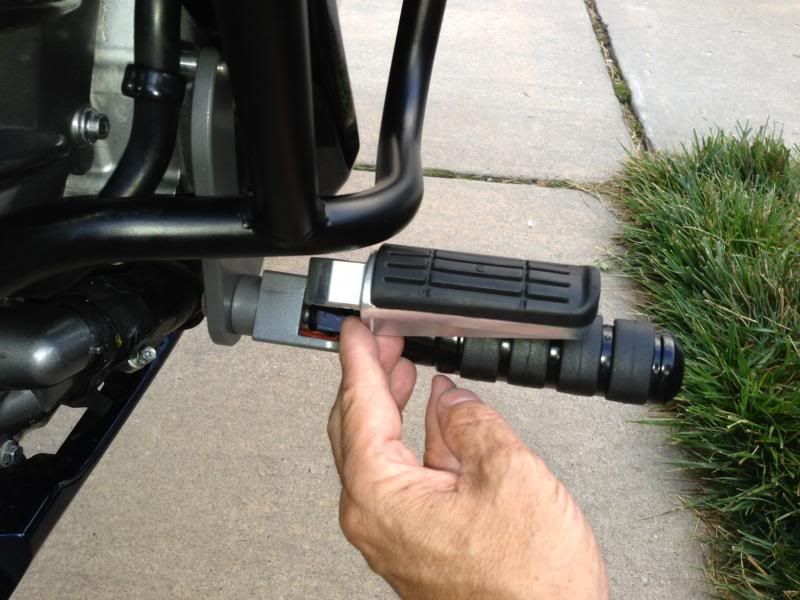
Here's a pic showing a comparison of the ends of the MC Larry Peg and the Rivco. If I were to do this again I'd shop for a longer peg with an end similar to the MC Larry Peg shown in the pics. That would be a simple swap. In this pic what's in my hand is the MC Larry peg attachment point which is attached to the MC Larry bracket.

Here's a little background on rationale behind the decision to mod Larry's peg mount to accept the Rivco Pegs if you're so inclined for whatever reason. Rather than mount the clamps and pegs to the Canyon Cage as I first envisioned I forced the Rivco Pegs to fit on the MCL brackets as I wanted to mount the Denali D2 LEDs to the cage using a PIAA universal mount and didn't want the busy-ness of the pegs mounted so close to the LEDs. There will be some disagreement here as many of you will think the MCL Highway Peg position isn't far enough forward or up vertically for relief. I've done 3 trips now totaling about 5,000 miles and to me the relief is great. If you don't have MCL pegs already I'd describe the foot position on the MCL pegs as more like the Harely floorboard positioning with your feet in front of you with a 90 degree bend at the knee. So there is a big difference than the stock FJR pegs feet position. The problem I have being a long-time Harley rider is that with my feet on the MCL pegs I forget sometimes that there is no brake at my right foot in this position and no shifter at my left foot position. Seriously. Interestingly enough, when I rode my Harley on long days, I'd put my feet back on the passenger floor boards for relief. This was much like the stock FJR riding position. It's exactly opposite now. The other problem I had in my first attempt at mouting the Rivco pegs to the Cage more forward and more verticle is that I compromised my reach to the handlebars and this would have tortured my back. But that's just me.
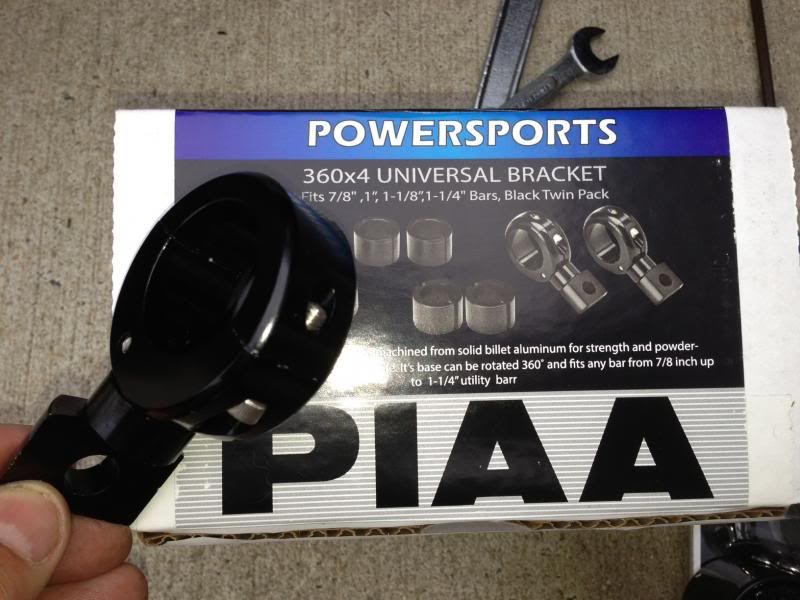
Here's the PIAA mounts I used for mounting the D2's. I had bought an extra set of the Drag Specialties clamps to mount the D2's but I liked the PIAA mounts some much better as it seemed more custom although they are universals. There is a lot of variation allowed in choices of mounting positions for the D2's. My final choice for the D2's will be rotated close to the fairing. This way the Cage will protect the lights if dropped. With this PIAA mount, the D2's could be rotated 90 degrees away from the fairing where I'm not sure if they would hit the ground before the cage or not.
To force the Rivco pegs to fit. I drilled and tapped a larger threaded hole in the Larry mount to match the 3/8"-24 hole in the Rivco pegs. This sounds all well and good but it was a pain in the ass to get right. I used a hex head bolt 3/8-24 x 2 1/2" through the back of the MCL bracket through the threaded MCL peg attachment to and through the end of the predrilled Rivco Peg. This makes for a very strong connection that is wobble free (I really didn't need the red rubber you can see inserted between the Rivco pegs and the MCL peg attachment). It sounds easy but was a PITA.
In the first and the following pix, the D2's are wired temporarily. Also the lights are not aimed in final position but I wanted to show the look.
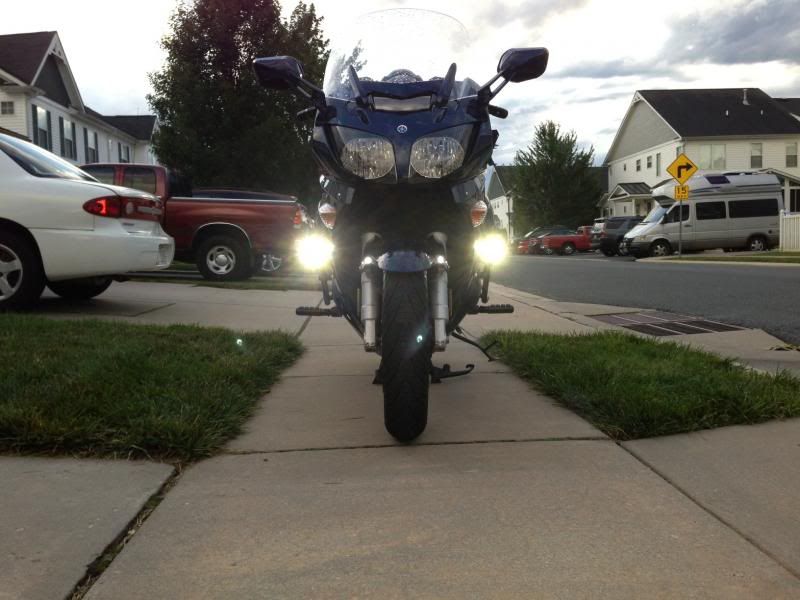
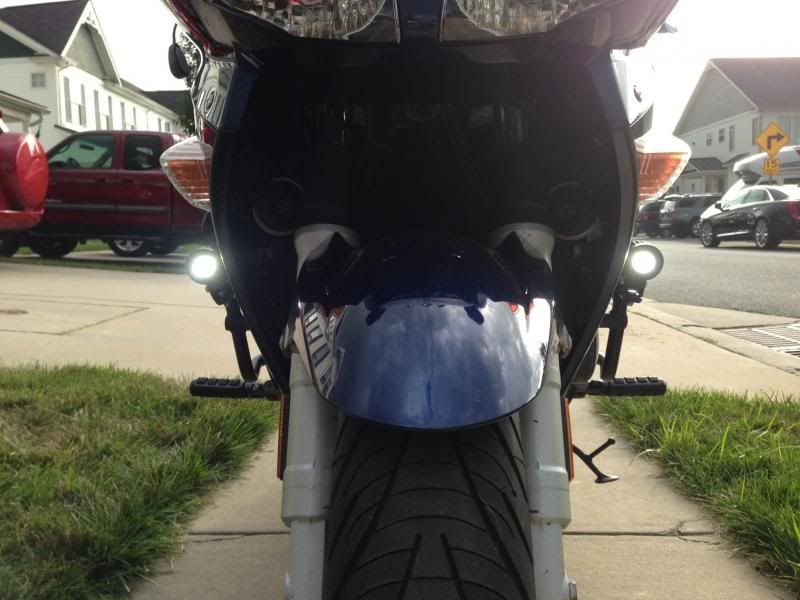
These are the D2's only. My headlights were NOT on.

So off to get these puppies wired up. I've bought a Fuze Box and am contemplating the purchace of Art's (road runner) rotating mounting brackets for the tail section. From some research I think I've narrowed down the location of access of the high beam circuit but PLEASE, if you've got an easier idea, chime in. I need to tap into a high beam trigger as the D2's have a low beam and high beam position. I've got the A, B, C and D panels off (just mounted some mirror extenders) so I figure I can get to a high beam trigger near the relay. Can anyone confirm that this is accessable w/o any further tupperware disassembly or even a better place to take tap a high beam trigger?
And looks like I've got to sell my unscathed OES Accessories Extended 06-12 FJR-1300 Frame Sliders for which I paid $65 plus shipping.
I'm coming to the Asheville area in Sep for the EOM meet in Maggie Valley, NC. My son lives in Asheville. He's just provided me with my second grandchild so that accounts for 2400 of the miles on my FJR. Hope to see some of you there!
Tim
So BLUF (bottom line up front): Driving lights (Denali D2's) look great mounted to the Canyon Cage (IMHO I think better than mounted on fender mounts I purchased from Twisted Throttle) and the MCL Highway Pegs do work with the Canyon Cage with a minor modification to the left MCL bracket. Although the MCL Pegs and Canyon Cage is compatible with that modification, the Canyon Cage requires a different (longer) highway peg to be practical.
Before I get into some of the detail, here's how it all looks together.

The right-side MC Larry Hi-way mounting bracket installs without interference with the Canyon Cage. (As I said, I had already installed the MC Larry Highway pegs prior to my installation of the Canyon Cage.) But there is interference with the left-side MC Larry Bracket. So I made a template, as mistakes were not an option here, and filed a half moon depression in the painted bracket that allowed the enough relief in the bracket from the interference it created with the cage. The bracket is white metal (or perhaps aluminum) and VERY easy to file. I did not apply a finish to the bare metal I exposed. That bare metal is barely visible and I figure the corresion will be very slow and very slight.You may disagree given the ease in which a little paint could have been applied.
Here is a pic of the modified part and the template. The template really only need to be accurate with regard to the mounting holes and the interfering surface:

Here is a pic where you can just see the crescent shaped cutout (cut by file) where the cage and the bracket come together just above my beautiful yellow long oil filter. Although the pic doesn't show the filed crescent in it's best light, it's a perfectly smooth, perfectly shapped half moon that was easy to do with the file taken to the soft metal.

Another similar pic pulled back a little further:

Note that the left side MCL bracket and peg can be removed or loosened (to remove the oil filter if you've used the longer filter) without removing the Canyon Cage. The right side MCL bracket and peg cannot be removed without removing or loosening the fasteners on the Canyon Cage but I can't forsee why that might be necessary.
The next issue with the MC Larry pegs and the Canyon Cage installed together... The cage pushes your leg further out away from the bike. It turns out that this restricts your footing to the outside 2 inches of the MC Larry pegs. Before I had installed the cages I had planned on mounting some pegs to the cage so I bought a set of Rivco Products Anti-Vibration Highway Pegs Black PEGSBK from eBay. I also bought a set of Drag Specialties Three-Piece Frame Clamp 7/8" Black 77-6016B from Amazon.
Here is a pic of the Drag Specialties 7/8" black clamp

Here is a pic showing the differences in sizes between the MC Larry Highway Pegs (an exact match to the stock FJR pegs) and the Rivco Pegs. It's significant. I've gotten a little more length of of them due to the way I mounted them which I'd never repeat due to the amount of work (more on that later).

Here's a pic showing a comparison of the ends of the MC Larry Peg and the Rivco. If I were to do this again I'd shop for a longer peg with an end similar to the MC Larry Peg shown in the pics. That would be a simple swap. In this pic what's in my hand is the MC Larry peg attachment point which is attached to the MC Larry bracket.

Here's a little background on rationale behind the decision to mod Larry's peg mount to accept the Rivco Pegs if you're so inclined for whatever reason. Rather than mount the clamps and pegs to the Canyon Cage as I first envisioned I forced the Rivco Pegs to fit on the MCL brackets as I wanted to mount the Denali D2 LEDs to the cage using a PIAA universal mount and didn't want the busy-ness of the pegs mounted so close to the LEDs. There will be some disagreement here as many of you will think the MCL Highway Peg position isn't far enough forward or up vertically for relief. I've done 3 trips now totaling about 5,000 miles and to me the relief is great. If you don't have MCL pegs already I'd describe the foot position on the MCL pegs as more like the Harely floorboard positioning with your feet in front of you with a 90 degree bend at the knee. So there is a big difference than the stock FJR pegs feet position. The problem I have being a long-time Harley rider is that with my feet on the MCL pegs I forget sometimes that there is no brake at my right foot in this position and no shifter at my left foot position. Seriously. Interestingly enough, when I rode my Harley on long days, I'd put my feet back on the passenger floor boards for relief. This was much like the stock FJR riding position. It's exactly opposite now. The other problem I had in my first attempt at mouting the Rivco pegs to the Cage more forward and more verticle is that I compromised my reach to the handlebars and this would have tortured my back. But that's just me.
Here's the PIAA mounts I used for mounting the D2's. I had bought an extra set of the Drag Specialties clamps to mount the D2's but I liked the PIAA mounts some much better as it seemed more custom although they are universals. There is a lot of variation allowed in choices of mounting positions for the D2's. My final choice for the D2's will be rotated close to the fairing. This way the Cage will protect the lights if dropped. With this PIAA mount, the D2's could be rotated 90 degrees away from the fairing where I'm not sure if they would hit the ground before the cage or not.

To force the Rivco pegs to fit. I drilled and tapped a larger threaded hole in the Larry mount to match the 3/8"-24 hole in the Rivco pegs. This sounds all well and good but it was a pain in the ass to get right. I used a hex head bolt 3/8-24 x 2 1/2" through the back of the MCL bracket through the threaded MCL peg attachment to and through the end of the predrilled Rivco Peg. This makes for a very strong connection that is wobble free (I really didn't need the red rubber you can see inserted between the Rivco pegs and the MCL peg attachment). It sounds easy but was a PITA.
In the first and the following pix, the D2's are wired temporarily. Also the lights are not aimed in final position but I wanted to show the look.


These are the D2's only. My headlights were NOT on.

So off to get these puppies wired up. I've bought a Fuze Box and am contemplating the purchace of Art's (road runner) rotating mounting brackets for the tail section. From some research I think I've narrowed down the location of access of the high beam circuit but PLEASE, if you've got an easier idea, chime in. I need to tap into a high beam trigger as the D2's have a low beam and high beam position. I've got the A, B, C and D panels off (just mounted some mirror extenders) so I figure I can get to a high beam trigger near the relay. Can anyone confirm that this is accessable w/o any further tupperware disassembly or even a better place to take tap a high beam trigger?
And looks like I've got to sell my unscathed OES Accessories Extended 06-12 FJR-1300 Frame Sliders for which I paid $65 plus shipping.
I'm coming to the Asheville area in Sep for the EOM meet in Maggie Valley, NC. My son lives in Asheville. He's just provided me with my second grandchild so that accounts for 2400 of the miles on my FJR. Hope to see some of you there!
Tim

