Clearwater Lights install instructions?

Yamaha FJR Motorcycle Forum

Help Support Yamaha FJR Motorcycle Forum:

This site may earn a commission from merchant affiliate links, including eBay, Amazon, and others.
Thanks Brodie for the detailed explanation. I think that'll help out a bit.

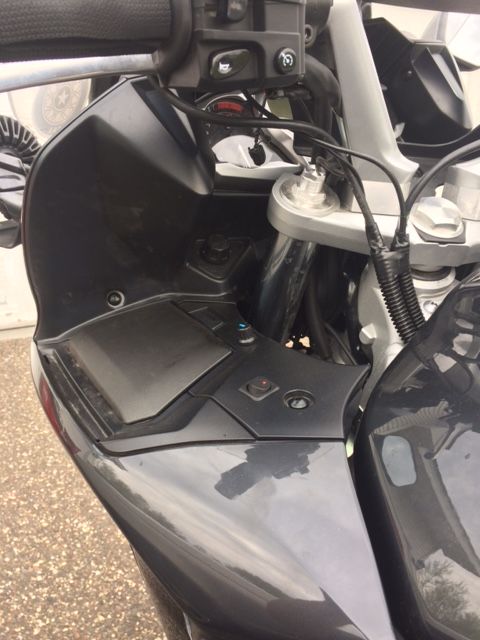
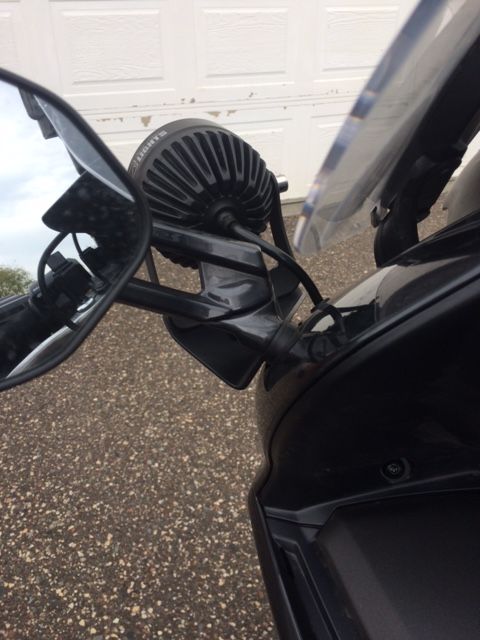
I exchanged emails today with Clearwater and apparently the harness I have is an old one, that explains why the diagrams you folks linked to earlier seemed insufficient. They sent me an old diagram that looks about right. But your explanation Brodie filled in a couple gaps. Thanks again. Hopefully tomorrow I'll finish up with the install and have this bike ready.

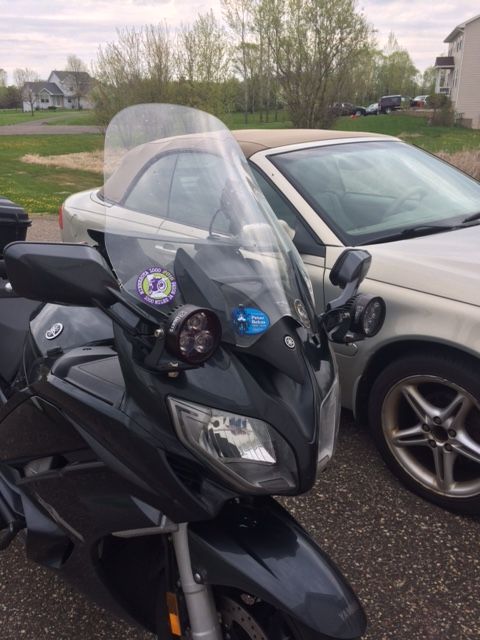
What made this whole thing frustrating is that with my '05 I took about 5 years to add elec. farkles here n there. Now with the new bike I've had to add as many (and then some) all at once. Now for a guy who knows only enough about electricity that I know never to piss on an electric fence, this has been a daunting task.

 
I don't know about that pissing on an electric fence stuff, but the hydraulic metaphor for electrical circuit design has served me well through the years. You have a faucet (source, DC+, AC black wire), a drain (common, DC-, AC white wire), and a sink (load, or device) where the work gets done. Keep these principals in mind and you can pretty much figure out most all of what's out there.

Please, keep us up to date with the progress with your bike build, this is cool stuff!

Brodie

👍

 
Last edited by a moderator:
One last question: the switch in the diagram is a three prong. Is there something special about that or would a two prong switch work just as well?

I would like to use a micro switch if at all possible as I am finding space to be pretty tight. And at this point I just don't feel like trying to remove the left side panel as it looks like the glove compartment needs to be removed first (and that in itself looks like no small feat).

Nevermind.....I may have found my answer.

 
Last edited by a moderator:
I wouldn't sweat it if I were you Kevin. I mean as long as you aren't like me, you probably won't have a difficult time.

I've just got a huge mental block going on where these lights are involved. Nobody else has trouble with them.

 
I have everything hooked up now. Brodie's explanation (not long winded at all) was quite helpful, particularly about the rocker switch.

However I get nothing to work. Has it been known if that Clearwater canbus (relay?) ever goes bad? Clearwater had stated that the wiring harness I have is an old style.

banghead.gif


Edit: SUCCESS!

I reread one of the instructions that Brodie & 101st had linked me to and there was a little nugget in there that basically explained that on the rocker switch, the ground prong is the one under the LED light on the switch. That prong had a + sign next to it so I thought that was where the powered wire had to attach to. Remember I didn't get a switch with these lights, had to go to Radio Shack for this one. Having read the CW instructions, it seems that they have everything pretty clearly marked out on the switch what wires go to which terminal.

Thanks to all who lent a digital hand in helping me. Much appreciated.

 
Last edited by a moderator:
Finally got my shit together lights mounted and operational.

IMG_1733.jpg


As shown here, I decided to run the wires through the cowling. One to make sure I had enough wire, and two, I just don't much care to have the wire wrapping around the side. Besides the black rubber grommets blend in just nicely with the '15's color. Unfortunately, having gone from a Gen 1 to a Gen 3, a lot of stuff I had made for the '05 I had to either retrofit it to work or re-make. The light brackets are a re-make.

IMG_1734.jpg


Showing where I decided to place the dimmer and the rocker switch. Plenty of room there for the dimmer, not so much for the rocker. I have to confess I didn't do a lot of soldering this time around, except where that rocker is concerned. Had to solder and then applied liquid tape over the 3 prongs. My main concern is that switch won't over heat where it's at. Right next to it is some electronic component that gets pretty hot and the switch probably isn't more than 1/2" away.

IMG_1736.jpg


The back of the light (no kidding Mike) and where the wire comes through.

IMG_1737.jpg


I also need to give thanks to Alleycat for the helpful pictures he had posted. I showed what module was needed for tapping into for the lights and which wires. He also said to have patience when trying to get that darn thing off the rubber holding it in place. I fought with that darned thing for quite awhile. Went back into the house and popped the top to another 12 oz. of patience, went back out and finally got it.

 
I am working on my own similar install also. You may not be the only one searching for wiring help. LOL

Dave

 
My Darlas came today. You've got me worried a little, buddy.

I am working on my own similar install also. You may not be the only one searching for wiring help. LOL
Dave
Come on guys, don't let that whiney girlie boy OP scare ya off from the install.

Take my word for it, if I was able to do it, you guys can do it.

 
+1 Just don't outrace the light that's coming out of your new Kristas.

Let's have a report about how you liked them, the first dark road you fired them up on.

 
Last edited by a moderator:
TM, I should have ignored this thread, as Clearwater also has a complementary Krista/Erica Hybrid option, you get one of each for the pair of Kristas. This also works for Erica's getting one Sevina.

I do not know if this is a regular option but it is available now.

I may have to suck it up and have a glass of this excellent (but expensive) nighttime coolaid.....

NBB

 
TM, I should have ignored this thread, as Clearwater also has a complementary Krista/Erica Hybrid option, you get one of each for the pair of Kristas. This also works for Erica's getting one Sevina.
I do not know if this is a regular option but it is available now.

I may have to suck it up and have a glass of this excellent (but expensive) nighttime coolaid.....

NBB
Don't delay NBB! If you missed my other post Clearwater has a May special where you can get Darla for 20% off or a free upgrade Hybrid option on the the Krista/ Erica & Erica/ Savina hybrids combos.
Your initial post is what got me started, but this post was due to thinking along the lines that if assistance was needed on the install TM is just a few minutes away, and we all know that he always needs an excuse to get in a few more miles.

Thanks for the reminder

 
Last edited by a moderator:
Top