Yamaha OEM Heated Grip Kit installation

Yamaha FJR Motorcycle Forum

Help Support Yamaha FJR Motorcycle Forum:

This site may earn a commission from merchant affiliate links, including eBay, Amazon, and others.
Thanks a bunch and I mean that.

Saw an 06A over at BMW Fort Myers today with said mod and I wanted to ask the guy about it. Could not find him and after I returned from my test ride he was gone. Looked good with the factory switch thingee on the left panel. Gonna try it sometime soon.

 
I realize this thread is about installing the entire OEM grip kit, but if it were me I would install the OEM controller, coupled with aftermarket heaters and aftermarket grips. That's the setup I'm running on my AE.

 
The controller is easy to install. just remove the left panel where it will be installed, remove the placeholder, moiunt the controller to the panel, and youll find the connectors for the controller right behind the accessory box:
grip_control_connectors.jpg
Thanks for posting this. I found the instructions in the OEM kit mostly helpful but incomplete.

Just to be clear, the black rubber stoppers in the white connector (stock A wiring) get pulled before connecting the controller's white plug to it?

 
Last edited by a moderator:
Just to be clear, the black rubber stoppers in the white connector (stock A wiring) get pulled before connecting the controller's white plug to it?
Never mind. I get it now. the whole thing is a plug; the white Delrin, the rubber plugs...(It's in the instructions. It's called a "blind plug")

edit: I found that after installing the heated grips, the throttle return is a little loose for my taste. I previously did the throttle return spring unwind, but I think I'll rewind it one complete revolution.

edit edit: another reading comprehension test failed. :(

 
Last edited by a moderator:
I just installed mine today (almost 100 degrees here today so heated grips were high on the priority list :huh: ) with the help of your write up. I had some other electrical accessories to install so I figured now was the time to get it all done. Thanks for the help.

 
The most confusing part of the instructions is the horrible drawing and explanation of how the wire for the right grip is routed through the throttle cable housing.

<...snip...>

See that nifty little plastic thing that's holding the wire to the switch housing? The instructions never mention that part at all, except for listing it in the parts list.
THANK YOU x 1.0E6! This was not at all obvious or intuitive, and these instructions probably saved me 3 or 4 hours and a LOT of frustration. Clear photos and killer writeup.

 
Wow... thanks to the OP for the excellent write up and pictures of the install of the OEM kit. Thanks to you, I didn't even open my instructions and the install took 1.5 hrs. I did monkey around with the loop inside the new throttle cable housing, but overall very smooth install with no surprises. And I have heat! Thanks a lot!!

 
Thanks a ton for taking the time to cover this. I know it's been a while, but it's still much appreciated.

 
My heart lept for joy when I saw a JustRoy post..

then augured in when I saw it soo long ago..

 
I recently installed the Yamaha heated grip (grip warmer) kit on my 2008 FJR A. I found the instructions quite lacking in detail, so here's some confidence boosters for anyone considering installing this on their bike. This should be the same for all Gen II (2006-2009) non-AE bikes (AEs come with the kit installed already). This is not a complete step-by-step guide, so you'll still need to read the kit's instructions thoroughly.

Other than the poor instructions, the kit is great. It came with everything that is needed, and required no wiring skills. Just route the wires to existing connectors and plug them in.

The kit came with the throttle grip already installed onto a throttle tube (it's longer than the original throttle tube), so you only have to worry about wrestling with the left grip.

The most confusing part of the instructions is the horrible drawing and explanation of how the wire for the right grip is routed through the throttle cable housing (the kit comes with a replacement house that nicely hides the wire). Here's what the loop should look like that they describe:

<img src="https://www.uselesspickles.com/files/pictures/heated_grip_install/throttle_wire_loop.jpg" border="0" class="linked-image" />

<img src="https://www.uselesspickles.com/files/pictures/heated_grip_install/throttle_wire_loop2.jpg" border="0" class="linked-image" />

Here's what the right grip looks like when completed:

<img src="https://www.uselesspickles.com/files/pictures/heated_grip_install/right_grip_routing.jpg" border="0" class="linked-image" />

Thats the best way I came up with for routing the wire. It follows down the handlebar behind the stock wiring. The screws on that little retaining clip for the wiring are very tight. They also require the removal of the handlebars to access them. I gave up and just used a flat-blade screwdriver to bend it outward enough so that I could slip the grip wire in there. A small flat-blade screwdriver is useful for pushing the grip wire completely behind the stock wiring. Theres a nice groove in the handlebar back there where the wire will fit. Once you're happy with the wire routing through there, fold up a rag and use it to protect the handlebar and the retaining bracket as you squeeze it back into place with some channel locks or pliers.

And here's the left grip:

<img src="https://www.uselesspickles.com/files/pictures/heated_grip_install/left_grip_routing.jpg" border="0" class="linked-image" />

See that nifty little plastic thing that's holding the wire to the switch housing? The instructions never mention that part at all, except for listing it in the parts list. Wire is routed down the handlebar much like the right grip.

I suggest removing the switch housing and clutch lever/reservoir to give you more room to wrestle the old grip off. I don't have an air compressor, so I cannot use the compressed air technique to remove it. I used a small flat blade screwdriver to break up the glue under the grip. Then I used the screwdriver to hold the grip away from the handlebar a bit while I poured some soapy water between the grip and the bar. Moving the screwdriver around with distribute the soapy water everywhere and make the grip slide off with ease.

Reinstall the the clutch lever and switch housing before installing the new grip so that you know how far to slide it on. Installing the new grip is pretty simple. Put some of the supplied glue on the bar and on the inside of the grip, then push and twist with all your might! Make sure you have the grip rotated with the wire coming out in the desired direction before you start, because it really doesn't want to move once you get it on all the way.Excess glue will squish out, so be ready to wipe it up.

The wires from the grips continue here:

<img src="https://www.uselesspickles.com/files/pictures/heated_grip_install/grip_wire_routing.jpg" border="0" class="linked-image" />

The right grip's wire goes under the ignition, then comes up and back down through the cable retainer, where it will meet up with the wire from the left grip. Both wires then follow an existing wiring bundle toward the left turn signal area. i zip tied the wires to the existing wiring to hold it in place.

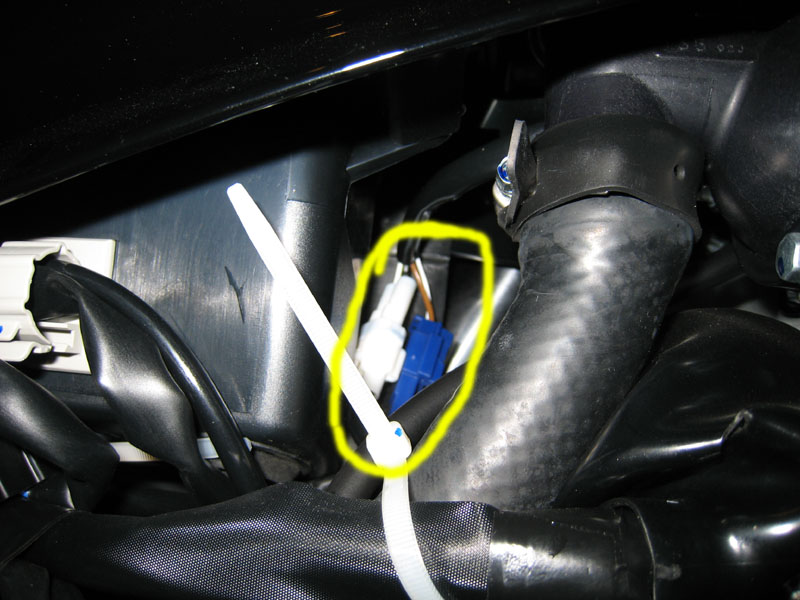
Here's where the grip wires plug in:

<img src="https://www.uselesspickles.com/files/pictures/heated_grip_install/grip_connectors.jpg" border="0" class="linked-image" />

They're right next to the left turn signal connector. I removed the left fairing to access the connectors, although it may be possible to do it by just removing the black inner fairing piece. With the left fairing removed, it's very easy to find where the wires should be routed, so I suggest just taking the time to remove it.

As far as I can tell, it doesn't matter which connector is used for which grip. The instructions do not specify, and the wiring diagram in the service manual shows the grips wired in series.

The controller is easy to install. just remove the left panel where it will be installed, remove the placeholder, moiunt the controller to the panel, and youll find the connectors for the controller right behind the accessory box:

<img src="https://www.uselesspickles.com/files/pictures/heated_grip_install/grip_control_connectors.jpg" border="0" class="linked-image" />

It took me about 3 hours, but that included some experimenting with wire routing. It should be easy to complete in less than 3 hours with these tips and pictures. Now I need the snow to melt so I can try them!

Questions & suggestions welcome. I'll make changes to this original post with any additional info or clarifications as needed.
 
Thanks for the great photos and description. I completed the installation this weekend and could not have done it without the photos and notes. Routing the right side heated grip cable in a loop through the new cable clamp would have been impossible without additional photos. Taking my time and reading all the instructions the whole thing took me just over two hours. I had to trim the throttle tube to prevent the bar end crimping the action of the throttle. Definitely easier to take off the left side faring to get at the connectors by the left indicator. Pretty straightforward if you take your time and read the instructions!

 
Does anyone know if you can buy just the OEM controller without the whole kit?
I looked on the 2011 parts fiche and on Electrical 2 it's part 49, CONTROL UNIT ASSY, 2D2-85590-00-00, about $280 retail.

https://www.sportlandmotorsports.com/fiche_image_popup.asp?fveh=48466&section=1644378&year=2011&make=YAMAHA&category=Motorcycles&dc=1583&name=ELECTRICAL+2
What is the difference between that part number and ABA-2D237-40-00?

(edit: Never mind... reading comprehension error)

(edit edit: Can you believe I still have the box from two years ago when I did the install on my '06? That didn't score me any points with my wife. She's going to send my name in to HOARDERS™)

 
Last edited by a moderator:
Thank you, Thank you, Thank you! I was installing a MCcruise control, at one point you have to remove the twist grip. I didn't pay attention to the loop and was stuck trying to figure it out. Your post saved me! Thanks again!

punk.gif


Be careful if removing heated grips, don't want to stretch too much to break the wires inside. Air compressor method preferred, and use something thin to slip in to loosen the glue (very small screwdriver). You can glue them back on with a little stripe on two opposite sides of high temp RTV (don't use much at all), which may be what the Yamma stuff is. Some heated grip manufacturers say to use epoxy, but it will be a problem if you ever want them off.

Also, if you find the OEM ones take a little too long to heat up when it's really cold, it's because the ground is pulsed via the ECU dependent on ground speed (and maybe RPM's, a power conservation measure). Also, at idle, you get only 30-50% power to the grips so they won't warm up much when you just start up and leave it running. The fix for that as passed along by another forum member is to locate the ground at the ECU (green w.white as I recall, ECU pin #27) remove it and ground it permanently (I wouldn't see any reason to put it back).

 
Top