Plugged fuel filter?

Yamaha FJR Motorcycle Forum

Help Support Yamaha FJR Motorcycle Forum:

This site may earn a commission from merchant affiliate links, including eBay, Amazon, and others.
No joy. As expected, the new TPS didn't affect a solution to my problem.
Back to the drawing board.

Dayum Howie!! I'm feelin bad fer ya dood! Fact I'm aboot ready to take my pump off an ship 'er down to ya.

Seriously, jus say the word...

Hell, I won't need it for a month.... gonna snow again tonight.

:jester:
Y'know, if I wasn't sure you wouldn't fuck up a wet dream, I'd take ya up on it! :)

Thanks, bud.

HEY ODOT!!! :fuck:

 
No joy. As expected, the new TPS didn't affect a solution to my problem.
Back to the drawing board.
Would have been surprised if it had-stuff just wasn't pointing it's way. For what it's worth, if it is condemned, found a used one on Fleabay, $150.

03 Pump

 
Last edited by a moderator:
Need a quickie answer if anyone's listening... :)

If I remove the fuel line from the left end of the fuel rail, opposite end of the Fuel Pressure Regulator, and switch the electrics on in Diag mode #9 and turn the kill switch on, should fuel be practically spraying out of the line?

All I'm getting is a dribble. The pump is running...just hummin' away, but the fuel volume is, as I said, just a dribble. No pressure at all.

And the gas IS filthy. Full of particulates.

I think the pump's clogged.

 
Sounds like ya found the problem Ace...I dunno if you could "clean" the filter but Hell, it's worth a try eh.

:jester:

 
Need a quickie answer if anyone's listening... :)
If I remove the fuel line from the left end of the fuel rail, opposite end of the Fuel Pressure Regulator, and switch the electrics on in Diag mode #9 and turn the kill switch on, should fuel be practically spraying out of the line?

All I'm getting is a dribble. The pump is running...just hummin' away, but the fuel volume is, as I said, just a dribble. No pressure at all.

And the gas IS filthy. Full of particulates.

I think the pump's clogged.
I would expect a high pressure flow. Sounds like you either got a load of crap past the fuel filter sock or the pump is digesting itself. Either way, that pump on Ebay looks like a good deal.

 
Last edited by a moderator:
Sounds like ya found it. Remember what I said about the injectors-no doubt their screens are full too.

 
You guys are NOT gonna believe this:

CLICK

I swear to god, it looks like someone dumped potting soil in my tank. Think its clogged now?

BTW, any good tips on tank cleaning? :)

Oh, but seriously, would hot soap and water damage the fuel pump?

 
Holy Crusty Splooge Batman!

Good news....I think you found the problem.

Bad news.....I think that's a gnarly infestation of rust you've got there. It sure looks like rust...... I wonder if our nation's recent predilection for E10 is coming home to roost as a problem with water settling in our tanks? Could it possibly be scale that came from inside the tank?

I'd think about maybe a petroleum solvent instead. Maybe drop some of that crap in some gasoline and see if it dissolves or not.

 
Last edited by a moderator:
You might want to send those pics to Mr. "I've seen the new TPS correct these same symptoms a dozen times" service manger. :huh:

As far as cleaning the tank out your not the first one clicky

Good luck

 
Radio,

OH MY Gosh! Here are some methods to Clean your tank:

1-Block all of the holes in the motorcycle tank. You can use a short piece of hose clamped onto the fittings on the tank, and closed off at the end with a bolt.

Step3Dump the bag of BB's into the motorcycle gas tank and add the 1/2 gallon of diesel fuel. Shake the tank vigorously. The BB's will knock the rust, or any other debris, free and the diesel fuel will keep the particles suspended so that they will dump out.

Step4Open the gas tank cap and look inside the tank. If it's not clean enough to suit you, resume shaking until the rust is removed to your satisfaction.

Step5Pour out the diesel fuel and BB mixture. Shake the tank to make sure you have removed all of the BBs. Flush the inside of the tank out thoroughly with gasoline to remove all traces of the diesel fuel. Your tank should now be rust free and ready to put back on the motorcycle.

2-Corrective Action "B" (Chemical Sanding/Rust Removal):

The new school way of doing a light rust removal is chemically, via Yamaha's Fuel Tank Rust Remover ($14.95, Part Number ACC-FUELT-CD-KT). It's a two part kit, with part A being a pint of phosphoric acid and part B being a sodium metasilicate solution (absorbs any remaining acid and dries out the interior). To use, you remove & drain the tank, seal the bottom openings, then fill it half way with water. Add the phosphoric acid and top off the tank with more water. Cap and seal, agitate. Remove cap (to vent), and let sit for four hours (their recommendation -- I'd visually check before draining as you may need as much as 24 hours). Drain, rinse (a pressure washer is recommended), repeat drain & rinse operations several times (hey, we're talking about an acid here!). Then pour in part B, and agitate to coat every nook and cranny. This will absorb any remaining moisture and any remaining acid. Drain and allow the tank to air-dry completely.

Note that this general process conversion is a part of POR-15's conversion/sealing process (listed below) and does not require purchase of Yamaha's kit if you are going with Corrective Action "C" (below).

Corrective Action "C" (Chemical Sanding/Rust Removal, plus a hard surface sealant):

Utilize a rust-remover or kit including a rust-remover & stripper such as POR- 15 to remove the rust, and then coat with the same firm's coating material (since the products are designed to work together). No sanding necessary! POR-15's coating is an epoxy-like two-part thin-coat material that is hard as a rock (and is humidity-cured, so it cures better/faster the higher the humidity level). Allow to dry for the specified period of time (or longer) before reinstalling tank. Change your fuel filter when reinstalling tank. Use tank as usual.

Note that POR-15 kit listed above also contains a stripper specifically designed to remove Kreem and/or RedKoat tank liners, if you've gone that route before and run into problems. They also offer a cheaper kit that doesn't include a stripper for previous coatings. Also note that the POR-15 route will typically take about 4 to 7 days to do it's magic (all the steps, plus curing) for a heavily rusted tank -- it's not a fast process.

--------------------------------------------------------------------------------

Metal converters use a chemical-based conversion process that converts iron rust (iron oxide) to a new metal (usually magnetite, a very hard form of iron oxide that is chemically inert and therefore not prone to rust).

Rust strippers use a chemical-based acid process that removes rust (turns it into loose particles to be washed out), and is normally followed by an application of a specific acid-neutralizer or a combination acid neutralizer + surface-prep agent (as a single step).

--------------------------------------------------------------------------------

Corrective Action "D" (seal/coat - latex barrier sealant):

Use Kreem or RedKoat to seal the tank, which coats the interior of the tank with a thick latex or latex-like substance. If you use this method, you need to use Corrective Action "A" or "B" first to remove the surface rust! Many users have used Kreem or RedKoat to their satisfaction, but a lot of users have also complained about the product breaking down after a number of months or years, flaking off and clogging the fuel system & carbs (esp. in hot-weather climates). As a result, I don't tend to recommend either these two products, but with proper surface preparation, they should work.

Note that the POR-15 kit (Corrective Action "C") comes with an acid stripper that will specifically strip away Kreem and RedKoat linings if you are having flaking issues using one of these two products.

Corrective Action "E" (Electrolytic Rust Removal - aka reverse plating process):

There is a simple way of forcing the rust to plate a sacrificial electrode (steel or iron), but the process can take quite some time. Needed are a battery charger (a weak one will do) or other power-source (an old step-down power brick for an discarded electrical device will work if you slap a couple alligator clips on the leads), a piece of bare mild steel or iron as large as you can find that will still fit through the gas-cap opening without touching anything, water and washing soda (Arm & Hammer brand will do nicely).

Remove the fuel-tank sender assembly, the petcock, the gas cap assembly, and any other removable items from the gas tank. Seal up all the holes in the tank except the gas cap filler hole (using plastic or rubber -- do not use aluminum), so that it's water-tight.

Mix 1 Tablespoon of washing soda per gallon of water and fill the tank with the mixture (note: stronger will not accelerate the process, so don't go overboard).

Without plugging it into the wall, connect the battery charger or other power source as follows: positive to the mild steel or iron part, and the ground to the gas tank itself (such as to a screw that normally holds in the petcock). You need to make sure that the lead to the mild steel or iron part will not touch the tank's metal, so insulated wiring is smart.

Figure out how to support the steel or iron part in the tank without touching the sides or bottom, and without forming a grounding circuit to the body of the tank (a bit of nylon mesh attached to a plastic ring too large to pass through the opening of the tank will work wonderfully -- or some nylon twine tied off to something above the tank). Lower the metal into the tank and double check that it's not touching anything except the solution.

Now you're ready to energize the system -- plug in the charger. How long the process will take will vary with three factors: the amount of surface area of the metal piece being suspended into the solution, the amount of power running through the solution, and how much rust we're dealing with here. In particularly bad cases, you may have to drain/rinse out the tank every 12 hours, wipe down the metal, then start over. If the mixture looks like a dark red stew, definitely time to change it. You will also need to top off the mixture with additional water if the level falls, as the process cooks off water (electrically rips it apart).

FAR MORE INFO ON ELECTROLSIS RUST REMOVAL HERE:

Electrolytic Derusting, at StoveBolt.com

Electrolytic Rust Removal FAQ, by Ted Kinsey

Rust Removal using Electrolysis, at Antique-Engines.com

Note 1: CAUTION: DO NOT PLACE ANY FLAMES CLOSE TO THE MIXTURE, BECAUSE IT GENERATES FLAMABLE GASES.

Note 2: Reversing the polarity will give you undesirable results!

--------------------------------------------------------------------------------

CYBERPOET'S RECOMMENDATION: POR-15.

 
Wow, RadioHowie...

Your very first diagnosis was correct?

Hey, wait a minute here...

I mean, come on guyz... RadioHowie diagnoses the problem correctly the first rattle outta DA box?
big_boss.gif
biggrinsmiley.gif


Seriously.. do you normally leave the tank less than full for extended periods of time in that salt air of FloreeeDuh? The amount of rust/crap is staggering.

When I bought Tim's bike, (TwoWheelNut for you FNG's), I was very surprised at the amount of corrosion on leading edges, fasteners, connectors, etc. He lived in Santa Barbara, and rode in salt air regularly.

OBTW, that fuel pump failed too.

Congrats on finding the problem - and remember Rad's sage injector advice..

 
wow that was long......................................................Sometimes it pays just to bring it to the shop 1.2.3 and get it over with or maybe you pockets are longer then your arms

 
Last edited by a moderator:
Wow, RadioHowie... Your very first diagnosis was correct?
Yeah, and only 150 replies and 2300 views to confirm my earliest hunch. :) The original symptoms simply felt "too familiar". Anyone who's ever run out of gas and was grabbing for the reserve handle on the petcock on a carbureted bike would recognize the feeling.

Seriously.. do you normally leave the tank less than full for extended periods of time in that salt air of FloreeeDuh? The amount of rust/crap is staggering.When I bought Tim's bike, (TwoWheelNut for you FNG's), I was very surprised at the amount of corrosion on leading edges, fasteners, connectors, etc. He lived in Santa Barbara, and rode in salt air regularly.
I "normally" don't leave the bike standing for any length of time. Except this once. And the tank was practically empty the entire time. Trust me, THAT will never happen again. I live about 80 miles from the Gulf, so there's really no "salt in the air" issue like you'd see with a beach bike. I think Iggy is pretty close to the mark with the E10 diagnosis contributing to moisture in the tank, combined with sitting mostly empty for too long.

OBTW, that fuel pump failed too.
Yep...Chapter One of the Wabs Chronicles.

Congrats on finding the problem - and remember Rad's sage injector advice..
Gonna either buy the chemicals to clean the tank myself or find a local radiator shop that does gas tanks to do it professionally. Chances are, though, I'll do it myself. So far, this little "project" hasn't cost me a dime, and I'd like to keep it that way.

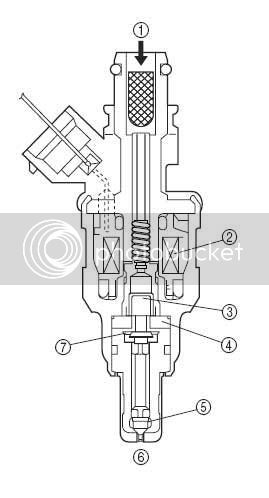
I did thoroughly clean the pump to the extent that one CAN clean one....externally and in the "strainer" area. Hooked it up to the Feej and powered it up for a few seconds. Runs smooth as silk. I'm NOT looking forward to yanking the injectorsl. Can I assume the screen-looking device with the #1 arrow pointing at it is the injector screen? The FSM isn't specific about it. Is it just a tube shaped screen you yank out and clean?

injector.jpg


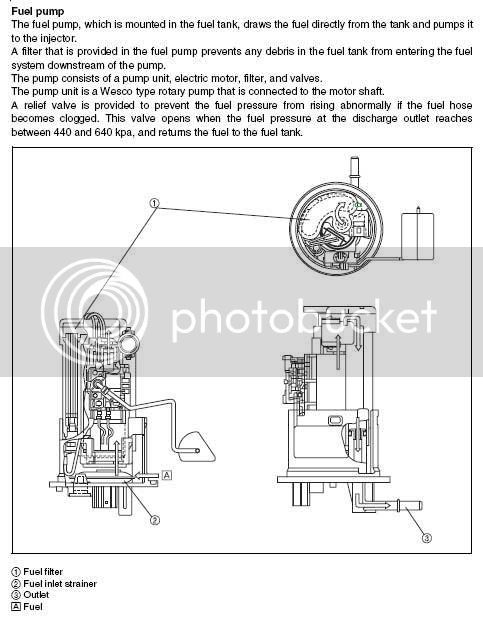
While I had the pump out to clean it, other than cleaning the screen at the base of the pump, it doesn't appear there is any way to clean the filter in the top of the pump as the housing appears to be sonically welded. I may try a back-flush attempt through the fuel outlet to see if anything runs out. Funny that the FSM mentions the second fuel filter in the pump but no way to get at it to clean/replace it. Guess MamaYama would rather sell fuel pumps. :(

filter.jpg


#1 in the above image positively references a fuel filter internal to the pump, but no mention in the FSM I could find to service it. Trust me...I'm putting an inline filter on the fuel line to the rail before it all goes back together. Maybe even one on the return line, too.

 
Last edited by a moderator:
That is incredible !!

While you have the fuel pump off, be sure to inspect that tank thoroughly with a mirror and flashlight.

The amount of rust in your photos would have me worried that your tank is going to developing some pinhole leaks.

I'm not a chemist, but it seems to me that rust doesn't develop evenly on a surface. There will be areas where the rust is much deeper and the steel is deeply pitted.

 
That is incredible !!...The amount of rust..is going to developing some pinhole leaks.
03HiYoSilver's post is the schnizzle :fan_1: Ending that process with POR-15 will not only prevent future rust but will permanently fix/prevent pinhole leaks. POR-15 is good shit everyplace but where the sun shines -- sunlight will compromise POR after extended exposure. Even though 03HiYoSilver's process is long and involved it will save any rusted tank.

 
Last edited by a moderator:
Top