Battery Access 2013/Gen III

Yamaha FJR Motorcycle Forum

Help Support Yamaha FJR Motorcycle Forum:

This site may earn a commission from merchant affiliate links, including eBay, Amazon, and others.
You do NOT need any tools to separate the dash panel. After removing all the fasteners, simply grab the mirror at the mount in one hand and the large, conical, black plastic piece on the other side and forcefully wiggle them back and forth. Do one side at a time. The dash will pop off with NO pry tools needed. Yes, it will take more force in the beginning than you think is necessary, but it WILL work.
Worked perfectly as you described without any need for tools. Thanks!

 
What is the anatomy of the quick connectors on the panel over the top of the battery, do you twist them, pull them or just how do they work,,,plueeeez,,,,

 
Push in the center. It will click into place then you can pull the connector out by the edge. To put back in, pull out the center, insert and push the center in to flush.

 
can this panel over the top of the battery be removed without removing any other panels or the front cowling??? thanks for the previous help of the quick connectors

 
Nope. Not the first time. You have to remove the cowl around the gauges to get at the screws on the left panel over the battery. It is very easy. Just reference the beginning of this thread. Don't be afraid to be firm when wiggling the cowl out of the clips. Once you do this, you can modify the left cover so you don't need to remove the cowl around the gauges to get it off in the future. Again, Info is earlier in this thread. Good luck!

 
As AKjitsu said, you can do this without cutting off the tab. I saved myself some time yesterday using his tip. That said, I will probably cut off the tab, just to simplify the process.

 
Buy Yamahas replacement battery cover which has been modified to allow battery access without taking anything of. Costs around $ 100, depending on the deal you can get . Elsewhere in this forum there are also instructions on how to modify the old cover to allow easy access. Problem has been solved by Yamaha.

 
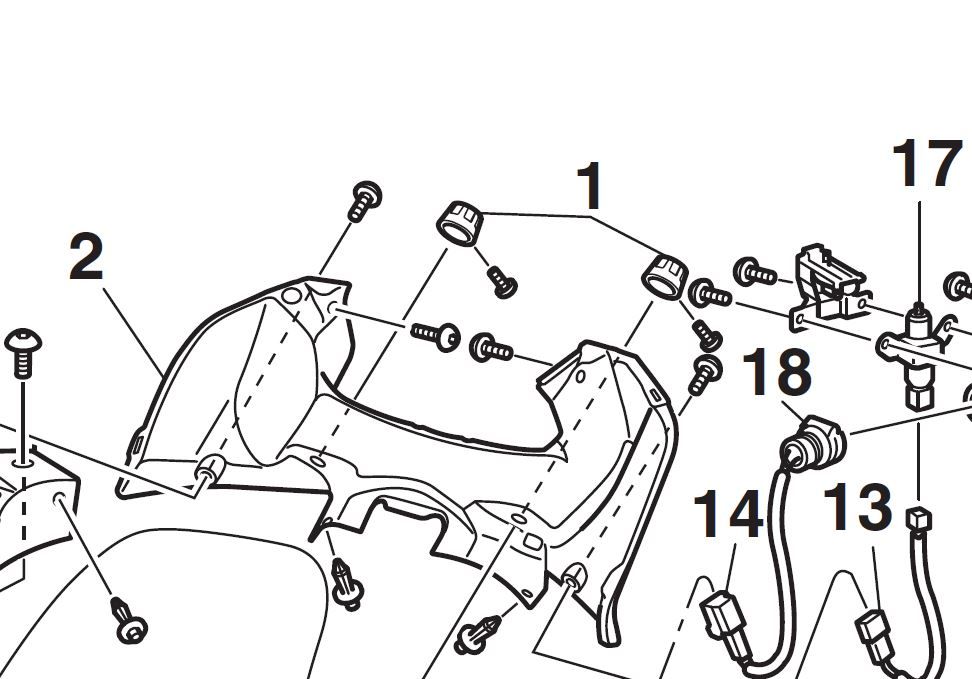
I won't waste time reiterating the insanity of the design, but thank you for these helpful posts everyone. I only have one question: how do I get "the two pesky screws holding the headlight adjustment knobs" off? I am going to use the method that AK references from now on, but I have to take it apart the long way at least once first. I just can't get those two damn adjustment knobs off!

 
those pesky knobs are held on by teeny tiny screws...get your smallest phillips head and go to town on it.

helpful pic...the screws are number 1 in the picture

Capture_zps6ad96b41.jpg


Last edited by a moderator:
those pesky knobs are held on by teeny tiny screws...get your smallest phillips head and go to town on it.
NOTE: As dictated by Murphy, those screw heads are always oriented toward the front cowling when the headlights are properly adjusted, meaning you need to turn the knobs (out of adjustment) to remove them.

 
Thank you! I was able to duplicate the process and finally gain access to my battery. Since I had it off I modified it to remove easier next time. I see no reason to buy the new panel now. ;-)

 
Thank you! I was able to duplicate the process and finally gain access to my battery. Since I had it off I modified it to remove easier next time. I see no reason to buy the new panel now. ;-)
If you've done the modification (properly), you have the new panel now.

 
+1 on modifying the older OEM battery panel. Took me around 10mins with a vibrating saw to remove the problem sections. Panel now removes and fits quickly without the need for the center cowl to come out.

Factory look is retained. No wind flapping or other noise.

I considered drilling a 1/4" hole in the panel directly above the positive battery terminal in case I ever needed to jump it (negative on frame) but didn't bother. Planned to plug the hole with a decorative plastic plug to hide it.

 
Last edited by a moderator:
Maybe I missed it in the thread. At some point Yamaha must have modified the panel on later 2013 bikes. I didn't have to remove any other panel. Just panel A. I took out two screws, two quick connectors. And took the panel A right off. Only took a couple minutes.

 
Last edited by a moderator:
Dan, later 2013's have the improved 2014 right hand cover. You can either cut off the extra tabs of buy a '14 cover. I found that a few minutes with a dremel tool was cheaper than spending $100 for a '14 cover.

Southern Cruizer, if you are going to keep those tiny Phillips-looking screws, use the small screwdriver in the tool kit. Japanese cross tips are slightly different from U.S. Phillips bits.

https://www.instructables.com/id/When-a-Phillips-is-not-a-Phillips/step10/JIS-Japanese-Industrial-Standard/

 
Last edited by a moderator:
Dan, later 2013's have the improved 2014 right hand cover. You can either cut off the extra tabs of buy a '14 cover. I found that a few minutes with a dremel tool was cheaper than spending $100 for a '14 cover.
Southern Cruizer, if you are going to keep those tiny Phillips-looking screws, use the small screwdriver in the tool kit. Japanese cross tips are slightly different from U.S. Phillips bits.

https://www.instructables.com/id/When-a-Phillips-is-not-a-Phillips/step10/JIS-Japanese-Industrial-Standard/
wow, had no idea. Good to know, thanks for the link.

 
The challenge getting into the battery access on the Gen III-brought a smile to my face! The first time it was frustrating--I really did not know what to do next-and I was afraid of breaking something. I discovered the plastic is much more flexible than I at first thought. I put it back together and then thought--"it can not be that difficult!!" I took it apart again immediately--a little faster and more easily! Did that about 4 times in a row--really not that bad at all! I was the majority of the problem--just needed a little practice!

 
I replaced the battery in my Gen II yesterday and was complaining (to myself) what a pain it was. Now I'm ashamed of myself for whimpering over a couple little push pins and a bolt!

 
Top