GenII Rear Fender Replacement, PITA?

Yamaha FJR Motorcycle Forum

Help Support Yamaha FJR Motorcycle Forum:

This site may earn a commission from merchant affiliate links, including eBay, Amazon, and others.
Great call! That's exactly where they came from.

The good news is the taillight was cracked so I bought the one from extrememarine's '09 and put it in there. That means those grommets and peg really were extra! I feel better now.

Got all the pic uploaded to P-bucket and edited tonight. Hope to get the write up done tomorrow. Gotta hurry as my memory has about a 1 day half life.

 
I always have an extra part or 2. I believe those spare parts of yours are from the transmission. You won't be able to ride, but I'll bet the fender looks great!
rolleyes.gif
What, do you think we're ridin' Harley's here? ...not that there's anything wrong with that...
sick.gif


OK, here are the details....

As previously mentioned and contrary to what the FSM says, you do not have to remove the 'Air Filter Box', or drain the rear brake fluid.

Part 1 - You will have to remove all the rear plastic. I'll include pics to help you as I was not able to find instructions easily. If you already know how to do this skip ahead to Part 2.

Start with the seats, which you already know how to remove, then the rear rack.

bd55b656-0525-410f-8553-18c16fe6a087.jpg


5 bolts and its off.

To get the rest of the plastic start with the center rear-most tail plastic

2016-01-162011.08.06.jpg


5 screws on top...

2016-01-162011.08.17.jpg


...and 2 underneath.

Pull the top of this piece straight back to disengage the little tabs underneath from the slots in the 2 side plastics

2016-01-162011.10.50.jpg


Now the 2 rear side plastics

2016-01-162011.12.21.jpg


4 plastic rivets and a screw on each side

Take the plastic shroud off the gas tank

2016-01-162011.18.27.jpg


A rivet, a screw and a push peg on each side.

Then the last 2 side panels

2016-01-162011.21.46.jpg


A rivet and a screw on each side, and...

...don't forget that allen screw in the handhold on the lefthand side

2016-01-162011.24.40.jpg


Part 2 coming up...

 
Part 2 - At this point the backend is pretty much naked so we can get down to what we came here for, getting the rear fender off.

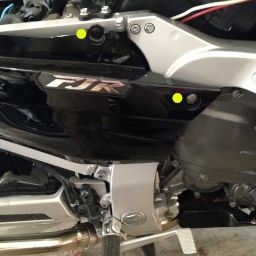
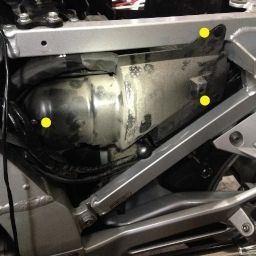
Next off is the intake snorkel that had been hidden beneath the left side cover

2016-01-162011.37.13.jpg


2 rivets and a screw.

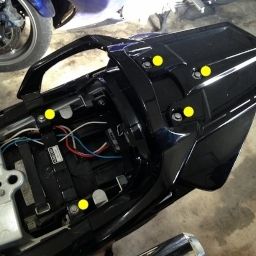
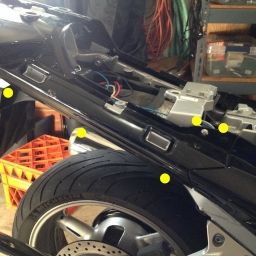
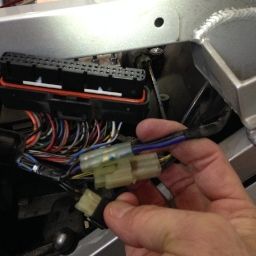
With the snorkel gone you can see the electrical connectors you'll have to unplug

2016-01-162011.52.24.jpg


Unplug the ECU, tail/brake light and license plate light connectors. Remember which wire goes where for the license plate light.

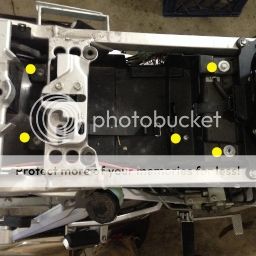
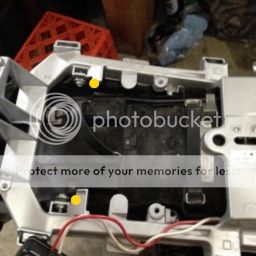
Now let's get the tool tray out of there

2016-01-162011.40.17.jpg


2 bolts and 3 screws, then just slide the tray back, pull up on the front, and pull the tray up, forward and out.

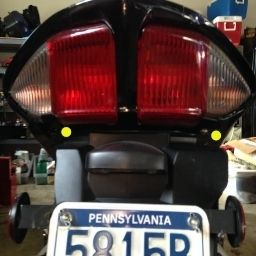
Tail/brake light assembly is next

2016-01-162011.57.33.jpg


A 10mm bolt on each side

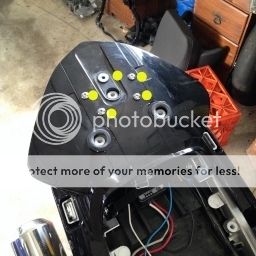
Now free up the lean angle sensor

2016-01-162012.08.09.jpg


2 screws.

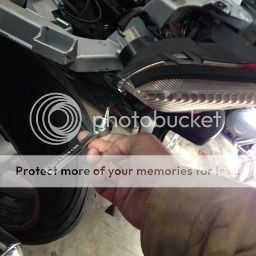
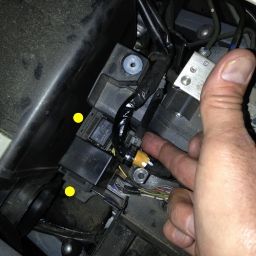
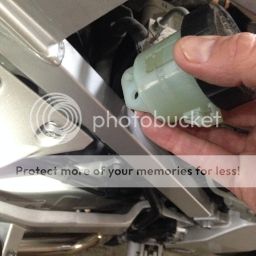
Release the 2 cable ties that had been hidden by the tool tray so you can free the 2 relays (you AE guys have 3). You don't have to unplug the relays, just slide their rubber jacket up off of the tongue then pull the whole wiring harness up out of the way a bit.

2016-01-162012.11.55.jpg


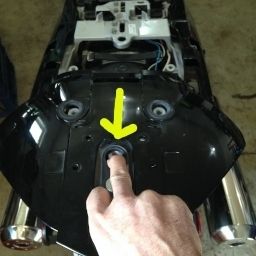
Just get your finger underneath and push down on the tab.

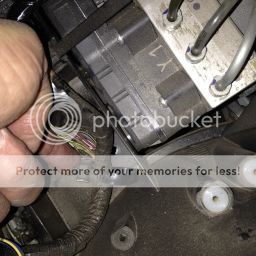
Here's a better picture of that tab with the tie mostly loosened and out of the way

2016-01-162012.11.13.jpg


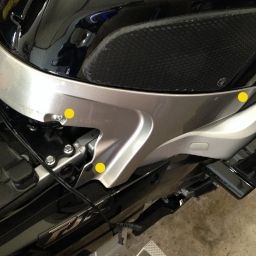
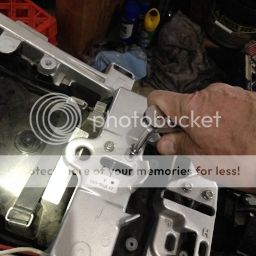
Now the seat lock and cable assembly. Start with the lock itself

2016-01-162012.20.26.jpg


2 t30 security screws.

I removed the latch mechanism too but I don't remember if I really had to

2016-01-162012.17.02.jpg


2 bolts and its free.

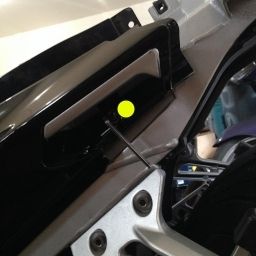
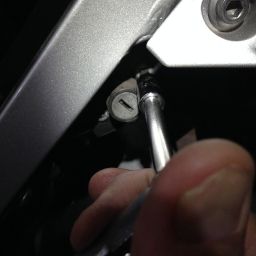
Finally, you'll need to unbolt the rear brake fluid reservoir

2016-01-162011.51.12.jpg


1 bolt and it's free. The tab that it's bolted to looks like it will give you trouble when you try to remove the fender but it's pretty flexible.

You're now ready to free up the actual fender.

2016-01-162012.24.39.jpg


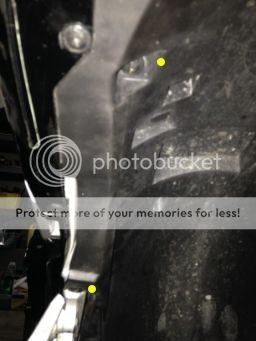
2 bolts on top, and...

ebc548fa-61ab-4089-ad5f-564481b9d75e.jpg


...4 rivets underneath, 2 on each side. (Forgot to take this pic while I was changing out the fender so just went out to the garage and took it. That's why plastic is back on.)

The rear fender is now free. I was able to remove it without removing the rear wheel by twisting it a bit to the left and snaking it back over the tire.

...and that's it! Installation is just the reverse of removal. No nasty surprises.

All in all not too bad. Let me know if I forgot anything.

 
Last edited by a moderator:
One thing (sorry I didn't mention this before you did it)!

With the seat latch out of the way this would be a good time to clean/lube the release latch & cable.

If you do it once well that should last you a lifetime..........

 
One thing (sorry I didn't mention this before you did it)!
With the seat latch out of the way this would be a good time to clean/lube the release latch & cable.

If you do it once well that should last you a lifetime..........
Good point! Too late for me but should help the next guy.

 
Excellent detailed instructions. Thanks SCB! Now that I see how many parts are involved in removing the rear fender, it's safe to assume that the fender wouldn't ever fall off on its own.
smile.png
Nice documentation.

 
Excellent write-up on how to replace a rear inner fender. I can tell that your bike is an '08 or later, the lean angle sensor is mounted in that area, the '06 & '07 is up front.

One thing that will make future servicing easier is to put a dab of silicon dielectric grease on all the *rubber grommet locations so the push pin will not get stuck.

IMG_0400.jpg


Briodie

rolleyes.gif


* The fuel tank surround, the side panels, the shouldered screws, and a few other locations on the bike

 
Last edited by a moderator:
One thing that will make future servicing easier is to put a dab of silicon dielectric grease on all the *rubber grommet locations so the push pin will not get stuck.
Yep.

Something else I didn't think of, having been a GenI guy for 5 years, while you've got that left side cover and snorkel off, and the dielectric grease in your hand, grease up that S1 spider if you haven't already done so. I'm just reading up on that now.

 
Great write up. I have had a new fender in the garage for over a year now. After reading this I finally tackled this project and glad to have this complete.

 
I need to do this, my rear tyre has rubbed right through the top of the fender under the rear seat. Just need to get hold of a fender now. Thanks for the write up, I can do that.

 
I need to do this, my rear tyre has rubbed right through the top of the fender under the rear seat. Just need to get hold of a fender now. Thanks for the write up, I can do that.
What?? Why did that happen? How on earth did a tire rub through the top of the rear fender?

 
I need to do this, my rear tyre has rubbed right through the top of the fender under the rear seat. Just need to get hold of a fender now. Thanks for the write up, I can do that.
What?? Why did that happen? How on earth did a tire rub through the top of the rear fender?
Yeah, did you lower it? ...put a tractor tire on? ...or worse yet, darkside it??

 
I need to do this, my rear tyre has rubbed right through the top of the fender under the rear seat. Just need to get hold of a fender now. Thanks for the write up, I can do that.
I'd be interested to know how you did that. However, if the fender is worn through up underneath where no one sees it, I'd be more inclined to find a way to patch it.

 
Top