• If you have bought, sold or gained information from our Classifieds, please donate to FJRForum and give back.

    You can become a Supporting Member or just click here to donate.

WynPro Anti-Vibe Light Brackets

Yamaha FJR Motorcycle Forum

Help Support Yamaha FJR Motorcycle Forum:

This site may earn a commission from merchant affiliate links, including eBay, Amazon, and others.
Status
Not open for further replies.
Don't tell me you lost them! I can get a price on just the spacers if need be. I had a feelin someone would ask eventualy.

Dave

 
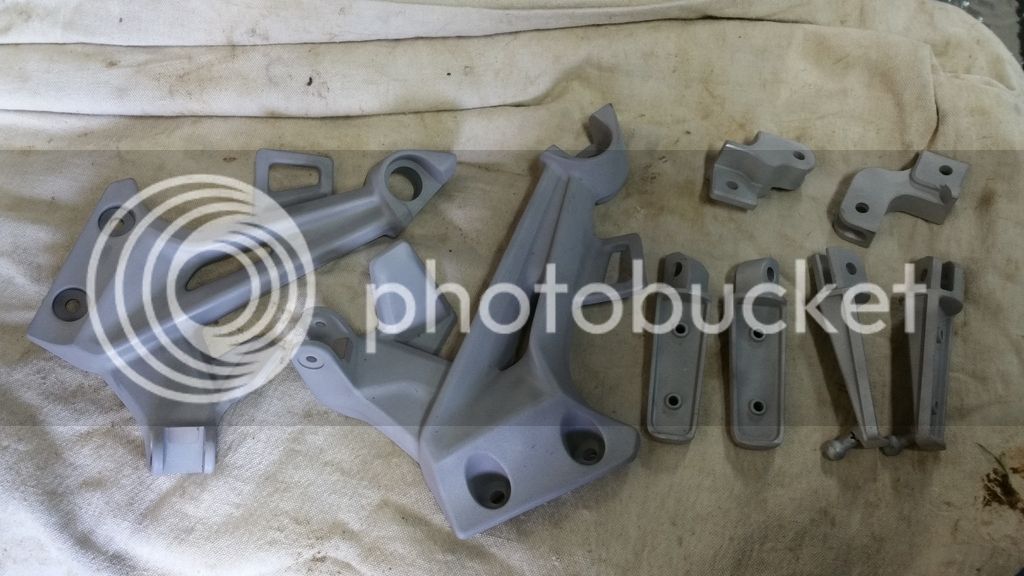
I haven't opened the pa kages yet, I thought the Spacers were black rubber widgits which I didn't see in the envelopes, I now believe the spacers must be the smaller aluminum widgets which I recall are in the envelopes.

Might help to post Freds Installation Instructions into this thread and/or label the parts in the picture a couple of pages back. My ignorance.

Sorry folks.

 
The spacers are already on the bike underneath the mirrors. You will see them when you start taking the bike apart.

Dave

 
The rubber things are called the "plate #2" in the stock parts diagram, and those are re-used. The "spacers" are what Dave makes to put behind the "brackets" and over "plate #2".

Here is a link to the Installation Instructions for WynPro AntiVibe Brackets on a 3rd Generation FJR1300 that I send along to Dave.

He may decide to add more to them before he prints them and forwards them along with the purchased brackets, but it will give you a good idea of what the process is.

 
Last edited by a moderator:
Could of questions for you guys... I plan on powder coating my kit. Has anyone done this? I was wondering if I should sandblast the parts before I actually powder coat them or just prep clean and powder the pieces?

 
Baaaah. Just grab some cans of rustoleum and spray the pieces... More then adequate for these small pieces.

I think powder coating is over kill for this application.. Just my opinion of course..

Either way Dave's stuff is fantastic

 
Last edited by a moderator:
Baaaah. Just grab some cans of rustoleum and spray the pieces... More then adequate for these small pieces.
I think powder coating is over kill for this application.. Just my opinion of course..

Either way Dave's stuff is fantastic
But then I wouldn't be putting my just purchased powder coating setup (sand blasting cabinet, house oven, Eastwood powder coating kit) to good use.. lol

 
The pieces arrive as perfectly machined, virgin alloy. You should be able to prep spray them (to remove any traces of oil) and finish them as is. No need to use your new sandblast cabinet (sorry).

 
Last edited by a moderator:
I have to look into one of those powder coating setups. Now to find a used oven. Mama wouldn't be to pleased using the one in the kitchen. Oh and by the way I do clean all the parts before they get shipped out. Hot water and simple green.

Just an FYI,

Dave

 
The pieces arrive as perfectly machined, virgin alloy. You should be able to prep spray them (to remove any traces of oil) and finish them as is. No need to use your new sandblast cabinet (sorry).
That's ok. I did put it to use today..

20150324_182241_zpsek9qwcwl.jpg


Last edited by a moderator:
Can't wait to see how this turns out. Don't forget to mask off some of the mating surfaces. How hot does the oven have to be to bake the powder coat?

Dave

 
Can't wait to see how this turns out. Don't forget to mask off some of the mating surfaces. How hot does the oven have to be to bake the powder coat?
Dave
I have different size plugs and special masking tape for powder coating (all comes in the kit).. The heat depends on the powder.. Usually Eastwood powder calls for you to start at 450 until flow out (when the powder changes to look wet) then it ranges from 375 to 400 for 15 to 20 minutes. Each bottle of powder I have actually has the cook time right on the bottle.

 
Here is my 1st run using satin black... Today I used black texture which is what I am going with. The black texture color from Eastwood seems to match the canyon cages & the Givi Top box mount better than the satin black.

20150321_172034_resized_zpstpj2mdqo.jpg


20150321_180437_resized_zpsnsp2fniz.jpg


Funny, I have wrenches from India also. Managed to break one of them but I had a 3 foot pipe on the end of it. I did some youtube vid's to expand my knowledge on powder coat. Looks like it can be done fairly cheap. Not including labor.

Dave

 
This past weekend at Tech Day X, in sunny, beautiful Owosso, I removed my trusty Hella FF50's and replaced 'em with a pair of Rigid D2 aux driving lights. Rigid D2 Clicky.

So far, I really like 'em but my one fear was realized on the ride home: since the D2sare heavier than the FF50's, Garauld's brackets just aren't up to the task and the lights vibrate a LOT.

So I'm looking for other bracket solutions.

Has anyone mounted up any other lights on these brackets? Wayne and I kinda held one of the D2sup to Dave's mounts on his bike and they may work, but I'm curious to know if any other lights have been used.

Thanks.

 
Wayne has the Gen2 version of brackets. The Gen1 brackets are longer and wider. Looking at the dimensions I would say the lamps would fit fine. I can bump the hole size up to a 1/4-20 screw size but not much more than that. Possibly a 5/16-18 also but the head might protrude slightly. If the hole in the bracket on the light is larger then it may not be an issue. They would still be flat head screws mounted flush to the bottom. I also wonder if we can do something similar to the Gen3 brackets for the Gen1's.

Dave

 
If the objective is to mount heavier / larger lights, I'm not sure how comfortable I would be with spacing the brackets up away from the faring surface. The added support you get from the bracket resting on the faring (with rubber padding behind) would be beneficial for bigger light mounting. The trick would seem to be to get a large enough flat head screw (or screws) countersunk into the back of the bracket. You could always add additional or thicker rubber on the back to accommodate a bigger screw head.

 
Status
Not open for further replies.
Top