You are using an out of date browser. It may not display this or other websites correctly.
You should upgrade or use an alternative browser.
You should upgrade or use an alternative browser.
Steering head socket vs spanner for setting torque
- Thread starter Gitbox
- Start date


Help Support Yamaha FJR Motorcycle Forum:
This site may earn a commission from merchant affiliate
links, including eBay, Amazon, and others.
mikerider
Well-known member
Same.
I didn't do that well in Physics, but do know Yamaha doesn't publish specs for different torquing devices, distances, angles, etc......just the one spec for each fastener. Truth is I don't know if the spec they published assumes the Yamaha spanner thing or just a pure number assuming center point of the fastener. If I understand correctly, you want to adjust for the difference iget into adjusting torque then start Googling and finding discussion and calculators like this that you could finnagle the offset and see it's probably not much to worry about.Even though it's extended away from the center for the spanner?
lnewlf
Well-known member
easy...I use this..tighten until the bars don't flop///
https://www.mscdirect.com/browse/tnpla/84965052?cid=ppc-google-New+-+Hand+Tools+-+PLA_s2q4Qu0st___164110844130_c_S&mkwid=s
https://www.mscdirect.com/browse/tnpla/84965052?cid=ppc-google-New+-+Hand+Tools+-+PLA_s2q4Qu0st___164110844130_c_S&mkwid=s
Mr_Canoehead
Well-known member
IIRC, the torque spec is 37ft*lbs at the Yamaha tool. Assuming that your torque wrench is 2' long, you would be applying a force of 18.5lbs. That 18.5lbs at the handle of the torque wrench (assuming the Yamaha tool is 3" from the center of the nut to the centre of the drive hole) would give an effective torque of 18.5 * ((24+3)/12) or 42ft*lbs at the center of the nut. YMMV depending on your torque wrench and the actual length of the Yamaha tool.
RossKean
Well-known member
NO!
The torque wrench is placed at 90° to the Yamaha tool so it is effectively the same as being right on the center of the nut. There is no added mechanical "advantage" due to the length of the Yamaha tool.
Someone posted a good reference to that somewhere here...
Edit:https://www.cncexpo.com/TorqueAdapter.aspx
Edit: Link is dead, but there are others out there...
Last edited:
Brodie
Darksider #16 - and Proud of it !
- Joined
- Sep 17, 2006
- Messages
- 1,449
- Reaction score
- 526
^^^^^^^^^^ BINGO !!!
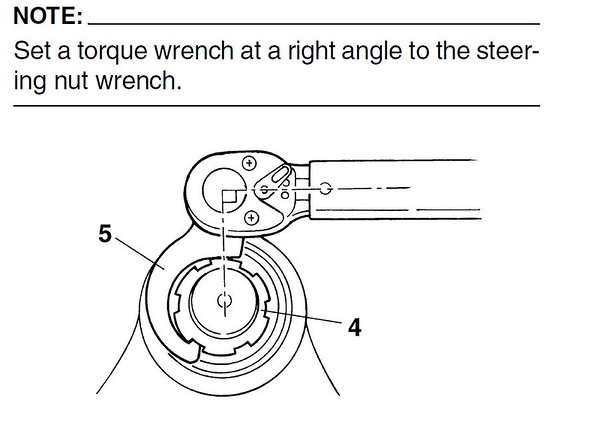
If you study the service manual it specifies exactly this 90 degree relationship between the torque wrench and the hook spanner attachment.
By the way, if you have a left over rear shock preload adjuster from an old Honda tool kit from the late 60s you have the makings for an excellent Yamaha steering nut tool. All you need to do is drill a 3/8 hole near the end of the handle, then file the 4 corners into it for the 3/8 socket drive. I did mine decades ago for my 90 Venture Royale.
Brodie
Last edited by a moderator:
Ingie
Active member
The tool you're all referring to is called a crow foot and you should be able to buy it at any NAPA, Lordco, or snap on vendor.

RossKean
Well-known member
The first time I encountered the Yamaha spanner tool, my thoughts were the same! Someone pointed out the service manual procedure and with a little research, I managed to get my head around the physics of the situation. The little calculator I posted helps - try some number sets with varying angles...
SLK50
Well-known member
Just a reminder: The torque values stated in the FSM are for
the OEM bearing and do not apply if you have swapped them
for tapered rollers.
the OEM bearing and do not apply if you have swapped them
for tapered rollers.
Mr_Canoehead
Well-known member
You are correct. The manual shows torquing at 90* - I missed that. That would mean no increase in torque applied since the moment arm is unchanged.NO!The torque wrench is placed at 90° to the Yamaha tool so it is effectively the same as being right on the center of the nut. There is no added mechanical "advantage" due to the length of the Yamaha tool.
Someone posted a good reference to that somewhere here...
Edit:https://www.cncexpo.com/TorqueAdapter.aspx
Valid point, SLK50... (balls vs tapered)
I installed tapered bearings on my '05 last year and honestly, I didn't follow the FSM at all since I didn't have a crow foot/hooked/spanner tool (at least not one that fit).
So I just ensured the bearing races were fully seated in the steering head and then snugged it all up.... the "test" being how easy the bars flopped from side to side. Too tight and there was obvious resistance in the side to side movement of the bars (sans fork tubes still) so I just found a nice middle ground. After a few weeks of riding, I checked them again and tightened up the bearings just a little. Not exactly scientific but it works (at 60K miles, my OEM ball headset didn't look bad at all but I got a deal on the tapered set so I installed them).
Regards,
Mr. BR
saread
Well-known member
NO!The torque wrench is placed at 90° to the Yamaha tool so it is effectively the same as being right on the center of the nut. There is no added mechanical "advantage" due to the length of the Yamaha tool.
Someone posted a good reference to that somewhere here...
Edit:https://www.cncexpo.com/TorqueAdapter.aspx
The above is crap. I did what my engineering professors always told me to do and sat down and drew the free body diagram (which I know I should have done first). The quoted information is exactly correct. If you place the torque wrench at 90 deg to the spanner, it is the same as if you'd be using a socket. The moments have to balance and if you apply a torque at the connection to the spanner without adding a moment arm (like placing the wrench at 90 deg) it has to be balanced by the identical torque at the nut or the whole world will spin out of control. Not like I ever have control of my world anyway.....
Last edited by a moderator:
C&C
Well-known member
The only number that I have seen on this thread is 37 ft-lbs; this is the initial tightening torque, after that you need to loosen and re-torque to the final torque value of 13 ft-lbs. Forgive me if I missed this important number (somewhere earlier in this discussion).
RossKean
Well-known member
I beg to differ... (Post #15)
Using the calculator, consider the calculator with the angle "A" at 90° as per the Yamaha manual. You can make the length "E" any length without affecting the required force/torque. There is a difference as a function of the length "E" if the angle is greater or less than 90°.
Using the calculator, consider the calculator with the angle "A" at 90° as per the Yamaha manual. You can make the length "E" any length without affecting the required force/torque. There is a difference as a function of the length "E" if the angle is greater or less than 90°.
Last edited by a moderator:
SLK50
Well-known member
Ross is correct.
If the length of torque wrench, measured from center of stem,
parallel to wrench, doesnt change, then torque values are
the same with crows foot or socket.
If the length of torque wrench, measured from center of stem,
parallel to wrench, doesnt change, then torque values are
the same with crows foot or socket.
Last edited by a moderator:
Brodie
Darksider #16 - and Proud of it !
- Joined
- Sep 17, 2006
- Messages
- 1,449
- Reaction score
- 526
Look at it another way...
With the attachment in line with the torque wrench extending beyond it, the attachments length is added to the leverage ratio. With it in line but under the torque wrenchs beam, its length is subtracted from the leverage ratio. There has to be a crossover point where it is neither added nor subtracted, and that is exactly at 90 degrees from the beam.
This logic is kind of like the stopped clock (analog) is more accurate than one which gains or looses a couple of seconds a day.
Brodie
Last edited by a moderator:
Similar threads
- Replies
- 3
- Views
- 611
- Replies
- 5
- Views
- 806
- Replies
- 29
- Views
- 3K
- Replies
- 2
- Views
- 644