Gen II ground spider discussion (bench racing)

Yamaha FJR Motorcycle Forum

Help Support Yamaha FJR Motorcycle Forum:

This site may earn a commission from merchant affiliate links, including eBay, Amazon, and others.

road runner

Well-known member
Joined
Mar 24, 2007
Messages
1,158
Reaction score
84
Location
Mechanicville, NY
Although a little late, I'm recommending we use this thread for any further grounding spider "bench racing". The other thread was meant as a poll for those that have been affected and not as much for fixes.

So if you have any failures then post Here on the Poll thread, and report the failure as recommended in that thread. Also you can read the earlier spider discussions there, but please keep the "bench racing" on this discussion thread.

If you have any theories, fixes, discussion, "bench racing" etc.etc. then go ahead and post you reply in this thread. If you want to read the earlier posts about the spiders then go to the other thread, but please keep the bench racing in this thread.

Thanks; A.C.

 
RZ, I'm thinking that even with all the ground spiders soldered up and independently grounded to the chassis it can't hurt to remove the big current consumers like the fans from the OEM wiring harness. Btw, following your and Ionbeam's findings I've since disconnected my new ground wires from S2 & S5, just to play it safe.
Could you please confirm if these are the EB connectors you think will be needed to make up the plug-in loom for separately grounding the fans, they look like the right ones, but...

I'm planning on installing the HID kit Todd is selling which will be using their own, direct power wiring, so that only leaves the fans...

Connectors with internal lock - by Sumitomo

Without having the connectors from EB in front of me to try, it is hard to say which is the proper one. The ones that best match it visually seem to be the black set, 2PF250, with the external lock barb (Yazaki). What is odd is that it states "Same connector as above, but in black" yet the white one shown doesn't appear to have a lock barb. The Yamaha harness connector does have an external lock barb and is black.

To be honest, I was being intentionally vague with my connector links because I'm not certain at this point which are correct, but was simply pointing people in the right general direction.
RZ

You are correct. It is the black connector (Yazaki). I also ordered a set of them for the fans, and a set of the headlights last week. They should be here any time now.

 
Set your DMM to the lowest DC voltage range. Clip the black meter lead to the battery ground terminal, no place else will work, must be to the battery ground post. Take the red lead and go to the headlight ground connection, with the headlights on, probe directly on the headlight ground at the headlight. Measure the voltage drop between the headlight and the battery. If it is over 0.100 volts your spider is sick. Don't sweat 0.001 volts, this reading will either be good or bad.

Leave the black DMM lead clipped on the battery negative post. Put the red DMM lead on a radiator cooling fan ground, at the fan connection. Use the diAG code to toggle the fan on, measure the voltage. If it is over 0.100 volts your spider is sick. Don't sweat 0.001 volts, this reading will either be good or bad.

Use this technique for every ground on the FJR except for the ones that use the ECU signal ground. If a spider is failing it means that it is not fully conducting all the current it should, so some will converted to a voltage (the 'voltage drop'). The higher the voltage between the item ground (headlight, horn, radiator, tail lights, meter assembly, etc.) and the battery the worse the condition of the spider. Ideally, item ground to battery ground will be 0.000 volts -- absolute 100% conduction. In reality there will always be some voltage drop produced. My use of 0.100 volts as a upper limit is just a target number where concern should begin, this is not some magic number. I chose this number because it represents ~1.2 to 1.4 watts of power being dissipated between the item and the battery. If the dissipation is uniform along the entire wire/connector run there is no problem but if it occurs in one place, like a spider that is significant. The spiders seem to be setup so that there are 1-2 ground wires and 4-5 item grounds. If the spider starts to corrode and 2 or 3 item grounds are dissipating 1.2 watts each within that one spider, you are on your way to doom PDQ.

FWIW.

 
Last edited by a moderator:
Very nice Alan. This is a very easy and accurate way to check all kinds of stuff. I use it all the time to check wiring.
Yup, not only do I use this technique at work, but at home too :lol:

It works on the positive voltage system too, clip the black lead to the positive post of the battery and the red lead probes the power connection of an item. In this case, make the first test with the meter set on the 20 or 30 volt scale, then switch to the lowest scale as required. The 0.100 volt drop is still the alarm point, anything > 0.100 is entering the problem zone.

 
WOW - a spacious new home. That other place was getting a little cramped. :rolleyes:

Good idea to split it off, road runner. It might be tough keeping new people from posting techincal discussions in the other one, however, so we might have to remind them occasionally and give them the link to this one.

I will gather up some of my final data and findings from the old thread and re-post it here so people don't have to go back and forth between the two threads.

 
Set your DMM to the lowest DC voltage range. Clip the black meter lead to the battery ground terminal, no place else will work, must be to the battery ground post. Take the red lead and go to the headlight ground connection, with the headlights on, probe directly on the headlight ground at the headlight. Measure the voltage drop between the headlight and the battery. If it is over 0.100 volts your spider is sick. Don't sweat 0.001 volts, this reading will either be good or bad.
Leave the black DMM lead clipped on the battery negative post. Put the red DMM lead on a radiator cooling fan ground, at the fan connection. Use the diAG code to toggle the fan on, measure the voltage. If it is over 0.100 volts your spider is sick. Don't sweat 0.001 volts, this reading will either be good or bad.

Use this technique for every ground on the FJR except for the ones that use the ECU signal ground. If a spider is failing it means that it is not fully conducting all the current it should, so some will converted to a voltage (the 'voltage drop'). The higher the voltage between the item ground (headlight, horn, radiator, tail lights, meter assembly, etc.) and the battery the worse the condition of the spider. Ideally, item ground to battery ground will be 0.000 volts -- absolute 100% conduction. In reality there will always be some voltage drop produced. My use of 0.100 volts as a upper limit is just a target number where concern should begin, this is not some magic number. I chose this number because it represents ~1.2 to 1.4 watts of power being dissipated between the item and the battery. If the dissipation is uniform along the entire wire/connector run there is no problem but if it occurs in one place, like a spider that is significant. The spiders seem to be setup so that there are 1-2 ground wires and 4-5 item grounds. If the spider starts to corrode and 2 or 3 item grounds are dissipating 1.2 watts each within that one spider you are on your way to doom PDQ.

FWIW.
Brilliant! Even a dcarver caveman could do this!
 
Gentlemen

Some time early next week I will have the components to build my first prototype "Grounding Harness". If all goes according to plan, I should have 14 of these harness built and ready for sale within a week or two. :)

The plan is still to make 1 harness with 6 female connectors that will plug into the existing male connectors on the bike's harness. All 6 pins in each connector will have a 16 gage black TXL wire crimped to them. Within an inch of the connector the 6 wires will be crimped together via a butt connector to a 12 gage pigtail attached to the other end. These pigtails will form the harness back to chassis ground. The corresponding spyder and black cap will be eliminated for these 6 locations... S1, S3, S4, S6, S7, & S8.

6p090-sp-a.jpg


Shown is the complete connector assembly. The male half on the right side of the picture is our beloved spyder's nest. By creating a harness that uses the female half on the left side of the picture, it will be a plug and play deal for the typical FJR owner. This "Grounding Harness" will supplement the path to ground - not take the place of it.

Of course, if your existing grounding spyder has failed and taken some wires with it you will need to get it fixed first.

P1010808.JPG


If you are adventurous, and don't mind doing a bit of surgery, I will have an overabundant supply of male connectors and pins I could supply for the price of postage.

The 2 grounding spiders which service the bikes electronics will not be involved (S2 & S5). They carry very little current and in my opinion are not in danger of a thermal runaway situation. My instructions will be to just service them by pulling the spyder in and out several times, injecting them with dielectric grease, reassemble them and leave them be.

Many thanks to RZ350, Road Runner, IonBeam, JamesK and several others who brain stormed the grounding circuit on our favorite ride. :thumbsup:

Brodie

 
Last edited by a moderator:
Gentlemen
Some time early next week I will have the components to build my first prototype "Grounding Harness". If all goes according to plan, I should have 14 of these harness built and ready for sale within a week or two. :)

The plan is still to make 1 harness with 6 female connectors that will plug into the existing male connectors on the bike's harness. All 6 pins in each connector will have a 16 gage black TXL wire crimped to them. Within an inch of the connector the 6 wires will be crimped together via a butt connector to a 12 gage pigtail attached to the other end. These pigtails will form the harness back to chassis ground. The corresponding spyder and black cap will be eliminated for these 6 locations... S1, S3, S4, S6, S7, & S8.

6p090-sp-a.jpg


Shown is the complete connector assembly. The male half on the right side of the picture is our beloved spyder's nest. By creating a harness that uses the female half on the left side of the picture, it will be a plug and play deal for the typical FJR owner. This "Grounding Harness" will supplement the path to ground - not take the place of it.

Of course, if your existing grounding spyder has failed and taken some wires with it you will need to get it fixed first.

P1010808.JPG


If you are adventurous, and don't mind doing a bit of surgery, I will have an overabundant supply of male connectors and pins I could supply for the price of postage.

The 2 grounding spiders which service the bikes electronics will not be involved (S2 & S5). They carry very little current and in my opinion are not in danger of a thermal runaway situation. My instructions will be to just service them by pulling the spyder in and out several times, injecting them with dielectric grease, reassemble them and leave them be.

Many thanks to RZ350, Road Runner, IonBeam, JamesK and several others who brain stormed the grounding circuit on our favorite ride. :thumbsup:

Brodie
Will you list the parts and the supplier like you did for the ignition switch harness? I think I may want to make one for myself again. Since it seems like S4 and S6 are the connectors that fail I may only want to add ground to those. What do you think?

 
I'm thinking like salan10. Would grounding more than #6 and#4 be overkill? Considering all the FJR s on the road and the relatively few failures it seems that the harness might only need a little help.

 
Brodie

I’m glad to see you are still working on the kit to help eliminate the grounding overload issue. Although people have several choices on how to tackle this problem, your solution offers a simple plug-n-play all-inclusive choice for those not wanting to take the full DIY route of buying individual parts, building, and installing.

For those still concerned about keeping the spider spade connectors in the circuit as Brodie’s solution and others do, please keep this in mind. Very similar or identical spade connections are used throughout the bike’s electrical system and are not causing any problems elsewhere (at least not to my knowledge). Granted, some are sealed connectors, but there are still plenty that are not sealed, as I witnessed while analyzing my spare harness. Connectors can be considered a “weak link” in any harness. These spider connections just happen to be failing due to current overloading in the ground bus circuit back to the battery during peak power usage. If current is kept below their design limits (by adding alternate ground paths), I believe these spade connections will work fine for years and years. Of course, some corrosion prevention will enhance the reliability.

Let us know if you need anything as you develop your kit.

 
Reposting Revision 04 of my Ground Bus wiring table in this thread for reference.

Peak current (everything powered up), total amperage on the individual spiders:

S1= 5.85

S3= 8.30

S4= 40.25

S6= 22.55

S7= 14.80

S8= 7.85

The following could be considered a more “normal” riding condition. I turned off fans, horns, and turn signals (still have 3A on acc port):

S1= 2.35

S3= 4.80

S4= 19.45

S6= 14.65

S7= 11.30

S8= 6.10

Worst Case Scenario:

4322930463_73cf29d2a3.jpg


4323665078_b68ff26bf6.jpg


Last edited by a moderator:
[SIZE=12pt]Here's a REPOST of what I intend to do based on the materials I have on hand and my particular situation. There are several solutions out there to choose from - you need to decide what best suits you.[/SIZE]

I HAVE MY PLAN OF ACTION...

After researching, reading prior posts here, and giving this a bunch of thought, I feel I have a solution for setting my mind at ease about this problem. I hope others will benefit from all our work. Hopefully, Yamaha will intervene before I actually get through all 3 steps.

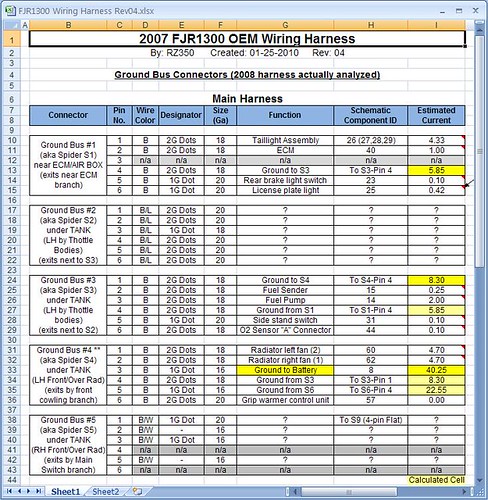
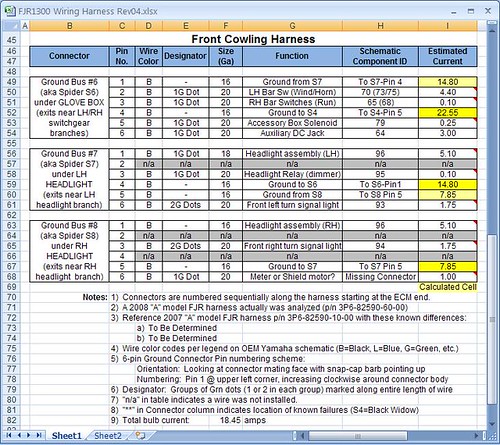
ROOT CAUSE: To me, it is obvious what the problem is here. The downstream ground spiders are simply getting overloaded. The wiring table shows which ones are worse off than the others (see Rev 04 in reply 287). Over time, a little corrosion pushes the overloaded terminals beyond their limits (in a degraded state) and things melt down.

A CAUTION: I don’t plan to do anything with spiders S2 or S5 (other than applying a little dielectric grease is prevent corrosion when accessible) since some wires in there are part of closed loop control circuits with isolated grounds. Since I don’t fully understand the logic inside those “black boxes” (the controllers), I don’t feel it’s necessary to mess with them and risk tampering with a feedback signal that could ultimately lead to safety issues someday. I also believe they are carrying much less current than the rest of the ground spiders so they are of no real threat of failure.

PLAN OF ACTION: Remember, this is my plan, based on the supplies I have at my disposal, my remaining YES warranty, and the current condition of my bike (low mileage). In general, applying dielectic grease to any connection on a bike is a good prevention against future corrosion.

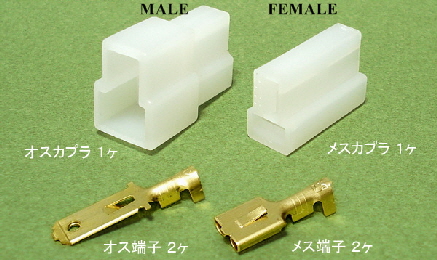
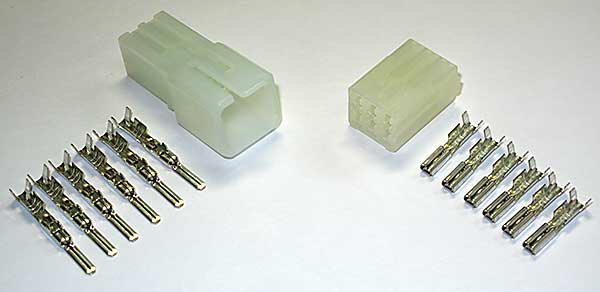
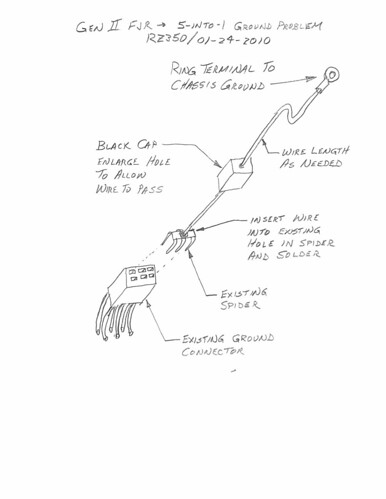
Step 1: Build one “5-INTO-1” repair spider connector as shown below and install it when I lift the tank to replace spark plugs. I just happen to have a spare spider and cap from the damaged portion of the front cowling harness so I can prepare the spider with ground lead prior to tearing into the bike. It wouldn’t take long to make one once the bike is apart though. I will not know exactly where to ground it on the chassis until I open it up, so I will solder on a long length of wire so I can cut-to-fit and crimp the ring terminal during installation. I’m in need of a spark plug change in the very near future so this will be an opportune time to do this step. This extra ground wire helps reduce the current flowing through spider S4-Pin3, the actual battery ground, where I believe the true trouble lies. This will eliminate a majority of the meltdown risk.

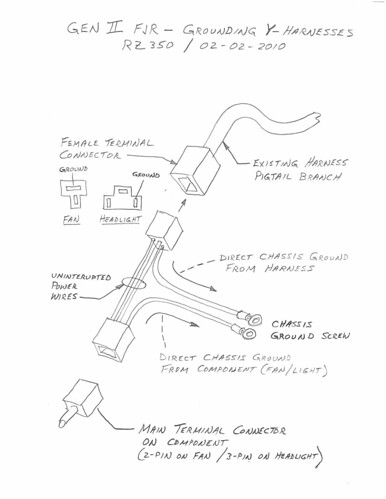
Step 2: Build two Y-connectors for the radiator fan motors (see below). I think this is important if you sit in traffic a lot and your fans come on often. These could also be prepared ahead of time, and be available when I’m ready to pull the side panels. As agreed upon by several forum members, they effectively will take the fan motor current (10A) completely out of the original ground loop AND add 2 additional ground paths to S4. At this time, I could remove the grounding spider wire installed in Step 1 since it is now redundant.

Step 3: If Yamaha has still not intervened with a factory fix to my liking, I will buy the necessary parts to build a similar Y-harness for each headlight. Like the fans, it will remove the headlight current from the original ground circuit (another 10A) and provide two additional ground paths for the front cowling harness (one each for S7 and S8). Even though an extra connection is added to each headlight creating another possible failure point, I feel the risk of BOTH lights going out at the same time is relatively low, therefore not a concern to me.

With all this done, I doubt there will ever be another issue with the grounding system. Good luck in fixing your bike.

Now - it’s time for me to do some riding...

4325724251_78cdc06333.jpg


4326460400_a7a27b2af2.jpg


Will you list the parts and the supplier like you did for the ignition switch harness? I think I may want to make one for myself again. Since it seems like S4 and S6 are the connectors that fail I may only want to add ground to those. What do you think?
Short answer...

Yes.


Long answer...

When I have a Grounding Harness design ready for production I will post the complete details just as I did for my Ignition Relay Harness. My main focus is to provide a quick plug & play solution for owners who would rather spend their time
riding
their bike. But for those who want to build their own, I say here are the details - Go For IT!!!


One note... several people have already sent me a PM asking for one. I still don't have all the components. I expect them to arrive sometime early next week. Then I need to build my first prototype. When I am ready I will start a post in the Vendors section and take orders through there.

One other thing, There is more than one way to skin this cat. Re-read the posts on this issue and decide what will work best for you. There is a lot of good information at our finger tips thanks to the efforts of some very generous forum members.

Damn, I like this place. :yahoo:

Brodie

 
Top