Forkoil leaking from compression adjustment

Yamaha FJR Motorcycle Forum

Help Support Yamaha FJR Motorcycle Forum:

This site may earn a commission from merchant affiliate links, including eBay, Amazon, and others.

Motardus

Member
Joined
Jul 4, 2013
Messages
10
Reaction score
0
Location
Sweden
I´m new here, just bought a 2006 FJR and it only has 7000 miles on it.
It has been standing for 2 years and I discovered after a short drive that it was leaking forkoil from the left compression adjustment. Not a lot but I really want to fix it. Anyone that knows how to?

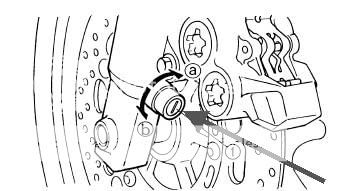
And, as I know you all know, Gen 1 has a different kind off adjustment, a screwed in aluminum thing with a brass screw. Gen 2 has, what it looks like, a pressed aluminum socket/sleeve with a brass screw.
Oil seeps out between the brass screw and the socket/sleeve.
Must be a dry o-ring or such in there...

Regards from Sweden

 
Count the turns in and then turn it in and out all the way . Then return to the originally settings do the same on the other side and match the settings . This may help If you are unsure of how to set up the suspension just do a search on the board . A little spray with wd40 may help as their may be a bit of corrosion or grim in the thread after 7 years and only so few miles .

 
Thnx Graham but I think you answered someone elses question? I´m not having a problem with settings and the compression damping adjuster is actually "oiling" itself... I have turned them both in and out several times trying to make the leaking stop, but no...

The left one is still leaking and I hope to hear from someone who knows how to fix the leaking, how to take the adjuster out of the forkleg and so on...

 
There is a o-ring in there so it could be pinched or something? Could be cross threaded. You are going to have to take the adjuster off and look. I am not sure how it would leak even without the o-ring but that would be my first thing. Just pull it off and look what is up. Can not remember but I think it is a 22mm socket. You do not have to loosen or pull anything else just the cap and look. If it is cross threaded that would not be good but when you break it loose, turn it in then out a few, back in and then out a few. This will help in getting it out with less damage. However at that point I would worry about shavings so you would need to service that fork and if you do that you should do the other.

Pull it and snap a pic so we can see.

https://www.boats.net/parts/search/Yamaha/Motorcycle/2010/FJR1300A%20-%20FJR13AZCS/FRONT%20FORK/parts.html

 
Last edited by a moderator:
LAF; you are talking about rebound damping adjustment. That´s on top of the fork. Compression adjustment is near bottom, the small "cups" pointing backwards. You have the same fork as me so if you look at them you´ll see what I mean.

Hard to get out, right?

And they are not even mentioned in the microfiche link?!?

 
Sorry miss read it all.

I just turned them all the way in with a light touch listening for the clicks. Once all the way in I backed mine out 9 turns as instrucked and been that way for 26,000 miles.

I have no idea what it up with yours leaking.? Did you turn it all the way in to seat it and see if it still leaks?

 
All the way in, all the way out, every way I can imagine... the little sucker still leaks...

 
A technician at Yamaha told me that I have to get a new outer tube since the compression adjuster is pressed in permanently and can´t be changed.
So now I know the solution to this very unusual problem...
 
Before you go to the expense of replacing your outer tube you might want to consider something like this, from Speedbleeder...........

Thread Sealant Now Available

The thread sealant is now available in 1/2 oz. bottles so that you can replace the sealant that has worn off over time. It comes in a plastic bottle with a brush cap applicator. It is available for $10.00 and can be used in many other situations where a quality pre-applied pipe sealant is required. A little goes a long way. The recommended procedure for applying is as follows:

Clean the Speed Bleeder with soapy water to remove any brake fluid or grease and dry. A hair dryer does this nicely. With the brush cap applicator apply a small amount of thread sealant evenly to the threaded portion of the bleeder screw. (Leave the first 1 1/2 threads uncoated. This makes it easy to start threading into the wheel cylinder or caliper without cross threading.) After it is applied, dry with a hair dryer on high setting for about 1 minute. When cool and dry it is ready for installation.

The thread sealant is available here for $10.00 plus P&P.

 
Since you are in Sweden I would call an Ohlins service shop and describe your issue. Ohlins and Yamaha have a relationship and Ohlins may have a parts solution that may be cheaper than replacing the fork leg. The other solution is to replace the factory forks with a set of Ohlins forks but that would be the big dollar fix.

 
Motardus,

I'm guessing you're talking about "this" adjuster screw (Gen I picture)

adjuster_zps1dce389f.jpg


If it were me, and trying to save the $200 a new outer fork tube would cost (which I would), here's what I'd try....

First, from where the screw is set now, lightly screw it in and count how many turns until it seats.

Then, screw it out as far as it will go, until you've exposed some threads on the screw. Don't know if it will come all the way out, but we're trying to save you $200, right?

Once you've exposed three or four threads of the screw, clean them well with alcohol (not the drinking kind) to get as much oil and dirt off the threads as you can. Once the threads are clean and dry, lightly coat the exposed threads with either clear nail polish or perhaps some kind of thread sealant like Donal suggested. You could even use 3M blue thread locker. Then screw the adjuster all the way back in. Then screw it back out the number of turns you counted at the beginning and let the bike sit for a day to let the sealant dry. Then, see if it still leaks.

IF the screw comes all the way out, you may lose the "clicking" ability of the adjuster, but if it DOES come out, no disaster, as you know where your starting point was to begin with. IF you can screw it all the way out, I'd wrap the threads with Teflon sealing tape to use as a sealant instead of a liquid product. Also, if the screw comes out far enough, or all the way out, you can see if there's an O-ring on the screw. Try replacing the O-ring (assuming there is one) and see if that doesn't correct the leak.

You really have nothing to lose but to try. Worst case scenario is you screw up the adjuster so badly, you have to buy that lower fork tube for $200, but that's really you're only alternative if a repair attempt fails.

Good luck and let us know how the repair/replace turns out.

 
Last edited by a moderator:
Before you go to the expense of replacing your outer tube you might want to consider something like this, from Speedbleeder...........
Thread Sealant Now Available

The thread sealant is now available in 1/2 oz. bottles so that you can replace the sealant that has worn off over time. It comes in a plastic bottle with a brush cap applicator. It is available for $10.00 and can be used in many other situations where a quality pre-applied pipe sealant is required. A little goes a long way. The recommended procedure for applying is as follows:

Clean the Speed Bleeder with soapy water to remove any brake fluid or grease and dry. A hair dryer does this nicely. With the brush cap applicator apply a small amount of thread sealant evenly to the threaded portion of the bleeder screw. (Leave the first 1 1/2 threads uncoated. This makes it easy to start threading into the wheel cylinder or caliper without cross threading.) After it is applied, dry with a hair dryer on high setting for about 1 minute. When cool and dry it is ready for installation.

The thread sealant is available here for $10.00 plus P&P.
I´m sorry Donal but I really can´t see how this could fix my problem?

 
Motardus,
I'm guessing you're talking about "this" adjuster screw (Gen I picture)

adjuster_zps1dce389f.jpg


If it were me, and trying to save the $200 a new outer fork tube would cost (which I would), here's what I'd try....

First, from where the screw is set now, lightly screw it in and count how many turns until it seats.

Then, screw it out as far as it will go, until you've exposed some threads on the screw. Don't know if it will come all the way out, but we're trying to save you $200, right?

Once you've exposed three or four threads of the screw, clean them well with alcohol (not the drinking kind) to get as much oil and dirt off the threads as you can. Once the threads are clean and dry, lightly coat the exposed threads with either clear nail polish or perhaps some kind of thread sealant like Donal suggested. You could even use 3M blue thread locker. Then screw the adjuster all the way back in. Then screw it back out the number of turns you counted at the beginning and let the bike sit for a day to let the sealant dry. Then, see if it still leaks.

IF the screw comes all the way out, you may lose the "clicking" ability of the adjuster, but if it DOES come out, no disaster, as you know where your starting point was to begin with. IF you can screw it all the way out, I'd wrap the threads with Teflon sealing tape to use as a sealant instead of a liquid product. Also, if the screw comes out far enough, or all the way out, you can see if there's an O-ring on the screw. Try replacing the O-ring (assuming there is one) and see if that doesn't correct the leak.

You really have nothing to lose but to try. Worst case scenario is you screw up the adjuster so badly, you have to buy that lower fork tube for $200, but that's really you're only alternative if a repair attempt fails.

Good luck and let us know how the repair/replace turns out.
The screw doesn´t show any threads at all when you turn it all the way out. The screw head stays level with the sleeve, full in or full out...

The technician told me the "moving parts" are inside the adjuster and advised me not to try to screw beyond full in or full out since that would just destroy the adjuster inside and I would have a non driveable bike...

So for now, and until I get the new outer tube installed, I just leave it and live with the small leakage. Rubberband and a small cloth does the trick until winter ;-)

But, you can rest assured, when I´ve changed the tube I will take the adjuster out of the old tube (with a hacksaw if that´s what it takes!) and dissect it!

I must know how it works and what is wrong with it. Pictures? Of course...

IF it had been, like on the Gen 1 bikes, a removable adjuster... probably fixed it already but that´s a different story.

Thanx you all for your dedication/tips/hints/advice....

 
Before you go to the expense of replacing your outer tube you might want to consider something like this, from Speedbleeder...........
Thread Sealant Now Available

The thread sealant is now available in 1/2 oz. bottles so that you can replace the sealant that has worn off over time. It comes in a plastic bottle with a brush cap applicator. It is available for $10.00 and can be used in many other situations where a quality pre-applied pipe sealant is required. A little goes a long way. The recommended procedure for applying is as follows:

Clean the Speed Bleeder with soapy water to remove any brake fluid or grease and dry. A hair dryer does this nicely. With the brush cap applicator apply a small amount of thread sealant evenly to the threaded portion of the bleeder screw. (Leave the first 1 1/2 threads uncoated. This makes it easy to start threading into the wheel cylinder or caliper without cross threading.) After it is applied, dry with a hair dryer on high setting for about 1 minute. When cool and dry it is ready for installation.

The thread sealant is available here for $10.00 plus P&P.
I´m sorry Donal but I really can´t see how this could fix my problem?
Oops, my mistake. I 'assumed' (always a bad thing) that by unscrewing, some threads would be exposed. Looking forward to the final report.

 
Motardus,

I'm guessing you're talking about "this" adjuster screw (Gen I picture)

adjuster_zps1dce389f.jpg


If it were me, and trying to save the $200 a new outer fork tube would cost (which I would), here's what I'd try....

First, from where the screw is set now, lightly screw it in and count how many turns until it seats.

Then, screw it out as far as it will go, until you've exposed some threads on the screw. Don't know if it will come all the way out, but we're trying to save you $200, right?

Once you've exposed three or four threads of the screw, clean them well with alcohol (not the drinking kind) to get as much oil and dirt off the threads as you can. Once the threads are clean and dry, lightly coat the exposed threads with either clear nail polish or perhaps some kind of thread sealant like Donal suggested. You could even use 3M blue thread locker. Then screw the adjuster all the way back in. Then screw it back out the number of turns you counted at the beginning and let the bike sit for a day to let the sealant dry. Then, see if it still leaks.

IF the screw comes all the way out, you may lose the "clicking" ability of the adjuster, but if it DOES come out, no disaster, as you know where your starting point was to begin with. IF you can screw it all the way out, I'd wrap the threads with Teflon sealing tape to use as a sealant instead of a liquid product. Also, if the screw comes out far enough, or all the way out, you can see if there's an O-ring on the screw. Try replacing the O-ring (assuming there is one) and see if that doesn't correct the leak.

You really have nothing to lose but to try. Worst case scenario is you screw up the adjuster so badly, you have to buy that lower fork tube for $200, but that's really you're only alternative if a repair attempt fails.

Good luck and let us know how the repair/replace turns out.
The technician told me the "moving parts" are inside the adjuster and advised me not to try to screw beyond full in or full out since that would just destroy the adjuster inside and I would have a non driveable bike...
Sorry, but that pig won't fly. Even if you destroyed the adjuster completely, the bike would NOT be "non driveable..." You'd simply have a bike with no compression adjustment on one fork. It's not gonna affect the adjustment of the other fork one smidgin. But, good luck with the outcome.

 
Don´t know if any pig fly but we all have our references what "non driveable" is. If you destroy the adjuster on one leg you definitely have different settings on the two legs. Non-driveable might also be no forkoil in one leg due to a destroyed adjuster that can´t hold the oil at all.

Either way the handling will be "interesting".

Anyways, I´m not gonna find out what he ment exactly. I´m relying on that he knows what he is talking about...

 
Any chance of getting hold of a 'scrap' outer tube and performing 'investigative surgery' on it? Might help you to decide which way to go.........................

Anybody out there with a damaged outer tube they are willing to donate?

 
Thanx Donal... but I already got a new outer tube. The Yamaha guy got me one really (really!) cheaply but since the season is in full swing I don´t want to take the fork apart and have the bike standing. The old one will have "surgery" when winter comes... ;-)

 
Top