Link to all my Gen II mods
I know there are plenty of you out there that share similar thoughts about this topic so I will share my saga in finding a solution to the poor handlebar position on the FJR Gen II models. If you have adapted your riding position/style to deal with the FJR ergos and are happy with the stock handlebar position – there is no need to read any further. I, however, was not happy with adapting to the FJR – I wanted the FJR adapted to me. Sorry for the long write-up, but I’ll try to give the truly interested readers as many details as I can. Please ask questions if I have left something out.
Cutting to the chase – MISSION ACCOMPLISHED! (See full story after pictures for all details)
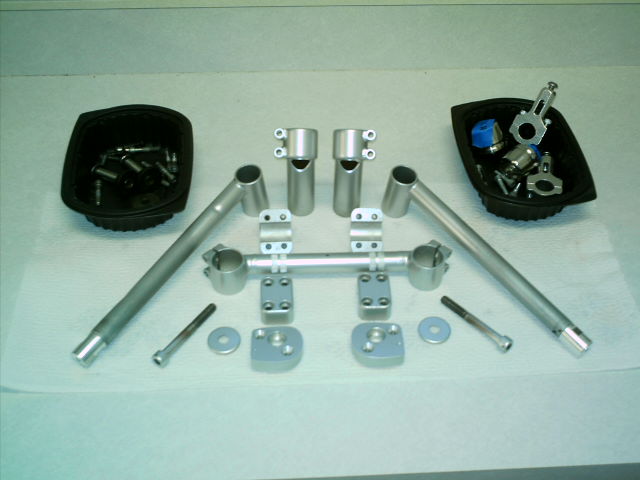
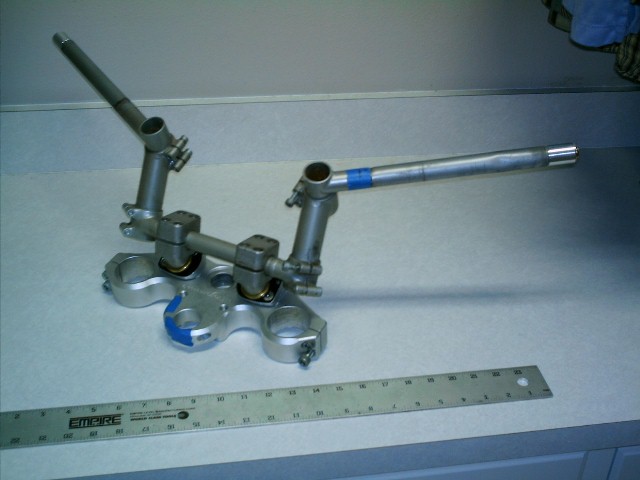
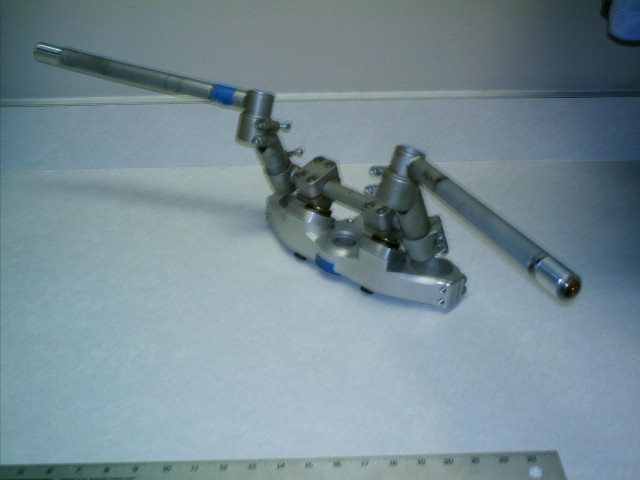
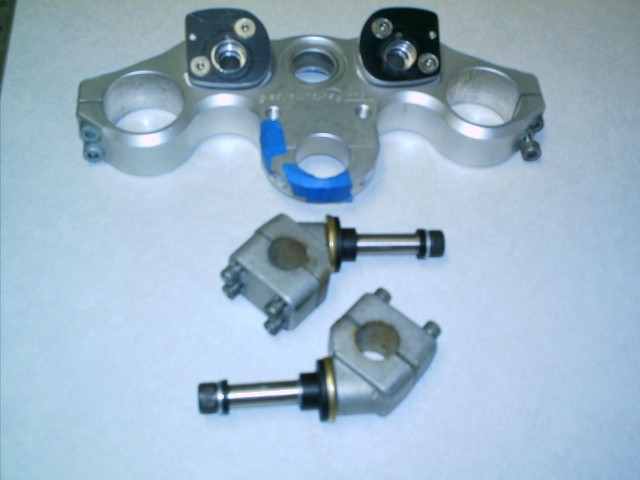
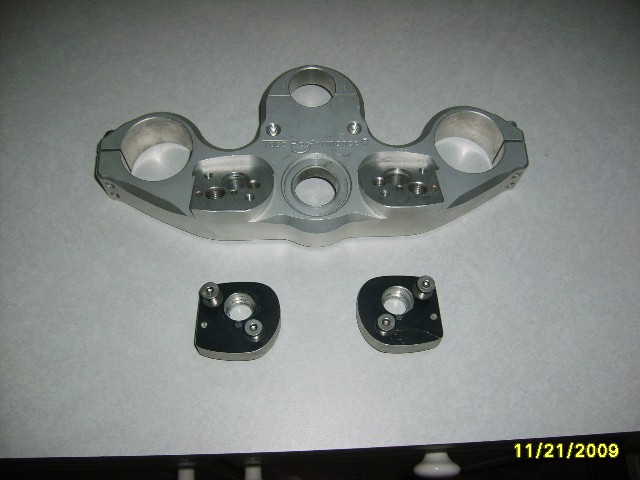
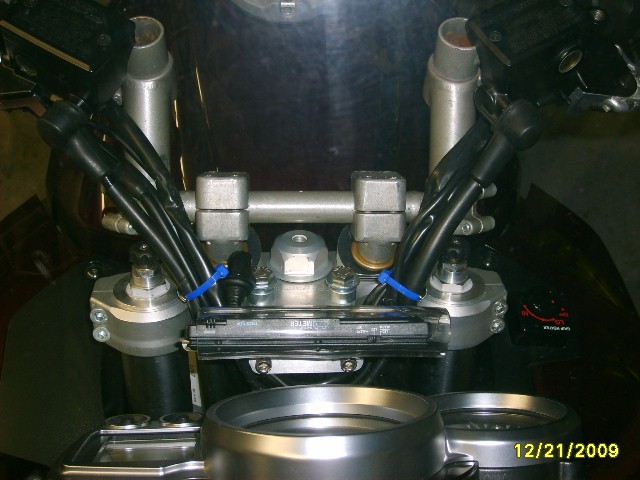
Here are some shots of the handlebar set-up by itself. It includes a Helibar HRT076 top triple clamp (Heli’s original version), a Helibar MTS handlebar from a Sprint ST, beefy bar clamps from an old Husky MX bike, and some assorted bit and pieces to accomplish the vibration isolation. The black 1/2” thick spacers were custom made as were the 1.125” long extensions added at the end of each bar to match the FJR OEM handlebar width. Please ignore the blue masking tape.
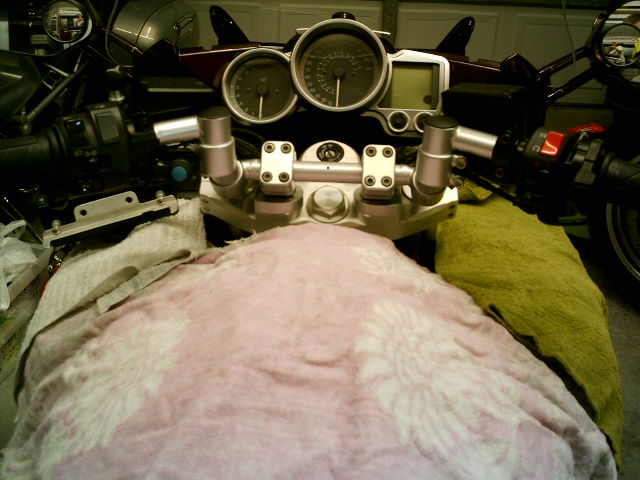
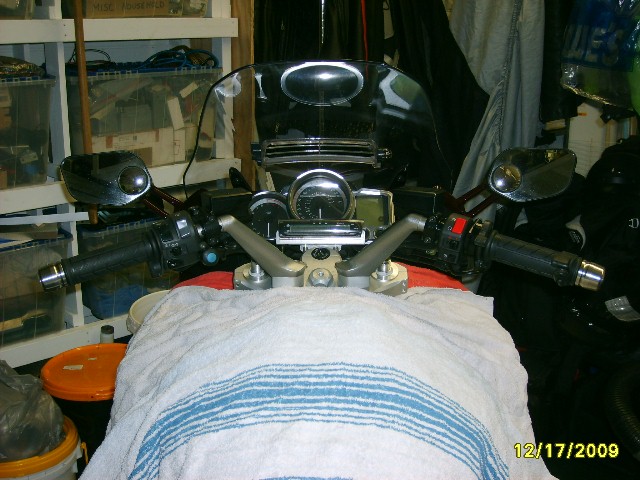
Here are before/after shots from behind comparing the grip angles. Before shot (12/17/2009) is with HeliBar HRT076 top clamp, HRTR01 riser blocks, and stock bar halves. This setup closely matches the Helibar’s latest clamp HRT076-02 (which I also had on the bike for a while) with the bars in the rear mount holes. The “after” shot (12/21/2009) is with the modified HRT076 with MTS bars. Please ignore the garage clutter in the background.
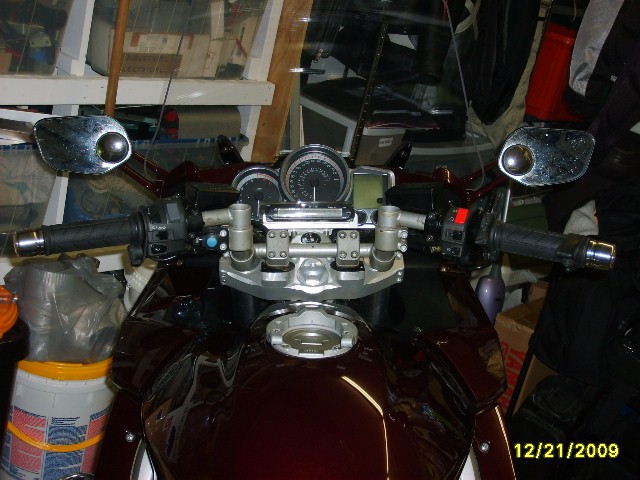
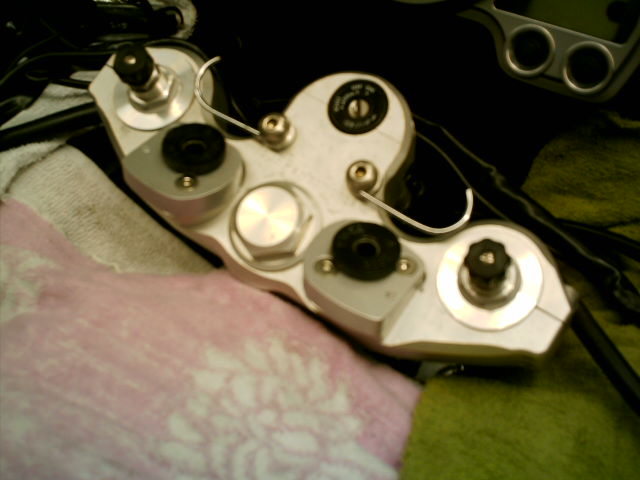
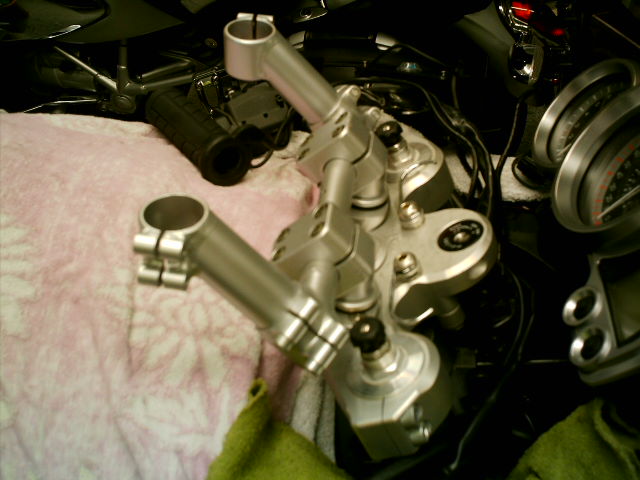
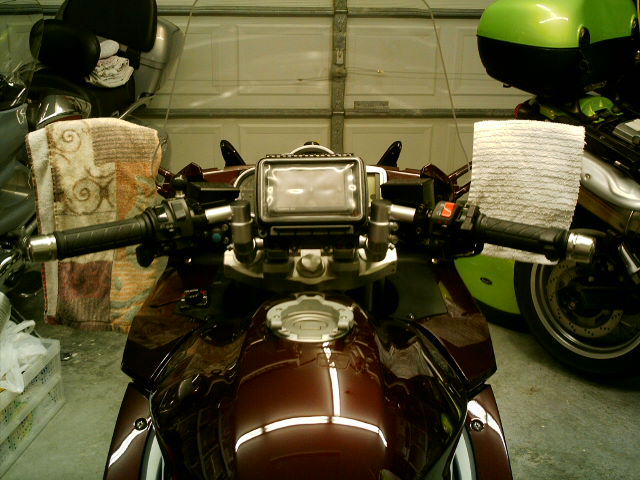
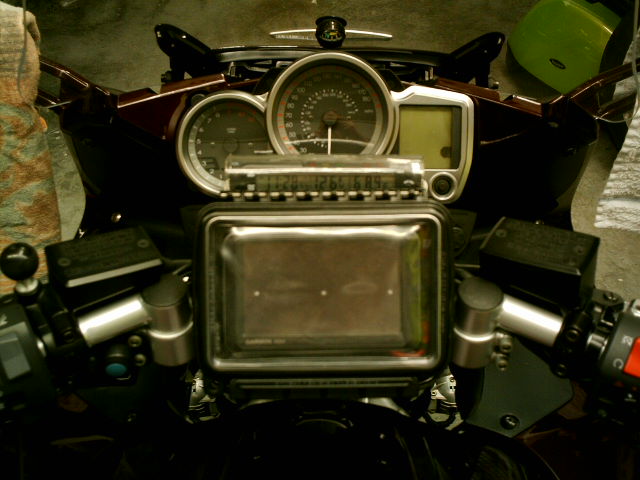
Here are some shots of the overall system from a few different angles. The voltmeter mounted above the ignition switch really isn’t part of this handlebar mod. so don’t be misled by it – it mounts on the front of either Helibar clamp. The bars were purchased used so there is still some painting to do. I also still need to cap the tube ends near the reservoirs and replace the blue cable ties with black ones. Lastly, to complete the package, a RAM AquaBox with Nuvi 780 inside will nestle perfectly down in between the bars – but I’ll save that for another time...


THE FULL STORY...
I have been working on a solution to the uncomfortable OEM handlebar positioning on my 2007 FJR since I bought the bike new. I realized early on that the stock bars weren’t going to work long-term for me so I started looking at the alternatives. In my opinion, the uncomfortable riding position of the FJR results from two things:
Problem 1 - The amount of weight being placed on your arms. Now I know this is all part of being a “sport” inspired bike but for long highway trips, it get tiresome in a hurry.
Problem 2 - I identified the second problem with modifications I made on my last bikes. The angle that the bars make with the ground, at least for me, can make for a painful ride. Grips that are parallel to the ground are most comfortable to me. If you look at the FJR stock bars from the rear of the bike, you will notice the bar ends angle down to the ground (about 10 degrees). This actually cocks your wrist inward when you grip the bars. Pain sets in after about an hour of riding.
GOALS:
My ultimate goal was to obtain a more upright riding condition while also flattening out the angle of the grips. I wanted to accomplish this without any changes to the stock control cable/hose/harness lengths. Of course, cost always plays some factor in my decision-making.
Yama-Mama didn’t make it easy for us:
Yamaha made any major variations to their stock set-up very difficult due to their handlebar mounting arrangement and limited cable/hose/harness length. Even the ABS brake hose with its special fitting at the end would make finding a longer replacement difficult. The aftermarket solutions available for the Gen II FJR range from simple riser blocks to replacement top triple clamps to pull the bars back closer to the rider. Some solutions even change the handlebar angle, but only in the fore/aft direction. None that I have found change the up/down angle to flatten out the grips relative to the ground.
WORKING ON A SOLUTION:
Initially, I decided to join a group buy on this forum and get a set of HeliBar clamps (latest version HRT076-2). This “dished-out” triple clamp allows quite a bit of cable/hose/harness slack, thus allowing the bars to be lifted and pulled back an appreciable amount. I rode with this setup for about a year, and although it made a huge difference in comfort, my wrists still ached shortly into a trip. Some work still needed to be done on that grip angle.
I looked at many different ways to change the angle of the grips using this Helibar clamp. I considered some type of wedge adapter that sandwiched between the bars and the top clamp but there just wasn’t enough cable/hose slack to allow pushing the bars up any further. In my opinion with the HRT076-02, the cables/hoses are stretched to their absolute limits as is.
Then I discovered the first generation of HeliBar clamp (HRT076) did not have the riser block built in. I thought it perhaps would allow room for special wedge adapters (replacing the Helibar optional riser blocks HRTR01) and retain the stock handlebars. So I was off in search of an old HRT076 to experiment with and eventually found one a few months later ($180) complete with riser blocks. I also cut some 10 degree wedges out of aluminum. While all this was going on, some long trips with the OEM bars still on proved them to be a bit “buzzy” at speeds above 70mph. So my original goals just expanded – I wanted to add in some type of vibration isolation while I was designing the solution. Many bikes have them, so why not the FJR too? Unfortunately, the two-piece (LH/RH) design of the FJR handlebars do not lend themselves very well to this type of mounting so I deemed it too risky. I realized that if I were to add in vibration isolation, I would need to switch to a conventional style of single handlebar. These, of course, would require the conventional split mounting clamps for attachment to the triple clamp. Unfortunately, the new plan didn’t include the wedges I just made, so they were thrown in the scrap pile (another Sunday afternoon wasted).
I’m always amazed at what you can find out there if you search, and I found a multitude of used “adjustable” 7/8” handlebars, most from old 1980’s Japanese bikes. There are also a bunch of adjustable aftermarket bar mounts, so the possibilities seemed to be endless. I was finding stuff that had potential of working on that auction site and if the price was right, I would snap it up, just to keep my options open. I bought adjustable snowmobile bar risers and a multitude of ATV/motorcycle bar clamps, but don’t think I spent more than $70 on the whole pile. I figured even if I didn’t use them for this project, there would always be another.
The first step in getting the HRT076 triple clamp adapted for convention bar mounting was to drill two large holes completely down through to bolt on the rubber-mounted handlebar holders. Luckily, there was a pilot hole already there (I think they were used as a drain holes for the OEM bar bolt counterbores) so that made it relatively easy with the limited tools I have. Counterbores make room for the rubber isolators. Some adjustable bars from an old Honda CB700SC (Nighthawk S) looked to be the best fit so I bought a pair ($20). I actually had a second pair purchased as a spare by the time I figured out the shape of the bars would interfere with the clutch/brake reservoirs. More parts for the scrap pile. It was then that I discovered HeliBar made a bar system called MTS which allows complete adjustability in all directions, and I was out on the hunt again. I spotted a pair extremely cheap, and they were mine ($100). They normally sell for three times that amount. For additional rise, I configured the MTS a bit differently than Helibar intended, but I believe there are other versions available with longer riser tubes that would work better.
I can ride year round where I live, so up until this point I had been preparing this new handlebar set-up off the bike so I could continue to ride the FJR (with the newer HeliBar HRT076-02 still installed). Luckily, the old and new generation HeliBar triple clamp share common threaded holes (for mounting RAM balls by ignition switch) and I made a little fixture that bolted in them so I could compare the new handlebar positions without having to actually install them on the bike. I didn’t want to have the bike out of commission while I was designing/machining all the new stuff, but I wanted to be reasonable sure it would fit on when I was all done.
So I finally got to the point where I was happy with the new handlebar set-up (at least on the workbench) and it came time to try it out on the bike. I first did a quick swap of the HRT076-2 with the HRT076 and kept the OEM bars on to make sure nothing was wrong with the clamp. Everything seemed fine after a month of riding so it was on to the full conversion.
FINALLY - IT GOES ON...
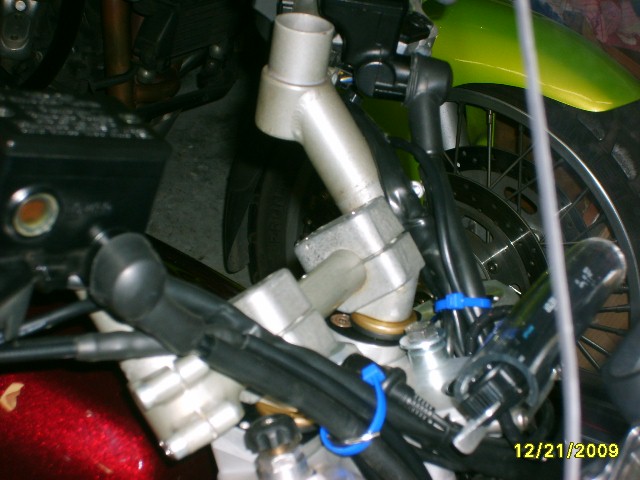
If you ever had some items removed from your stock bars, you may have noticed there are index pins on the brake perch, throttle housing, and both control switch pods. I believe they are there to keep things from rotating, but mostly also allow quick and repetitive production line assembly. I could have drilled indexing holes in the MTS bars for the pins after guessing where the optimum locations were, but I chose to remove the pins instead, allowing infinite adjustment. Remember the MTS system has infinite adjustment so I did not want to limit the controls in any way. I was a little leery about doing this, especially on the throttle housing since you are intentionally twisting it during use, but everything still seems very tight and can’t rotate. The other minor mod I did to the OEM parts (which I was very hesitant to do) was cutting the hose stop tab from the clutch reservoir housing. This allowed a more direct hose routing down to the steering head thus offering more slack. The brake hose tab didn’t need to be cut off because it simply pulls away from the tab to gain slack.
Since both bar sides are infinitely adjustable, a digital angle finder helps tremendously to match the left and right sides. The only issue I ran into while installing everything was clearance for the fork preload and damping adjustments at the top of the tubes. Since the bars can now move slightly in their rubber mounts, I feared the bottom of the MTS could occasionally hit the little black adjustment knobs. I originally had the spring preload backed out all the way (I’m a lightweight) but screwed it in halfway to gain the clearance. If this ends up bothering me, I will figure something else out. Taking off the knobs would do it but that doesn’t look very nice.
AND SOME MEASUREMENTS...
(With the bike up on its centerstand)
Configuration before - Helibar HRT076/HRTR01 Riser Blocks/OEM Bars
Configuration after - HRT076 with MTS system
Bar angle with ground: 10 degrees down (before); level with ground (after)
Bar width: 30.125” (before); 30.375” (after)
Bar end height: 42.50” (before); 44.50” (after)
Overall angle between left and right bars (measured from top view): 124 degrees (before); 124 degrees (after)
Distance back from steering nut to bar reference point): 3.75” (before); 3.75” (after)
Distance up from steering nut to bar reference point: 4.875” (before); 4.75” (after)
The bars feel much closer to the rider and I attribute this to the fact the grips are higher (note the bar end height difference) thus closer to my shoulders. My wrists are much more comfortable and the bar angle feels natural when you reach out to grab them. I also noticed the bar ends now seem quite a bit higher in the rearview mirrors.
After a month or two of riding, I will take the bars off to not only inspect all the parts (mainly the rubber bushings for wear/distortion) but also to give the bars a fresh coat of silver paint. By that time, I should have the GPS mounting all worked out too. I also plan to make/find a few spare parts and have them on hand since I can’t just run down to the Yamaha dealer to buy parts should a minor accident occur. Of course in a pinch, I can always revert back to OEM bars, assuming the triple clamp wasn’t damaged, since the tapped mounting holes still exist to mount them as normal.
IN SUMMARY...
After about a year of playing around, I feel I have achieved my goals – more upright riding position compared to the HeliBar design , grip angle change, and vibration isolation (added bonus), all without any replacement of the handlebar control hoses/cables/harnesses. Another nice feature is the bars are fully adjustable so if I feel like changing the angle a bit, I can. Now, if I would have started the custom set-up BEFORE I bought the new HRT076-2 top clamp ($280) and didn’t buy all the misc parts I didn’t ultimately need, I would have about $320 invested in this upgrade. I’m guessing to buy the parts new would cost about twice that if you could find them. I’m sure I can recoup some of the money selling the surplus parts in auctions someday.
The bottom line is I‘m extremely happy with the results. The FJR is a wonderful bike and I didn’t want to trade her in. I love the features, the powertrain, and it does everything I need it to do. This was really the last major thing I needed to sort out. It goes to show you - perseverance sometimes pays off.
HOW CAN ANYONE BENEFIT FROM THIS UPGRADE?
If there is anyone crazy enough to go through all the custom machining that I did, I can share more details on that. For the rest of you looking for a bolt-on solution, you will have to convince the top triple clamp manufacturers to make a change to their designs.
Early on, I contacted the clamp manufacturers about my idea to make their product more comfortable. I believe if the parts are machined differently (bar mount pads machined at an angle), they could achieve the same bar angles and riding position I obtained, and still retain the stock half bars. The different machine program shouldn’t affect the price of the part either. Neither of them were interested, but I don’t blame them – one person’s opinion doesn’t hold much weight, especially if it’s just a hunch at the time. But now I have confirmed my hunch and maybe if enough of you potential buyers request the change, the manufacturers will make it.
I know there are plenty of you out there that share similar thoughts about this topic so I will share my saga in finding a solution to the poor handlebar position on the FJR Gen II models. If you have adapted your riding position/style to deal with the FJR ergos and are happy with the stock handlebar position – there is no need to read any further. I, however, was not happy with adapting to the FJR – I wanted the FJR adapted to me. Sorry for the long write-up, but I’ll try to give the truly interested readers as many details as I can. Please ask questions if I have left something out.
Cutting to the chase – MISSION ACCOMPLISHED! (See full story after pictures for all details)
Here are some shots of the handlebar set-up by itself. It includes a Helibar HRT076 top triple clamp (Heli’s original version), a Helibar MTS handlebar from a Sprint ST, beefy bar clamps from an old Husky MX bike, and some assorted bit and pieces to accomplish the vibration isolation. The black 1/2” thick spacers were custom made as were the 1.125” long extensions added at the end of each bar to match the FJR OEM handlebar width. Please ignore the blue masking tape.
Here are before/after shots from behind comparing the grip angles. Before shot (12/17/2009) is with HeliBar HRT076 top clamp, HRTR01 riser blocks, and stock bar halves. This setup closely matches the Helibar’s latest clamp HRT076-02 (which I also had on the bike for a while) with the bars in the rear mount holes. The “after” shot (12/21/2009) is with the modified HRT076 with MTS bars. Please ignore the garage clutter in the background.
Here are some shots of the overall system from a few different angles. The voltmeter mounted above the ignition switch really isn’t part of this handlebar mod. so don’t be misled by it – it mounts on the front of either Helibar clamp. The bars were purchased used so there is still some painting to do. I also still need to cap the tube ends near the reservoirs and replace the blue cable ties with black ones. Lastly, to complete the package, a RAM AquaBox with Nuvi 780 inside will nestle perfectly down in between the bars – but I’ll save that for another time...
THE FULL STORY...
I have been working on a solution to the uncomfortable OEM handlebar positioning on my 2007 FJR since I bought the bike new. I realized early on that the stock bars weren’t going to work long-term for me so I started looking at the alternatives. In my opinion, the uncomfortable riding position of the FJR results from two things:
Problem 1 - The amount of weight being placed on your arms. Now I know this is all part of being a “sport” inspired bike but for long highway trips, it get tiresome in a hurry.
Problem 2 - I identified the second problem with modifications I made on my last bikes. The angle that the bars make with the ground, at least for me, can make for a painful ride. Grips that are parallel to the ground are most comfortable to me. If you look at the FJR stock bars from the rear of the bike, you will notice the bar ends angle down to the ground (about 10 degrees). This actually cocks your wrist inward when you grip the bars. Pain sets in after about an hour of riding.
GOALS:
My ultimate goal was to obtain a more upright riding condition while also flattening out the angle of the grips. I wanted to accomplish this without any changes to the stock control cable/hose/harness lengths. Of course, cost always plays some factor in my decision-making.
Yama-Mama didn’t make it easy for us:
Yamaha made any major variations to their stock set-up very difficult due to their handlebar mounting arrangement and limited cable/hose/harness length. Even the ABS brake hose with its special fitting at the end would make finding a longer replacement difficult. The aftermarket solutions available for the Gen II FJR range from simple riser blocks to replacement top triple clamps to pull the bars back closer to the rider. Some solutions even change the handlebar angle, but only in the fore/aft direction. None that I have found change the up/down angle to flatten out the grips relative to the ground.
WORKING ON A SOLUTION:
Initially, I decided to join a group buy on this forum and get a set of HeliBar clamps (latest version HRT076-2). This “dished-out” triple clamp allows quite a bit of cable/hose/harness slack, thus allowing the bars to be lifted and pulled back an appreciable amount. I rode with this setup for about a year, and although it made a huge difference in comfort, my wrists still ached shortly into a trip. Some work still needed to be done on that grip angle.
I looked at many different ways to change the angle of the grips using this Helibar clamp. I considered some type of wedge adapter that sandwiched between the bars and the top clamp but there just wasn’t enough cable/hose slack to allow pushing the bars up any further. In my opinion with the HRT076-02, the cables/hoses are stretched to their absolute limits as is.
Then I discovered the first generation of HeliBar clamp (HRT076) did not have the riser block built in. I thought it perhaps would allow room for special wedge adapters (replacing the Helibar optional riser blocks HRTR01) and retain the stock handlebars. So I was off in search of an old HRT076 to experiment with and eventually found one a few months later ($180) complete with riser blocks. I also cut some 10 degree wedges out of aluminum. While all this was going on, some long trips with the OEM bars still on proved them to be a bit “buzzy” at speeds above 70mph. So my original goals just expanded – I wanted to add in some type of vibration isolation while I was designing the solution. Many bikes have them, so why not the FJR too? Unfortunately, the two-piece (LH/RH) design of the FJR handlebars do not lend themselves very well to this type of mounting so I deemed it too risky. I realized that if I were to add in vibration isolation, I would need to switch to a conventional style of single handlebar. These, of course, would require the conventional split mounting clamps for attachment to the triple clamp. Unfortunately, the new plan didn’t include the wedges I just made, so they were thrown in the scrap pile (another Sunday afternoon wasted).
I’m always amazed at what you can find out there if you search, and I found a multitude of used “adjustable” 7/8” handlebars, most from old 1980’s Japanese bikes. There are also a bunch of adjustable aftermarket bar mounts, so the possibilities seemed to be endless. I was finding stuff that had potential of working on that auction site and if the price was right, I would snap it up, just to keep my options open. I bought adjustable snowmobile bar risers and a multitude of ATV/motorcycle bar clamps, but don’t think I spent more than $70 on the whole pile. I figured even if I didn’t use them for this project, there would always be another.
The first step in getting the HRT076 triple clamp adapted for convention bar mounting was to drill two large holes completely down through to bolt on the rubber-mounted handlebar holders. Luckily, there was a pilot hole already there (I think they were used as a drain holes for the OEM bar bolt counterbores) so that made it relatively easy with the limited tools I have. Counterbores make room for the rubber isolators. Some adjustable bars from an old Honda CB700SC (Nighthawk S) looked to be the best fit so I bought a pair ($20). I actually had a second pair purchased as a spare by the time I figured out the shape of the bars would interfere with the clutch/brake reservoirs. More parts for the scrap pile. It was then that I discovered HeliBar made a bar system called MTS which allows complete adjustability in all directions, and I was out on the hunt again. I spotted a pair extremely cheap, and they were mine ($100). They normally sell for three times that amount. For additional rise, I configured the MTS a bit differently than Helibar intended, but I believe there are other versions available with longer riser tubes that would work better.
I can ride year round where I live, so up until this point I had been preparing this new handlebar set-up off the bike so I could continue to ride the FJR (with the newer HeliBar HRT076-02 still installed). Luckily, the old and new generation HeliBar triple clamp share common threaded holes (for mounting RAM balls by ignition switch) and I made a little fixture that bolted in them so I could compare the new handlebar positions without having to actually install them on the bike. I didn’t want to have the bike out of commission while I was designing/machining all the new stuff, but I wanted to be reasonable sure it would fit on when I was all done.
So I finally got to the point where I was happy with the new handlebar set-up (at least on the workbench) and it came time to try it out on the bike. I first did a quick swap of the HRT076-2 with the HRT076 and kept the OEM bars on to make sure nothing was wrong with the clamp. Everything seemed fine after a month of riding so it was on to the full conversion.
FINALLY - IT GOES ON...
If you ever had some items removed from your stock bars, you may have noticed there are index pins on the brake perch, throttle housing, and both control switch pods. I believe they are there to keep things from rotating, but mostly also allow quick and repetitive production line assembly. I could have drilled indexing holes in the MTS bars for the pins after guessing where the optimum locations were, but I chose to remove the pins instead, allowing infinite adjustment. Remember the MTS system has infinite adjustment so I did not want to limit the controls in any way. I was a little leery about doing this, especially on the throttle housing since you are intentionally twisting it during use, but everything still seems very tight and can’t rotate. The other minor mod I did to the OEM parts (which I was very hesitant to do) was cutting the hose stop tab from the clutch reservoir housing. This allowed a more direct hose routing down to the steering head thus offering more slack. The brake hose tab didn’t need to be cut off because it simply pulls away from the tab to gain slack.
Since both bar sides are infinitely adjustable, a digital angle finder helps tremendously to match the left and right sides. The only issue I ran into while installing everything was clearance for the fork preload and damping adjustments at the top of the tubes. Since the bars can now move slightly in their rubber mounts, I feared the bottom of the MTS could occasionally hit the little black adjustment knobs. I originally had the spring preload backed out all the way (I’m a lightweight) but screwed it in halfway to gain the clearance. If this ends up bothering me, I will figure something else out. Taking off the knobs would do it but that doesn’t look very nice.
AND SOME MEASUREMENTS...
(With the bike up on its centerstand)
Configuration before - Helibar HRT076/HRTR01 Riser Blocks/OEM Bars
Configuration after - HRT076 with MTS system
Bar angle with ground: 10 degrees down (before); level with ground (after)
Bar width: 30.125” (before); 30.375” (after)
Bar end height: 42.50” (before); 44.50” (after)
Overall angle between left and right bars (measured from top view): 124 degrees (before); 124 degrees (after)
Distance back from steering nut to bar reference point): 3.75” (before); 3.75” (after)
Distance up from steering nut to bar reference point: 4.875” (before); 4.75” (after)
The bars feel much closer to the rider and I attribute this to the fact the grips are higher (note the bar end height difference) thus closer to my shoulders. My wrists are much more comfortable and the bar angle feels natural when you reach out to grab them. I also noticed the bar ends now seem quite a bit higher in the rearview mirrors.
After a month or two of riding, I will take the bars off to not only inspect all the parts (mainly the rubber bushings for wear/distortion) but also to give the bars a fresh coat of silver paint. By that time, I should have the GPS mounting all worked out too. I also plan to make/find a few spare parts and have them on hand since I can’t just run down to the Yamaha dealer to buy parts should a minor accident occur. Of course in a pinch, I can always revert back to OEM bars, assuming the triple clamp wasn’t damaged, since the tapped mounting holes still exist to mount them as normal.
IN SUMMARY...
After about a year of playing around, I feel I have achieved my goals – more upright riding position compared to the HeliBar design , grip angle change, and vibration isolation (added bonus), all without any replacement of the handlebar control hoses/cables/harnesses. Another nice feature is the bars are fully adjustable so if I feel like changing the angle a bit, I can. Now, if I would have started the custom set-up BEFORE I bought the new HRT076-2 top clamp ($280) and didn’t buy all the misc parts I didn’t ultimately need, I would have about $320 invested in this upgrade. I’m guessing to buy the parts new would cost about twice that if you could find them. I’m sure I can recoup some of the money selling the surplus parts in auctions someday.
The bottom line is I‘m extremely happy with the results. The FJR is a wonderful bike and I didn’t want to trade her in. I love the features, the powertrain, and it does everything I need it to do. This was really the last major thing I needed to sort out. It goes to show you - perseverance sometimes pays off.
HOW CAN ANYONE BENEFIT FROM THIS UPGRADE?
If there is anyone crazy enough to go through all the custom machining that I did, I can share more details on that. For the rest of you looking for a bolt-on solution, you will have to convince the top triple clamp manufacturers to make a change to their designs.
Early on, I contacted the clamp manufacturers about my idea to make their product more comfortable. I believe if the parts are machined differently (bar mount pads machined at an angle), they could achieve the same bar angles and riding position I obtained, and still retain the stock half bars. The different machine program shouldn’t affect the price of the part either. Neither of them were interested, but I don’t blame them – one person’s opinion doesn’t hold much weight, especially if it’s just a hunch at the time. But now I have confirmed my hunch and maybe if enough of you potential buyers request the change, the manufacturers will make it.
Last edited by a moderator: