Clearwater Lights install instructions?

Yamaha FJR Motorcycle Forum

Help Support Yamaha FJR Motorcycle Forum:

This site may earn a commission from merchant affiliate links, including eBay, Amazon, and others.

TripperMike

Old Yeller - Thanks for the Memories
FJR Supporter
Joined
Apr 17, 2011
Messages
1,569
Reaction score
622
Location
Nowthen, MN
So here's the deal, back in Nov (I think) I bought some used Kristas from a fellow forumite. But I received no instructions, no big deal really I thought. When I recieved them, I took them out of the box and marveled at how nice they looked. And promptly put them back in the box again.

So NOW I decide to quit procrastinating and decide I'm going to install them this weekend. I'm looking at all them darn wires and wondering Holy Hanna what did I get myself into. I don't need to dim the lights, I don't need to tie them in with my high beams. I'm the type of guy who likes to turn them on n off seperately of my high beams. I have another pair of aux lights I leave on almost all the time at night. It's quite rare when oncoming traffic flashhes me for having them on, so I leave them on.

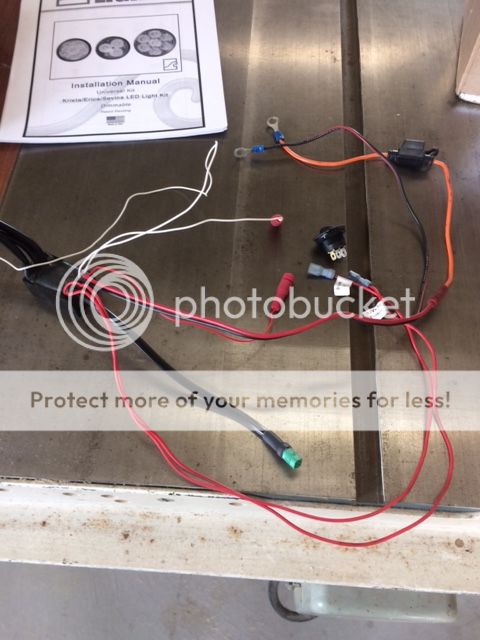
My question is, is it possible to forego some of that wiring and do a more striaght forward approach (dummy down) on the install? These Kristas look like they have some pretty fancy schmancy wire leads to them. Is it possible to swap out the wiring coming out of the lights themselves?

I have no idea what I'm doing with these lights, so any help would be appreciated. I've tried to going onto Clearwater's website, but I keep getting a warning that their website certificate isn't secure or up to date or some such bs. So I don't even have their phone #.

 
Mike,

Are you gonna be at Red Lodge? If so I can bring a set of instructions IF I can find them. If not, We can hook up on the way there or on the way back

as my travels will pass close by. I believe Clearwater has PDF instructions on their site if you take the plunge. Come to think about it, I think Craigregs did

a post on installation about 2 years ago, try a PM.

 
Last edited by a moderator:
Mike,

Try this link...

https://cdn.shopify.com/s/files/1/0970/7672/files/Erica_Glenda_Sevina_Universal_Manual_Revised_sm.pdf?2073820936284333526

It's really one slick system when you get it all hooked up. I run mine on low intensity full time. The only time they go full intensity is when I hit high beams. It is nice that the low intensity can be adjusted higher if you like. The horn option is cool too.

Good luck with the install.

Brodie

rolleyes.gif


Last edited by a moderator:
This is sorta time critical though Tony. I was kinda hoping to get these put on for BL8. One of the big reasons I put off this install is I was vascilating back n forth on whether to purchase a new bike or not and I wasn't going to install these on my '05.

I'll try their website again using a different browser.

 
This is sorta time critical though Tony. I was kinda hoping to get these put on for BL8. One of the big reasons I put off this install is I was vascilating back n forth on whether to purchase a new bike or not and I wasn't going to install these on my '05.
I'll try their website again using a different browser.
Sorry Mike, forgot you were riding that. I do have the instructions, but I won't be in Minnesota until Wednesday.

 
Mike,
Try this link...

https://cdn.shopify.com/s/files/1/0970/7672/files/Erica_Glenda_Sevina_Universal_Manual_Revised_sm.pdf?2073820936284333526

It's really one slick system when you get it all hooked up. I run mine on low intensity full time. The only time they go full intensity is when I hit high beams. It is nice that the low intensity can be adjusted higher if you like. The horn option is cool too.

Good luck with the install.

Brodie

rolleyes.gif
Awesome Brodie! Although not the dummying down install I was hoping for, you know something more on my level, but this might just get me up and running with these lights.

Thank You Very Much!

 
This is sorta time critical though Tony. I was kinda hoping to get these put on for BL8. One of the big reasons I put off this install is I was vascilating back n forth on whether to purchase a new bike or not and I wasn't going to install these on my '05.
I'll try their website again using a different browser.
Sorry Mike, forgot you were riding that. I do have the instructions, but I won't be in Minnesota until Wednesday.
Swing by if it works into your ride schedule. Food, rest or whatever.

 
Here is a link to my Clearwater Darla install which should be very similar to your Kristas..... https://www.fjrforum.com/forum//index.php/topic/163166-darla-install/

I have a lot of photos which might help you. I would not dummy down the install in order to get the best usage out of your lights. On a scale of 1 to 10 (10 being hard), the entire install would be a 5. It is intimidating at first but take your time and think the steps through and it really isn't difficult. When in doubt, take a break and gets answers first.

 
Here is a link to my Clearwater Darla install which should be very similar to your Kristas..... https://www.fjrforum.com/forum//index.php/topic/163166-darla-install/
I have a lot of photos which might help you. I would not dummy down the install in order to get the best usage out of your lights. On a scale of 1 to 10 (10 being hard), the entire install would be a 5. It is intimidating at first but take your time and think the steps through and it really isn't difficult. When in doubt, take a break and gets answers first.
TY ACat. Just that much more info to reference as I tackle this today.

 
Mike,

Even though it looks complicated, it's really not and you will want the full function that these lights offer. You will still be able to run your lights at any intensity you want without the high beams on with the dimmer switch hooked up and when you kick your high beams on at night, BAM, the road lights up like daylight. Pain through it and you will be glad you did.

 
Well I've decided to postpone the install until after BL8. Thanks for all the helpful input guys, it's just that I should have tackled this weeks ago. Doesn't make good sense to wire up something new only to find out on the ride to Denver that I F**'ed something up.

Thanks agian though.

 
You can always call Glenn and the folks at Clearwater Lights. They are great folks to deal with and will talk to you or send you emails with the information you seek.

 
Clearwater%20wiring.jpg


This is very aggravating. The illustrations that you folks were so kind to supply links to in this thread shows 9 wires, my wiring harness shows 8. The instructions talk about yellow wires, mine has none. Been spending most of today trying to tackle the wiring on my bike with some success until I began wiring the pieces of crap Clearwater lights. (frustration rearing it's ugly head) One reason I say "crap" is because I thought I'd mount these lights after fabbing my brackets to check to see if the position I had them in would bother me while riding. Well after the first rain storm one of the lights was full of condensation. GGRRRRR

So this wiring has me completely at my wits end. I have tried a multitude of combinations in temporary wiring connections to see what would trun these lights on. No go. The switch you see amongst all the wiring is something I had to buy from one of the few remaining Radio Shacks in the area. The seller failed to send that along when I bought the lights. Yes I could call Clearwater, but they were less than helpful when I tried to get an answer from them on how to prevent the condensation from getting inside the lights.

Has anyone else had a different wiring combination than what's shown in the instructions? What wires go where? I see one white wire with a positap on it, I assume that would go to the high beam wire. The power wires that would go to the fuze block is obvious. The other wire without a connection on it I figure goes to the horn. But then I have 3 red wires and no yellow ones. <deleted expletives>

And if someone is tempted to say "well that's what winters are for", just keep it to yourself.

Rant over. I feel a little better after venting. But only a little.

 
Have you checked the photos and explanations in my linked post (further up) ? The only yellow wire is the one that comes from the bike, not the provided wires from Clearwater. Which lights are you installing ? The previous owner had them on what kind of bike ?

 
Mike

The short red wire with the posi-tap I believe is to trigger the lights on. It needs to see a switched 12V+ from your bike wiring in order to turn the whole system on.

The red and black wire of course is the source and ground.

The 2 white wires are interchangeable and connect to the high beam and/or horn, they trigger full intensity.

From the picture you posted I can see that the 2 long red wires have tags on them. The picture is quite pixelated, but one tag looks to be 12V+ to Switch. The other one I can't make out clearly.

The toggle switch has 3 terminals. One side terminal supplies power into the switch, the 12V+ tagged wire connects to it. The center terminal is switched (load), the remaining side terminal is to lead to ground to enable the switch to light up, you need to supply that black wire from the looks of it. Look closely at the toggle switch, these 3 terminals should be marked on the plastic switch housing.

Not being able to read the tag on the remaining red wire, I speculate that it connects to the switched (load) terminal of the toggle switch.

This is how the system is supposed to work

1. The black/red wire can draw directly from the battery with its own fuse. This would be an always hot connection.

2. The short red (posi-tap) wire turns the system on when your headlights come on, when connected between the bike's headlight relay and high beam relay.

3. The lighted toggle switch allows you to turn off the Krista lamps next to your mirrors, yet leave the smaller Glenda lamps mounted on your forks turned on.

4. The knob allows you to vary the intensity for all the lights from approx. 30% to approx. 95%.

5. One white wire connects to your high beam positive. Switch your high beams on and the currently turned on lights come on at 100% intensity. Switch back to low beams and the system reverts back to current settings.

6. The other white wire is triggered by your horn. Honk the horn, the currently turned on lights come on to 100% intensity while the horn sounds, then reverts back to current settings when the horn button is released.

Note... Both white wires need to see positive, not negative. However, the horns are a negative switched system. You need to add another relay to change negative switched horn circuit into positive switching for that white wire.

Note... You can remove the inline fuse and hook up the black/red wire to your Fuze Block. If you decide to make that circuit switched, then the short red (posi-tap) turn on wire can also connect to this same fuse. That's the way I have mine hooked up.

Long winded I know, but I hope this helps. Good luck with it, keep us posted.

Brodie

😉

 
Last edited by a moderator:
As for condensation inside the lamp housing, most likely it came through the wire at the back. Make sure you have a drip loop in place, and you may have to re-seal that area from the inside. The lense bezel unscrews anti-clockwise and will allow access. Be careful to correctly align things back up before tightening the bezel. It is possible to get the focus assembly 180 degrees off from the LED array.

It's a good system, it just needs a little TLC, especially being a second hand unit.

Brodie

😉

 
Top