I'd just drill or notch for the relocated front two bolts. The set-back plate will reinforce the two little plates that are welded onto the tubular SR rack.
You are using an out of date browser. It may not display this or other websites correctly.
You should upgrade or use an alternative browser.
You should upgrade or use an alternative browser.
Givi Trunk Relocation Plate
- Thread starter ionbeam
- Start date


Help Support Yamaha FJR Motorcycle Forum:
This site may earn a commission from merchant affiliate
links, including eBay, Amazon, and others.
K_Flyer
Well-known member
Hmm. after reading this, I may look at a way to move my case forward. Moving the case forward should reduce the load on the sub-frame and give a better weight distribution. Theresa has her own bike, however she sometimes rides a short distance with me coming back from dinner so I'll see how much I could move it forward and still have room for her. There would still be room for the seat bags that we use for overnight use.
mikerider
Well-known member
I like to move mine forward too. I always ride solo so I like to move it way forward.Hmm. after reading this, I may look at a way to move my case forward. Moving the case forward should reduce the load on the sub-frame and give a better weight distribution. Theresa has her own bike, however she sometimes rides a short distance with me coming back from dinner so I'll see how much I could move it forward and still have room for her. There would still be room for the seat bags that we use for overnight use.
Last edited by a moderator:
Good answer, Ionbeam - good answer - Pillion
The problems I am having on this bike setup compared to the '04 are: (1) I sit closer to the driver and can't see as much, and (2) When dismounting I don't have enough room to bend my leg between the trunk and the driver. It seems that there is less room - whether that is the Givi trunk setup as opposed to the Yamaha, or the 2015 compared to the 2004, I don't know.
Possibly some of this will change when we get new seats...
Uncle Hud
Just another blob of protoplasm using up your oxyg
Those people at GE... always bringing good things to life.

What you'd really like would be for the case to be able to be re-positioned over the passenger seat area when no passenger is there, or slid back over the traditional spot when one is. That would be a very slick setup. Invent that and you could sell a bunch of them.Hmm. after reading this, I may look at a way to move my case forward. Moving the case forward should reduce the load on the sub-frame and give a better weight distribution. Theresa has her own bike, however she sometimes rides a short distance with me coming back from dinner so I'll see how much I could move it forward and still have room for her. There would still be room for the seat bags that we use for overnight use.
Yeah, there is definitely less seat space for the passenger on the 3rd Gens (and 2nds also, I imagine) as compared to our old 1st Gens, and this is using the same Givi trunk on both.The problems I am having on this bike setup compared to the '04 are: (1) I sit closer to the driver and can't see as much, and (2) When dismounting I don't have enough room to bend my leg between the trunk and the driver. It seems that there is less room - whether that is the Givi trunk setup as opposed to the Yamaha, or the 2015 compared to the 2004, I don't know.
Possibly some of this will change when we get new seats...
Last edited by a moderator:
Redfish Hunter
Gone Fishing
Fred, there is a forum member who made a device that does just that. He can put the box in its normal place or position it over the back seat. I cannot recall who that was.
As you pointed out earlier, my recall device is faulty. And possibly my sarcasm detection unit has failed as well.
As you pointed out earlier, my recall device is faulty. And possibly my sarcasm detection unit has failed as well.
Last edited by a moderator:
I saw that too, which prompted my remark.
I think his was two Givi plates mounted in the two desired positions, and he just removed the one over the seat when he wasn't using it. I'll go look for it.
Edit - Found it. It's bergment and he posted about it recently here in the "Top box I hate / love mine" thread
photos for the truly lazy among us:
Last edited by a moderator:
ionbeam
2 FUN
Last edited by a moderator:
ionbeam
2 FUN
Well, update time. We took a ride over to see FJReady and do some bracket business with him as they were trying to pack for a trip to the left coast. Russ discussed the bracket and some of his observations about relocating the trunk mounting plate and sent me home with a sample bracket.
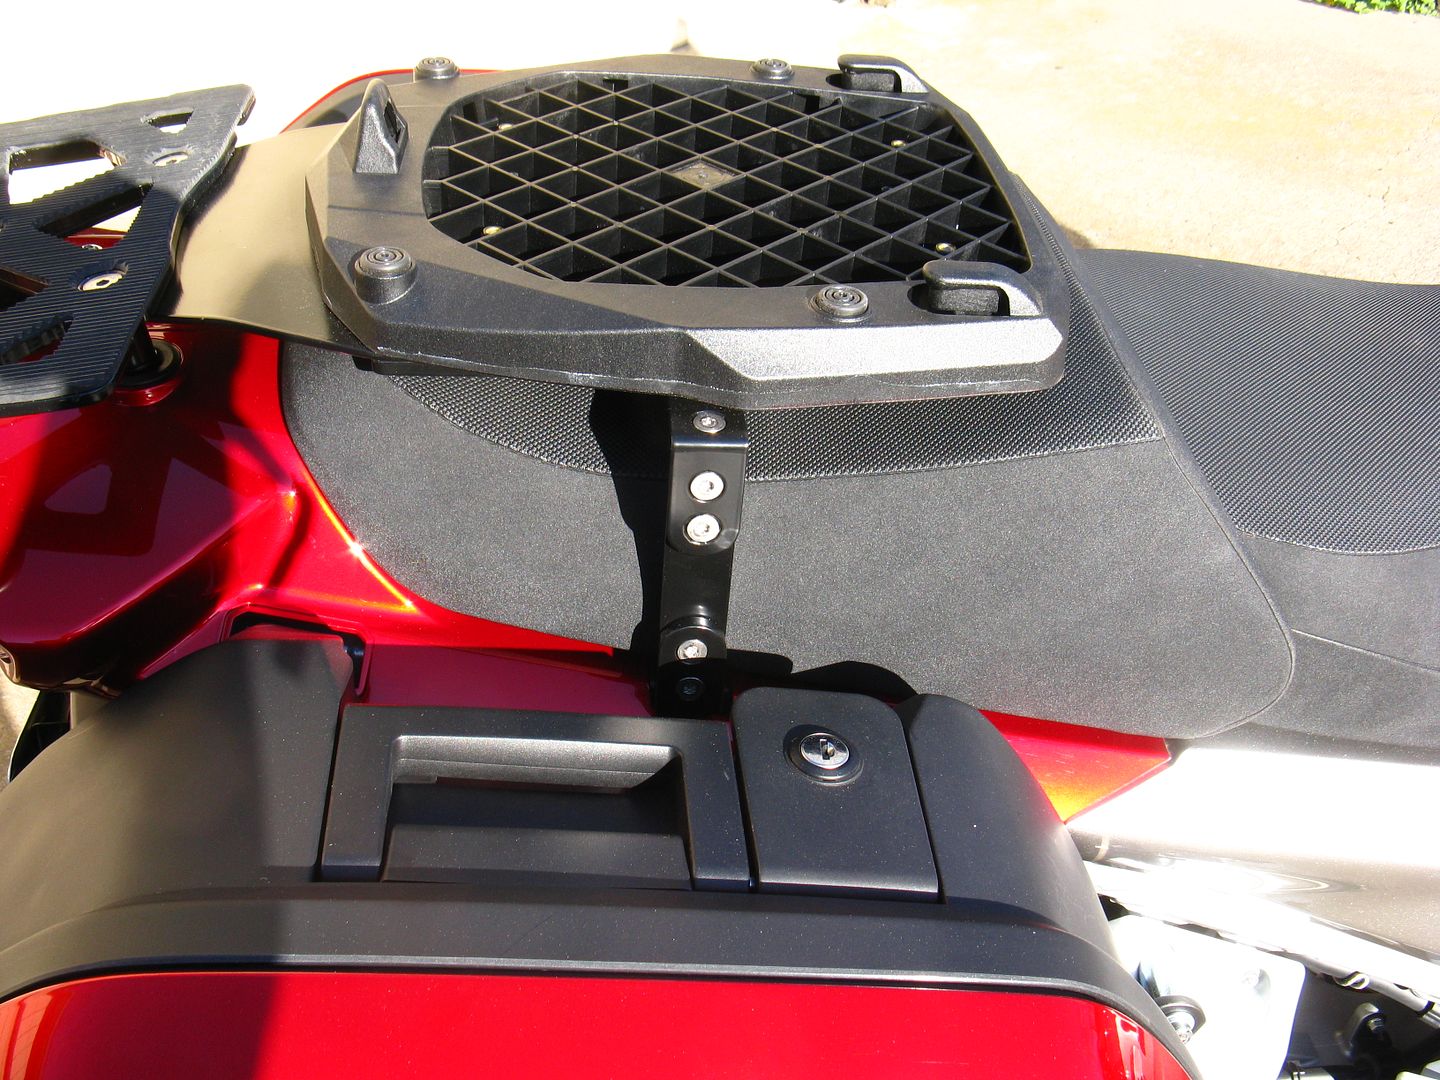
I mounted his one bracket on one side and we did a careful test fit. Pillion says that the setback was surprisingly good for such a small amount, more like that please.
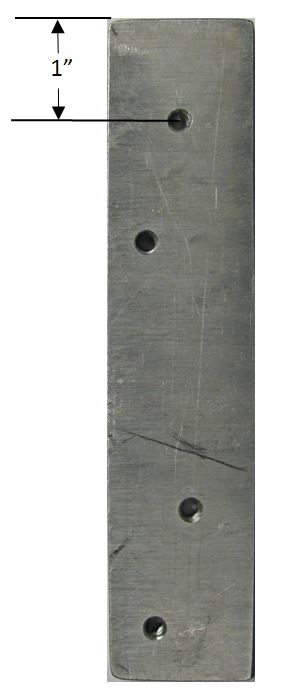
I ordered two 0.375" x 1.75" x 12" 6061 aluminum bars from McMaster Carr and went to the hardware store and picked up some 1" stainless steel cap head screws. This weekend when it was blazing hot and wicked humid I cut the bars down to 7.5 inches then drilled and tapped the bars. I took some time to break all sharp edges and rounded the corners on the bars. I setup the holes to provide 1.75" of setback. When trial fitting the brackets I found that I had to relieve the upper right corner of the bracket as viewed from the picture below it took about 3/16" to allow the bracket to clear the inside edge of the plastic mounting plate. The amount of sweating that went into this relatively simple project was amazing. I might as well have been in Louisiana or Florida
When mounting the brackets onto the Givi metal frame I used all the spacers, rubber isolators and washers just like the OEM install only now it screwed into the newly fabricated bracket. The 1" hardware required an additional washer to keep the end of the screw flush with the top of the setback bracket. When mounting the brackets I used loctite per Russ's recommendation, now he can relax

I used 0.75" stainless cap head screws to attach the plastic mounting base onto the setback bracket along with the OEM washers. This was enough to get the screw to engage all the threads in the bracket holes.
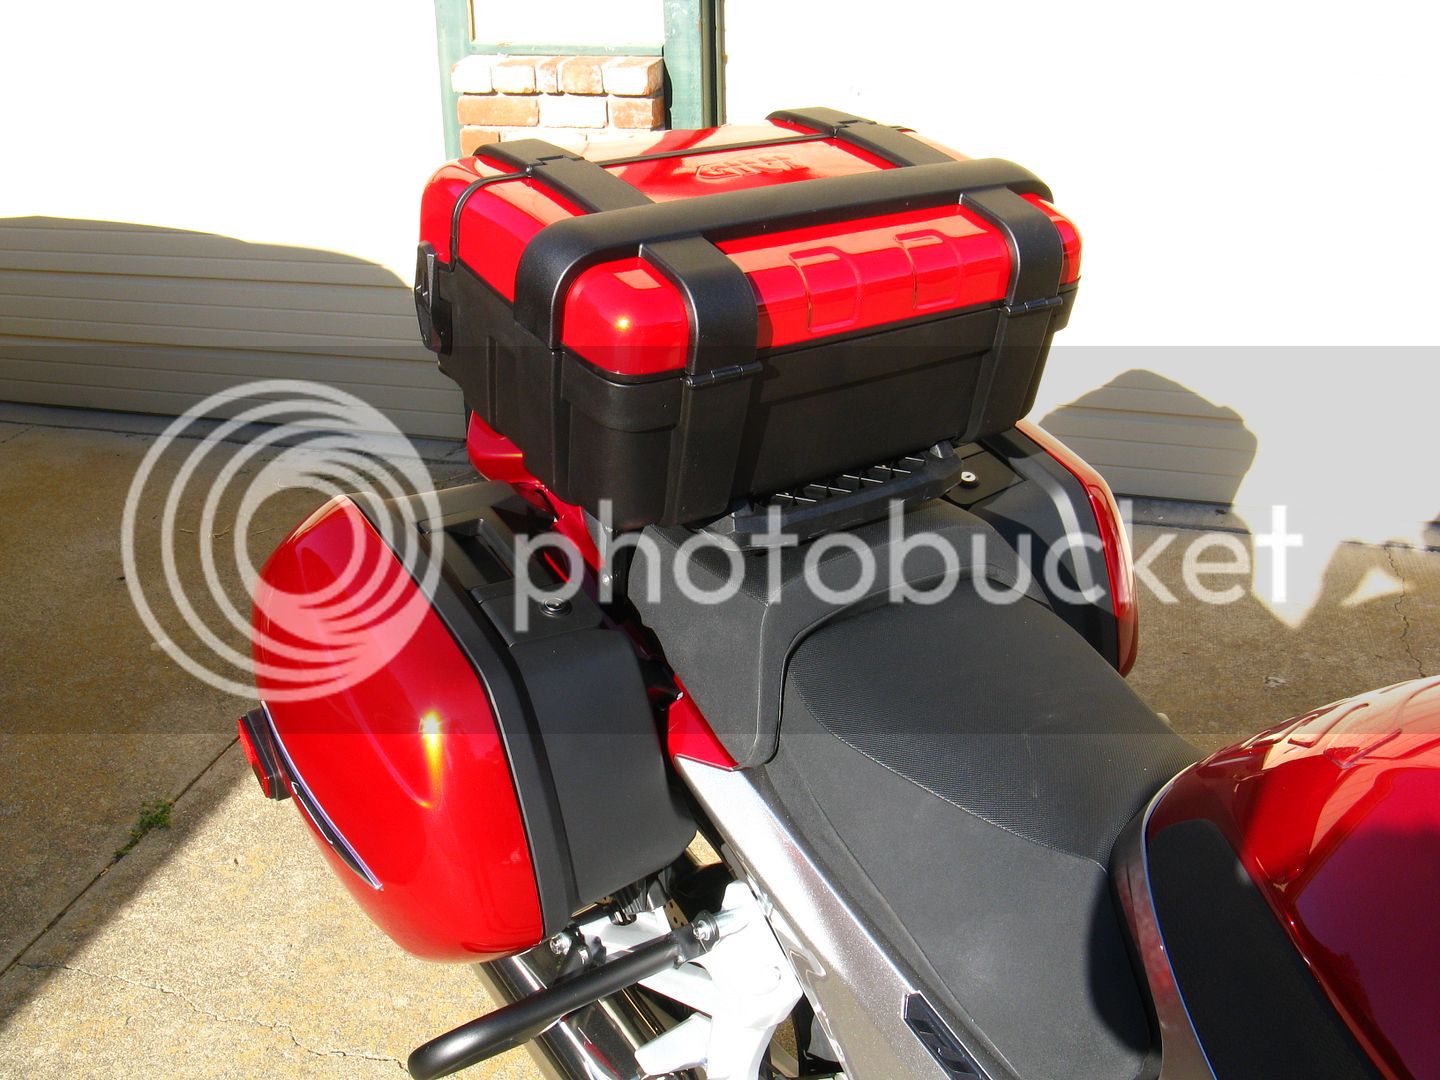
Yesterday we went out on a afternoon long ride and it looks like the setback delivers everything we were looking for. The only thing that remains to be seen is the changed seat position. Pillion sits far enough back that the sitting bits of pillion are slightly over the rear of the seat. We still don't have the Russell seats so the final assessment awaits.
The bracket that Russ made is shown below. The two right side holes align with the Givi metal frame, hardware goes up from the bottom of the Givi frame, through the spacers and rubber isolators and into the bracket (with loctite). I was able to get the screws to go all the way through the bracket but not protrude out the top. The plastic trunk mounting plate sits down over the bracket and screws into the two left side holes. So far it looks like a fairly simple success.
I mounted his one bracket on one side and we did a careful test fit. Pillion says that the setback was surprisingly good for such a small amount, more like that please.
I ordered two 0.375" x 1.75" x 12" 6061 aluminum bars from McMaster Carr and went to the hardware store and picked up some 1" stainless steel cap head screws. This weekend when it was blazing hot and wicked humid I cut the bars down to 7.5 inches then drilled and tapped the bars. I took some time to break all sharp edges and rounded the corners on the bars. I setup the holes to provide 1.75" of setback. When trial fitting the brackets I found that I had to relieve the upper right corner of the bracket as viewed from the picture below it took about 3/16" to allow the bracket to clear the inside edge of the plastic mounting plate. The amount of sweating that went into this relatively simple project was amazing. I might as well have been in Louisiana or Florida
When mounting the brackets onto the Givi metal frame I used all the spacers, rubber isolators and washers just like the OEM install only now it screwed into the newly fabricated bracket. The 1" hardware required an additional washer to keep the end of the screw flush with the top of the setback bracket. When mounting the brackets I used loctite per Russ's recommendation, now he can relax
I used 0.75" stainless cap head screws to attach the plastic mounting base onto the setback bracket along with the OEM washers. This was enough to get the screw to engage all the threads in the bracket holes.
Yesterday we went out on a afternoon long ride and it looks like the setback delivers everything we were looking for. The only thing that remains to be seen is the changed seat position. Pillion sits far enough back that the sitting bits of pillion are slightly over the rear of the seat. We still don't have the Russell seats so the final assessment awaits.
The bracket that Russ made is shown below. The two right side holes align with the Givi metal frame, hardware goes up from the bottom of the Givi frame, through the spacers and rubber isolators and into the bracket (with loctite). I was able to get the screws to go all the way through the bracket but not protrude out the top. The plastic trunk mounting plate sits down over the bracket and screws into the two left side holes. So far it looks like a fairly simple success.
Last edited by a moderator:
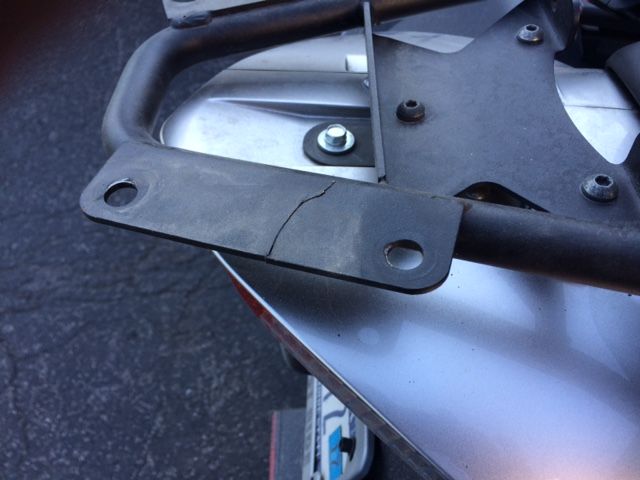
Jeebus, at least you could have stolen the one where I fixed it and made it all pretty-like!I have no plans to move the trunk 3". I believe that number was arrived at to avoid having to drill or mill the Givi SR357. To relocate only an inch or so may mean having to drill/mill/notch the two side pieces that the trunk bolts to. For illustration purposed I'm talking about the the side pieces like the broken one in this stolen picture:
From the description of FJRready's relocation plate it may provide the work-around to allow a smaller adjustment.

I ordered two 0.375" x 1.75" x 12" 6061 aluminum bars from McMaster Carr and went to the hardware store and picked up some 1" stainless steel cap head screws. This weekend when it was blazing hot and wicked humid I cut the bars down to 7.5 inches then drilled and tapped the bars.
The 1" hardware required an additional washer to keep the end of the screw flush with the top of the setback bracket. When mounting the brackets I used loctite per Russ's recommendation, now he can relax
I used 0.75" stainless cap head screws to attach the plastic mounting base onto the setback bracket along with the OEM washers. This was enough to get the screw to engage all the threads in the bracket holes.
So, if I understand this right you opted to tap and just thread the new bolts into the 3/8" thick alloy brackets, both from below the SR rack and also from above holding the plate to the bracket?
I guess that I might be a little concerned about having all of the weight of a loaded 47 liter trunk cantilevered on the alloy threads, plus the likely situation of the passenger pressing back on the trunk at times. Not so concerned about the bolts coming loose (Russ' Locktite requirement) as much as those shallow threads pulling out.
If it were me, I'd have rather through-bolted the bracket with nuts and washers. But I ain't no mechanical injuneer.
Last edited by a moderator:
ionbeam
2 FUN
Yes, I thru drilled the bar stock and used a coarse thread 1/4" x 20 screw as suggested by Russ. The hole was drilled using the correct bit size for the tap.
The trunk mounting plate essentially has the same contact surface support on the metal frame as the OEM mounting location. As far as the trunk and plastic mount are concerned there is essentially no cantilever involved but the metal sub frame will see the relocated weight. I'm not worried about the screws in the alloy 6061 AL, it isn't cheese soft. I also trust Russ, the Mechanical Engineer is this endeavor.
The screws that go through the plastic mounting plate into the relocation bracket should be more durable than the plastic plate.
It's up to Russ to defend his engineering honor on the internet
NASA trusts Russ enough to be on a team that designed an item which was successfully shot into space and came back home safe.
Should this project turn out to have risk and/or reliability issues it is completely reservable and not a financial disaster at ~$11.
The trunk mounting plate essentially has the same contact surface support on the metal frame as the OEM mounting location. As far as the trunk and plastic mount are concerned there is essentially no cantilever involved but the metal sub frame will see the relocated weight. I'm not worried about the screws in the alloy 6061 AL, it isn't cheese soft. I also trust Russ, the Mechanical Engineer is this endeavor.
The screws that go through the plastic mounting plate into the relocation bracket should be more durable than the plastic plate.
It's up to Russ to defend his engineering honor on the internet
Should this project turn out to have risk and/or reliability issues it is completely reservable and not a financial disaster at ~$11.
Last edited by a moderator:
Just voicing my concern. Hope it works out for you.
ionbeam
2 FUN
Your tone confidence is overwhelming.Just voicing my concern. Hope it works out for you.
If there is an issue with the aluminum then Helicoil or Time Serts would be an answer. Typically the first 7 threads of a screw take just about all the load of the screw and there are more than that number of threads in the hole.
Last edited by a moderator:
Similar threads
- Replies
- 8
- Views
- 821
- Replies
- 11
- Views
- 678
- Replies
- 1
- Views
- 402
- Replies
- 3
- Views
- 542