QUOTE (SCRider @ Sep 3 2008, 12:07 AM)
<{POST_SNAPBACK}>
QUOTE (mcatrophy @ Sep 2 2008, 03:50 AM)
<{POST_SNAPBACK}>
QUOTE (SCRider @ Sep 2 2008, 02:33 AM)
<{POST_SNAPBACK}>
QUOTE (mcatrophy @ Aug 21 2008, 07:27 AM)
<{POST_SNAPBACK}>
QUOTE (biknflyfisher @ Aug 19 2008, 04:53 PM)
<{POST_SNAPBACK}>
... When I was ready to reinstall the two top tank bolts, they were slightly below the corresponding holes, so I believe when the front of the tank was raised it must have "settled" some on the rear rubber mounting block.
I was able to get the holes to line up after some work and general mumbling, but it was a curveball I was not anticipating none-the-less. ...
biknflyfisher
Did you slacken off the rear tank bolt?
(click on image for larger view)
Front alignment is then not a problem.
I found that removing the rear bolt completely works far better. If you leave the bolt in, the rear of the tank contacts the front seat support and basically tries to bend it as you lift up the front of the tank. If you pull the bolt out, the tank sits in the U-shaped groves under the tabs and gives plenty of support to the rear of the tank when tilted up. Once the tank is back down, I lift the tank from the rear to perfectly align the front bolts to where they were originally (paint scratches under the bolt heads covered).
SCRider
I guess you are a tallish guy (with seat in upper position)? Me, I'm a short-ars*; I hadn't considered the seat support in its upper position.
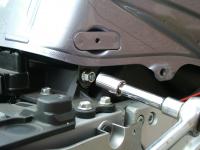
The seat position doesn't matter with what I'm talking about. If you look at the far left side of your picture, you can see how close the plastic cover is to the bottom lip of the tank. The bottom lip of the tank will contact the plastic cover over the top seat support if you don't remove the bolt. If you look closely at your picture, you can see the nicks on the corners of the plastic piece from being hit by the bottom lip of the tank. When the tank hits the seat support (or plastic cover when the seat is set at the low position) it pulls the tank backward on the rubber rear mount and makes it very difficult to get the tank back forward enough to get the front bolts in. The first couple of times under the tank, I had to remove the rear bolt to get the front bolts in. That's when I noticed the interference. This weekend, I was under the tank running some wires and went ahead and pulled the rear bolt out before I lifted the tank. Even with a full tank, I couldn't believe how much easier the tank came up.
Ah. I see what you mean. I suspect I've not raised the tank quite as far, when I felt resistance (presumably the rear touching that plastic), I've stopped lifting and put in my wooden support at the front.
(click on image for larger view)

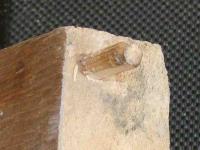
The dowel at the end goes into one of the front tank bolt holes.
I've always found enough room for what I've wanted to do like that (TBS and throttle spring release), and the tank has always aligned nicely at the front when I've put it down.
I suppose if you push it further, things will start to move!


