One more Stebel horn option

Yamaha FJR Motorcycle Forum

Help Support Yamaha FJR Motorcycle Forum:

This site may earn a commission from merchant affiliate links, including eBay, Amazon, and others.

Further

Well-known member
Joined
Apr 22, 2008
Messages
97
Reaction score
6
Location
Santa Rosa, CA
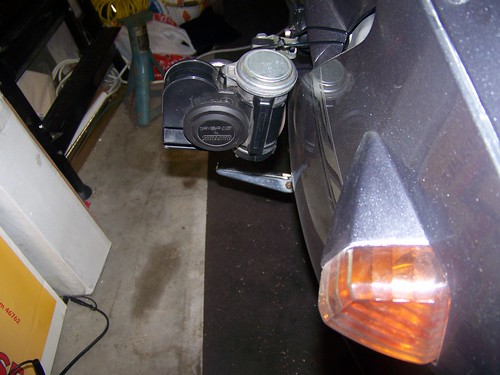
So first I tried installing the Stebel as one piece on the existing right horn bracket of my Gen II. I know several folks claim you can get sufficient clearance if done right, but I can't begin to imagine how.

Then I split the horn into the pump and the trumpet, connected by a run of tubing, as has been suggested here by some. But, call me paranoid, though I could get enough clearance on the pump side, on the trumpet side, no matter how I tried configuring it, I didn't think there was enough space. My concern isn't the forks. You CAN make enough space to clear the forks. But I just couldn't imagine that grabbing a serious handful of front brake, and bottoming out your front suspension wouldn't bring your fender up close and personal with that horn trumpet.

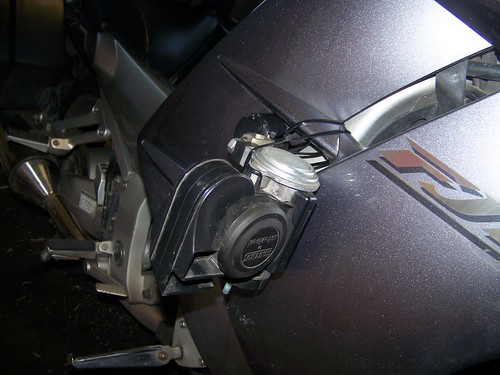
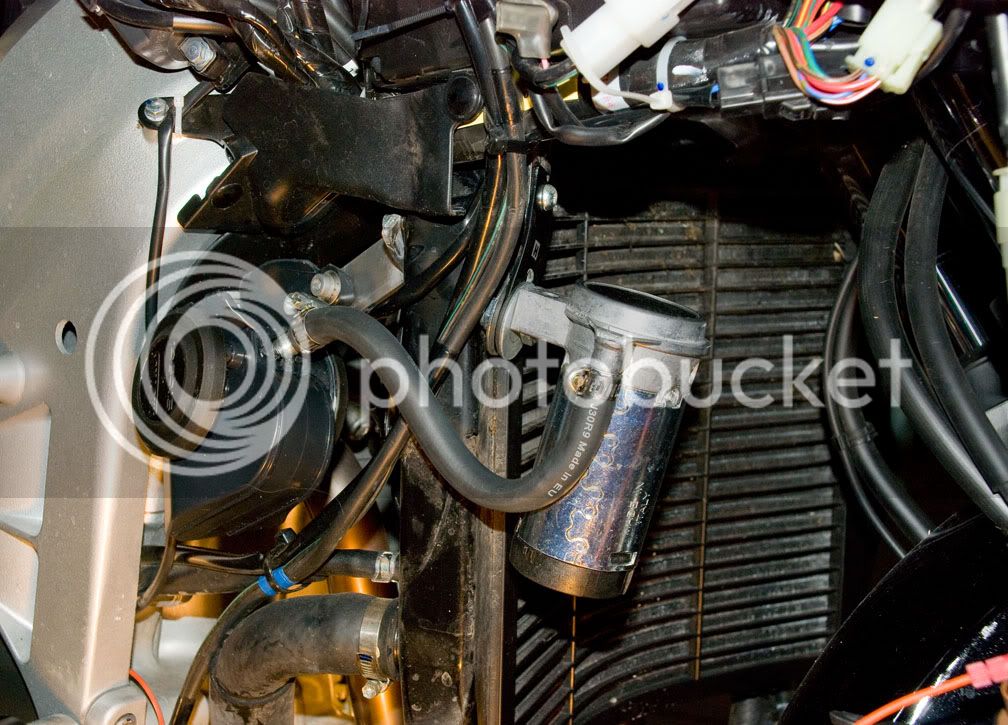
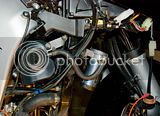
So I looked, and I figured, and I measured, and I tried to imagine an option. What I came up with is pictured below. I left the pump on the right side horn bracket, but Dremeled off extraneous plastic, and mounted the trumpets behind the radiator on the extreme right side directly behind the pump.

All I needed was to cut, bend, and drill a piece of 1x1/8th aluminum stock and slip it under the existing bolt that holds the bracket for the fan assembly in that upper corner of the radiator.

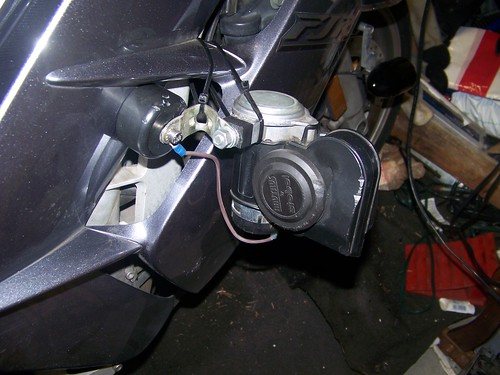
I'm sure 2 questions come to mind: First, will it melt? I don't think so. You know, the fan blades are plastic too, and this horn is off to the side. I think it will be OK. I'll let you know if I'm wrong. (Haven't buttoned it up yet and put it on the road... waiting for my lower fairing to come back from its' custom painting). Second, will the sound be muffled? Maybe just a little, but this horn puts out SO MUCH sound I think the loss will be minimal. I did Dremel away some of the bottom "flanges" of the trumpets so the sound will be directed more straight down to the pavement. I've been using a Stebel on my Mazda 3 for years, mounted in the engine compartment just in front of the radiator, and turn towards the engine, not out towards the front, and it's still EXTREMELY loud.

Pix are below. It's one more option for everyone to consider.

th_HornLocation2.jpg


th_HornLocation1.jpg


Last edited by a moderator:
I'll probably be adding one of these also. My Magnum Blasters sound kind'a sick this year. It may be just corroded connections, but it's a good excuse for an upgrade.

 
Separate horn switches/buttons for Fiamm discs and Steibel

3302053076_3295fd5967.jpg


Function over form - still need to paint all shiny metal surfaces flat black and clean up the wiring with high quality black wire

3302053098_3e64bb6e25.jpg


3302053092_b3cb32216b.jpg


3302053084_01f3eae202.jpg


Separate horn switches/buttons for Fiamm discs and Steibel


Function over form - still need to paint all shiny metal surfaces flat black and clean up the wiring with high quality black wire

3302053084_01f3eae202.jpg
And people think the crash bars are Ugly...

Toe that would '0' left at that price.

: )

Oh, I would be very interested in seeing these pics... I looked at Joevelocities pics and can't see that working on a Gen II

 
Last edited by a moderator:
I apologize Nova Scotia, if there are no pix. I've got an inquiry into the guy who wrote the Forum "how to" for photo posting to try and understand why I can see the photos when I look at the post, but some others can't.

Thought I followed all the instructions correctly, but hey, I'm a Scot. I'm better at cooking up a nice steaming bowl of haggis, than playing on websites. As an NS resident, you can probably relate.

I'll do my best to fix it.

 
Separate horn switches/buttons for Fiamm discs and Steibel


Function over form - still need to paint all shiny metal surfaces flat black and clean up the wiring with high quality black wire

3302053084_01f3eae202.jpg
And people think the crash bars are Ugly...

Toe that would '0' left at that price.

: )

Oh, I would be very interested in seeing these pics... I looked at Joevelocities pics and can't see that working on a Gen II
Well, I hope to install the crash bars from group buy when Gen I is ironed out

Guess the horn will be mounted to a crash bar somewhere; maybe inside the loop on one of the rear, but I think I'll hate being in front of that train horn so I'll try to see about the front bars

Thanx again for your work on the crash bar group buy and also sorrys for your little get off testing the front bars

My first drop with the Feejer was just last weekend, but no harm done as I went up a friends driveway and wanted to park facing back toward the street. Attempted an off road U turn in his yard and the soil was soggy and wet from recent monsoons rain. Front stuck like a pig and over it went on the left side in the soggy grass. Glad it didn't go over to the right and crush the Steibel Horn mounted on the TOG.

Don't want to repeat and will feels lots better when a complete set of crash bars are hanging off the bike.

Cheers,

Mike in Nawlins'

 
I apologize Nova Scotia, if there are no pix. I've got an inquiry into the guy who wrote the Forum "how to" for photo posting to try and understand why I can see the photos when I look at the post, but some others can't.
Thought I followed all the instructions correctly, but hey, I'm a Scot. I'm better at cooking up a nice steaming bowl of haggis, than playing on websites. As an NS resident, you can probably relate.

I'll do my best to fix it.
You seem to be doing everything right on this end. Some photo-hosting websites aren't friendly with forum linky stuff. May I suggest Photobucket.com?

 
SkooterG, thanks for the suggestion.

I just completed the attempt. Put the same two pix on Photobucket. Pasted the new link info into the troublesome page using the Edit feature.

The new pix appear in an almost thumbnail size, even though they are about 900x600 pixels and were imported into Photobucket at full size.

Very frustrating.

I'm gonna go get coffee....

 
SkooterG, thanks for the suggestion.
I just completed the attempt. Put the same two pix on Photobucket. Pasted the new link info into the troublesome page using the Edit feature.

The new pix appear in an almost thumbnail size, even though they are about 900x600 pixels and were imported into Photobucket at full size.

Very frustrating.

I'm gonna go get coffee....
You are on the right track, when you go to photobucket copy and paste the link for "IMG CODE", it looks like you copied the link for "IMG THUMB".

 
I toyed with the very setup you are talking about, Further. I was concerned about the amount of vibration the relatively heavy compressor would experience hanging on the stock horn mount. So I ended up putting the plastic piece on the stock horn bracket and placing the compressor aft of the radiator. I have grabbed a BIG ol' handful of brakes on more than one occasion with no adverse effects on the horn, the forks, the front fender, etc. BTW, this is on a Gen I.

Please reconsider mounting the heavy compressor on the stock bracket. I'd hate to hear the damn thing broke and fell off while you were riding down the road some day in the future.

 
Now I get it. No, I didn't copy/paste the "thumbnail", I used the "direct link" option.

OK, I'm writtin' this down for future reference, since a week from now, this info will probably be replaced in my brain by the where-I-left-the-car-keys synapse.

Thanks so much.

 
I toyed with the very setup you are talking about, Further. I was concerned about the amount of vibration the relatively heavy compressor would experience hanging on the stock horn mount. So I ended up putting the plastic piece on the stock horn bracket and placing the compressor aft of the radiator. I have grabbed a BIG ol' handful of brakes on more than one occasion with no adverse effects on the horn, the forks, the front fender, etc. BTW, this is on a Gen I.
Please reconsider mounting the heavy compressor on the stock bracket. I'd hate to hear the damn thing broke and fell off while you were riding down the road some day in the future.

Geeze, I actually thought the stock bracket would be OK for the pump by itself. I did replace the stock nut with a Nylock nut. And I've thought I'd hang a zip-tie on it just for "insurance".

Now I'm havin' 2nd thoughts. My paranoia is emerging...

But I always like to say, "Just 'cause I'm paranoid, doesn't mean there AREN'T people following me."

Thanks for your thoughts.

Chris

 
Top