dcarver
Well-known member
Update 2011-03-01
Some of my photobucket pix got deleted. If you're interested in seeing all the pix to this thread clicky here https://candybutt.org/cba/node/90
<a href="https://www.fjrforum.com/forum//index.php?showtopic=25361&hl=auxillary+tank" target="_blank">joe2lmaker has been designing and building an aux tank for the FJR.</a> I was lucky enough to get SN1, a prototype, for testing. Yes, I paid hard money for this tank. No, I have no financial interests or investment in his aux tank endeavors. Yes, I paid less than full price - Joe has told me I paid less than it cost him to build. The trade off is that I'm testing his tank and providing feedback for future improvements, and the tank to me is 'as is'. My job then, is to report the good and the bad ("things needing improvement").
If you're OK with this, then, let's get going.
SN 1 arrives well packaged
<img src="https://i75.photobucket.com/albums/i320/dcarver220b/FJR/Aux%20Tank/DSC05040.jpg" border="0" class="linked-image" />
On the bench for initial inspection with the goodies too. The welds and bends are top quality, gorgeous.
<img src="https://i75.photobucket.com/albums/i320/dcarver220b/FJR/Aux%20Tank/DSC05042.jpg" border="0" class="linked-image" />
Tank interior, it says so! Good baffles to prevent sloshing effect.
<img src="https://i75.photobucket.com/albums/i320/dcarver220b/FJR/Aux%20Tank/DSC05046.jpg" border="0" class="linked-image" />
My first task was to fit the JAZ cap to the tank. SN1 required some modification, as the Jaz cap flange interfered with the vent bung hole weld. Here is the interference line. Joe has already corrected this on later tanks.
<img src="https://i75.photobucket.com/albums/i320/dcarver220b/FJR/Aux%20Tank/DSC05072.jpg" border="0" class="linked-image" />
<img src="https://i75.photobucket.com/albums/i320/dcarver220b/FJR/Aux%20Tank/DSC05048.jpg" border="0" class="linked-image" />
<img src="https://i75.photobucket.com/albums/i320/dcarver220b/FJR/Aux%20Tank/DSC05081.jpg" border="0" class="linked-image" />
My sophisticated machining mill...
<img src="https://i75.photobucket.com/albums/i320/dcarver220b/FJR/Aux%20Tank/DSC05082.jpg" border="0" class="linked-image" />
The final product. I was chicken to reduce the weld. I don't have alum weld equipment, and I can always buy another flange if needed..
<img src="https://i75.photobucket.com/albums/i320/dcarver220b/FJR/Aux%20Tank/DSC05084-1.jpg" border="0" class="linked-image" />
The next thing to look at was the cap ring. I couldn't figure out what the purpose was for this. Supposedly, it fits inside the tank. I think it might be for tanks with a bladder. I saw no need for it, and haven't used it.. unless I find out there is a good reason to.
<img src="https://i75.photobucket.com/albums/i320/dcarver220b/FJR/Aux%20Tank/DSC05085.jpg" border="0" class="linked-image" />
<img src="https://i75.photobucket.com/albums/i320/dcarver220b/FJR/Aux%20Tank/DSC05086.jpg" border="0" class="linked-image" />
Ok then, let's mount this tank on the Gen2 06.
Provided are new collars for the primary tank mounts, to the grab rail. OEM on left, new on right. They are well done, nice machining.
<img src="https://i75.photobucket.com/albums/i320/dcarver220b/FJR/Aux%20Tank/DSC05061.jpg" border="0" class="linked-image" />
Bolts pass through the hollow tubes for easy install. I bought some longer bolts so that there is a full 1/2" thread engagement.
<img src="https://i75.photobucket.com/albums/i320/dcarver220b/FJR/Aux%20Tank/DSC05063.jpg" border="0" class="linked-image" />
<img src="https://i75.photobucket.com/albums/i320/dcarver220b/FJR/Aux%20Tank/DSC05064.jpg" border="0" class="linked-image" />
Stock bolts are 30 mm I used 35 for more thread engagement. In hindsight, the stockers would probably be OK, but once full of fuel I'd rather have the additional threads.
<img src="https://i75.photobucket.com/albums/i320/dcarver220b/FJR/Aux%20Tank/DSC05078.jpg" border="0" class="linked-image" />
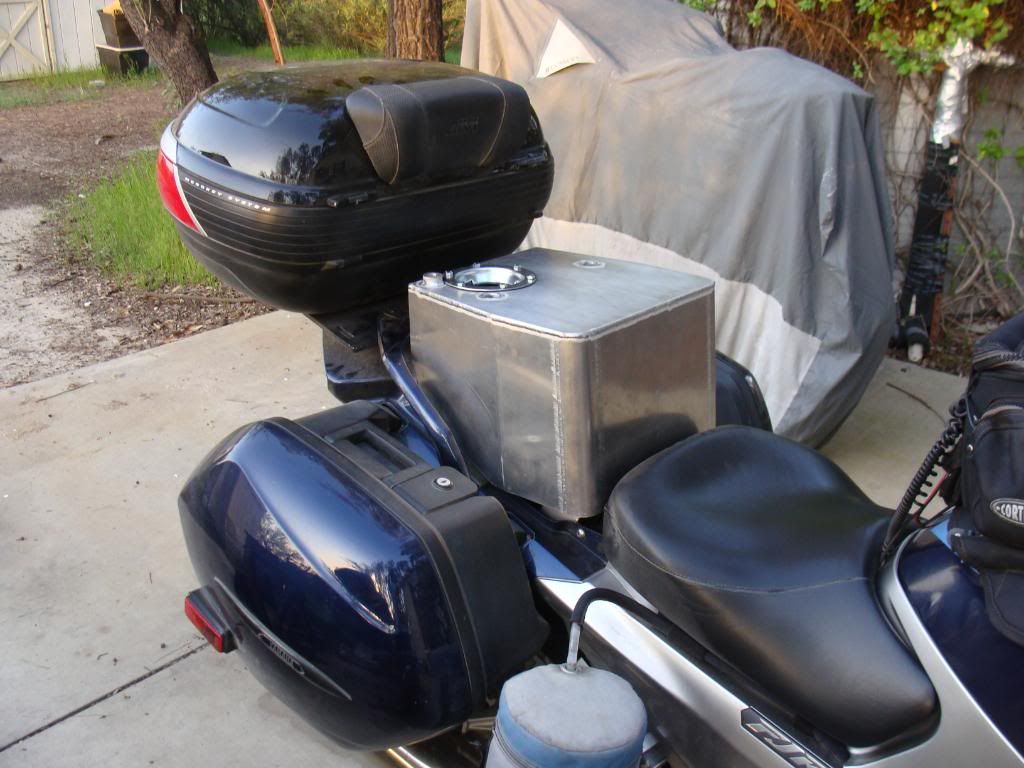
On the bike, it fit perfectly - a huge thing.
<img src="https://i75.photobucket.com/albums/i320/dcarver220b/FJR/Aux%20Tank/DSC05053.jpg" border="0" class="linked-image" />
<img src="https://i75.photobucket.com/albums/i320/dcarver220b/FJR/Aux%20Tank/DSC05051.jpg" border="0" class="linked-image" />
<img src="https://i75.photobucket.com/albums/i320/dcarver220b/FJR/Aux%20Tank/DSC05058.jpg" border="0" class="linked-image" />
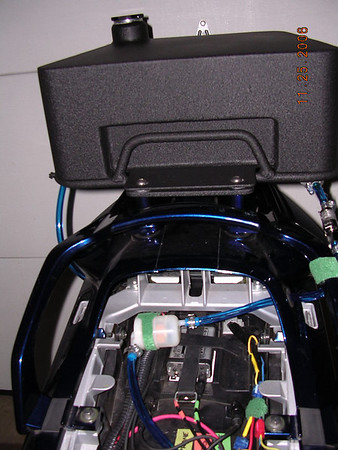
Brodie just happened to be in the Hondarosa hood and wanted to see how his seat, which has been extended rearward to accommodate his long legs, fit. It's a custom Bill Mayer seat. The tab and hole at lower left is for the valve. What a great guy Brodie is.
<img src="https://i75.photobucket.com/albums/i320/dcarver220b/FJR/Aux%20Tank/DSC05104.jpg" border="0" class="linked-image" />
<img src="https://i75.photobucket.com/albums/i320/dcarver220b/FJR/Aux%20Tank/DSC05105.jpg" border="0" class="linked-image" />
<img src="https://i75.photobucket.com/albums/i320/dcarver220b/FJR/Aux%20Tank/DSC05108.jpg" border="0" class="linked-image" />
The dude has some seriously long legs.
<img src="https://i75.photobucket.com/albums/i320/dcarver220b/FJR/Aux%20Tank/DSC05112.jpg" border="0" class="linked-image" />
<img src="https://i75.photobucket.com/albums/i320/dcarver220b/FJR/Aux%20Tank/DSC05106.jpg" border="0" class="linked-image" />
As you can see, there is plenty of room for longer seats, Givi52's, etc.
<img src="https://i75.photobucket.com/albums/i320/dcarver220b/FJR/Aux%20Tank/DSC05075.jpg" border="0" class="linked-image" />
I replaced the stock Jaz flange bolts
<img src="https://i75.photobucket.com/albums/i320/dcarver220b/FJR/Aux%20Tank/DSC05072.jpg" border="0" class="linked-image" />
with some nice stainless button heads. Not needed, just nicer.
Finally, I added water to the tank to check for leaks and see what the additional weight felt like when riding.
<img src="https://i75.photobucket.com/albums/i320/dcarver220b/FJR/Aux%20Tank/DSC05143-1.jpg" border="0" class="linked-image" />
Couldn't test it because of a <a href="https://www.fjrforum.com/forum//index.php?showtopic=126868&st=0&p=715542entry715542" target="_blank">stoopid mistake.</a>
If you have any questions, please ask. I'll answer honestly.
to be continued
Some of my photobucket pix got deleted. If you're interested in seeing all the pix to this thread clicky here https://candybutt.org/cba/node/90
<a href="https://www.fjrforum.com/forum//index.php?showtopic=25361&hl=auxillary+tank" target="_blank">joe2lmaker has been designing and building an aux tank for the FJR.</a> I was lucky enough to get SN1, a prototype, for testing. Yes, I paid hard money for this tank. No, I have no financial interests or investment in his aux tank endeavors. Yes, I paid less than full price - Joe has told me I paid less than it cost him to build. The trade off is that I'm testing his tank and providing feedback for future improvements, and the tank to me is 'as is'. My job then, is to report the good and the bad ("things needing improvement").
If you're OK with this, then, let's get going.
SN 1 arrives well packaged
<img src="https://i75.photobucket.com/albums/i320/dcarver220b/FJR/Aux%20Tank/DSC05040.jpg" border="0" class="linked-image" />
On the bench for initial inspection with the goodies too. The welds and bends are top quality, gorgeous.
<img src="https://i75.photobucket.com/albums/i320/dcarver220b/FJR/Aux%20Tank/DSC05042.jpg" border="0" class="linked-image" />
Tank interior, it says so! Good baffles to prevent sloshing effect.
<img src="https://i75.photobucket.com/albums/i320/dcarver220b/FJR/Aux%20Tank/DSC05046.jpg" border="0" class="linked-image" />
My first task was to fit the JAZ cap to the tank. SN1 required some modification, as the Jaz cap flange interfered with the vent bung hole weld. Here is the interference line. Joe has already corrected this on later tanks.
<img src="https://i75.photobucket.com/albums/i320/dcarver220b/FJR/Aux%20Tank/DSC05072.jpg" border="0" class="linked-image" />
<img src="https://i75.photobucket.com/albums/i320/dcarver220b/FJR/Aux%20Tank/DSC05048.jpg" border="0" class="linked-image" />
<img src="https://i75.photobucket.com/albums/i320/dcarver220b/FJR/Aux%20Tank/DSC05081.jpg" border="0" class="linked-image" />
My sophisticated machining mill...
<img src="https://i75.photobucket.com/albums/i320/dcarver220b/FJR/Aux%20Tank/DSC05082.jpg" border="0" class="linked-image" />
The final product. I was chicken to reduce the weld. I don't have alum weld equipment, and I can always buy another flange if needed..
<img src="https://i75.photobucket.com/albums/i320/dcarver220b/FJR/Aux%20Tank/DSC05084-1.jpg" border="0" class="linked-image" />
The next thing to look at was the cap ring. I couldn't figure out what the purpose was for this. Supposedly, it fits inside the tank. I think it might be for tanks with a bladder. I saw no need for it, and haven't used it.. unless I find out there is a good reason to.
<img src="https://i75.photobucket.com/albums/i320/dcarver220b/FJR/Aux%20Tank/DSC05085.jpg" border="0" class="linked-image" />
<img src="https://i75.photobucket.com/albums/i320/dcarver220b/FJR/Aux%20Tank/DSC05086.jpg" border="0" class="linked-image" />
Ok then, let's mount this tank on the Gen2 06.
Provided are new collars for the primary tank mounts, to the grab rail. OEM on left, new on right. They are well done, nice machining.
<img src="https://i75.photobucket.com/albums/i320/dcarver220b/FJR/Aux%20Tank/DSC05061.jpg" border="0" class="linked-image" />
Bolts pass through the hollow tubes for easy install. I bought some longer bolts so that there is a full 1/2" thread engagement.
<img src="https://i75.photobucket.com/albums/i320/dcarver220b/FJR/Aux%20Tank/DSC05063.jpg" border="0" class="linked-image" />
<img src="https://i75.photobucket.com/albums/i320/dcarver220b/FJR/Aux%20Tank/DSC05064.jpg" border="0" class="linked-image" />
Stock bolts are 30 mm I used 35 for more thread engagement. In hindsight, the stockers would probably be OK, but once full of fuel I'd rather have the additional threads.
<img src="https://i75.photobucket.com/albums/i320/dcarver220b/FJR/Aux%20Tank/DSC05078.jpg" border="0" class="linked-image" />
On the bike, it fit perfectly - a huge thing.
<img src="https://i75.photobucket.com/albums/i320/dcarver220b/FJR/Aux%20Tank/DSC05053.jpg" border="0" class="linked-image" />
<img src="https://i75.photobucket.com/albums/i320/dcarver220b/FJR/Aux%20Tank/DSC05051.jpg" border="0" class="linked-image" />
<img src="https://i75.photobucket.com/albums/i320/dcarver220b/FJR/Aux%20Tank/DSC05058.jpg" border="0" class="linked-image" />
Brodie just happened to be in the Hondarosa hood and wanted to see how his seat, which has been extended rearward to accommodate his long legs, fit. It's a custom Bill Mayer seat. The tab and hole at lower left is for the valve. What a great guy Brodie is.
<img src="https://i75.photobucket.com/albums/i320/dcarver220b/FJR/Aux%20Tank/DSC05104.jpg" border="0" class="linked-image" />
<img src="https://i75.photobucket.com/albums/i320/dcarver220b/FJR/Aux%20Tank/DSC05105.jpg" border="0" class="linked-image" />
<img src="https://i75.photobucket.com/albums/i320/dcarver220b/FJR/Aux%20Tank/DSC05108.jpg" border="0" class="linked-image" />
The dude has some seriously long legs.
<img src="https://i75.photobucket.com/albums/i320/dcarver220b/FJR/Aux%20Tank/DSC05112.jpg" border="0" class="linked-image" />
<img src="https://i75.photobucket.com/albums/i320/dcarver220b/FJR/Aux%20Tank/DSC05106.jpg" border="0" class="linked-image" />
As you can see, there is plenty of room for longer seats, Givi52's, etc.
<img src="https://i75.photobucket.com/albums/i320/dcarver220b/FJR/Aux%20Tank/DSC05075.jpg" border="0" class="linked-image" />
I replaced the stock Jaz flange bolts
<img src="https://i75.photobucket.com/albums/i320/dcarver220b/FJR/Aux%20Tank/DSC05072.jpg" border="0" class="linked-image" />
with some nice stainless button heads. Not needed, just nicer.
Finally, I added water to the tank to check for leaks and see what the additional weight felt like when riding.
<img src="https://i75.photobucket.com/albums/i320/dcarver220b/FJR/Aux%20Tank/DSC05143-1.jpg" border="0" class="linked-image" />
Couldn't test it because of a <a href="https://www.fjrforum.com/forum//index.php?showtopic=126868&st=0&p=715542entry715542" target="_blank">stoopid mistake.</a>
If you have any questions, please ask. I'll answer honestly.
to be continued
Last edited by a moderator: