Steering Head Bearing Tool

Yamaha FJR Motorcycle Forum

Help Support Yamaha FJR Motorcycle Forum:

This site may earn a commission from merchant affiliate links, including eBay, Amazon, and others.
Hey profireguy.....give us some dimensions. What size pipe--how large are the tabs--will they handle the torque without distorting etc, etc.!!
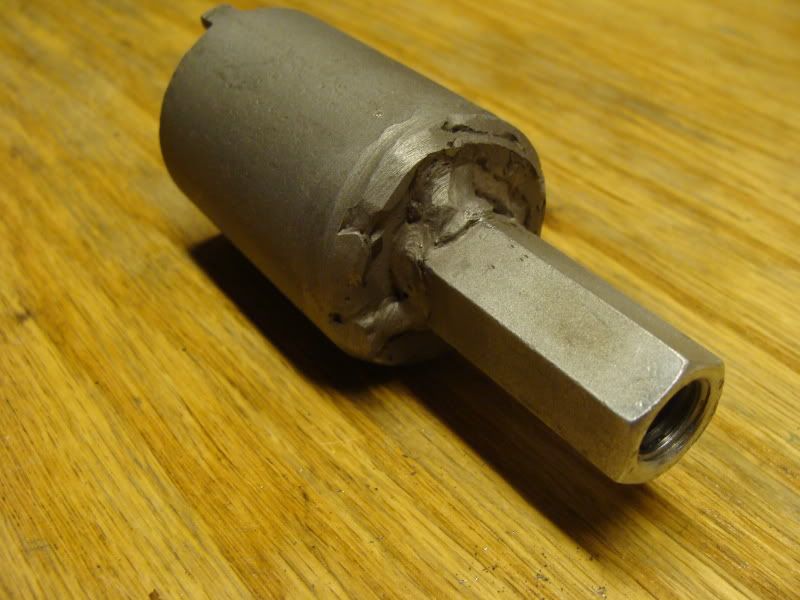
That is a bit harder to answer than you think. I'll go measure the pipe when I get a chance, but what I did was find a piece of scrap pipe I had that was the same size (OD) as the nut, then cut it to fit. I squared the pipe up in chop saw, then laid the nut on the end. Using a sharpie, I marked two opposing tabs onto the pipe. I then cut straight down on the pipe with a sawzall, at the edges of those marks. Leave enough to work with. Two more cuts to drop the sides off, and the tabs are exposed. I then used my bench grinder to carefully adjust the tab size until it is a tight fit in the nut.

Weld a washer and nut on, and you are done. I would have used a flared nut if I had one big enough, and eliminated the washer. Mine is made of galvanized pipe, and the stem nut is aluminum, so it is plenty strong.

Make sure you make the pipe long enough to reach the lower nut without bottoming out on the stem.

 
Last edited by a moderator:
The pipe I used measures inch and five eighth OD, with an eighth inch wall. I belive that would make it named inch and a half galvanized. Maybe someone can chime in on what "schedule" that is, but you should be able to look at any steel 1.5 inch pipe and see if it has an eighth inch wall. Gas pipe should be right, and better than galvanized to weld.

 
Thanks for the info. Looks like I will have to look for some pipe at work tomorrow night at work! I guess it would be a lot easier to have the nut in hand while fabbing the wrench. It may not be pretty, but it should get the job done. Kudos to profireguy!

 
I have to thank profireguy again for inspiring me to make this homemade tool from his post here. Got the 1 1/2" X 2"long black pipe cut at locally owned hardware store. Cost:$1.00 At work tonight, asked the tool crib guy (former FJR owner) for a "castle nut", and a washer. Cost: $0.00. Sandblasted parts before welding, then went to the welding shop to "bubblegum" them together. Gave the assembly a finish grinding, and a WD-40 bath to remove grit and prevent rust.

Crude, but effective....

DSC00970.jpg


DSC00969.jpg


I cancelled my order from WildHareAccessories since they had a 4 week backorder, and saved about $27.00. The next time I use this homemade tool, I figure it will save me around $80.00 in shop fees, and I will know that the job was done to my satisfaction. If any of you have access to do this simple tool fab, I highly recommend it. I think that this deserves entry into the FJR Bin'o'Facts section of the forum, with credit to profireguy!

 
Last edited by a moderator:
That looks good, the nut you are using I have always heard called a "coupling nut". It is a good idea, it gives you room to weld without compromising the area your torque wrench socket will need. Another bonus is, if you use a 1/2 inch coupling nut (3/4" across the flats), it will double as a tool to remove your front axle.

Nicely done. :clapping:

 
I have to thank profireguy again for inspiring me to make this homemade tool from his post here. Got the 1 1/2" X 2"long black pipe cut at locally owned hardware store. Cost:$1.00 At work tonight, asked the tool crib guy (former FJR owner) for a "castle nut", and a washer. Cost: $0.00. Sandblasted parts before welding, then went to the welding shop to "bubblegum" them together. Gave the assembly a finish grinding, and a WD-40 bath to remove grit and prevent rust.
Crude, but effective....

DSC00969.jpg


DSC00970.jpg


I cancelled my order from WildHareAccessories since they had a 4 week backorder, and saved about $27.00. The next time I use this homemade tool, I figure it will save me around $80.00 in shop fees, and I will know that the job was done to my satisfaction. If any of you have access to do this simple tool fab, I highly recommend it. I think that this deserves entry into the FJR Bin'o'Facts section of the forum, with credit to profireguy!

Just a thought....couldn't you just cut down a large socket? No welding needed.

 
The socket might be a good idea if you could find one the right dimension. I have never tried to cut on a socket, but I bet the tool hardness would make it very difficult to cut with a hacksaw. Maybe one of the cheapy sockets would be softer?

 
The socket might be a good idea if you could find one the right dimension. I have never tried to cut on a socket, but I bet the tool hardness would make it very difficult to cut with a hacksaw. Maybe one of the cheapy sockets would be softer?
Best bet if you are going to use a socket is to grind. If you get the correct size, a socket would work just fine.

 
I received a price on making 10 of the tools. The tool I have has a 3/8" extension welded to the pipe section. It's a very nice, CNC machined pipe section.

However, the company that made a couple prototypes, has quoted $50 each in lots of ten(10). It will cost me another $5 each to powder coat them, putting the total tool cost at $55 each plus shipping.

At this point, I have no idea if it's worth that kind of money to you guys or not. Just let me know. I'll take a pic of my steering head tool this weekend and post it up.

HA

 
The pipe I used measures inch and five eighth OD, with an eighth inch wall. I belive that would make it named inch and a half galvanized. Maybe someone can chime in on what "schedule" that is, but you should be able to look at any steel 1.5 inch pipe and see if it has an eighth inch wall. Gas pipe should be right, and better than galvanized to weld.
Looks like it might be 1 1/4 sch 40 pipe clicky which is 1.660 OD with a .140 wall. Does this sound about right? I think I'm going to make one as well and it would be nice not to have to remove the tripple tree to measure.

Thanks

 
I received a price on making 10 of the tools. The tool I have has a 3/8" extension welded to the pipe section. It's a very nice, CNC machined pipe section.
However, the company that made a couple prototypes, has quoted $50 each in lots of ten(10). It will cost me another $5 each to powder coat them, putting the total tool cost at $55 each plus shipping.

At this point, I have no idea if it's worth that kind of money to you guys or not. Just let me know. I'll take a pic of my steering head tool this weekend and post it up.

HA

Oh Damnit Jeff, you had me all excited about that tool (easy ODOT) but when you stated 55 clams for it, I figured that I'll be call WildHare shortly.

Last winter I did the steering head maintenance and I borrowed an adjustable spanner wrench for a plummer friend of mine. I asked him where he got it from and he said his dad got it way back in the 1950's. Seems that they don't make adjustable spanner wrenches any more! Damn!

V.

 
The pipe I used measures inch and five eighth OD, with an eighth inch wall. I belive that would make it named inch and a half galvanized. Maybe someone can chime in on what "schedule" that is, but you should be able to look at any steel 1.5 inch pipe and see if it has an eighth inch wall. Gas pipe should be right, and better than galvanized to weld.
Looks like it might be 1 1/4 sch 40 pipe clicky which is 1.660 OD with a .140 wall. Does this sound about right? I think I'm going to make one as well and it would be nice not to have to remove the tripple tree to measure.

Thanks
Don't sweat it about removing the top trip to get to the bearing nuts. I took a couple of heavy towels to cover the tank and instrument display and fairing top sides. Pull that center nut/cap, loosen the top clamps and pull the whole handlebar ass. at once, and set it forward on the intsrument panel. Slide the lock washer off, and you should almost be able to take the lock nut off be hand. Total time to get to it is maybe 10 min. Definitely worth the time to have the nut in hand while fabbing the wrench! Also, I had to do a little bit of filing of the i.d. of the tabs to make the nut fit.

 
Last edited by a moderator:
FYI Gents - I contacted K&L Supply and they will NOT sell me the wrench unless I'm a Yammie dealer. They told me too see mama Yama... well really me local dealer.

 
Last edited by a moderator:
I considered a socket when building mine, but everyone I looked at while holding the actual nut seem like it was going to be more work than what I ended up making. You would need a socket where the flats are the right thickness, and it would be harder to machine. Maybe if you had a mill, it would be easier to go that way. I had thought of a few ways to build this before I found the piece of pipe. Because it looked like a perfect size, I went from looking at the pipe to making the tool in about 30 minutes, I had everything on hand and it sort of fell together. I do like using the coupling nut for the reasons I mentioned above.

 
Top