Stripped Oil Pump Cover Bolt

Yamaha FJR Motorcycle Forum

Help Support Yamaha FJR Motorcycle Forum:

This site may earn a commission from merchant affiliate links, including eBay, Amazon, and others.

RavFJR

Well-known member
Joined
Jun 8, 2010
Messages
198
Reaction score
16
Location
South Dakota
Relocated cross county and finally got settled enough to offer myself a ride... I was inspecting the bike and found the top oil pump cover bolt missing. I ordered a new bolt, but when I tried to install it, found that the hole was completely stripped out - no threads at all. Has anyone had experience dealing this this, and can offer me insight on re-threading the hole and replacing with a larger bolt? Thanks...

 
In many cases the tapped hole is deeper than the fastener is long so you may be able to source a longer bolt and pick up enough threads to secure the part. If not then Heilcoils are available for most any size and are pretty easy to install.

 
I have opted to do the repair using the Time-Sert M6 - 1.0 repair kit, and substituting the kit provided 9.4mm insert with an 8 mm insert. The hole in question lines up with the cam chain, so I have to be mindful of clearance issues. The kit is on order, so I will report back after I make the repairs.

 
I have opted to do the repair using the Time-Sert M6 - 1.0 repair kit, and substituting the kit provided 9.4mm insert with an 8 mm insert. The hole in question lines up with the cam chain, so I have to be mindful of clearance issues. The kit is on order, so I will report back after I make the repairs.
Used a Time-Sert 12 x 1.25 oil drain repair kit on an RM125 the other day. Worked flawlessly with a new copper washer. Highly recommend.

 
Used a Time-Sert 12 x 1.25 oil drain repair kit on an RM125 the other day. Worked flawlessly with a new copper washer. Highly recommend.
Yes, this was the reason for my choice... I've had great success with previous time-sert repairs. The kits are pricy, but always offered good results if directions are followed.

I might need to use a 5mm insert, since I forgot about the time-sert "shoulder" adding depth to the repair. Like stated on my previous post, I will offer my results on the repair. 

 
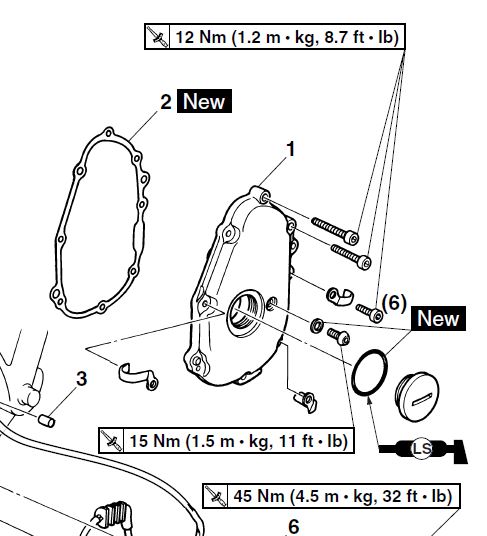
Well, the kit was delivered late yesterday, so this morning I was going to get started on the repair. However, I read the detailed instructions in the Time-Sert kit, and it states the need for at least a 1/4" space beyond the hole being repaired. This is to allow the expansion tool to properly seat the insert.

The hole is roughly 7mm deep with very little clearance behind the hole where the cam chain and guide both reside. The space is so narrow, that to protect the chain and guide from drilling, I wedged a putty knife and thin piece of cardboard behind the hole, and they are wedged in fairly tight.

Since I can't properly install the Time-Sert insert, I am opting for plan 'B'. I am going to move up in size and tap to an M8 fastener. To deal with the clearance issue behind the hole, I will be using both a plug and bottoming tap to do the job. For reference to others, I will be using a 6.8mm drill to prep the hole for tapping. 

It's another waiting game for the taps and drill to arrive.  I will post the results of the repair once completed. I will either be posting from an insane asylum or at home drinking a beer, depending on the outcome. Stay tuned...

 
While I am waiting for the new tools to arrive, I thought I'd share my opinion to why I believe this bolt failed. Offering my thoughts might save someone future aggravation.  If you review my past posts you'll notice I was having issues with the OEM CCTs some time back.. I had a shop put in a manual CCT and replace the cam chain, as they were already doing the value adjustment for me (yes, the cam chain had elongated. I saw it myself).  Anyway, I believe the failure of the bolt had to do with the shop not following torque specs and me pulling the FJR on a trailer for some 1700+ miles. Pulling it so far beat the cr@p out of it. I have found several missing fasteners, including this bolt I am repairing. Looking back, I should have had the bike shipped to me using a professional motorcycle shipping service to reduce the wear and tear I put the bike through. This is just food for thought for others...

 
My FJR has the top two bolts on the oil pump cover mostly stripped. After the last valve adjustment, I used my Draper click-type torque wrench set to the required 10Nm. All of the bolts around the cover torqued correctly except for the top two. They just kept rotating. The threads seem to have just enough grab to keep the bolt in place, so I put them in as snug as I could with blue loc-tite on the threads. With several hundred miles on it since, I have seen no evidence of oil seepage. I'll keep an eye on it and do a more permanent thread repair next time that cover comes off.

I wonder if the metal in the crankcase is softer around those bolts for some reason? It seems like 10Nm is a bit too much torque...next time I'll set the wrench for 8Nm just to be cautious.

 
I assume everyone is aware that two of the bolts for the timing chain cover are longer than the the other six...

Putting a short one into the position for one of the longer ones - threads won't engage.

Putting a long one in the wrong place may ruin the threads in the hole when the bolt bottoms out.
Yes, the 2 longer bolts should be used on the holes that have the clamps for the hose and wiring, located at the 3 and 9 positions of the cover. Mine were correctly placed.

 
My FJR has the top two bolts on the oil pump cover mostly stripped. After the last valve adjustment, I used my Draper click-type torque wrench set to the required 10Nm. All of the bolts around the cover torqued correctly except for the top two. They just kept rotating. The threads seem to have just enough grab to keep the bolt in place, so I put them in as snug as I could with blue loc-tite on the threads. With several hundred miles on it since, I have seen no evidence of oil seepage. I'll keep an eye on it and do a more permanent thread repair next time that cover comes off.

I wonder if the metal in the crankcase is softer around those bolts for some reason? It seems like 10Nm is a bit too much torque...next time I'll set the wrench for 8Nm just to be cautious.
Aside from the torque spec, I personally hate manufacturers using aluminum as a threaded means to hold anything on an engine.  Between the heat cycles, vibrations, and hardness of the fasteners (threads), I'm surprised there aren't more issues.  More specifically with these bolts, fine threads aren't the best to holding things together in the environment I have described above. I believe my little trailer journey proved this hypothesis. Let me tell you, roads in the U.S. are in bad need of repair. The trailer was jumping around quite a bit during the trip.

 
Yes, the 2 longer bolts should be used on the holes that have the clamps for the hose and wiring, located at the 3 and 9 positions of the cover. Mine were correctly placed.
I do not believe that is correct.  The two longer bolts go in the top positions, not on the clamps for hose and wiring.  This may be the root of your trouble!  Pictures below are from FSM (2007) and from an on-line parts fiche.  It is clear where the two longer bolts go.  Note that the flange is deeper in the two upper positions - visible on the FSM snip but not so much on the snip from the fiche.

Timing-Cover.jpg
Timing-Cover-2.jpg


Wow, interesting... Thanks for the correction.  I believe you solved why I experienced this failure.  When I pulled the cover, the 2 longer screws were at the 3 and 9 positions, assuming it was because of the clamps. I can't verify the bolt in the top hole, but logic dictates it was a shorter bolt. 

 
Hopefully you saw this before drilling out the holes!

Perhaps there is no damage at all...
I wish it was that simple, but the hole is smooth all the way through inside - unfortunately. However, I really do appreciate the correction, as this will forego any future failures. 

 
Good catch on the different bolt length. When I pull any cover bolts out, I lay them out in an outline of where they're fitted. I noted the top two bolts were longer on my first valve check 30K miles ago; I marked those longer bolts with a Sharpie, along with a corresponding small Sharpie mark on the crankcase. Even with the bolts fitted in their proper place, the top two still stripped with the proper torque spec (obviously 12Nm, as opposed to the 10Nm I mentioned earlier just going from memory).

 
Even with the bolts fitted in their proper place, the top two still stripped with the proper torque spec
Unfortunate...

I never used a torque wrench for these so I don't know what actual torque I used.  Just tightened in crisscross pattern until it "felt" right.  Never leaked and never stripped so it must have been OK.

 
I have a micro torque wrench, but wondering if I should just hand tighten and move on. With the abuse the bolts (and bike) took previously, they might not be up to par to do a full torque. I do plan to use Loctite when I reassemble.  Taps arriving tomorrow...

 
Top